6.4 Loading and Saving XML Documents from VBA
| While the GUI provides a convenient way to work with whatever XML you encounter, you may want to create applications that work with XML on a regular basis, and don't want the user of the spreadsheet to have to interact with XML directly. Using Visual Basic for Applications, you can create spreadsheets that load XML and save XML through Excel's maps without the user even needing to know where their data is coming from. The spreadsheet shown in Figures 6-40 and 6-41 will be used to demonstrate how this works. Figure 6-40. XML maps and user interface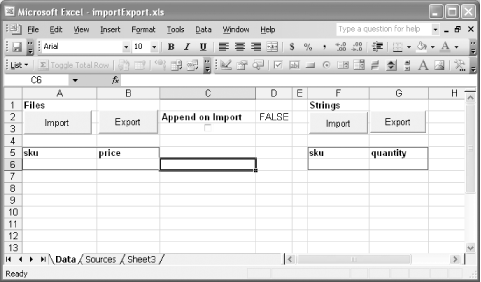 Figure 6-41. A backstage area storing information used by the VBA code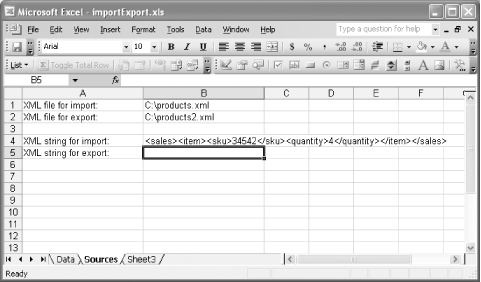 The worksheet shown in Figure 6-40 contains four buttons, a checkbox linked to cell D2, and two XML maps. The left-hand map expects data like that shown in Example 6-10, while the right-hand map expects data like that shown in cell B4 of Figure 6-41 or like that shown in Example 6-11. Example 6-10. Simple product information format<products> <item> <sku>34542</sku> <price>29.42</price> </item> <item> <sku>34546</sku> <price>19.24</price> </item> <item> <sku>34548</sku> <price>99.42</price> </item> </products> Example 6-11. Simple sales information format<sales> <item> <sku>34542</sku> <quantity>10</quantity> </item> <item> <sku>34546</sku> <quantity>4</quantity> </item> <item> <sku>34548</sku> <quantity>1</quantity> </item> </sales> Rather than expecting users of the spreadsheet to import or export this information themselves using the GUI, this spreadsheet provides buttons that import and export XML information. The first Import button on the left contains the code shown in Example 6-12. Example 6-12. Importing from an XML file to an Excel XML mapPrivate Sub ImportFile_Click( ) Dim myMap As XmlMap 'reference map by name Set myMap = ActiveWorkbook.XmlMaps("products_Map") Dim source As String source = Worksheets(2).Range("B1").Text Dim append As Boolean append = Range("D2").Value myMap.AppendOnImport = append myMap.AdjustColumnWidth = False myMap.Import (source) End SubFirst, this code retrieves the first XML map in the Excel spreadsheet from the workbook's XmlMaps collection. Next, it gets the source file from which it is to import from cell B1 of the worksheet shown in Figure 6-41. It collects the value of cell D2 on the main worksheet so it can tell Excel whether to append new data or replace the existing data in the map with the new data, by setting the AppendOnImport property of the map. To avoid columns changing sizes, the script explicitly sets AdjustColumnWidth to false. Finally, it calls the map object's Import method, giving it the source argument collected at the beginning. (That source can be a URL, not just a file reference.) If the products.xml file listed in Example 6-10 is at the location specified by cell B1 of the Source sheet, you'll see a result like that of Figure 6-42. Figure 6-42. Result of the first import from a file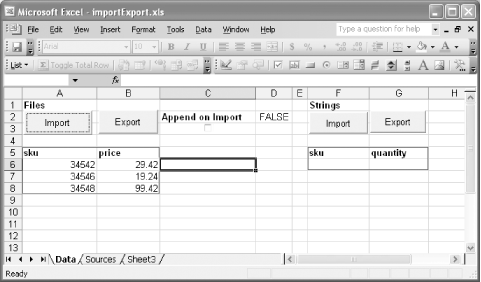 If you check the "Append on Import" checkbox, thereby changing cell D2's contents to true, and then click Import again, it will add the same three values to the map again, as shown in Figure 6-43. Figure 6-43. Result of the second import from a file, with append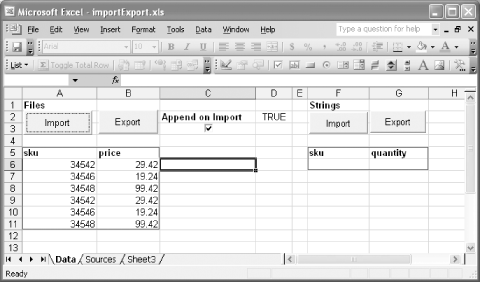 Its companion Export button is simpler, containing the code shown in Example 6-13. Example 6-13. Exporting from an XML file to an Excel XML mapPrivate Sub ExportFile_Click( ) Dim myMap As XmlMap 'reference map by number (6-12 referenced by name) Set myMap = ActiveWorkbook.XmlMaps(1) Dim dest As String dest = Worksheets(2).Range("B2").Text myMap.Export (dest) End SubLike the Import version, it collects the first map in the workbook, and a location from the Sources worksheet. Instead of importing, though, it uses the Export method to drop the XML in the file specified. If the spreadsheet looks like Figure 6-43, clicking the right-hand Export button will produce the code shown in Example 6-14. Example 6-14. Exporting from an Excel XML map to an XML file<?xml version="1.0" encoding="UTF-8" standalone="yes"?> <products xmlns:xsi="http://www.w3.org/2001/XMLSchema-instance"> <item> <sku>34542</sku> <price>29.42</price> </item> <item> <sku>34546</sku> <price>19.24</price> </item> <item> <sku>34548</sku> <price>99.42</price> </item> <item> <sku>34542</sku> <price>29.42</price> </item> <item> <sku>34546</sku> <price>19.24</price> </item> <item> <sku>34548</sku> <price>99.42</price> </item> </products> The map and buttons on the right-hand side behave differently. Rather than importing from and exporting to files, they import from and export to strings, using the ImportXML and ExportXML methods instead of Import and Export. You might want to do this if your data came from someplace other than a file, or if you need to do something to the XML before the import or export takes place. The string import method is shown in Example 6-15 and the string export method is shown in Example 6-16. Example 6-15. Importing from an XML string to an Excel XML mapPrivate Sub ImportString_Click( ) Dim myMap As XmlMap Set myMap = ActiveWorkbook.XmlMaps(2) Dim sourceData As String sourceData = Worksheets(2).Range("B4").Text Dim append As Boolean append = Range("D2").Value myMap.AppendOnImport = append myMap.AdjustColumnWidth = False myMap.ImportXml (sourceData) End SubExample 6-16. Exporting from an Excel XML map to an XML stringPrivate Sub ExportString_Click( ) Dim myMap As XmlMap Set myMap = ActiveWorkbook.XmlMaps(2) Dim result As String myMap.ExportXml result Worksheets(2).Range("B5").Value = result End SubIf the Sources sheet looks like Figure 6-41, clicking on the right-hand Import button of the Data sheet will produce the result shown in Figure 6-44. Figure 6-44. Importing from a string on the Sources sheet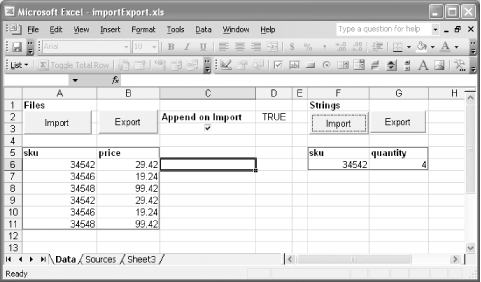 If you now click on the right-hand Export button and then go look at the Sources sheet, you'll see the result shown in Figure 6-45. Figure 6-45. The Sources sheet after an export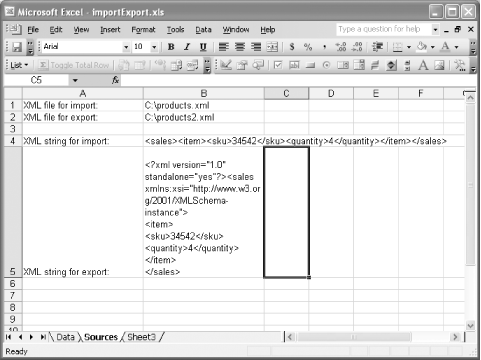 While these examples are fairly simple, they've demonstrated several ways to get information into and out of Excel. You can extend these examples with more VBA to create applications that update their data automatically, issue queries against web sites and present results, or pass XML information to custom processes for further work. |
EAN: 2147483647
Pages: 135