2.6 Auxiliary Hints in WordprocessingML
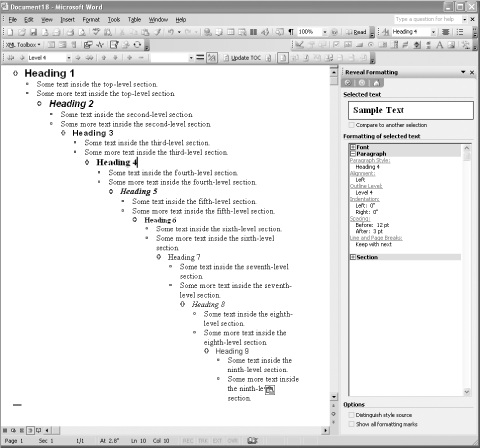
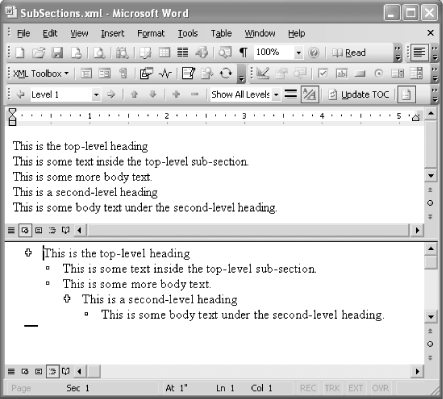
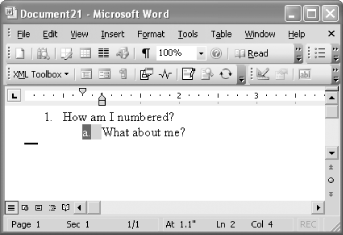
| Until now, we've managed to stick to a pretty strict diet of elements and attributes from the WordprocessingML namespace, which has had times more pleasant than others. Now it's time to introduce a set of elements and attributes from another namespace that are designed purely for the purpose of making your life easier. That's right, you guessed it: the wx prefix is your friend (so long as it's mapped to the right namespace: http://schemas.microsoft.com/office/word/2003/auxHint). There are quite a few contexts in which elements and attributes from the wx namespace appear in WordprocessingML documents saved by Word. We'll be focusing on some of the most significant of these: sections, sub-sections, and list text, as well as formatting hints. These hints save consumers of WordprocessingML documents much grief and processing power that would otherwise be spent on things like traversing the links of a list definition, for example. Again, elements and attributes in the wx namespace represent information that could be useful to us in handling WordprocessingML but that is of no internal use to Word. One implication of this distinction is that, while you may write applications that depend on their presence, it hardly ever makes sense to write applications that output elements or attributes in the wx namespace when generating WordprocessingML except perhaps when doing incremental processing of an existing document such that you want to maintain the auxiliary information that originally came from Word. Even then, you're not really generating it; you're just forwarding it on. 2.6.1 Section ContainersEarlier in the chapter, in "Sections," we introduced WordprocessingML's non-intuitive way of representing a document's sections how the presence of a w:sectPr element is implicitly interpreted to mean that the current paragraph is the last one in a section. Without a common container in which paragraphs of the same section are grouped together, it's not only counterintuitive but more difficult to process than it would otherwise be. Fortunately, the wx:sect element, which was introduced way back in Example 2-2, is Microsoft's answer to this problem. Whenever Word saves a document as XML, it doesn't just output the content of the w:body element. Instead, it groups the paragraphs and tables inside the body into wx:sect elements, corresponding to sections in the Word document. To recognize the helpfulness of this feature, all we need to do is have Word open and to re-save the WordprocessingML document from Example 2-8. No longer is it so difficult to figure out where the section boundaries are: <w:body> <wx:sect> <w:p> <w:pPr> <w:sectPr> <w:pgSz w:w="12240" w:h="15840"/> <w:pgMar w:top="1440" w:right="1800" w:bottom="1440" w:left="1800" w:header="720" w:footer="720" w:gutter="0"/> <w:cols w:space="720"/> </w:sectPr> </w:pPr> <w:r> <w:t>First section</w:t> </w:r> </w:p> </wx:sect> <wx:sect> <w:p> <w:r> <w:t>Second section, first paragraph</w:t> </w:r> </w:p> <w:p> <w:pPr> <w:sectPr> <w:pgSz w:w="12240" w:h="15840"/> <w:pgMar w:top="1440" w:right="1800" w:bottom="1440" w:left="1800" w:header="720" w:footer="720" w:gutter="0"/> <w:cols w:space="720"/> </w:sectPr> </w:pPr> <w:r> <w:t>Second section, second paragraph</w:t> </w:r> </w:p> </wx:sect> <wx:sect> <w:p> <w:r> <w:t>Third section, first paragraph</w:t> </w:r> </w:p> <w:p> <w:r> <w:t>Third section, second paragraph</w:t> </w:r> </w:p> <w:sectPr> <w:pgSz w:w="12240" w:h="15840"/> <w:pgMar w:top="1440" w:right="1800" w:bottom="1440" w:left="1800" w:header="720" w:footer="720" w:gutter="0"/> <w:cols w:space="720"/> <w:docGrid w:line-pitch="360"/> </w:sectPr> </wx:sect> </w:body> Note that there are three wx:sect elements, one for each section, and that the paragraphs in each section are clearly grouped together. As mentioned before, we could remove the start and end tags of each wx:sect element, and Word would process the document no differently. Conversely, the meaning of the document as far as Word is concerned is completely unaltered by the addition of the wx:sect element. It only considers the w:sectPr elements to determine where the sections are. The same old rules apply: w:sectPr elements inside w:pPr elements represent section breaks, but the last w:sectPr element (provided it follows the last paragraph inside the w:body element) does not represent a break, but instead simply contains the properties of the last section. An example using XPath can help demonstrate how the wx:sect element enables easier processing of WordprocessingML documents outside of Word. If we were to write an XPath expression to select all of the paragraphs in, say, the third section, this would be easy (assuming the appropriate namespace bindings): /w:wordDocument/w:body/wx:sect[3]/w:p However, without the aid of the wx:sect element, the task is still possible but not as straightforward and certainly not as intuitive: /w:wordDocument/w:body/w:p[count(preceding::w:sectPr)=2] Clearly, the wx:sect element, though it may have looked cryptic at first sight, is a helpful aid to processing WordprocessingML documents as output by Word. 2.6.2 Outline Levels and Sub-SectionsWord has a special paragraph property that we didn't mention earlier: the outline level. As might be guessed, the outline level property has an effect on the display of a paragraph in Word's "Outline" view. Example paragraph styles for which an outline level is defined include all of Word's built-in Heading styles. In fact, it's no accident that the Outline view supports nine levels and that there are precisely nine Heading styles. Figure 2-22 shows how all of the Heading styles are displayed in Outline view, along with some body text on each rung of the ladder. The body text has no outline level specified, as is the case with most normal paragraphs. All of the Heading paragraphs, however, have the outline level corresponding to their name. Heading 1 has Outline Level 1, Heading 2 has Outline Level 2, etc. Figure 2-22. Word's built-in Heading styles, as displayed in Outline view Clearly, the document in Figure 2-22 follows a hierarchical structure (if rather deep). Many people author such hierarchically organized documents in Word. Indeed, the Heading styles in conjunction with Outline view give them incentives for doing so. Unfortunately none of that hierarchical structure made it into WordprocessingML, which remains wedded to the flat-list-of-paragraphs paradigm. Sure, you can make a document look like it's hierarchically structured, but underneath the covers it's just a sequence of paragraphs with various formatting properties applied. But all is not lost. Once again, the wx namespace comes to the rescue, in what is arguably the most useful element of all the auxiliary hints: the wx:sub-section element. Whenever Word saves a WordprocessingML document that has an outline level specified on any of its paragraphs, then at least a one-level depth tree of wx:sub-section elements will be present in the output. Specifically, any time Word comes across a paragraph with an outline level, it establishes a new sub-section context equal in depth of sub-sections to the outline level of the paragraph. For example, if the outline level is 3, then the paragraph will be contained within three nested wx:sub-section elements. This stays in effect for following paragraphs either until it reaches another paragraph with an outline level, or it comes to the end of the section (in which case all of the wx:sub-section elements are closed). In the case of the document in Figure 2-22, it would output a structure similar to the following: <wx:sub-section> Heading 1 Body text Body text <wx:sub-section> Heading 2 Body text Body text <wx:sub-section> Heading 3 Body text Body text ... </wx:sub-section> </wx:sub-section> </wx:sub-section> You can achieve a similar effect with any custom paragraph style that you develop, simply by adding an outline level to the style definition. While using styles is probably the best way to achieve this effect, the use of styles isn't required. You can also apply the outline level property locally, as direct formatting on your paragraph. Example 2-10 finally demonstrates the syntax for the outline level property, as specified inside a paragraph's w:pPr element. This document contains a series of five paragraphs, two of which specify an outline level using the w:outlineLvl element, whose w:val attribute value must be between 0 and 8 (exposed as 1 through 9 in the Word UI). Example 2-10. Setting outline levels locally<?xml version="1.0"?> <?mso-application prog?> <w:wordDocument xmlns:w="http://schemas.microsoft.com/office/word/2003/wordml" xml:space="preserve"> <w:body> <w:p> <w:pPr> <w:outlineLvl w:val="0"/> </w:pPr> <w:r><w:t>This is the top-level heading</w:t></w:r> </w:p> <w:p> <w:r><w:t>This is some text inside the top-level sub- section.</w:t></w:r> </w:p> <w:p> <w:r><w:t>This is some more body text.</w:t></w:r> </w:p> <w:p> <w:pPr> <w:outlineLvl w:val="1"/> </w:pPr> <w:r><w:t>This is a second-level heading</w:t></w:r> </w:p> <w:p> <w:r><w:t>This is some body text under the second-level heading.</w:t></w:r> </w:p> </w:body> </w:wordDocument> First, let's see what this document looks like when opened in Word. Figure 2-23 shows both the Normal view and the Outline view. The outline levels are completely invisible in the Normal view; the paragraphs look no different than any other plain, boring paragraph. Outline view is another story. Figure 2-23. Outline levels shown in Normal and Outline views Finally, we can see the wx:sub-section element in action by resaving the document as XML from within Word. Example 2-11 shows the body content excerpted from the WordprocessingML document as saved by Word. Example 2-11. A document body with outline levels, when saved as XML in Word<w:body> <wx:sect> <wx:sub-section> <w:p> <w:pPr> <w:outlineLvl w:val="0"/> </w:pPr> <w:r> <w:t>This is the top-level heading</w:t> </w:r> </w:p> <w:p> <w:r> <w:t>This is some text inside the top-level sub-section.</w:t> </w:r> </w:p> <w:p> <w:r> <w:t>This is some more body text.</w:t> </w:r> </w:p> <wx:sub-section> <w:p> <w:pPr> <w:outlineLvl w:val="1"/> </w:pPr> <w:r> <w:t>This is a second-level heading</w:t> </w:r> </w:p> <w:p> <w:r> <w:t>This is some body text under the second-level heading.</w:t> </w:r> </w:p> <w:sectPr> <w:pgSz w:w="12240" w:h="15840"/> <w:pgMar w:top="1440" w:right="1800" w:bottom="1440" w:left="1800" w:header="720" w:footer="720" w:gutter="0"/> <w:cols w:space="720"/> <w:docGrid w:line-pitch="360"/> </w:sectPr> </wx:sub-section> </wx:sub-section> </wx:sect> </w:body> Example 2-11 demonstrates that Word interprets the outline levels to automatically structure the resulting WordprocessingML into sub-sections, using wx:sub-section elements, which are highlighted. Again, outline levels are most useful when they are associated with particular paragraph styles, rather than assigned directly to individual paragraphs (which, in the Word UI, can only be done in Outline View). Provided that the user applies styles in the order that they are intended, e.g., Heading 1 followed by Heading 2, etc., then the WordprocessingML that Word generates will be structured into sub-sections that reflect the true hierarchical structure of the document, rather than merely a flat sequence of paragraphs. 2.6.3 List Item Formatting HintsAnything Word wants to provide in the way of making lists easier to process is certainly welcome. As we saw earlier in this chapter, lists in WordprocessingML are rather complicated to process. Generally, you can recognize the presence of a list item by the presence of a w:listPr element inside a paragraph's w:pPr element. While that's a start, if you want to find out anything about how the list item is formatted, including even whether it's a "numbered" or "bulleted" list, you have to traverse a number of intra-document links. How many depends on whether and to what extent paragraph or list styles are involved. As a matter of fact, Word does rather consistently save us this trouble by outputting the wx:t element inside a paragraph's w:listPr element. The wx:t element has three attributes: wx:val, wx:wTabBefore, and wx:wTabAfter. The wx:val attribute specifies the actual text used for the number or bullet point of this particular list item. The wx:wTabBefore is measured in twips and specifies the width of the tab preceding the line number. This usually corresponds to the indentation of the list item from the page's left margin. The wx:wTabAfter, on the other hand, calculates the distance, in twips, between the end of the text of the line number and the beginning of the editable area. It takes into consideration the font size and length of the line number itself. For example, consider the second list item of the simple list in Figure 2-24. Figure 2-24. A simple list item The hint as it resultantly appears in this paragraph's w:listPr element (inside its w:pPr element) is as follows: <wx:t wx:val="a." wx:wTabBefore="1080" wx:wTabAfter="195" /> The wx:val attribute clearly relates that the line number text is "a." The wx:wTabBefore corresponds to the actual left indent of this paragraph, namely .75 inches, or 1080 twips. And the wx:wTabAfter attribute represents the distance between the "a." text and the contents of the list item in other words, the gray, highlighted area following "a." in Figure 2-24. |
EAN: 2147483647
Pages: 135