Character Formatting Using CSS
| You've already seen how styles can be used to modify the appearance of various elements. Any of the effects associated with the tags introduced in today's lesson can also be created using CSS. Before I go into these properties, however, I want to talk a bit about how to use them. As I've said before, the style attribute can be used with most tags. However, most tags somehow affect the appearance of the text that they enclose. There's a tag that doesn't have any inherent effect on the text that it's wrapped around: the <span> tag. It exists solely to be associated with style sheets. It's used exactly like any of the other tags you've seen today. Simply wrap it around some text, like this: <p>This is an example of the <span>usage of the span tag</span>.</p> Used by itself, the <span> tag has absolutely no effect. Paired with the style attribute, it can take the place of any of the tags you've seen today and can do a lot more than that as well. The Text Decoration PropertyThe text-decoration property is used to specify which, if any, decoration will be applied to the text within the affected tag. The valid values for this property are underline, overline, line-through, and blink. The application of each of them is self-explanatory. However, here's an example that demonstrates how to use each of them: Input <p>Here is some <span style='text-decoration: underline">underlined text</span>.</p> <p>Here is some <span style="text-decoration: overline">overlined text</span>.</p> <p>Here is some <span style="text-decoration: line-through">line-through text</span>.</p> <p>Here is some <span style="text-decoration: blink">blinking text</span>.</p> Using <span> and the text-decoration property to underline text is no different from using the <u> tag, except that some old browsers that don't support CSS might not support it. The cool thing is that you can use this, and all the properties you'll see in today's lesson, with any tag that encloses text. Take a look at this example: <h1 style="text-decoration: underline">An Underlined Heading</h1> Using the style attribute, you can specify how the text of the heading appears. Choosing between this approach and the <u> tag is a washif you want to remove the underlining from the heading, you'd have to come back and edit the tag itself, regardless of whether you used the <u> tag or style attribute. Later, you'll see how style sheets can be used to control the appearance of many elements at once. Font PropertiesWhen you want to modify the appearance of text, the other major family of properties you can use is font properties. Font properties can be used to modify pretty much any aspect of the type used to render text in a browser. One of the particularly nice things about font properties is that they're much more specific than the tags that you've seen so far. First, let's look at some of the direct replacements for tags you've already seen. The font-style property can be used to italicize text. It has three possible values, normal, which is the default, italic, which renders the text in the same way as the <i> tag, and oblique, which is somewhere between italic and normal, and is not as well supported by browsers as the italic style is. Here are some examples: Input <p>Here's some <span style="font-style: italic">italicized text</span>.</p> <p>Here's some <span style="font-style: oblique">oblique text</span> (which may look like regular italics in your browser).</p> Now let's look at how you use CSS to create boldfaced text. In the world of HTML, there are two options: bold and not bold. With CSS, you have (theoretically) many more options. The reason I say theoretically is that browser support for the wide breadth of font weights available using CSS can be spotty. To specify that text should be boldface, the font-weight property is used. Valid values are normal (the default), bold, bolder, lighter, and 100 through 900, in units of 100. Here are some examples: Input <p>Here's some <span style="font-weight: bold">bold text</span>.</p> <p>Here's some <span style="font-weight: bolder">bolder text</span>.</p> <p>Here's some <span style="font-weight: lighter">lighter text</span>.</p> <p>Here's some <span style="font-weight: 700">bolder text</span>.</p> You can also set the typeface for text using the font-family property. You can also set the specific font for text, but I'm not going to discuss that until later today. In the meantime, let's look at how you can set the font to a member of a particular font family. The specific font will be taken from the user's preferences. The property to modify is font-family. The possible values are serif, sans-serif, cursive, fantasy, and monospace. So, if you want to specify that a monospace font should be used with CSS instead of the <tt> tag, you would use the following code: Input <p><span style="font-family: monospace">This is monospaced text.</span></p> Now let's look at one capability that's not available using regular HTML tags. Using the font-variant property, you can have your text rendered so that lowercase letters are replaced with larger capital letters. The two values available are normal and small-caps. Here's an example: Input <p><span style='font-variant: small-caps'>This Text Uses Small Caps.</span></p> The browser window in Figure 6.3 contains some text that uses the font-variant property as well as all the other properties described in this section. Output Figure 6.3. Text styled using CSS.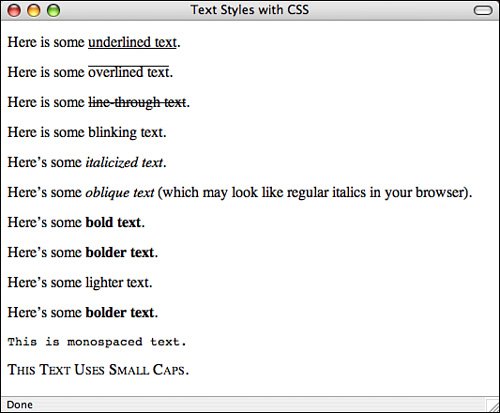 |
EAN: 2147483647
Pages: 305