Complex Data Binding in Windows Forms
| for RuBoard |
In the next example, you will build a quick-and-dirty Windows Form that will display all customers in a bound ListBox and the customer's associated Orders in a bound DataGrid . A more complex DataSet will be needed that provides the relationship path to traverse from customers to orders using the primary key of Customers (CustomerID) to foreign key in Orders (CustomerID). You will have to do data bindings for both the ListBox control and the DataGrid control. This example is one of the classic data binding scenarios described earlier.
Create a New Project in VS .NET
-
Create a new project in VS .NET by choosing File, New, and then choosing the Project option. Or, you can just modify the "ADO.NET24hoursDB" that we just created for simple binding. If you choose to modify this one, delete all of the Forms objects, methods , and so on that we added so that you start from a clean slate. This will include deleting the DataSet schema that is shown in the Solution Explorer.
-
When the New Project dialog box appears, choose Visual Basic Projects (or Visual C# Projects) and Windows Applications. Name this project "ADO.NET24hoursE". This creates a default form for you to start from.
Add the Data Connection and Two Data Adapters
You will need to access both the Customers table and the Orders table, so two data adapters will be created, each populating different controls but using one database connection.
-
From the Data tab of the Toolbox, drag a SQLDataAdapter object into your form. This will automatically invoke the Data Adapter Configuration Wizard. Both the data connection and the data adapter can be fully configured here.
-
The wizard starts with the Choose Your Data Connection dialog box. If you already have a connection defined in your project, it will be placed in the dialog box; otherwise , choose to create a new connection and specify the appropriate connection information (test the connection as well).
-
Choose the Use SQL Statements option.
-
You will be presented with a Generate the SQL Statements dialog box where you will simply type in a valid SQL statement, or you can use the Query Builder option to formulate the SQL query. For our example, just type in the following query:
SELECT CustomerID, CompanyName FROM Customers
-
Finally, the wizard will show you the tasks that it has done and indicate whether the SqlDataAdapter has been configured successfully (it should be named SqlDataAdapter1 along with a SqlConnection name SqlConnection1 .
-
-
Okay, we need one more data adapter for access to the Orders table. Drag another SqlDataAdapter object onto the form.
-
Again, the wizard starts with the Choose Your Data Connection dialog box.
-
Choose the Use SQL Statements option.
-
You will be presented with a Generate the SQL Statements dialog box where you will type the following query:
SELECT OrderID, CustomerID, OrderDate, ShipVia, Freight, ShipName FROM Orders
-
And lastly, the wizard will show you the tasks that it has done and indicate whether the SqlDataAdapter has been configured successfully (it should be named SqlDataAdapter2 ).
-
Generate a DataSet
Now that the SqlDataAdapter and DataConnection objects have been configured and added to the form, you must generate a DataSet and then add an instance of this DataSet to the form.
-
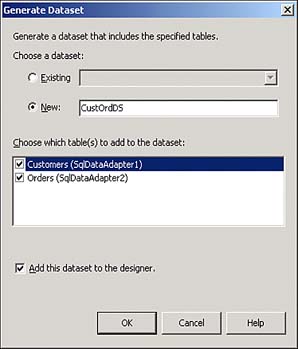
From the Data menu in Visual Studio, simply choose the Generate Dataset option. The resulting dialog box can be seen in Figure 9.6.
Figure 9.6. Generating a new dataset for the form.
-
Now, just choose to create a new dataset using the name "CustOrdDS" (as also seen in Figure 9.6) that it provides ( DataSet1 ). Make sure you have checked the Customers table, Orders table, and checked the Add Dataset to Designer box. Click OK.
-
When the process finishes, a DataSet instance named CustOrdDS1 will be on the form and a dataset schema will be in the Solutions Explorer (named CustOrdDS.xsd).
-
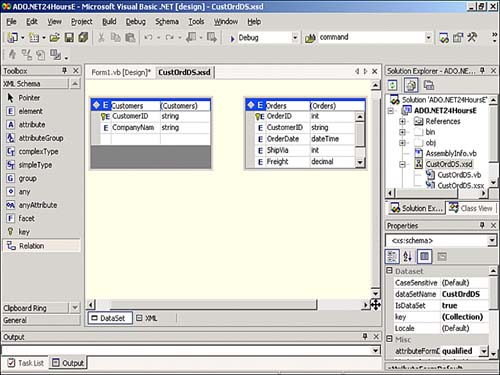
You're not quite done yet. There must also be a way for the schema to know that there is a parent/child relationship between Customers and Orders. You do this by adding a Relation object onto the Orders table in the schema. First, double-click on the CustOrdDS.xsd schema file in the Solutions Explorer. This takes you immediately into the XML Schema editor. Figure 9.7 shows the two tables that are part of the CustOrdDS.xsd schema.
Figure 9.7. XML Schema editorCustOrdDS.xsd schema file.
-
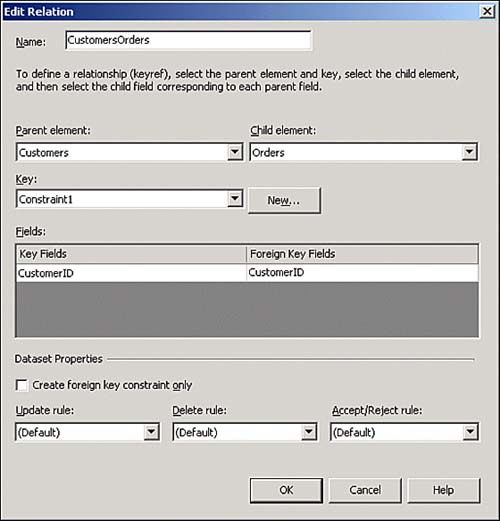
Next, drag a Relation object onto the Orders table (this is the child side of the parent/child relationship). You are immediately put into the Edit Relation dialog box.
-
Verify that the name of the Relation defaults to CustomersOrders, the Parent element is Customers, the Child element is Orders, and the Key Fields and Foreign Key Fields both are CustomerID. Nothing else should be checked at this point. Figure 9.8 shows the values in the Edit Relation dialog box. Click OK when you are satisfied that all is correct.
Figure 9.8. The Edit Relation dialog box for the CustomersOrders relation.
-
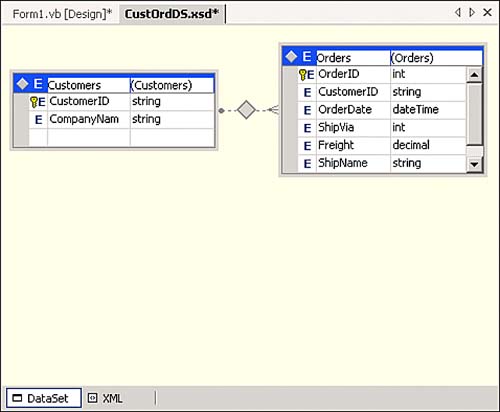
The XML Schema editor should now show a one-to-many relationship line between the Customers and Orders table as seen in Figure 9.9. The following code is the content of the CustOrdDS.xsd XML Schema file that now reflects the new relationship:
<?xml version="1.0" standalone="yes" ?> <xs:schema id="CustOrdDS" targetNamespace= "http://www.tempuri.org/CustOrdDS.xsd" xmlns:mstns="http://www.tempuri.org/CustOrdDS.xsd" xmlns= "http://www.tempuri.org/CustOrdDS.xsd" xmlns:xs="http://www.w3.org/2001/XMLSchema" xmlns:msdata= "urn:schemas-microsoft-com:xml-msdata" attributeFormDefault="qualified" elementFormDefault="qualified"> <xs:element name="CustOrdDS" msdata:IsDataSet="true"> <xs:complexType> <xs:choice maxOccurs="unbounded"> <xs:element name="Customers"> <xs:complexType> <xs:sequence> <xs:element name="CustomerID" type="xs:string" /> <xs:element name="CompanyName" type="xs:string" /> </xs:sequence> </xs:complexType> </xs:element> <xs:element name="Orders"> <xs:complexType> <xs:sequence> <xs:element name="OrderID" msdata:ReadOnly="true" msdata:AutoIncrement="true" type="xs:int" /> <xs:element name="CustomerID" type="xs:string" minOccurs="0" /> <xs:element name="OrderDate" type="xs:dateTime" minOccurs="0" /> <xs:element name="ShipVia" type="xs:int" minOccurs="0" /> <xs:element name="Freight" type="xs:decimal" minOccurs="0" /> <xs:element name="ShipName" type="xs:string" minOccurs="0" /> </xs:sequence> </xs:complexType> </xs:element> </xs:choice> </xs:complexType> <xs:unique name="Constraint1" msdata:PrimaryKey="true"> <xs:selector xpath=".//mstns:Customers" /> <xs:field xpath="mstns:CustomerID" /> </xs:unique> <xs:unique name="Orders_Constraint1" msdata:ConstraintName="Constraint1" msdata:PrimaryKey="true"> <xs:selector xpath=".//mstns:Orders" /> <xs:field xpath="mstns:OrderID" /> </xs:unique> <xs:keyref name="CustomersOrders" refer="mstns:Constraint1"> <xs:selector xpath=".//mstns:Orders" /> <xs:field xpath="mstns:CustomerID" /> </xs:keyref> </xs:element> </xs :schema>
Figure 9.9. The XML Schema editor, showing the new relationship between Customers and Orders.
Adding the ListBox and DataGrid Controls
The next step is to add the ListBox control to display the Company Names and the DataGrid control to display the Order information associated with these companies.
-
First, let's create the ListBox to display all of the Company Names from the Customers table.
-
Drag a ListBox object from the Windows Forms tab of the Toolbox onto the Form.
-
Press F4 to go right to the properties of this ListBox .
-
For the DataSource property, you will need to select the CustOrdDS1 data source.
-
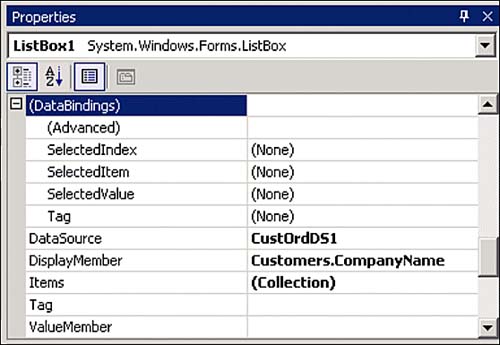
For the DisplayMember property, you will select Customers, expand this node, and select CustomerName. Figure 9.10 shows the complete ListBox property specifications for this example.
Figure 9.10. ListBox property specifications.
-
-
Now, let's create the DataGrid control to display all of the Orders that are associated with a particular Company that is selected. As the form is running, whenever you move from one CompanyName to another, the form's data binding framework queries the data relation object so it can provide the correct Orders (for that company).
-
Drag a DataGrid object from the Windows Forms tab of the toolbox onto the Form.
-
Press F4 to go right to the properties of this DataGrid .
-
For the DataSource property, you will need to select the CustOrdDS1 data source.
-
And, for the DisplayMember property, you will select and expand Customers, and then select CustomersOrders. This is actually the data relation (and the Orders table). So, we are binding to the data relation object! Figure 9.11 shows the DataMember property specifications.
Figure 9.11. Completed ListBox , DataGrid , and labels within VS .NET.

-
-
Go ahead and add labels on the top of the ListBox and the DataGrid if you want. Figure 9.11 also shows this completed form with labels.
Properties or Methods BindingFor ListBox controls, you can bind the control to a DataSet class using the DataSource and DisplayMember properties as you have seen in our Windows Forms example: Me.ListBox1.DataSource = Me.CustOrdDS1 Me.ListBox1.DisplayMember = "Customers.CompanyName" Or, you can use the DataBinding method programmatically to achieve the same results. Me.ListBox1.DataBindings.Add(New System.Windows.Forms.Binding ("SelectedItem", Me.CustOrdDS1, "Customers.CompanyName")) For DataGrid controls, you bind the control to a DataSet class using the DataSource and DataMember properties : Me.DataGrid1.DataMember = "Customers.CustomersOrders" Me.DataGrid1.DataSource = Me.CustOrdDS1 Or, use the SetDataBinding method programmatically to achieve the same results: Me.DataGrid1.SetDataBinding(CustOrdDS1,"Customers. |
Add Code to Populate the DataSet
Now we are ready to complete the application by adding the code to fill the DataSet . We have determined that the best time to fill the DataSet is when the form is brought up (at form load time).
Just double-click on the form to create a handler for the form's Load event. You will need to clear the DataSet first, and then fill each data adapter that we defined.
CustOrdDS1.Clear() SqlDataAdapter1.Fill(CustOrdDS1) SqlDataAdapter2.Fill(CustOrdDS1)
Test It!
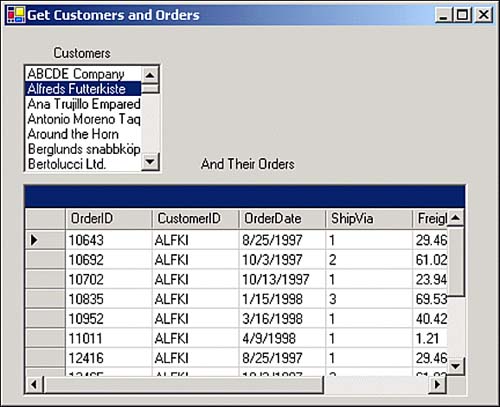
That's it! Now just hit the F5 key and test your application. When the form comes up, it should already display Company Names in the ListBox . When you select one of these (with orders), the DataGrid will display all related orders for that company.
In Figure 9.12, you can see the form displaying a valid customer's information successfully.
Figure 9.12. The Get Customer Forms application, showing complex DataGrid binding.
| for RuBoard |
EAN: 2147483647
Pages: 237
- Structures, Processes and Relational Mechanisms for IT Governance
- Integration Strategies and Tactics for Information Technology Governance
- Technical Issues Related to IT Governance Tactics: Product Metrics, Measurements and Process Control
- Managing IT Functions
- Governing Information Technology Through COBIT