Typed DataSets in Visual Studio .NET
| for RuBoard |
In Visual Studio .NET, you will frequently be adding typed datasets to forms or components to manipulate data, bind controls to the dataset, and so on. Remember, when you add a dataset, you are really creating an instance of the typed DataSet class on your form or component. The dataset must be in your project for you to use it. Just as you did before, you will have to generate this typed dataset somehow. There are a few places where the typed dataset can come from. The first is by generating it in another form or component in your project. Or, you could create it manually (as we did earlier) and pull it into your project to use. And lastly, you can create a reference to an XML Web service or another component that returns a dataset. In all cases, we will want to generate it as a typed dataset. The best way to get the hang of generating the needed typed dataset in VS .NET is to build a tiny forms application. Let's quickly step through an example that will query customer contact names for customers in the Customers table of the Northwind SQL Server database.
Create a New Project in VS .NET
-
Create a new project in VS .NET by choosing File, New, and then choosing the Project option.
-
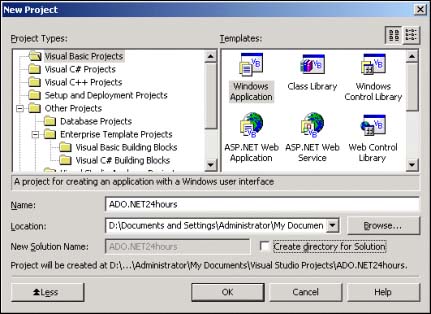
When the New Project dialog box appears, choose Visual Basic Projects (or Visual C# Projects) and Windows Applications. Name this project "ADO.NET24hours" as you can see in Figure 20.3.
Figure 20.3. Visual Studio .NET New Projects dialog box.
-
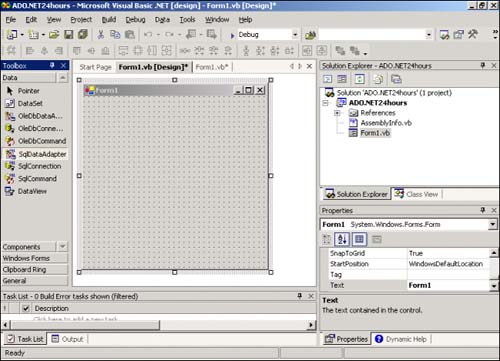
This creates a default form for you to start from.
Add the Data Connection and Data Adapter
We will be accessing the Customers table in SQL Server's Northwind database. So, first we will need to create a data connection and a data adapter to Microsoft SQL Server.
-
From the Data tab of the Toolbox, drag a SQLDataAdapter object into your form.
Figure 20.4. Visual Studio .NET Form with Data Toolbox SqlDataAdapter object selected.
-
This will automatically invoke the Data Adapter Configuration Wizard. Both the data connection and the data adapter can be fully configured here.
-
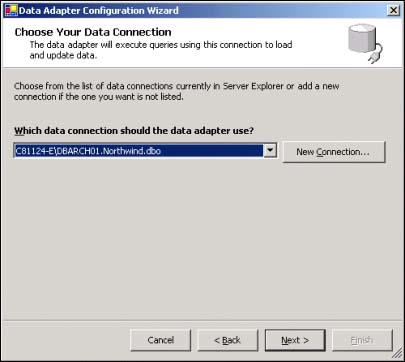
The wizard starts with the Choose Your Data Connection dialog box. If you already have a connection defined in your project, it will be placed in the dialog box; otherwise , choose to create a new connection and specify the appropriate connection information (test the connection as well).
Figure 20.5. Data Adapter WizardChoose Your Data Connection dialog box.
-
You will then have to decide to supply SQL statements, build a new stored procedure, or give the name of an existing stored procedure for the data access. In our example we will use the Use SQL Statements option.
-
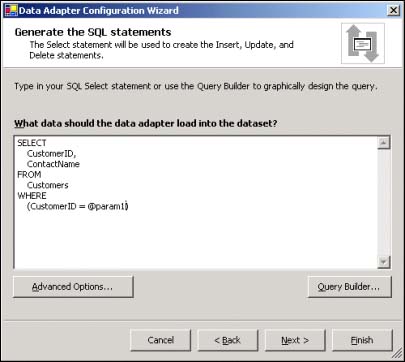
You will be presented with a Generate the SQL Statements dialog box where you will simply type in a valid SQL statement or you can use the Query Builder option to formulate the SQL query. For this example, just type in the following query:
SELECT CustomerID, ContactName FROM Customers WHERE (CustomerID = @param1)
It should also be noted that for SqlDataAdapter s, you will use a named parameter ( @param.... ) for any values that are to be substituted into the WHERE clause. The OleDBDataAdapter 's SQL statements would use a "?". This dialog box should look like what is shown in Figure 20.6.
Figure 20.6. Data Adapter WizardGenerate the SQL Statements dialog box.
-
Lastly, the wizard will show you the tasks it has done and indicate whether the SqlDataAdapter has been configured successfully.
-
After the SqlDataAdapter and DataConnection objects have been configured and added to the form, you must first generate a typed DataSet and then add an instance of this DataSet to the form.
Generate the Typed DataSet
You can generate a typed DataSet from either a predefined XML Schema (as we did manually before) or from a DataSet you have already created with the Component Designer. Because we already have a good Customers.xsd (XML schema), we will use this approach (for consistency).
-
Choose Project, Add Existing Item and locate the .xsd file you will be using as the basis of your dataset creation (Customers.xsd). We have placed a copy in the ADO.NET24hours folder.
-
When you have located the .xsd file, choose Open and the file will be placed in your Solution Explorer.
-
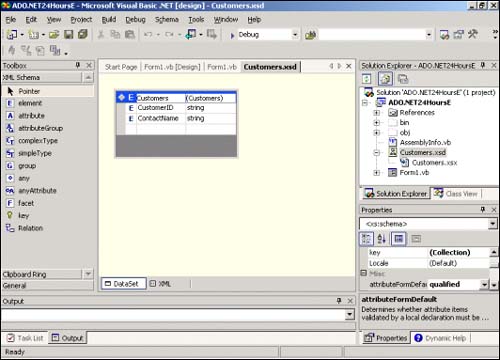
Double-click on this Customers.xsd entry in the Solution Explorer window. Immediately it will appear in the Component Designer as you can see in Figure 20.7.
Figure 20.7. Visual Studio .NET Component Designer for Customers.xsd.
-
Choose Schema, Generate DataSet and you will see the customers.vb entry added in the Solution Explorer. A typed DataSet has been generated and placed below the customers.xsd schema file in the Solution Explorer. You haven't added this dataset to your form yet; that comes next .
 | You could have just as easily created a typed DataSet from the SqlDataAdapter side as well. After the SqlDataAdapter is added to the designer, you could have chosen the Data menu and the Generate DataSet option. The resulting typed DataSet would be what was specified in the SQL statement for the data adapter. |
Add an Instance of the DataSet to the Form
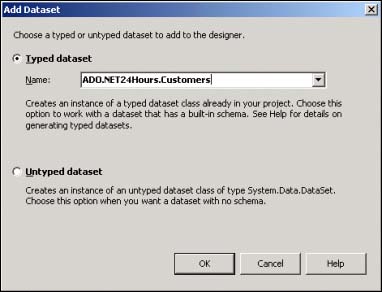
You must now add an instance of the typed DataSet to the form. Simply drag and drop a DataSet object from the Data tab of the toolbox and place it in the form. As you can see in Figure 20.8, you must choose whether it should be a "typed" or "untyped" dataset. Simply choose for it to be typed and click OK.
Figure 20.8. The Add Dataset dialog box for a new instance of a DataSet for the form.
You have now completed everything you need to do to populate the DataSet from a valid SQL Server connection.
Add Some Controls to Display the Data
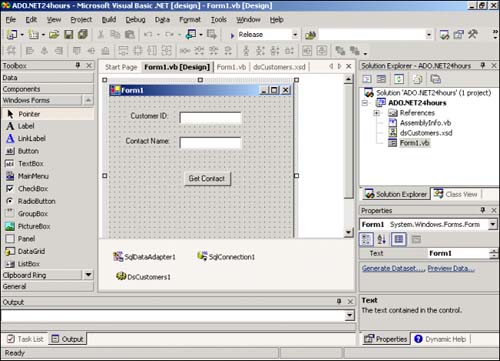
The next step is to complete the small form example to include a couple of text boxes and a control button. From the Windows Forms tab of the Toolbox, add the following:
-
Textbox With a name of txtCustParameter and text is blank.
-
Textbox With a name of txtContactName and text is blank.
-
Button With a name of btnGet and text of "Get Contact".
Go ahead and add labels in front of each text box so that it looks like the form in Figure 20.9.
Figure 20.9. Add text boxes, button, and labels to the form.
Add Code to Populate the DataSet
Now we are ready to complete the application by adding the code to fill the dataset based on the parameterized value we get from the txtCustParameter text box. This will be plugged into the SQL statement and executed to fill the DataSet (and displayed in the txtContactName text box).
Just double-click on the Get Contact button to create a method for the Click event. You will have to add code to the handler to set the value of the single parameter required by the SQL statement (from txtCustParameter ), make a call to the dataset's Clear method to clear the dataset between iterations, and call the data adapter's Fill method, passing the reference to the dataset and the parameter value for the query. The following code is added:
SqlDataAdapter1.SelectCommand.Parameters("@param1").Value = txtCustParameter.Text Customers1.Clear() SqlDataAdapter1.Fill(Customers1) Bind the Text Box to the DataSet
Nothing is left to do other than bind the text box to the DataSet and run the application.
-
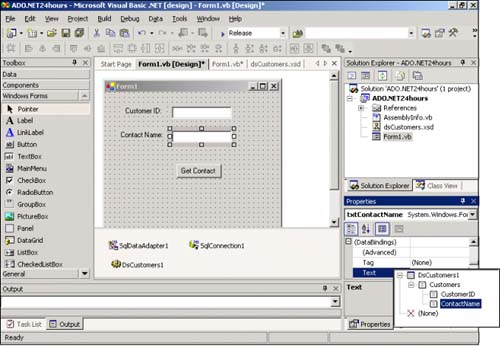
From the Forms designer, select the txtContactName text box and press F4. This will position you to the properties window for this text box.
-
Expand the ( DataBindings) node in the properties list and its text property.
-
Expand the Customers1 and Customers nodes and select the ContactName from the list as seen in Figure 20.10.
Figure 20.10. The (Databindings) node of the text box property.
Test It!
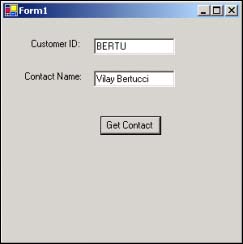
That's it. Now just hit the F5 key and test your application by putting in a CustomerID value that is in the Customers table. Try the value "ALFKI". In Figure 20.11 you can see the form retrieving a valid contact name from the Customers database successfully.
Figure 20.11. Form executionretrieving valid contact name from Customers.
| for RuBoard |
EAN: 2147483647
Pages: 237