Typical Errors to Handle
| for RuBoard |
When using the ADO.NET capabilities, much of what you will encounter centers on getting to data sources, pulling data out of data sources and into datasets, manipulation of the data within your datasets, and pushing that data back out to the data sources. The errors that you will see the most can be categorized as:
-
Connection errorsFailure to connect, stay connected, disconnect, or other connection- related failures
-
Data retrieval errorsFailure to get data, fill errors, and so on
-
Dataset manipulation errorsUpdate, delete, or insert issues in your cached dataset
-
Data source manipulation errorsFailures of deletes, inserts , or updates such as optimistic concurrency violations or primary key constraint violations, and so on
We will now build up a quick Windows Forms application that will use a Try/Catch/Finally structure as part of its data refresh operation to handle errors when connecting to the data source (in this case, the SQL Server Northwind database).
-
Create a new project in VS .NET by choosing File, New, and then choosing the Project option.
-
When the New Project dialog box appears, choose Visual Basic Projects (or Visual C# Projects) and Windows Applications. Name this project ADO.NET24hoursERROR . This creates a default form for you to start from.
-
You will need to access the Customers table. From the Data tab of the Toolbox, drag a SQLDataAdapter object into your form. This will automatically invoke the Data Adapter Configuration Wizard. Both the data connection and the data adapter can be fully configured here.
-
The wizard starts with the Choose Your Data Connection dialog box. If you already have a connection defined in your project, it will be placed in the dialog box; otherwise , choose to create a new connection and specify the appropriate connection information (test the connection as well).
-
Choose the Use SQL Statements option.
-
You will be presented with a Generate the SQL Statements dialog box where you will simply type in a valid SQL statement, or you can use the Query Builder option to formulate the SQL query. For this example, just type in the following query:
SELECT CustomerID, CompanyName, ContactName, ContactTitle, phone FROM Customers
-
Last, the wizard will show you the tasks that it has done and indicate whether the SqlDataAdapter has been configured successfully (it should be named SqlDataAdapter1 along with a SqlConnection named SqlConnection1 ).
-
-
Now that the SqlDataAdapter and DataConnection objects have been configured and added to the form, you must generate a dataset and then add an instance of this dataset to the form.
-
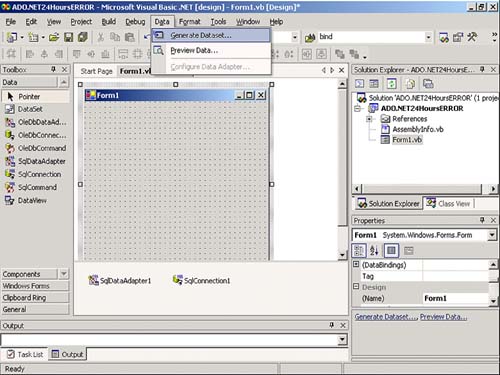
From the Data menu in Visual Studio, simply choose the Generate Dataset option. Figure 13.1 shows this option.
Figure 13.1. Generate a new dataset for the form.
-
Now, just choose to create a new dataset using the name CustomerDS . Make sure you have checked the Customers table and have indicated that the dataset is to be added to the Designer. Click OK.
-
When this process finishes, a DataSet instance named CustomerDS1 will be on the form and a DataSet schema will be in the Solutions Explorer (named CustomerDS.xsd).
-
-
The next step is to add the DataGrid control to display the Customer information.
-
Drag a DataGrid object from the Windows Forms tab of the Toolbox onto the form.
-
Press F4 to go right to the properties of this DataGrid .
-
For the DataSource property, you will need to select the CustomerDS1 data source.
-
And, for the DisplayMember property, you will select Customers.
-
Go ahead and add a label to the top of the DataGrid entitled "Customer Inquiry". And change the form name (text property) if you want.
-
-
Now we are ready to complete the application by adding the code to fill the DataSet and refresh the data with a button. We have determined that the best time to fill the dataset is when the form is brought up (at form load time).
-
Just double-click on the form to create a handler for the form's Load event. You will need to clear the dataset first, and then fill the dataset using the DataAdapter that we defined.
Me.CustOrdDS1.Clear() Me.SqlDataAdapter1.Fill(Me.CustomerDS1)
-
Next we add a button so that we can refresh the dataset's data anytime we want to. Start by dragging a Button object from the Windows Forms Toolbox onto the form.
-
Press F4 to take you directly to the properties of this button. Change the name of the button to btnRefresh and the text of the button to Refresh .
-
Now, double-click the Button object on the form so that you can add the Try/Catch structure logic. Then you add the following to first clear the dataset, refill the dataset (which used the SqlDataAdapter and the SqlConnection ), and make sure that no connection error has occurred. If an error has occurred, display a message box to the user :
Try Me.CustomerDS1.Clear() Me.SqlDataAdapter1.Fill(Me.CustomerDS1) Catch ee As System.Data.SqlClient.SqlException MessageBox.Show("Refresh Failed. Check With DBA.") End Try
-
Test It!
That's it. Now just hit the F5 key and test your application. When the form comes up, it should already display all the Customer information in the DataGrid . Now, do the following:
-
Click on the Refresh button to make sure it works properly.
-
Bring up the Microsoft SQL Server Service Manager and "pause" the SQL Server you are using ( assuming that no one else is using it right now). What you are doing is creating an error situation for the Try/Catch in the Refresh button logic.
-
Now, click on the Refresh button again. You should see the message box appear indicating that an exception has occurred.
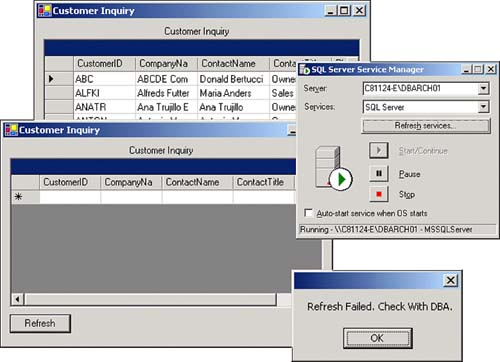
In Figure 13.2 you can see the original form displaying a valid DataGrid of Customer information, the SQL Server Service Manager and the Pause option, and the form encountering the "Refresh Failed" error that we coded for.
Figure 13.2. Customer Inquiry form successful execution, SQL Server Service Manager, and Customer Inquiry form with Refresh Failed exception displayed.
Now, let's change the Try/Catch logic to provide the exact error message number and description that is being returned by the SqlDataAdapter . From the Windows Form designer, double-click on the Refresh button object we built, and change the logic as follows :
Try Me.CustomerDS1.Clear() Me.SqlDataAdapter1.Fill(Me.CustomerDS1) Catch ee As System.Data.SqlClient.SqlException Dim j As Integer For j = 0 To ee.Errors.Count - 1 MessageBox.Show("Error # " & j & ControlChars.Cr & _ "Error: " & ee.Errors(j).ToString() & ControlChars.Cr) Next j End Try Now, once again, hit F5 and test your application as follows:
-
Click on the Refresh button to make sure it works properly.
-
Bring up the Microsoft SQL Server Service Manager and "pause" the SQL Server you are using (assuming that no one else is using it right now). What you are doing is creating an error situation for the Try/Catch in the Refresh button logic.
-
Now, click on the Refresh button again. You should now see the message box appear indicating that an exception has occurred.
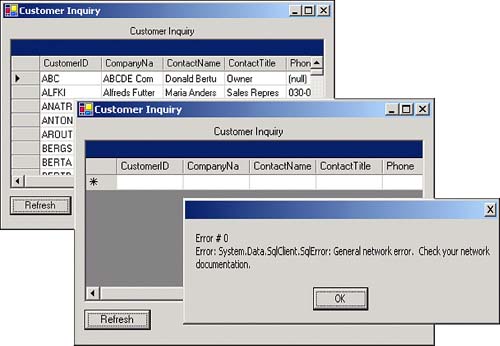
In Figure 13.3 you can see the original form displaying a valid DataGrid of Customer information and the form encountering the Refresh error. This time, we see the full SQL error information in the message box.
Figure 13.3. Customer Inquiry form successful execution and Customer Inquiry form with SQL error message displayed.
| for RuBoard |
EAN: 2147483647
Pages: 237