Flylib.com

Books Software


Creating Text Boxes


Creating Text Boxes

Text boxes can contain one line of free-form textthat is, anything that the visitor wants to typeand are typically used for names , addresses, and the like.

Figure 17.16. While it's essential to set the name attribute for each text box, you only have to set the value attribute when you want to add default values for a text box.
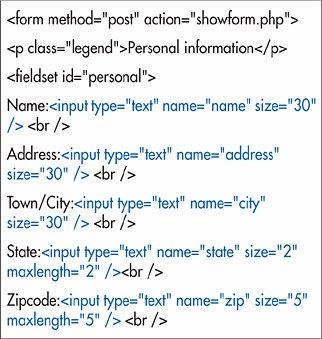

To create a text box:

1.

If desired, type the label that will identify the text box to your visitor (for example, Name: ).

2.

Type <input type="text" .

3.

Type name="label" , where label is the text that will identify the input data to the server (and your script).

4.

If desired, type value="default" , where default is the data that will initially be shown in the field and that will be sent to the server if the visitor doesn't type something else.

5.

If desired, define the size of the box on your form by typing size="n" , replacing n with the desired width of the box, measured in characters .

6.

If desired, type maxlength="n" , where n is the maximum number of characters that can be entered in the box.

7.

Finish the text box by typing a final /> .

Figure 17.17. Text boxes can be different sizes to accommodate different types of fields. We'll straighten these up in just a moment (on page 264).


Tips

  • Even if your visitor skips the field (and you haven't set the default text with the value attribute), the name attribute is still sent to the server (with an undefined, empty value ).

  • The default for size is 20. However, visitors can type up to the limit imposed by the maxlength attribute. Still, for larger, multi-line entries, it's better to use text areas (see page 269) .


Creating Password Boxes

The only difference between a password box and a text box is that whatever is typed in the former is hidden by bullets or asterisks . The information is not encrypted when sent to the server.

Figure 17.18. The name attribute identifies the password when you compile the data.


To create password boxes:

1.

If desired, type the label that will identify the password box to your visitor (for example, Enter password: ).

2.

Type <input type="password" .

3.

Type name="label" , where label is the text that will identify the input data to the server (and your script).

4.

If desired, define the size of the box on your form by typing size="n" , replacing n with the desired width of the box, measured in characters .

5.

If desired, type maxlength="n" , where n is the maximum number of characters that can be entered in the box.

6.

Finish the text box by typing a final /> .

Figure 17.19. When the visitor enters a password in a form, the password is hidden with bullets or asterisks.


Tips

  • Even if nothing is entered in the password box, the name is still sent to the server (with an undefined value ).

  • You could set default text for value (as in step 4 on page 262), but that kind of defeats the purpose of a password.

  • The only protection the password box offers is from folks peering over your visitor's shoulder as she types in her password. To really protect passwords you have to use them on a secure server.


Formally Labeling Form Parts

As you've seen, the explanatory information next to a form element is generally just plain text. For example, you might type "First name" before the text field where the visitor should type her name . (X)HTML provides a method for marking up labels so that you can formally link them to the associated element and use them for scripting or other purposes.

To formally label form parts:

1.

Type <label .

2.

If desired, type for="idname"> , where idname is the value of the id attribute in the corresponding form element.

3.

Type the contents of the label.

4.

Type </label> .

Figure 17.20. Marking field labels in a formal way gives you an easy way to identify them in a CSS style sheet.


Tips

  • If you use the for attribute, you must also add the id attribute to the associated form element's opening tag in order to mark it with a label . (Otherwise, the document will not validate.) For more details about the id attribute, consult Naming Elements on page 63.

  • If you omit the for attribute, no id attribute is required in the element being labeled. The label and the element, in that case, are then associated by proximity, or perhaps by being placed in a common div element.

  • Another labeling technique is to use the title attribute. For more information, consult Labeling Elements in a Web Page on page 68.

  • You can use CSS to format your labels ( Figure 17.21) .

    Figure 17.21. Now I can sweep the labels out of the flow and align the text and password boxes to their right.

    Figure 17.22. The form is beginning to take shape.