Now that you have gained a good grounding in object-oriented basics from first two chapters, we'll push on with a slightly more complex look at how you can build a real application using object-oriented techniques.
Our chosen application is a contact manager that is intended to manage data about individuals and organizations and to enable users to look up and edit contact information associated with them. The discussion in this chapter is designed to present you with a good grounding in the issues behind creating working object-oriented applications. Along the way, it will also demonstrate how the major principles behind the object-oriented paradigm, such as code reuse, encapsulation, inheritance, and of course, abstraction, can be applied.
Creating the Contact Manager
A contact management application enables the user to track individuals and organizations, their contact information (such as address, e-mail, and phone number), and the relationships between them. This is basically what Microsoft Outlook's address book does.
Here's a quick, high-level description of what you might expect from this sort of program:
The application will track information about individuals and organizations in a database and display it on a Web page.
Contacts can have zero or more addresses, e-mail addresses, and phone numbers.
An individual has just one employer (an organization).
An organization has zero or more employees (individuals).
You can now take a look at how to begin putting together this solution using UML. One caveat, however, should be made clear before you begin: This chapter intends to demonstrate how your thinking while designing an application might evolve as you discover new and better ways of implementing the solution. As a result, this chapter should be read more as a progressive evolution and development of the sample application rather than as a straightforward listing of its code. A concrete example such as this can help you gain a better understanding of how the principles of object-oriented programming work.
The Contact Manager UML Diagrams
Fire up the UML diagramming application of your choice and create a new file called ContactManager.[extension], where [extension] is the default file extension for your application (for example, .dia for diagrams created using Dia, and so on).
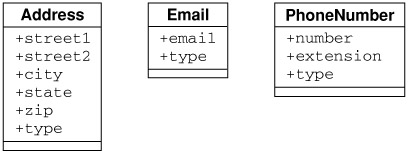
First, create classes for the three different kinds of contact information that you want to represent. In this case, these are address, e-mail address, and phone number classes, but you could create classes for whatever type of contact information you require. Their properties are shown in the following table.
Class
Properties
Address
street1
street2
city
state
zip (ZIP Code)
type (Home, Work, and so on)
EmailAddress
email
type
PhoneNumber
number
extension
type
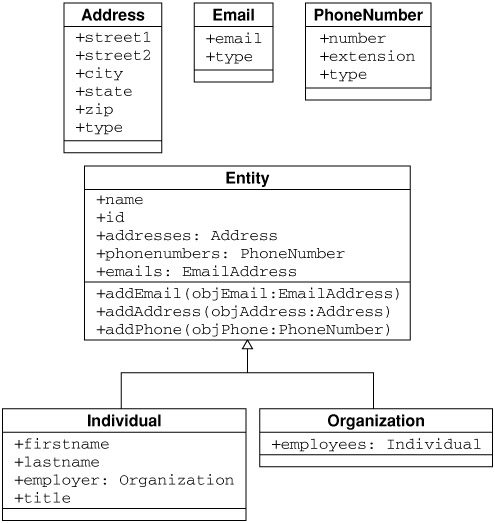
These classes just store and display data, so you don't need to define any methods at this time, and the third sections of the class symbols are empty. The properties are all public, so they're prefixed with a plus sign. Figure 3-1 shows the UML representation of these classes as they are at the moment.
Figure 3-1
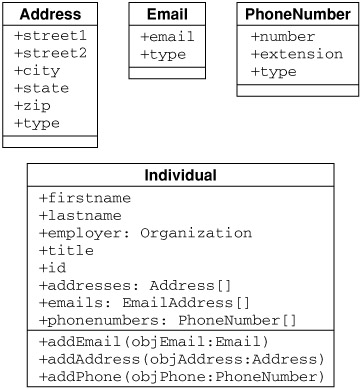
Next, you should map out the Individual and Organization classes. An individual has a first name, a last name, a unique identifier (the id field from the database), a collection (of e-mails, addresses, and phone numbers), an employer, and a job title. You also need to be able to add contact types. Figure 3-2 shows the UML diagram with the Individual class.
Figure 3-2
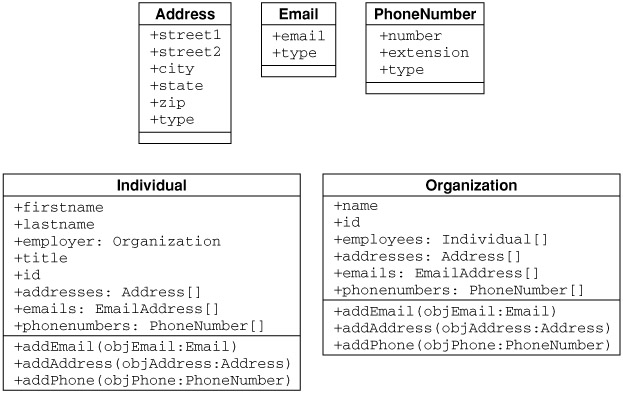
An organization has a name, a unique identifier, collections of contact types (much as an individual does), methods to add them, and a collection of employees. Figure 3-3 shows the UML diagram with the Organization class.
Figure 3-3
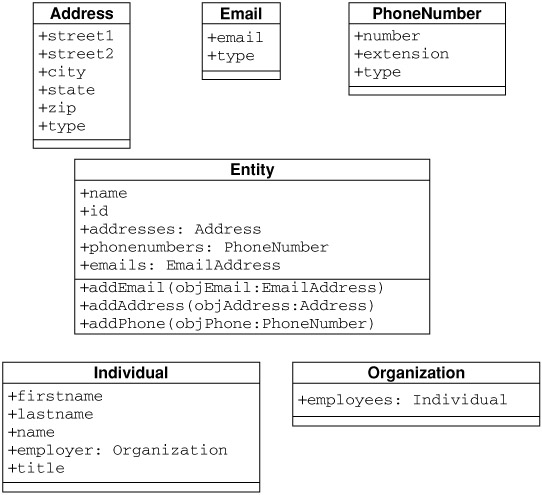
The diagram shows the Individual and Organization classes sharing a lot of the same properties and methods. This is generally an indication that you could save yourself a lot of work and improve the flexibility of your application by using inheritance. You can create another class (Entity, in this example) in which you combine the features common to the Individual and Organization classes and allow them to share the same code. In a UML diagram, you indicate properties and methods only on the class that actually implements them. In this case, you need to move all the common properties and methods of the Individual and Organization classes to the symbol representing the Entity class (see Figure 3-4). You repeat them in the child class (child classes inherit members from their parent classes) only if the child overrides the implementation.
Figure 3-4
In this case, the name property of the Entity class is overridden in the Individual class. When you retrieve the name property of an Individual, you'll return "lastname, firstname''. This way, you can hand the Organization or Individual classes to a function that will just print a name without having to use separate functions.
UML also defines symbols to indicate relationships. In this example, you need something to show that the Individual and Organization classes inherit from the Entity class. As you have seen, the UML specification calls this relationship generalization and indicates it by an open-headed arrow that points from the child class(es) to the parent class, as shown in Figure 3-5.
Figure 3-5
Now it's clear that the Individual and Organization classes inherit from the Entity class. Using connectors to indicate inheritance makes it easy to glance at the diagram and see how the classes relate to one another.
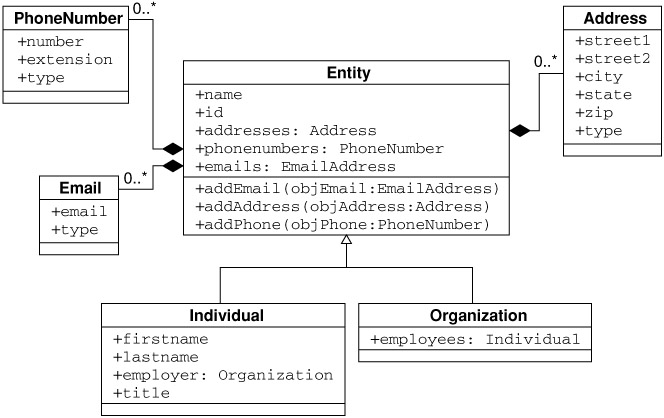
There's another type of connection you need to show the Entity class, which uses the Address, Email, and PhoneNumber classes. The UML specification calls this relationship a composite, and you indicate it by using a black diamond on the end of the line attached to the user of the class (see Figure 3-6). The classes being used also have a property called multiplicity, that is, how many of them are used. In this example, an entity may have zero, one, or more of any of the contact types, so you write 0..* on the connector line closest to the item being used to indicate that a class may have 0 or more of the class to which it points. Figure 3-6 also shows that notation. By revealing this relationship in the diagram, you can clearly see which parts of the application will be affected by a change to another part. Here, a change to the Email, Address, or PhoneNumber classes will have an impact on the Entity, Individual, and Organization classes.
Figure 3-6
An Entity has a PhoneNumber, an Email, and an Address, and in all three cases it may have zero or more of that item. Because Individual and Organization inherit from Entity, both of these also have zero or more of the contact types.
This is the basic structure of the application as we understand it so far. We could, of course, make plenty of improvements to it by thinking of how we actually begin implementing it in real life, there are a few important points to note regarding this, and then, in the next section, we'll work on the application. We present more UML a little later on to give you a clear idea of what the end product looks like.
Recall from the encapsulation discussion in Chapter 1 that it's always a good idea to protect your data in private member variables and use accessor methods to provide access to those properties. Also recall using __get and __set to make this process a bit easier. You can see just by looking at the class diagrams shown earlier that all your classes have fairly simple property requirements. Because you know about inheritance and how to use it to your advantage in PHP, you can remove the functionality from being tied to just the Entity class and create a class that will enable you to reuse its code in other classes in effect, adding another layer of abstraction to facilitate better use of the functions common to all the classes. This parent class will be called PropertyObject.
In the real world, you also would probably want to add a layer of abstraction when dealing with data as a matter of good practice. To this end, creating a DataManager class is probably a good idea. One more thing to consider is that at present you have no unified facility for data validation, so you need an interface for anything that can be validated. Quickly, here's the code for the interface:
<?phpinterface Validator {abstract function validate();}?>
Name the file interface.Validator.php. Now put it to some use with the new PropertyObject class, shown below.
The PropertyObject Class
The code that follows shows how to integrate the Validator interface with the PropertyObject class. Enter the code in a file called class.PropertyObject.php.
<?phprequire_once('interface.Validator.php');abstract class PropertyObject implements Validator {protected $propertyTable = array(); //stores name/value pairs//that hook properties to//database field namesprotected $changedProperties = array(); //List of properties that//have been modifiedprotected $data; //Actual data from//the databaseprotected $errors = array(); //Any validation errors//that might have occurredpublic function __construct($arData) {$this->data = $arData;}function __get($propertyName) {if(!array_key_exists($propertyName, $this->propertyTable))throw new Exception("Invalid property \"$propertyName\"!");if(method_exists($this, 'get' . $propertyName)) {return call_user_func(array($this, 'get' . $propertyName));} else {return $this->data[$this->propertyTable[$propertyName]];}}function __set($propertyName, $value) {if(!array_key_exists($propertyName, $this->propertyTable))throw new Exception("Invalid property \"$propertyName\"!");if(method_exists($this, 'set' . $propertyName)) {return call_user_func(array($this, 'set' . $propertyName),$value);} else {//If the value of the property really has changed//and it's not already in the changedProperties array,//add it.if($this->propertyTable[$propertyName] != $value &&!in_array($propertyName, $this->changedProperties)) {$this->changedProperties[] = $propertyName;}//Now set the new value$this->data[$this->propertyTable[$propertyName]] = $value;}}function validate() {}}?>
Take a closer look at what's happening here. You've created four protected member variables. Protected member variables are visible only to subclasses of a class; they aren't visible to the code that uses those objects.
$propertyTable will contain a map of human-readable property names to field names in your database. Often the names of database fields have been prefixed with a naming convention to indicate their data type. For example, entities.sname1 might be a field in the table entities of type string, containing the first name. However, sname1 isn't a terribly friendly name for an object property, so it's worthwhile providing a mechanism to translate database field naming conventions to friendly property names.
$changedProperties is an array that stores a list of the names of the properties that have been modified.
$data will be an associative array of database field names and values. The array will be supplied to the constructor with the data structure coming directly from pgsql_fetch_assoc(). This approach makes constructing a useful object directly from a database query a lot easier, as you'll see shortly.
The last member variable, $errors, will contain an array of field names and error messages in the event that the validate method (required by the Validate interface) should fail.
The class is declared abstract for two reasons. The first is that the PropertyObject class on its own is not very useful. The classes that extend PropertyObject still have some work to do before you can use its methods. The second is that you have not provided an implementation of the required method validate(). Because you are still labeling that method abstract in PropertyObject, you must also label the class itself abstract, forcing all inheriting classes to implement that function. Anything that attempts to use classes that extend PropertyObject but not implement the function will cause a runtime error.
Next, you see the greatly simplified constructor. The constructor merely accepts the associative array that will most likely be populated from a database query and assigns it to the protected member variable $data. Most subclasses of PropertyObject will need to override the constructor and do something a little more interesting.
Finally, note the internals of the __get() and __set() accessor methods. Because you are storing data in the $data member, you need to be able to map property names to the actual field names in the database. The lines that contain the code $this->data[$this->propertyTable[$propertyName]] are doing just that. By fetching and assigning values to the $data member using their database field names rather than their property names, you are implementing a form of data persistence.
If the workings of the $data and $propertyTable members aren't clear to you yet, don't worry. They will be as soon as you see an example.
The Contact Type Classes
Now that you have the PropertyObject class, you can start putting it to some use. The files that follow are for the Address, EmailAddress, and PhoneNumber classes.
In the code you'll see a reference to a class called DataManager, which will be a wrapper class for all the database functions you need to use. This wrapper enables you to have one central place for all your data-interaction code. You'll examine that class very soon.
Enter the code that follows (the Address class) into a file called class.Address.php:
Because the PropertyObject class took care of so much of the work, only two methods in the Address class needed to be implemented (a __toString() implementation was thrown in just for fun). In the constructor, you see for the first time how the $propertyTable array works. The list of properties required in the class was specified in the Address class UML diagram created during the initial architecture of the application (in the beginning of this chapter). Based on the properties this object has, you can also make some decisions about the structure of the database table. Generally, you need one field for each property and, because this class has to relate back to the Entity class, you need to store some reference to the parent Entity. Use the following SQL statement to create the Address table:
A properly named database field indicates its data type by using a one-character prefix, letting you know what kind of data goes in the field. Having naming conventions is just as important for database design as it is for your code.
The propertyTable array is set up in the Address class to map friendly property names (such as city, state, and zip code) to the less friendly database field names (such as scity, cstate, and spostalcode). Note that you can map multiple property names to the same database field name in propertyTable. This mapping enables you to refer to the primary key of the address by either $objAddress->addressid or $objAddress->id.
What's incredibly exciting about the Address class is that the overwhelming majority of the code is spent implementing business logic and data validation. There's almost no extraneous code here. Its sole responsibility is to populate itself and validate its own contents. Everything else is left up to the DataManager class (which you'll see in detail shortly) and the PropertyObject.
The code for the Email class, which looks very similar, follows. Enter it into a file called class.EmailAddress.php.
This file has very little ancillary code; it's just fetching the code from the database and setting up the propertyTable. Everything else is data validation. Again, the UML diagram was the guide to deciding on the properties of the Email class and the structure of the corresponding database table.
The database table for the entityemail table looks like this:
CREATE TABLE "entityemail" ("emailid" SERIAL PRIMARY KEY NOT NULL,"entityid" int,"semail" varchar(255),"stype" varchar(50),CONSTRAINT "fk_entityemail_entityid"FOREIGN KEY ("entityid") REFERENCES "entity"("entityid"));
The PhoneNumber class works very much like Address and Email. Here's the code to enter the code into class.PhoneNumber.php:
And here's the SQL statement to create the entityphone table:
CREATE TABLE "entityphone" ("phoneid" int SERIAL PRIMARY KEY NOT NULL,"entityid" int,"snumber" varchar(20),"sextension" varchar(20),"stype" varchar(50),CONSTRAINT "fk_entityemail_entityid"FOREIGN KEY ("entityid") REFERENCES "entity"("entityid"));
The DataManager Class
You can now take a look at that DataManager class. It and the other database code samples in this chapter have been using PostgreSQL, although a class like this would work just as well with MySQL, Oracle, or any other RDBMS.
The primary responsibility of the DataManager class is to put all the data access code into a single location, making it much easier to change the database type or connection parameters later on. All the class's methods have been declared static because the class doesn't rely on any member variables. Note the use of the static function variable in getConnection(). This is used to ensure that only one database connection is open during a single page request. Much overhead is associated with establishing a database connection, so eliminating unnecessary connections helps to improve performance. Create a file called class.DataManager.php and enter the following class code:
<?phprequire_once('class.Entity.php'); //this will be needed laterrequire_once('class.Individual.php');require_once('class.Organization.php');class DataManager{private static function _getConnection() {static $hDB;if(isset($hDB)) {return $hDB;}$hDB = pg_connect("host=localhost port=5432 dbname=sample_db user=phpuserpassword=phppass");or die("Failure connecting to the database!");return $hDB;}public static function getAddressData($addressID) {$sql = "SELECT * FROM \"entityaddress\" WHERE\"addressid\"=$addressID";$res = pg_query(DataManager::_getConnection(), $sql);if(! ($res && pg_num_rows($res))) {die("Failed getting address data for address $addressID");}return pg_fetch_assoc($res);}public static function getEmailData($emailID) {$sql = "SELECT * FROM \"entityemail\" WHERE\"emailid\"=$emailID";$res = pg_query(DataManager::_getConnection(), $sql);if(! ($res && pg_num_rows($res))) {die("Failed getting email data for email $emailID");}return pg_fetch_assoc($res);}public static function getPhoneNumberData($phoneID) {$sql = "SELECT * FROM \"entityphone\" WHERE \"phoneid\" = $phoneID";$res = pg_query(DataManager::_getConnection(), $sql);if(! ($res && pg_num_rows($res))) {die("Failed getting phone number data for phone $phoneID");}return pg_fetch_assoc($res);}}?>
The DataManager class provides the data structures used to populate the $data member of your PropertyObject subclasses. Separate functions return the data for each of the types. You'll be adding a few new functions to this class a bit later.
All the methods of this class are declared to be static. Remember, static methods are those requiring all member variables to be static, too. You don't need to instantiate static classes to use their methods. There are several cases in which this makes sense. Consider a class called Math that exposes methods such as squareRoot(), power(), and cosine() and has properties including the mathematical constants e and pi. All instances of this class perform the same math. The square root of 2 doesn't change; 4 raised to the 3rd power will always be 64; and the two constants are, well, constant. There's no need to create separate instances of this class because its state and properties never change. A class called Math implemented in this manner should allow for all its functions to be called statically.
The DataManager class is much the same. All the functions are self-contained. No nonstatic member variables are present for the functions to interact with. The class exposes no properties. You can invoke the methods of the class using the static method operator :: as a result. Because all the methods you've created are static, you need never instantiate the object with $obj = new DataManager() and then call methods using syntax such as $obj->getEmail(). Instead, you can use the simple syntax DataManager::getEmail().
The Entity, Individual, and Organization Classes
With all the supporting classes in place, you can move on to the core of the application: the Entity class and its subclasses.
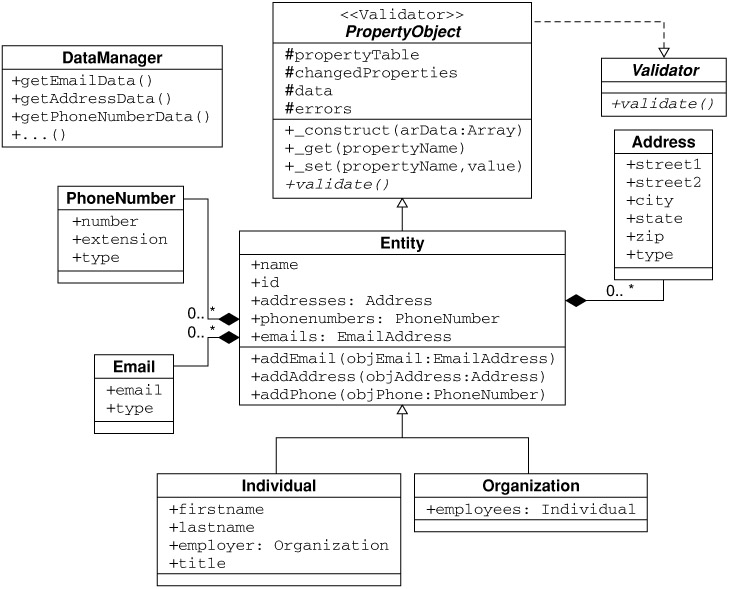
First, make sure that you're updating your UML diagram as you make changes to the object hierarchy so that you keep track of what you, or the development team, are doing. You've created the PropertyObject class and made all your classes subclasses of it, with one exception the new DataManager class, which does not inherit from anything but merely provides data abstraction functionality. The PropertyObject implements an abstract interface called Validator. Figure 3-7 shows the updated diagram.
Figure 3-7
Now you can begin to develop the Entity, Individual, and Organization classes. The following code shows the fully implemented Entity class, class.Entity.php:
<?phprequire_once('class.PropertyObject.php');require_once('class.PhoneNumber.php');require_once('class.Address.php');require_once('class.EmailAddress.php');abstract class Entity extends PropertyObject {private $_emails;private $_addresses;private $_phonenumbers;public function __construct($entityID) {$arData = DataManager::getEntityData($entityID);parent::__construct($arData);$this->propertyTable['entityid'] = 'entityid';$this->propertyTable['id'] = 'entityid';$this->propertyTable['name1'] = 'sname1';$this->propertyTable['name2'] = 'sname2';$this->propertyTable['type'] = 'ctype';$this->_emails = DataManager::getEmailObjectsForEntity($entityID);$this->_addresses = DataManager::getAddressObjectsForEntity($entityID);$this->_phonenumbers =DataManager::getPhoneNumberObjectsForEntity($entityID);}function setID($val) {throw new Exception('You may not alter the value of the ID field!');}function setEntityID($val) {$this->setID($val);}function phonenumbers($index) {if(!isset($this->_phonenumbers[$index])) {throw new Exception('Invalid phone number specified!');} else {return $this->_phonenumbers[$index];}}function getNumberOfPhoneNumbers() {return sizeof($this->_phonenumbers);}function addPhoneNumber(PhoneNumber $phone) {$this->_phonenumbers[] = $phone;}function addresses($index) {if(!isset($this->_addresses[$index])) {throw new Exception('Invalid address specified!');} else {return $this->_addresses[$index];}}function getNumberOfAddresses() {return sizeof($this->_addresses);}function addAddress(Address $address) {$this->_addresses[] = $address;}function emails($index) {if(!isset($this->_emails[$index])) {throw new Exception('Invalid email specified!');} else {return $this->_emails[$index];}}function getNumberOfEmails() {return sizeof($this->_emails);}function addEmail(Email $email) {$this->_emails[] = $email;}public function validate() {//Add common validation routines}}?>
By moving all the accessor method functionality to the parent PropertyObject class, you simplify the Entity class and ensure that it is focused only on the code required to implement an entity.
The Entity class is declared abstract because it isn't useful on its own. All entities are either Individuals or Organizations. You do not want to be able to instantiate objects of class Entity. Declaring it abstract prevents the class from being instantiable.
To create the PostgreSQL table entities, run the following SQL statement:
CREATE TABLE "entities" ("entityid" SERIAL PRIMARY KEY NOT NULL,"name1" varchar(100) NOT NULL,"name2" varchar(100) NOT NULL,"type" char(1) NOT NULL);
You've added requests to a few new functions of the DataManager: getEntityData() and get[x]ObjectsForEntity. getEntityData() returns the data required to instantiate an entity, just as functions you've already seen do for the contact types. The following shows the code for the new functions in class.DataManager.php:
// top of file omitted for brevity . . . die("Failed getting phone number data for phone $phoneID"); } return pg_fetch_assoc($res); } public static function getEntityData($entityID) {$sql = "SELECT * FROM \"entities\" WHERE\"entityid\" =$entityID";$res = pg_query(DataManager::_getConnection(),$sql);if(! ($res && pg_num_rows($res))) {die("Failed getting entity $entityID");}return pg_fetch_assoc($res);} ?>
To add the get[x]ObjectsForEntity functions, place the following code at the end of class.DataManager.php, just after the getEntityData function:
public static function getAddressObjectsForEntity($entityID) {$sql = "SELECT \"addressid\" from \"entityaddress\" WHERE \"entityid\"=$entityID";$res = pg_query(DataManager::_getConnection(), $sql);if(!$res) {die("Failed getting address data for entity $entityID");}if(pg_num_rows($res)) {$objs = array();while($rec = pg_fetch_assoc($res)) {$objs[] = new Address($rec['addressid']);}return $objs;} else {return array();}}public static function getEmailObjectsForEntity($entityID) {$sql = "SELECT \"emailid\" from \"entityemail\"WHERE \"entityid\" = $entityID";$res = pg_query(DataManager::_getConnection(), $sql);if(!$res) {die("Failed getting email data for entity $entityID");}if(pg_num_rows($res)) {$objs = array();while($rec = pg_fetch_assoc($res)) {$objs[] = new EmailAddress($rec['emailid']);}return $objs;} else {return array();}}public static function getPhoneNumberObjectsForEntity($entityID) {$sql = "SELECT \"phoneid\" from \"entityphone\"WHERE \"entityid\" = $entityID";$res = pg_query(DataManager::_getConnection(), $sql);if(!$res) {die("Failed getting phone data for entity $entityID");}if(pg_num_rows($res)) {$objs = array();while($rec = pg_fetch_assoc($res)) {$objs[] = new PhoneNumber($rec['phoneid']);}return $objs;} else {return array();}}
These functions take an entity ID value. They query the database to determine whether any e-mails, addresses, or phone numbers exist for the entity in question. If they do, the functions build an array of EmailAddress, Address, or PhoneNumber objects by passing each id to the constructor for the appropriate object type. This array is then passed back to the Entity object, where it is stored in the appropriate private member variable.
With the Entity class doing all the heavy lifting, the remaining work is fairly simple: You just need to implement the Individual and Organization classes. Create a file called class.Individual.php and enter the following:
<?phprequire_once('class.Entity.php');require_once('class.Organization.php');class Individual extends Entity {public function __construct($userID) {parent::__construct($userID);$this->propertyTable['firstname'] = 'name1';$this->propertyTable['lastname'] = 'name2';}public function __toString() {return $this->firstname. ' '. $this->lastname;}public function getEmployer() {return DataManager::getEmployer($this->id);}public function validate() {parent::validate();//add individual-specific validation}}?>
Short and sweet. Inheritance makes this easy. The Individual class sets up a few new properties that make accessing the first and last name of the individual easier, instead of having to use the rather ugly name1 and name2 properties defined in the Entity class. It also defines a new method, getEmployer(), which requires a new function in the DataManager. You get to that function as soon as you have your Organization class, which is shown in the following code. Create a file called class.Organization.php and enter this code into it:
<?phprequire_once('class.Entity.php');require_once('class.Individual.php');class Organization extends Entity {public function __construct($userID) {parent::__construct($userID);$this->propertyTable['name'] = 'name1';}public function __toString() {return $this->name;}public function getEmployees() {return DataManager::getEmployees($this->id);}public function validate() {parent::validate();//do organization-specific validation}}?>
Again, this is a fairly simple class, thanks to the power of inheritance. You declare a property called name that makes it easier to obtain the one and only name that an organization has (the sname2 property goes unused for organizations).
To add the functions getEmployer() and getEmployee() to the DataManager class, append the following code to the end of class.DataManager.php:
public static function getEmployer($individualID) {$sql = "SELECT \"organizationid\" FROM \"entityemployee\""."WHERE \"individualid\" = $individualID";$res = pg_query(DataManager::_getConnection(),$sql);if(! ($res && pgsql_num_rows($res))) {die("Failed getting employer info for individual $individualID");}$row = pgsql_fetch_assoc($res);if($row) {return new Organization($row['organizationid']);} else {return null;}}public static function getEmployees($orgID) {$sql = "SELECT \"individualid FROM \"entityemployee\" " ."WHERE \"organizationid\" = $orgID";$res = pgsql_query(DataManager::_getConnection(), $sql);if(! ($res && pgsql_num_rows($res))) {die("Failed getting employee info for org $orgID");}if(pgsql_num_rows($res)) {$objs = array();while($row = pgsql_fetch_assoc($res)) {$objs[] = new Individual($row['individualid']);}return $objs;} else {return array();}}
These two functions rely on the presence of a table called entityemployee, shown following. This table relates individuals to the organizations by which they are employed. For example, employees of the same company would have different individual ids but the same organization ids:
CREATE TABLE "entityemployee" ("individualid" int NOT NULL,"organizationid" int NOT NULL,CONSTRAINT "fk_entityemployee_individualid"FOREIGN KEY ("individualid") REFERENCES "entity"("entityid"),CONSTRAINT "fk_entityemployee_organizationid"FOREIGN KEY ("organizationid") REFERENCES "entity"("entityid"));
One last function is needed to make the entire system work the DataManager method for listing all the entities in the database. It's called getAllEntitiesAsObjects() and it finishes all the work you need to do on your objects:
public static function getAllEntitiesAsObjects() {$sql = "SELECT \"entityid\", \"type\" from \"entities\"";$res = pgsql_query(DataManager::_getConnection(), $sql);if(!$res) {die("Failed getting all entities");}if(pgsql_num_rows($res)) {$objs = array();while($row = pgsql_fetch_assoc($res)) {if($row['type'] == 'I') {$objs[] = new Individual($row['entityid']);} elseif ($row['type'] == 'O') {$objs[] = new Organization($row['entityid']);} else {die("Unknown entity type {$row['type']} encountered!");}}return $objs;} else {return array();}}
DataManager enables you to enumerate over all the contacts in your system. It examines the value of the ctype field in the entity table to determine whether the entry is an Individual or an Organization and then instantiates an object of the appropriate type and adds it to the array that the function returns.
Making Use of the System
By now you can see the real power of an OOP approach. The following code, called test.php, will display a view of all the contacts in your database with all their contact details:
<?phprequire_once('class.DataManager.php'); //everything gets included by itfunction println($data) {print $data . "<br>\n";}$arContacts = DataManager::getAllEntitiesAsObjects();foreach($arContacts as $objEntity) {if(get_class($objEntity) == 'individual') {print "<h1>Individual - {$objEntity->__toString()}</h1>";} else {print "<h1>Organization - {$objEntity->__toString()}</h1>";}if($objEntity->getNumberOfEmails()) {//We have emails! Print a headerprint "<h2>Emails</h2>";for($x=0; $x < $objEntity->getNumberOfEmails(); $x++) {println($objEntity->emails($x)->__toString());}}if($objEntity->getNumberOfAddresses()) {//We have addresses!print "<h2>Addresses</h2>";for($x=0; $x < $objEntity->getNumberOfAddresses(); $x++) {println($objEntity->addresses($x)->__toString());}}if($objEntity->getNumberOfPhoneNumbers()) {//We have phone numbers!print "<h2>Phones</h2>";for($x=0; $x < $objEntity->getNumberOfPhoneNumbers(); $x++) {println($objEntity->phonenumbers($x)->__toString());}}print "<hr>\n";}?>
We leave the job of entering data into your tables to you, because it will help you to figure out how everything goes together. You may want to try to imitate the results shown (by navigating to test.php in your browser) in Figure 3-8.
Figure 3-8
In only 36 lines of code you can display nearly everything there is to show about the entities in your system. Employer and employees aren't shown here; again, we leave that as an exercise for you to try. The line that calls the get_class function in test.php will give you some ideas for figuring out which class you're dealing with so that you'll know whether to call getEmployer() on an Individual,or getEmployees() on an Organization.