Shooting Better Movies
| Before you shoot anything, become familiar with the operation of your camera, audio gear, lights, and other equipment. And, like a Boy Scout, be prepared for anything. So here are some before-the-shoot tips I find helpful.
If you keep all of your gear in a bag, ready for action, you can just grab it and go. I keep my camcorder, spare batteries, tapes, and a small microphone in a small camera bag. I just carry the whole thing with me whenever I think I might see something worth shooting. If I need additional gear for a particular shoot, I have a rather large duffel bag I can lug instead.
And that's the end of my little sermon. Sounding offMany new filmmakers make the mistake of thinking audio isn't as important as video, and that if you just point the camera at the action, the sound recorded through your camcorder's microphone will be good enough. And it is, at least for some things. But even if it's a great mic, it's still attached to the camcorder. So, as I said in Chapter 2, if there's a lot of ambient noise or if your subject isn't near the camera or speaks quietly, the audio you record will suffer.
Good sound gives you options; bad sound is hard to fix after the fact. Think of it this way: The sound can't possibly be too good, but it can easily be too bad. If you get good audio in the field, you'll have far more options when you edit and "sweeten" the audio.
So how do you record field audio that sounds great? The first rule is to get the microphone as close to the speaker as possible.
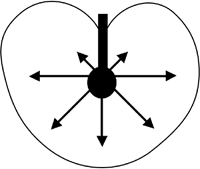
Second, most camcorders have a headphone jack. Use it. Get some headphones and start wearing them before you roll any tape, and keep them on while you shoot. Listen for buzzing, humming, and other types of interference as well as for natural sounds and sound levels. Electronic equipment, neon signs, and all kinds of other devices can wreak havoc with microphones. If you don't listen, you won't know…at least not until it's too late. Mister MicrophoneThe key to capturing good live audio is to use the right microphone for the job. Don't rely on your camcorder's built-in mic for critical audio. Even an inexpensive mic, if placed properly, will do a better job. There are several types of microphone. Here's a quick run-down designed to help you choose the one (or more) that will be most useful to your shooting style. A cardioid microphone has a heart-shaped pickup pattern that is more sensitive to sound coming from the front and sides than sound coming from behind. Here's my rendition of what a cardioid mic and its pickup pattern look like:
If extraneous noise is a concern, a directional microphone is an option. Directional mics have a focused pickup pattern. An extreme example is a shotgun mic, which has a long, narrow, tightly-focused pickup pattern, like this:
Super-cardioid mics are a versatile type of directional mic, and may be what came mounted on your camcorder. Their pickup pattern looks something like this:
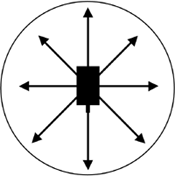
Then there are omni-directional microphones, which pick up sound from all directions equally, like this:
You might also consider a boom, the fishing-pole-like contraption that lets you dangle the microphone just out of the shot. Sometimes nothing else will do. Many good microphones come with foam covers, often gray in color, that look like head covers for golf clubs. Although they do provide some protection, they're actually windscreens, and can filter out wind and breathing noises.
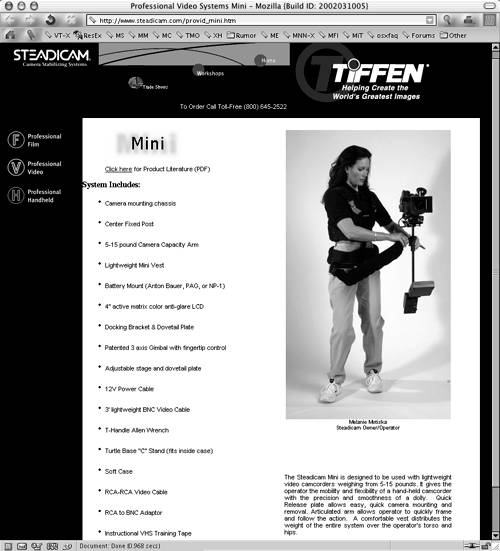
Ready, steady, goWe've all seen home movies where the picture jumps around as the cameraperson (bless their heart) walks around obliviously, swinging the camera hither and yon, bobbing and weaving like Muhammad Ali in his heyday. So unless you're filming a documentary about an earthquake, you know to avoid jittery scenes and poorly framed shots. Without spending big bucks for a camera stabilizer unit like the Steadicam shown in Figure 4.1, there are things you can do if you absolutely must move the camera while tape is rolling. Figure 4.1. Steadicam makes camera stabilizing systems like this one.
One inexpensive way to minimize jumpiness is the "poor man's Steadicam," otherwise known as a tripod. Tripods are widely available, and prices start well under $100. If you can use a tripod for a particular shot, you should. The resulting video will look much more professional. A tripod won't help for fancy stuff like "follow shots," or "crane shots," but you can pan or tilt if you must (remember to do it slowly and smoothly).
If you don't need to move the camera and you don't have a tripod, look for a solid surface to lean against a tree, table, fence, rail, low wall, car hood, or whatever. When working tripod-free, you should stabilize the camera with a stationary object whenever you can. If you have to move the camera while tape's rolling and you aren't using a tripod, be very aware of the camera and its position. Move as smoothly and slowly as you can, with your elbows locked to your sides to provide additional stabilization. With practice, you can minimize most camera jitter and jumpiness, and you might even develop a usable style.
Zoom-zoomAnother way to make your footage look better is to keep your finger off the darn Zoom button. Unless you're attempting the psychedelic look, don't zoom when you can avoid it.
Of course there are exceptions. Sometimes it's necessary to do a lot of zooming (sporting events, kids playing, and so forth). If you're shooting something or someone from a distance, you can zoom in until the subject is framed the way you like. And if you must zoom, zoom slowly if you plan to include the zooming part in your movie. Later you can edit out the zoom part if you want. Finally, if your camcorder offers both optical and digital zoom, turn off the digital zoom if you can it will only cause you heartache. Because digital zoom uses interpolation to "guess" what the far away object actually looks like, the digital zoom introduces noise and artifacts that leave you with an unidentifiable blob where you thought you were filming the subject. So just turn it off and forget you have it. For the most part go easy on the zoom. And when you're editing, consider every zoom on the tape a prime candidate for cutting. |