Moving Reports and Supporting Files to the Report Server
Now that you know how to create folders, it is time to put some content in those folders. You do this by moving reports and their supporting files from the development environment to the Report Server. This can be done using a number of different methods. We will look at two of those methods now: using Visual Studio and using the Report Manager.
Deploying Reports Using Visual Studio
The most common method of moving reports to the Report Server is by using Visual Studio. Once you are satisfied with a report you have developed, you can make it available to your users without leaving the development environment. This ability to create, preview, and deploy a report from a single authoring tool is a real plus.
Deploying Reports in the Chapter09 Project Using Visual Studio
Let’s try deploying the report project from Chapter 9. To do so, follow these steps:
-
Start Visual Studio and open the Chapter09 project.
-
Select Project | Chapter09 Properties from the main menu. The Chapter09 Property Pages dialog box will appear.
-
Type Galactic Delivery Services/Chapter 09 for TargetFolder. This is the folder into which the report will be deployed.
-
Type http://ComputerName/ReportServer for TargetServerURL, where ComputerName is the name of the computer where the Report Server is installed. You should replace “http:” with “https:” if you are using a secure connection. You can use “localhost” in place of the computer name if the Report Server is installed on the same computer you are using to run Visual Studio (see Figure 10-3).
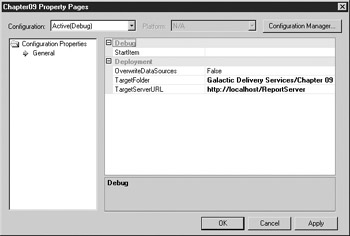
Figure 10-3: The Chapter09 Property Pages dialog box -
Click OK to exit the Chapter09 Property Pages dialog box.
-
Right-click the Chapter09 project entry in the Solution Explorer and select Deploy from the context menu.
-
Visual Studio will build all the reports in the project and then deploy all the reports, along with their supporting files, to the Report Server. (During the build process, Visual Studio checks the report for any errors that would prevent it from executing properly on the Report Server.) The results of the build and deploy will be shown in the Visual Studio Output window.
-
Open the Report Manager in your browser. Click the Galactic Delivery Services folder to view its content. You will see that Visual Studio created a new folder in the Galactic Delivery Services folder called Chapter 09.
-
Click the Chapter 09 folder to view its content. All the items in the Chapter09 project—three reports and a shared data source—were deployed.
-
Click the RenderingTest report. You will see the HTML version of the RenderingTest report.
Note You can also deploy the contents of a project by selecting Build | Deploy Solution or Build | Deploy {Project Name} from the main menu.
Working Through the Web Service
When Visual Studio deploys reports, it works through the Reporting Services web service. The Report Manager web application provides a human interface to Reporting Services. The web service provides an interface for other programs to communicate with Reporting Services. Because Visual Studio falls into the latter of these two categories, it uses the web service to deploy reports.
The web service has a different URL than the Report Manager. You must enter the URL for the web service and not the Report Manager in the Properties Pages dialog box in order for the deployment to work properly. The default URL for the web service is shown in step 4 in the previous section.
Creating Folders While Deploying
In steps 2 through 5, you entered information into properties of the Chapter09 project. These values tell Visual Studio where to put the reports and supporting items when the project is deployed. In this case, you instructed Visual Studio to put our reports and shared data source in the Chapter 09 folder within the Galactic Delivery Services folder.
You created the Galactic Delivery Services folder in the previous section. You did not create the Chapter 09 folder. Instead, Visual Studio created that folder for us as it deployed the items in the project. In fact, Visual Studio will create folders for any path you specify.
Deploying a Single Report
In step 6, you used the project’s context menu to deploy all the items in the project. Alternatively, you could have right-clicked a report and selected Deploy from the report’s context menu. However, this would have deployed only this report, not the entire project.
On some occasions, you will want to deploy a single report rather than the entire project. At times, one report will be completed and ready for deployment while the other reports in the project are still under construction. At other times, one report will be revised after the entire project has already been deployed. In these situations, it is only necessary to redeploy the single revised report.
Deploying Shared Data Sources
Even when a single report is deployed, any shared data sources used by that report are automatically deployed along with it. This only makes sense. A report that requires shared data sources will not do much if those shared data sources are not present.
If you look back at Figure 10-3, you will notice an OverwriteDataSources item in the dialog box. This controls whether a shared data source that has been deployed to the Report Server is overwritten by subsequent deployments. In most cases, shared data sources do not change, so they do not need to be overwritten. For this reason, OverwriteDataSources is set to False, meaning “Do not overwrite existing data sources.”
Aside from saving unnecessary effort, not overwriting data sources also helps out in another way. Consider the environment shown in Figure 10-4. In this environment, reports are developed in Visual Studio using a shared data source that points to a development database server. Once the first version of the report is completed, it is deployed to a production Report Server, as shown in Figure 10-5. As soon as the deployment is complete, the shared data source on the production Report Server needs to be changed to point to the production database server. This is shown in Figure 10-6.
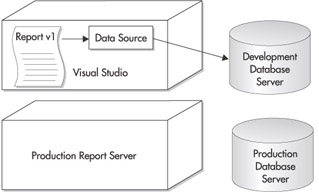
Figure 10-4: A report and shared data source ready to deploy
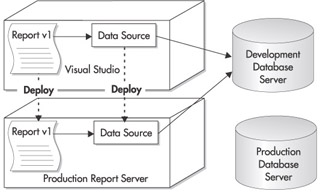
Figure 10-5: Deploying the report and shared data source
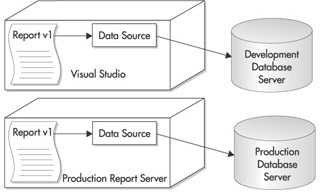
Figure 10-6: Modifying the shared data source to point to the production database server
Now, as time has passed, a new version of the report (version 2) is created in the development environment. This time, when version 2 of the report is deployed to the production Report Server, the shared data source already exists there. If OverwriteDataSources is set to True, the data source from the development environment would overwrite the data source in the production environment, and we would be back to the situation in Figure 10-5. With this setting, we would have to redirect the shared data source each time a report is deployed.
To avoid this, OverwriteDataSources is set to False. Now when version 2 of the report (and subsequent versions) is deployed to the production Report Server, the shared data source is not overwritten. It remains pointing to the production database server. This is shown in Figure 10-7. We have saved a bit of extra effort with each deployment.
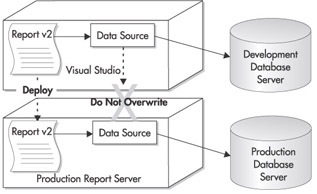
Figure 10-7: A subsequent deployment with OverwriteDataSources set to False
Additional Properties in the Property Pages Dialog Box
If you look back at Figure 10-3, you will see a couple additional items in the Property Pages dialog box that we have not discussed. We will take a look at those two items now.
Maintaining Multiple Configurations At the top of the dialog box is the Configuration drop-down list. This drop-down list allows you to maintain several different deployment configurations for the same project. Each configuration has its own values for TargetFolder, TargetServerURL, and the other settings in the dialog box.
This is useful if you need to deploy the reports in a project to more than one Report Server. Perhaps you have the Report Server loaded on your own PC for your own testing, a development Report Server where the report will undergo quality assurance testing, and a production Report Server where the report will be made available to the end users. You can enter the properties for deploying to the Report Server on your PC in the DebugLocal configuration, the properties for deploying to the development Report Server in the Debug configuration, and the properties for deploying to the production Report Server in the Production configuration.
You can then easily switch between deploying to each of these Report Servers as new versions of your reports go from your own testing to quality assurance testing and are then made available to the users. You can change the configuration you are using for deployment through the Solution Configurations drop-down list in the Visual Studio toolbar, as shown in Figure 10-8.
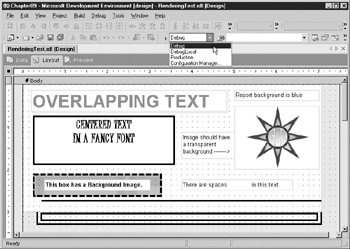
Figure 10-8: The Solution Configurations drop-down list
| Note | “Active(Debug)” in the Configuration drop-down list simply refers to the Debug configuration that is currently the selected or active configuration. |
Running a Report Project The final item we want to look at in the Project Property Pages dialog box is StartItem, which is used when running your report project.
Use the StartItem drop-down list to select which report from your project will be executed when you run the project. The report selected as the “start item” will be displayed in a browser window in HTML format.
When you run a report project, you deploy all the reports in the project to the target server and target folder in your active configuration. Once the deployment is complete, the report specified as the start item is executed in a browser window. You can then “debug” this report, making sure it looks correct and functions properly in HTML format. You can run the project by clicking the Start button on the toolbar (to the left of the Solution Configuration drop-down list) or by selecting any of the following items from the Debug menu (or by pressing any of the shortcut keys that correspond to these menu items):
-
Start
-
Start Without Debugging
-
Step Into
-
Step Over
There really is no such thing as stepping into or over a report. These menu items simply run the project. The report selected as the start item is executed in a browser window from start to finish.
Uploading Reports Using Report Manager
Another common method of moving a report to the Report Server is by using the Report Manager. This is known as uploading the report. Deploying reports from Visual Studio can be thought of as pushing the reports from the development environment to the Report Server, whereas uploading reports from the Report Manager can be thought of as pulling the reports from the development environment to the Report Server.
You may need to use the Report Manager upload in situations where your report authors do not have rights to deploy reports on the Report Server. The report authors create their reports and test them within Visual Studio. When a report is completed, the report author can place the RDL file for the report in a shared directory or send it as an e-mail attachment to the Report Server administrator. The Report Server administrator can upload the RDL file to a quality assurance Report Server and test the report for clarity, accuracy, and proper use of database resources. Once the report has passed this review, the Report Server administrator can upload the report to the production Report Server.
Uploading Reports in the Chapter06 Project Using the Report Manager
Let’s try uploading some of the reports from the Chapter06 report project:
-
Open the Report Manager in your browser. Click the Galactic Delivery Services folder to view its content.
-
Create a new folder called Chapter 06.
-
Select the new folder to view its contents.
-
Click the Upload File button in the toolbar on the Content tab. The Upload File page will appear, as shown in Figure 10-9.
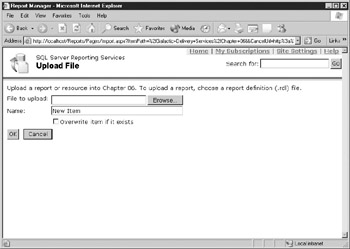
Figure 10-9: The Upload File page -
Click Browse. The Choose File dialog box will appear.
-
Navigate to the folder where you created your solution for Chapter 6. If this folder is in the default location, you will find it under the following path:
My Documents\Visual Studio Projects\MSSQLRS\Chapter06
-
Select the Nametags report (Nametags.rdl) and click Open to exit the Choose File dialog box.
-
Click OK to upload the file.
-
The Nametags report has been uploaded to the Chapter 06 folder.
-
Click the Nametags report to execute it. You will see an error similar to the one in Figure 10-10. You received this because, unlike the deployment in Visual Studio, the upload in Report Manager did not bring the shared data source along with the report.
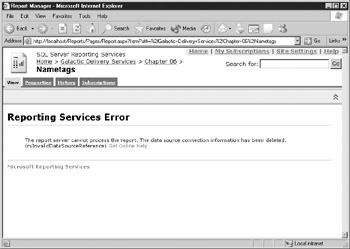
Figure 10-10: The Reporting Services error page -
Click the link to the Chapter 06 folder at the top of the page.
Creating a Shared Data Source in the Report Manager
In order to get the Nametags report functioning, we need to provide it with a shared data source. One way to do this is to create a new shared data source using the Report Manager. Follow these steps:
-
Click the New Data Source button in the toolbar on the Content tab. The New Data Source page for a shared data source will appear, as shown in Figure 10-11 and Figure 10-12.
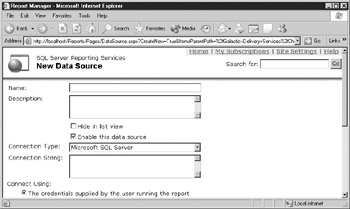
Figure 10-11: The New Data Source page (top)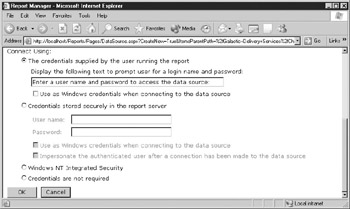
Figure 10-12: The New Data Source page (bottom) -
Type Galactic for Name.
-
Type Connection to the Galactic Database for Description.
-
Make sure Microsoft SQL Server is selected in Connection Type. Other options here are OLE DB, Oracle, and ODBC.
-
Type data source=(local);initial catalog=Galactic for Connection String. If the Galactic database is not on the Report Server but rather is on a different computer, put the name of that computer in place of “(local)” in the connection string.
Note Do not include the parentheses if you use a computer name in place of “(local)”.
-
Select the option Credentials Stored Securely in the Report Server.
-
Type GalacticReporting for User Name.
-
Type gds for Password.
-
Click OK to save the data source and return to the Chapter 06 folder.
-
Click the Nametags report to execute it. You will receive the same error message page because we have not yet told the report to use our new data source.
-
Select the Properties tab. The properties page for the Nametags report will appear.
-
Click the Data Sources link on the left side of the screen. The Data Sources page for an individual report will appear.
-
A shared data source should be selected. Click Browse. The Select a Shared Data Source page will appear.
-
Expand each folder in the tree view under Location until you can see the Galactic shared data source in the Chapter 06 folder. Click the Galactic shared data source. The path to the Galactic shared data source will be filled in Location. (You can also type this path into Location if you do not want to use the tree view.)
-
Click OK to exit the Select a Shared Data Source page.
-
Click Apply at the bottom of the page.
Note It is very easy to forget to click Apply when making changes to a report’s data sources. If you do not click Apply, none of your changes will be saved. This can lead to confusion, frustration, and wasted troubleshooting time. At least, that is what I have been told.
-
Select the View tab to view the report. The report will now generate using the new shared data source. (There will be a red X where the GDS logo is supposed to be. We will deal with this later.)
-
Once the report has completed generating, click the Chapter 06 link at the top of the page.
Hiding an Item
Figure 10-13 shows the list view of the Chapter 06 folder. The Galactic shared data source appears in the left column. Shared data sources have a globe and screen icon. The Nametags report appears in the right column. Reports have an icon showing a piece of paper with two columns.

Figure 10-13: The Chapter 06 folder list view
When users are browsing through folders to find a report, you may not want other items such as shared data sources cluttering things up. It makes more sense to have the shared data sources where the reports can use them, but out of sight of the users. Fortunately, Report Manager provides a way to do just that:
-
Click the Galactic data source. The Data Source Edit page will appear.
-
Check the Hide in List View check box.
-
Click Apply to save this change.
-
Click the Chapter 06 link at the top of the page.
The Galactic data source is no longer visible in the list view. You can use this same technique to hide reports you do not want to have generally available to users browsing through the folders.
If you do need to edit the Galactic data source, you can view it by using the detail view of the folder. Follow these steps:
-
Click the Show Details button in the toolbar on the Contents tab. The Galactic data source is now visible in this detail view, as shown in Figure 10-14. By default, the detail view is in alphabetical order by name.
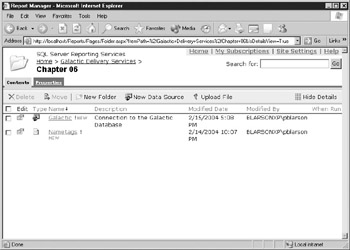
Figure 10-14: The Chapter 06 folder detail view -
Click the Type column heading. The detail view is now sorted by type in ascending order. (In an ascending sort by type, the reports are at the top of the list, with supporting items, such as shared data sources, at the bottom.) Note that the downward, black arrow is now next to the Type column heading on your screen.
-
Click the Type column heading again. The detail view is now sorted by type in descending order. Now the black arrow is pointing upward next to the column heading.
Note The name of the sort order (ascending or descending) and the direction of the black arrow may seem to be opposite to one another. Just remember this: In an ascending sort, you move from smaller values (A, B, C…) to larger values (…X, Y, Z). When you move through the list in the direction of the arrow, you also move from smaller values to larger values.
-
Click the Modified Date column heading. The detail view is sorted by modified date in ascending order. You can sort the detail view by Type, Name, Description, Modified Date, Modified By, or When Run, in either ascending or descending order.
-
Click the Hide Details button in the toolbar on the Contents tab. You are back to the list view.
Connect Using Options
When you are accessing data from a server-based database such as SQL Server or Oracle, you need to provide some type of credentials, usually a user name and password, to show that you have rights to access the data. Keeping these credentials secure is an important concern. The shared data sources created on the Report Server provide several methods for specifying these credentials.
When entering the connection string into a shared data source, it is best not to include the credentials in the connection string itself. The connection string is displayed as plain text to anyone who views the Data Source Edit page. To better protect password information, always enter the credential information under one of the Connect Using options described here.
Credentials Supplied by the User The first Connect Using option is to have the user enter the credentials required by the data source each time the report is run. This is the Credentials Supplied By the User Running the Report option. You can specify the prompt that will be presented each time the user must enter these credentials. If the Use as Windows Credentials When Connecting to the Data Source check box is checked, the user name and password entered by the user are treated as a Windows login. This means the user name and password provide database access using Windows Integrated security. If this check box is not checked, the user name and password are treated as a database login.
Having the user enter the credentials each time the report is run is the most secure option. There is no login information stored with the data source. However, most users are not pleased with a system where they must enter login information each time they run a report. This option may be appropriate when your organization’s security policy forbids storing login information in any way. In most other cases, the other Connect Using options provide a better solution.
Credentials Stored in the Report Server The next option allows you to have the user name and password stored in the Report Catalog on the Report Server. This is the Credentials Stored Securely in the Report Server option. The user name and password entered with this option are encrypted when they are stored in the Report Catalog. Also, the password is not displayed to the user in the Data Source Edit page.
This Connect Using option is convenient for the user because they do not need to remember and enter credentials to run reports using this data source. It also provides the required security for most situations through the measures noted in the previous paragraph.
As with the first Connect Using option, there is a Use as Windows Credentials When Connecting to the Data Source check box here as well. If this check box is checked, the user name and password stored in the Report Catalog are treated as a Windows login. If this check box is not checked, the user name and password are treated as a database login.
The second check box under this Connect Using option is Impersonate the Authenticated User After a Connection Has Been Made to the Data Source. If this check box is checked, the data source can use these credentials to impersonate this user. Not all database servers support this type of delegation of credentials. Consult the documentation for your specific Report Server for more information.
Integrated Security If you are not comfortable with storing credentials in the Report Catalog, but you do not want your users entering credentials every time a report is run, integrated security may be the solution for you. The Windows NT Integrated Security option does not require the user to enter credentials. Instead, it takes the Windows login credentials that allowed the user to access the Report Manager and passes them along to the database server. Your database server, of course, needs to be set up to accept these credentials.
Integrated security will always work when the data source exists on the same server as the Report Server. It may run into problems, however, if the data source is on another server. The problems are caused by the way integrated security works between servers.
For a better understanding of the problems with integrated security, let’s look at an example of the way integrated security works. The user logs in to their computer. This computer knows everything about this user because the original authentication occurred here.
When the user accesses the Report Manager application, the user’s credentials are passed from their computer to the computer hosting the Report Server. However, using standard Windows security, not everything about this login is passed to the Report Server computer; only enough to authenticate the user. Some sensitive information does not make this hop across the network.
When the user runs a report with a data source using integrated security, the Report Server must pass on the credentials to the database server. However, the Report Server does not have the complete credentials to pass along. In fact, it does not know enough about the user to successfully authenticate them on the database server. The authentication on the database server will fail. Using standard Windows security, integrated security only works across one hop, from the original authenticating computer to a second computer. In the case of the Report Manager, this is the hop from the user’s computer to the Report Server.
In order to get integrated security to work across more than one hop, your Windows domain must use a special kind of security known as Kerberos, which allows authentication across multiple hops. Using Kerberos security, integrated security will work across any number of servers in the network.
Credentials Not Required The final Connect Using option is for data sources that do not require any authentication. This option would be used for connection to some Access databases, FoxPro databases, and others that do not require any login or password. This option could also be used if you insist, despite prior warnings here, on putting your credentials right in the connection string.
Uploading Other Items Using Report Manager
In addition to reports and shared data sources, other items can be created in Report Server folders. External images needed as part of the reports can be uploaded, for example, as well as documentation and other supporting materials.
Uploading External Report Images
If you look closely at the Nametags report when it comes up in Report Manager, you will notice that there is a problem with this report. The GDS logo that is supposed to appear in the lower-left corner of each nametag is missing. You will see the broken-link “X” symbol instead of the GDS logo.
This image was stored as an external image in the Chapter06 project. We need to upload this image to the Report Server. Once the image is uploaded into the same folder as the report, the report will be able to find it. Here are the steps to follow to do this:
-
Return to the Chapter 06 folder in the Report Manager.
-
Click Upload File in the Contents tab toolbar. The Upload File page will appear.
-
Click Browse. The Choose File dialog box will appear.
-
Navigate to the folder containing the Chapter06 project. Select the gds.gif file and click Open to exit the Choose File dialog box.
-
Leave the name as gds.gif. The image needs to keep this name so it can be found by the report. Click OK to upload this file.
-
Click the Nametags report to execute it. If the broken-link “X” is still visible, click the Refresh Report button in the Report Viewer toolbar, as shown in Figure 10-15.
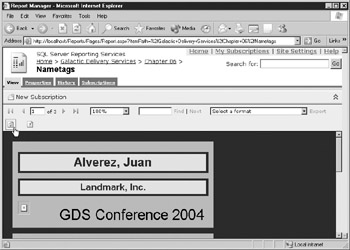
Figure 10-15: The Refresh Report button in the Report Viewer toolbarNote When you need to have Report Manager refresh a report, always use the Refresh Report button in the Report Viewer toolbar. Do not use the browser’s Refresh button. The browser’s Refresh button will cause the page to be refreshed, but it will not cause the report to be reexecuted.
-
Click the link for the Chapter 06 folder.
-
The entry for the gds.gif image shows in the list view of the Chapter 06 folder. As with the Galactic shared data source, we probably don’t want entries for supporting resources cluttering up our list view. Click on the entry for gds.gif. The gds.gif image will be displayed.
-
Click the Properties tab.
-
Check the Hide in List View check box.
-
Click Apply.
-
Click the link for the Chapter 06 folder.
Uploading Supporting Materials
In some cases, you will need to provide your users with documentation on one or more reports in the form of either a text file or a Word or HTML document. There may also be supporting materials created in other applications. For example, you may have a PowerPoint presentation or a Visio diagram that aids in the interpretation and understanding of a set of reports. These materials can be uploaded as a folder item just like report files.
A text file or an HTML document can be displayed right in the browser without any additional software. For other types of documents, if the appropriate application is installed on the user’s computer, the documents can be viewed right in the browser as well. These documents can also be downloaded and saved to the user’s computer, if desired.
We’ll now create a simple text document and then upload it to the Chapter 06 folder:
-
Open Notepad or another text editor.
-
Type the following in the text editor:
The items in this folder are for the GDS Conference.
-
Save this as ReportReadMe.txt in a temporary location on your computer.
-
Return to your browser with the Report Manager viewing the Chapter 06 folder. Click Upload File in the Contents tab toolbar. The Upload File page will appear.
-
Click Browse. The Choose File dialog box will appear.
-
Navigate to the ReportReadMe.txt file and click Open to exit the Choose File dialog box.
-
Click OK to upload this file.
-
Select the ReportReadMe.txt entry in the Chapter 06 folder. You will see the contents of the text file displayed within the Report Manager.
-
Click the link for the Chapter 06 folder.
-
Let’s add a second line to our text file. Open up the ReportReadMe.txt file in your text editor and add the following as a second line:
These items were created for the GDS Art Department.
-
Save the changes and close your text editor.
-
Return to your browser with the Report Manager viewing the Chapter 06 folder. Click Upload File in the Contents tab toolbar. The Upload File page will appear.
-
Click Browse. The Choose File dialog box will appear.
-
Navigate to the ReportReadMe.txt file and click Open to exit the Choose File dialog box.
-
Check the Overwrite Item If It Exists check box. If you fail to check this check box, the new version of the text file will not overwrite the older version on the Report Server.
-
Click OK to upload this file.
-
Select the ReportReadMe.txt entry in the Chapter 06 folder. You will see the new version of the text file.
-
Click the Properties tab.
-
Type The purpose of these reports… for the description.
-
Click Apply to save your changes.
-
Click the link for the Chapter 06 folder. The description shows up under the entry for ReportReadMe.txt.
-
Let’s make another change to our text file and look at another way to overwrite an entry on the Report Server. Open up the ReportReadMe.txt file in your text editor and add the following as a third line:
These items were created for all billing contacts.
-
Save the changes and close your text editor.
-
Return to your browser with the Report Manager viewing the Chapter 06 folder. Select the ReportReadMe.txt entry.
-
Click the Properties tab.
-
Click Replace.
-
Click Browse. The Choose File dialog box will appear.
-
Navigate to the ReportReadMe.txt file and click Open to exit the Choose File dialog box.
-
Click OK to upload this file.
-
Click the View tab. You will see the latest version of the text file.
-
Click the link for the Chapter 06 folder.
-
Delete the ReportReadMe.txt file on your computer.
Uploading Reports Using .NET Assemblies
In addition to external images, reports can also reference .NET assemblies. You saw this in the Weather report created in Chapter 8. Let’s look at the steps necessary to move this report to the Report Server.
Copying the .NET Assembly to the Report Server
In order for a report to access a .NET assembly, it must be in the application folder of the Report Server. No fancy deployment, upload, or installation routine is required here. Simply copy the assembly’s DLL file to the appropriate directory. We will give this a try using the Weather report and its .NET assembly, WeatherInfo.dll. Here are the steps to follow:
-
Locate the WeatherInfo.dll file. If you do not have it anywhere else, it should be in the Report Designer folder on your development computer. The default path for the Report Designer folder is
C:\Program Files\Microsoft SQL Server\80\Tools\Report Designer
-
Copy this file.
-
Paste this file into the Report Server application folder on the computer acting as your Report Server computer. The default path for the Report Server application folder is
C:\Program Files\Microsoft SQL Server\MSSQL\Reporting Services\ ReportServer\bin
Code Access Security
Because Reporting Services is a .NET application, it uses code access security to determine what execution permissions are possessed by each assembly. A code access group associates assemblies with specific permissions. The criteria for membership in a code access group is determined by a security class, and the permissions are determined by named permission sets.
Figure 10-16 provides an illustration of code access security. A .NET assembly or web service can gain entry into a code access group only if it matches the criteria specified by the security class. Once the .NET assembly or web service is allowed into a code access group, it can use the named permission set associated with that code access group to gain rights. These rights allow the .NET assembly or web service to perform tasks on a computer. Full trust rights and execution rights are the two types of rights we will use with the Weather report. There are, however, a number of different types of rights that can be included in a named permission set.
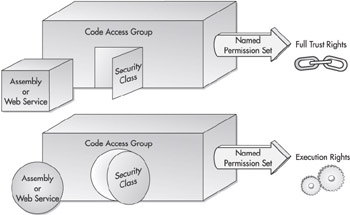
Figure 10-16: Code access security
Code access groups can be nested one inside another. A .NET assembly or web service can be allowed into a parent group and gain its permissions; then it can try to gain membership in child code access groups to accumulate additional rights. A code access group can be a first match code group, where a .NET assembly or web service can only gain membership in one code access group—the first one it matches. Alternatively, a code access group can be a union code group, where a .NET assembly or web service is allowed to gain membership in a number of code access groups, joining together the permissions from each group.
In order for our Weather report to execute properly, we will have to create a code access group that provides permissions to the WeatherInfo.dll assembly. Also, we will have to create a second code access group to provide permissions to the web service that we are using to get our weather information. Even though this web service is not executing on our server, our WeatherInfo.dll assembly is executing some if its methods, so it needs to have permission to execute.
Security Classes A security class describes the conditions that a .NET assembly or web service needs to meet in order to get into a code access group. We will use two different types of security classes with the Weather report. The UrlMembershipCondition security class will be used with the web service, and the StrongNameMembershipCondition security class will be used with the WeatherInfo.dll assembly.
The UrlMembershipCondition security class says that any assembly or web service that is being executed from a specified URL will be included in a particular code access group. The URL that must be matched is listed in each code access group that is using the UrlMembershipCondition security class. For example, the GDSServer code access group may use UrlMembershipCondition and give “http://GDSServer//*” as the URL that must be matched. Any web service running on the GDSServer would be included in this code access group.
The StrongNameMembershipCondition security class uses the strong name associated with an assembly to identify it. The strong name is assigned to the assembly when it is created. It is a long string of hexadecimal digits that uniquely identifies an assembly. The StrongNameMembershipCondition security class is a good way to ensure that only the intended assembly is allowed into your code access group.
You will see a couple of other security classes in the Report Server security configuration. The AllMembershipCondition security class allows in all .NET assemblies and web services. The ZoneMembershipCondition security class allows in .NET assemblies and web services that originate in a particular zone. Some sample zones are MyComputer, Intranet, and Internet.
Named Permission Sets Named permission sets group together the permissions that will be assigned by code access groups. The security configuration used by the Report Server contains three named permission sets. The Nothing permission grants no rights. It is used to initially take away all rights from a .NET assembly or web service before specific rights are added back by subsequent code access groups. This ensures that each .NET assembly or web service has only the rights it should have.
The Execution permission grants execution rights to a .NET assembly or web service. This means that the .NET assembly or web service can be run. The .NET assembly or web service does not, however, have rights to access any protected resources, such as the file system or the registry.
The FullTrust permission grants the .NET assembly or web service access to everything. This includes access to all the protected resources. FullTrust permission should only be granted to .NET assemblies and web services that you trust not to mess up your computer!
Modifying the Report Server’s Security Configuration
Now that you have a basic understanding of code access security, we can modify the Report Server’s security configuration to allow WeatherInfo.dll to run.
| Note | Consult with your Reporting Services or network administrator before making any changes to server security. |
We need to make some additions to the Report Server’s security configuration
in order to provide our custom assembly with the rights it needs to execute. The security configuration for the Report Server is in the rssrvpolicy.config file. The default path for this file is
C:\Program Files\Microsoft SQL Server\MSSQL\Reporting Services\ ReportServer
This file contains the code access security information in an XML structure.
| Note | Make a backup copy of the rssrvpolicy.config file before making any modifications to it. If you accidentally create an invalid XML structure or otherwise cause a problem with the security configuration, the Report Server will not be able to execute any reports. |
The XML structure in the rssrvpolicy.config file can be divided into three sections: Security Classes, Named Permission Sets, and Code Groups. We will only need to make changes to the Code Groups section of the document. Here are the steps to follow:
-
Open the rssrvpolicy.config file in Notepad or another text editor.
-
Scroll down until you locate the Code Group portion of the document. The Code Group portion of the document starts on the line after the closing XML tag for the named permission sets:
</NamedPermissionSets>
-
The first code group is the parent code group which makes use of the AllMembershipCondition to assign the Nothing permission to all .NET assemblies and web services. We will add a new child code group right beneath this. Insert this new code group as shown here (add the lines shown in bold):
. . . <CodeGroup version="1" PermissionSetName="Nothing"> <IMembershipCondition version="1" /> <CodeGroup version="1" PermissionSetName="Execution" Name="WeatherWebServiceCodeGroup" Description="Code group for the Weather Web Service"> <IMembershipCondition version="1" Url="http://live.capescience.com/*" /> </CodeGroup> <CodeGroup version="1" PermissionSetName="Execution" Name="Report_Expressions_Default_Permissions" Description="This code group grants default permissions for code in report expressions and Code element. "> . . .
-
There is another parent code group that uses ZoneMembershipCondition to assign Execute permissions to all .NET assemblies and web services in the MyComputer zone. We will add a new child code group right beneath this. Insert this new code group as shown here (add the lines shown in bold). Note that the Description and PublicKeyBlob should each be entered on one line.
. . . <CodeGroup version="1" PermissionSetName="Execution" Description="This code group grants MyComputer code Execution permission. "> <IMembershipCondition version="1" Zone="MyComputer" /> <CodeGroup version="1" PermissionSetName="FullTrust" Name="WeatherInfoCodeGroup" Description="Code group for the Weather info Custom Assembly"> <IMembershipCondition version="1" PublicKeyBlob="0024000004800000940000000602000000 240000525341310004000001000100B9F7 4F2D5B0AAD33AA619B00D7BB8B0F767839 3A0F4CD586C9036D72455F8D1E85BF635C 9FB1DA9817DD0F751DCEE77D9A47959E87 28028B9B6CC7C25EB1E59CB3DE01BB516D 46FC6AC6AF27AA6E71B65F6AB91B957688 6F2EF39417F17B567AD200E151FC744C6D A72FF5882461E6CA786EB2997FA968302B 7B2F24BDBFF7A5" /> </CodeGroup> <CodeGroup version="1" PermissionSetName="FullTrust" Name="Microsoft_Strong_Name" Description="This code group grants code signed with the Microsoft strong name full trust. "> <IMembershipCondition version="1" PublicKeyBlob="0024000004800000940000000602000000 24000052534131000400000100010007D1 FA57C4AED9F0A32E84AA0FAEFD0DE9E8FD 6AEC8F87FB03766C834C99921EB23BE79A D9D5DCC1DD9AD236132102900B723CF980 957FC4E177108FC607774F29E8320E92EA 05ECE4E821C0A5EFE8F1645C4C0C93C1AB 99285D622CAA652C1DFAD63D745D6F2DE5 F17E5EAF0FC4963D261C8A12436518206D C093344D5AD293" /> </CodeGroup> . . .
-
Save the modified file and exit your text editor.
Note Looking at the rssrvpolicy.config file, you can see that expressions written within a report are granted Execute permissions. Because the WeatherInfo.GetWeather method is called from a report expression, by default it should only be able to get Execute permissions. .NET Security says that a process cannot get rights that exceed the rights granted to processes further up the stack. The GetWeather method needs FullTrust rights in order to make the web service call. The GetWeather method uses a special process to assert that it needs to exceed the rights of the calling process and gain FullTrust rights. If you downloaded the source code for the WeatherInfo.dll, you can look to see how the assert is accomplished.
Uploading the Report
You are now ready to upload the Weather report. Complete the following steps using the Report Manager:
-
Create a folder called Chapter 08 in the Galactic Delivery Services folder.
-
Open the Chapter 08 folder and upload the WeatherReport.rdl file from the Chapter08 project folder.
-
Click the report WeatherReport to execute it. The report will produce an error because the shared data source does not exist.
-
Click the Properties tab. The properties page for WeatherReport will appear.
-
Click the Data Sources link on the left side of the screen. The Data Sources page for an individual report will appear.
-
A shared data source should be selected. Click Browse. The Select a Shared Data Source page will appear.
-
Rather than create another shared data source, we are going to use the existing shared data source in the Chapter 06 folder. Expand each folder in the tree view under Location until you can see the Galactic shared data source in the Chapter 06 folder. Click the Galactic shared data source.
-
Click OK to exit the Select a Shared Data Source page.
-
Click Apply at the bottom of the page.
-
Select the View tab to view the report. The report will now generate. (Remember that the .NET assembly calls a web service, so it requires an Internet connection.)
Modifying Reports from the Report Server
In addition to uploading a report definition to the Report Server, it is also possible to download a report definition, modify it, and send your modifications back to the Report Server as an update. You only need to do this if you do not have a copy of the RDL file for a report on the Report Server that needs to be modified. If you already have the report in a report project, you can edit that report using Visual Studio and then redeploy it.
Downloading a Report Definition
For this example, we will imagine that we do not have the RDL file for the SubReportTest report and need to make a change to the report. The first task we need to complete is to download this report’s RDL file from the Report Server to our local computer. Follow these steps:
-
Open up the Report Manager in your browser and navigate to the Chapter 09 folder.
-
In the previous section, when we wanted to view the Properties tab for a report, we first executed that report. Now, we will use the Show Details button to get at the Properties tab another way. Click the Show Details button in the Contents tab toolbar. The detail view of the folder’s contents will appear.
-
Click the icon in the Edit column next to the SubReportTest report. The Properties tab for the SubReportTest report will appear.
-
There is a Report Definition section on this page just above the buttons at the bottom. Click the Edit link in the Report Definition section. This causes the Report Manager to download a copy of the SubReportTest.rdl file so you can edit it. The File Download dialog box will appear.
-
Click Save. The Save As dialog box will appear.
-
Browse to an appropriate temporary location on your computer. Leave the filename as SubReportTest.rdl. Click Save to exit the Save As dialog box. The file will be downloaded and saved in the specified location.
Note If you have logon credentials stored in one or more data source definitions in the report, these are not saved in the resulting report definition file, for security purposes.
Editing the Report Definition
We now have the report definition file for the SubReportTest report moved from the Report Server to our local computer. However, an RDL file by itself is not very useful. In order to edit it, we have to place it in a report project. Again, remember that, for this example, we are imagining that we do not already have the SubReportTest report in a report project. Here are the steps to follow:
-
Start Visual Studio.
-
Create a new report project in the MSSQLRS folder called EditSubReportTest. (Do not use the Report Wizard.)
-
Create a shared data source called Galactic for the Galactic database using “GalacticReporting” for the user name and “gds” for the password.
-
Right-click the Reports entry in the Solution Explorer and select Add | Add Existing Item from the context menu. The Add Existing Item dialog box will appear.
-
Navigate to the location where you stored the SubReportTest.rdl file in the previous section. Select the SubReportTest.rdl file and click Open to exit the Add Existing Item dialog box.
-
Double-click the SubReportTest report to open it for editing. (If you encounter an error while trying to edit this report, save the project, close Visual Studio, start it back up again, and reopen the EditSubReportTest project.)
-
On the Data tab, add the PurchaseDate to the output.
-
On the Layout tab, put the PurchaseDate in a text box to the right of the SerialNumber. Set the Format property for this text box to “MM/dd/yyyy.”
-
Use the Preview tab to make sure your changes were made properly.
-
Click Save All in the toolbar.
-
Close Visual Studio.
Uploading the Modified Report Definition
Now that the report definition changes have been completed, we are ready to upload the modified report:
-
Return to the Report Manager. If you are not already there, navigate to the Properties tab for the SubReportTest report.
-
Click the Update link in the Report Definition section of the page. The Import Report page will appear.
-
Click Browse. The Choose File dialog box will appear.
-
Navigate to the EditSubReportTest folder to find the updated version of the SubReportTest.rdl file.
Note Do not select the copy of SubReportTest.rdl that you originally downloaded. The modified version is in the folder with the EditSubReportTest report project.
-
Select SubReportTest.rdl and click Open to exit the Choose File dialog box.
-
Click OK to upload the file.
-
Click the View tab to view the report, then click the Refesh button in the Report Viewer toolbar. The purchase date is now shown for each transport.
EAN: 2147483647
Pages: 109