| Custom fields, available only for WordPress server installations, give you some interesting possibilities for working with your posts. You might use one of the many plugins that require you to edit custom fields, such as those listed at codex.wordpress.org/Plugins/Meta. Or perhaps you sometimes like to add some extra information to your post, such as your mood, what music you're listening to, or a list of related links. You add a key and then give the key a value. For example, if I wanted to add a line to my post telling my visitors what book I'm currently reading then my key may be: "Currently reading". The value would vary from post to post, and would be the title of whatever book it is I'm reading at that time. To use custom fields you must both add the field key and value to your post and edit one or more theme files. We show you in detail how to edit theme files in Chapter 6. If you add any custom fields WordPress treats them as an unordered list. It wraps the items in list tags when it generates the page, as you can see in this example: <ul class='post-meta'> <li><span class='post-meta- key'>Music:</span> Elena</li> <li><span class='post-meta-key'>TV Show:</span> Futurama</li> </ul>
This WordPress-generated coding creates what you see in Figure 73. The ul is given a class of post-meta, while the key is wrapped in a span of class post-meta-key. The key and value are both contained within an li tag. You can set up rules within the CSS file to control the appearance of the various items. If you have more than one custom field attached to a post, they are displayed sorted by alphabetical order of the Key field. You can add custom fields through the Write Post or Write Page administration panel. If you use a stand-alone blogging tool, such as those we wrote about in Chapter 9, you may find you are unable to add any custom fields by that means. To add a custom field to a post 1. | Log in to the Dashboard.
| 2. | Create a new post or edit an existing post in the usual way.
| 3. | Scroll down to the Custom Fields area below the Uploads box.
| 4. | If necessary, click the plus sign in the blue header area to reveal the Custom Fields area.
| 5. | Add a Key and Value in the Add a new custom field form (Figure 65):
- Select: this pop-up contains any keys you have used previously. If you have already used "Coffee blend" as a key, for example, then that will be available under Select.
- Key: add the Key text here. Examples: Currently reading, Listening to, Menu of the day, Coffee blend.
- Value: this is a free-form field into which you can add text, HTML, and even the HTML code for an image.
Figure 65. I've added one custom field previously to this post and am now adding another. 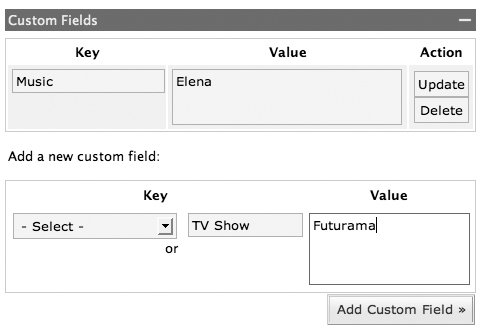
| 6. | To add further Custom Fields click the Add Custom Field button. Further blank fields become available.
| 7. | Save or Publish your post when you are ready. Your custom field information is saved in the database with the post. The fields will not display until you edit the blog's theme, as explained at the end of this chapter.
|
To edit custom fields 1. | Log in to the Dashboard.
| 2. | Edit an existing post in the usual way.
| 3. | Scroll down to the Custom Fields area below the Uploads box.
| 4. | If necessary, click the plus sign in the blue header area to reveal the Custom Fields area (Figure 65).
| 5. | Edit the contents of the Key and / or Value field.
| 6. | Click the Update button. The Key and/or Value field changes are saved in the database.
|
To delete custom fields 1. | Log in to the Dashboard.
| 2. | Edit an existing post in the usual way.
| 3. | Scroll down to the Custom Fields area below the Uploads box.
| 4. | If necessary, click the plus sign in the blue header area to reveal the Custom Fields area (Figure 65).
| 5. | Click the Delete button in the Action column beside the Key and Value pair you wish to delete. The Key and Value pair are removed from the post.
|
To display custom fields 1. | Open the theme file you wish to edit, for example: wp-content/themes/default/index.php.
| 2. | Move the cursor to the point where you wish the custom fields to display, for example, above or below the postmetadata section below the body of the post (Figure 66).
Figures 66 & 67. Add the code to index.php to display the custom fields. Here I've added it just below the post entry (top). When I view the Home Page my custom fields are listed below the post in a very plain list (bottom). 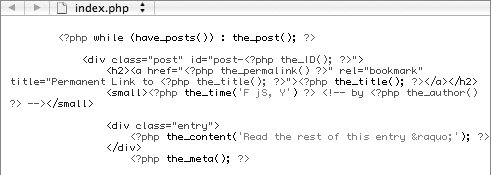 
| 3. | Add in this code: <?php the_meta(); ?>.
| 4. | Save the edited theme file to the server. Any custom fields will be displayed as list items below the post.
| 5. | View a post with custom fields to confirm it is working as expected (Figure 67).
|
To style custom fields 1. | Open the style sheet for the theme your blog uses, for example: wp-content/themes/default/style.css.
| 2. | Add rules for .post-meta, .post-meta li and .post-meta-key (Figure 68).
Figure 68. Add rules to the style sheet to style the display of the custom fields. 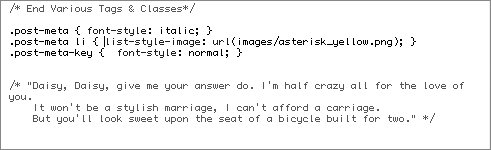
| 3. | Example:
.post-meta { font-style: italic; } .post-meta li { list-style-image: url(images/asterisk_yellow.png); } .post-meta-key { font-style: normal; }
| 4. | Save the style sheet to the server. Any custom fields will be styled according to the new rules.
| 5. | View a post with custom fields to confirm it is working as expected (Figure 69).
Figure 69. Adding styles for the custom fields makes them more attractive. 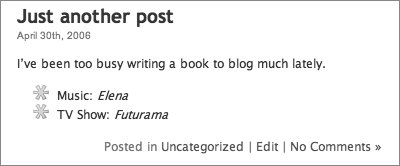
|
Tip
|