| Disk Utility, as the name implies, is a utility for working with disks. Specifically, it can: Provide general information about a disk or volume. Verify and repair a disk or volume. Erase a selected disk or volume. Divide a disk into several volumes or partitions. Set up a RAID disk. Create a blank disk image, or a disk image from a file or a disk. Mount disk images as disks. Burn a disk image to CD-R or DVD-R. Restore a disk from a backup image.
In this part of the chapter, I explain how to use Disk Utility's most useful features.  Tips Tips
A disk is a storage device. A volume is a part of a disk formatted for storing files. A disk image is a single file that contains everything on a disk. You can mount a disk image on your desktop just like any other disk. I tell you more about mounting and unmounting disks in Chapter 3. Disk images are often used to distribute software updates on the Internet. Disk image files often include .img or .dmg filename extensions. Disk Utility's RAID and Restore panes are not covered in this book. To learn more about this feature, enter a search phrase of RAID or restore in Mac Help and follow links that appear for specific instructions.
To get information about a disk or volume 1. | Open the Disk Utility icon in the Utilities folder (Figure 1).
| 2. | In the Disk Utility window that appears, select the disk or volume you want information about. Some information about the item appears at the bottom of the window (Figure 39).
Figure 39. Select the disk or volume you want to work with in Disk Utility's main window. The list includes physical disks and their volumes as well as disk image files you have created and saved on disk. 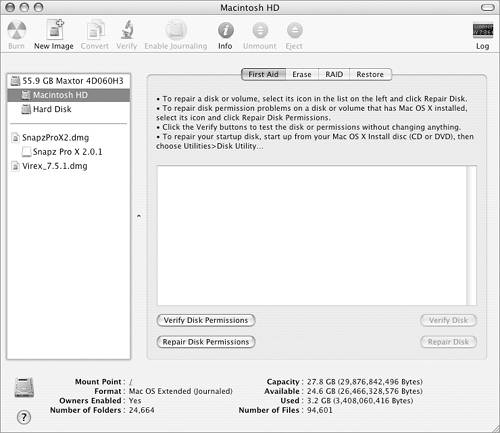
| 3. | Click the Info button on the toolbar. A window with additional information appears (Figure 40).
Figure 40. This window shows information about one of the two volumes on my hard disk. 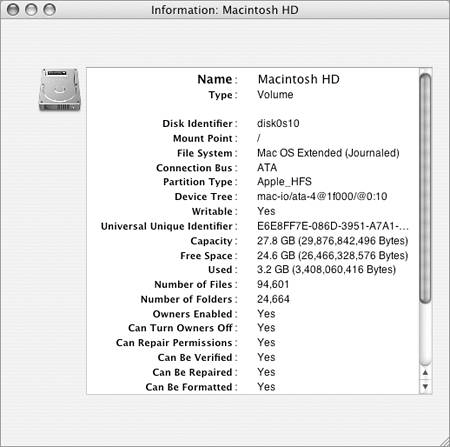
|
To verify or repair a disk or volume or its permissions 1. | Open the Disk Utility icon in the Utilities folder (Figure 1).
| 2. | In the Disk Utility window that appears, click the First Aid button.
| 3. | Select the disk(s) or volume(s) you want to verify or repair (Figure 39).
| 4. | Click the button for the action you want to perform:
Verify Disk Permissions verifies file permissions on a Mac OS X startup disk or volume. Repair Disk Permissions repairs file permissions on a Mac OS X startup volume. Verify Disk verifies the directory structure and file integrity of any disk or volume other than the startup disk or volume. Repair Disk repairs damage to the directory structure of any volume other than the startup disk, as long as it is not write-protected.
| 5. | Wait while your computer checks and/or repairs the selected disk or volume and its permissions. When it's done, it reports its results on the right side of the window (Figure 41).
Figure 41. At the end of the verification (or repair) process, Disk Utility's First Aid feature reports results. In this example, Disk Utility found just one error in the permissions on my startup disk. 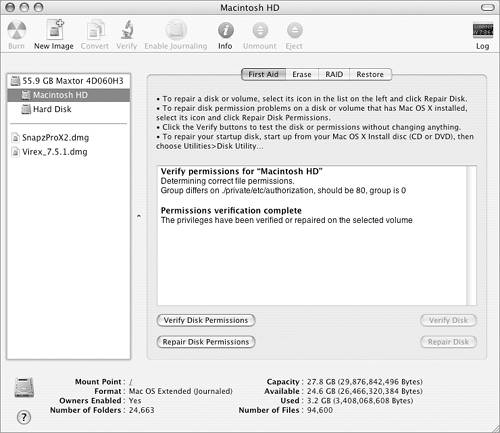
|
Tips Permissions determine how users can access files. If permissions are incorrectly set for a file, it may not be accessible by the users who should be able to use it. If permissions are really messed up, your computer might not work correctly. The startup disk is verified and, if necessary, repaired when you start your computer. To verify or repair your startup disk or volume, start your computer from the Mac OS X install disc. When the Installer launches, choose Installer > Disk Utility to run Disk Utility. To select more than one disk or volume in step 3, hold down  while clicking each item. while clicking each item. Disk Utility's First Aid feature cannot repair all disk problems. For severely damaged disks, you may need to acquire third-party utilities, such as Symantec's Norton Utilities or Alsoft's DiskWarrior.
To erase a disk or volume 1. | Open the Disk Utility icon in the Utilities folder (Figure 1).
| 2. | In the Disk Utility window that appears, click the Erase button.
| 3. | Select the disk or volume you want to erase (Figure 42).
Figure 42. Use Disk Utility's Erase pane to erase a disk or volume. 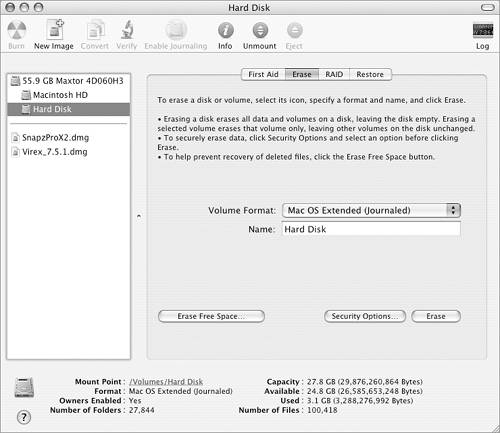
| 4. | Set options for the volume:
Volume Format is the format applied to the volume. Depending on what you are erasing, your options include Mac OS Extended (Journaled), Mac OS Extended, Mac OS Extended (Case-sensitive, Journaled), Mac OS Extended (Case-sensitive), Mac OS Standard, MS-DOS File System, and UNIX File System. Name is the name of the volume. Mac OS 9 Drivers Installed installs drivers on the disk so it can be read by computers running Mac OS 9.x. (This option is only available if you select a disk to erase.)
| 5. | To specify how disk space occupied by deleted files should be erased, click the Erase Free Space button. Then select an option in the Erase Free Space Options dialog (Figure 43) and click OK.
Figure 43 & 44. These dialogs offer more secure options for erasing a disk. 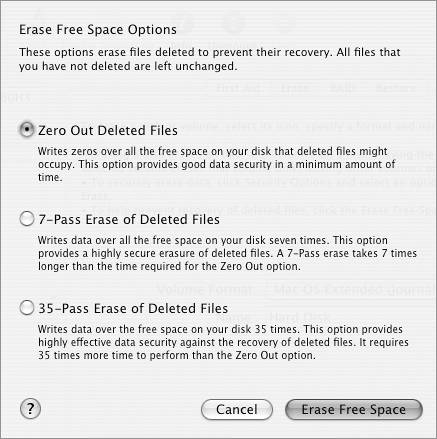
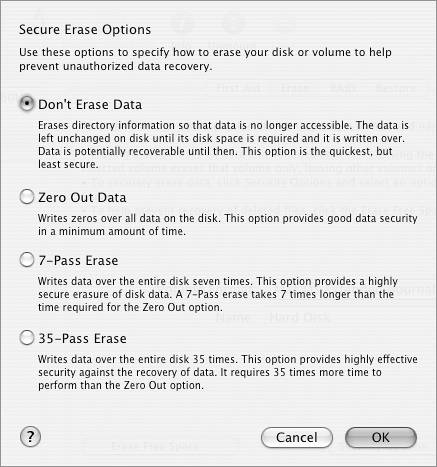
| 6. | To increase security and prevent the disk from being unerased, click the Security Options button. Then select an option in the Secure Erase Options dialog (Figure 44) and click OK.
| 7. | Click Erase.
| 8. | A dialog sheet like the one in Figure 45 appears. Click Erase.
Figure 45. A dialog like this appears to confirm that you really do want to erase the volume or disk. 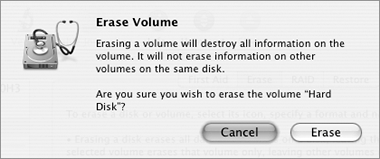
| 9. | Wait while your computer erases the disk or volume. A progress dialog appears as it works. When it's finished, an icon for the erased disk or volume reappears on the desktop.
|
 Caution! Caution!
Tips You cannot erase the startup disk. (And that's a good thing.) When you erase a disk, you replace all volumes on the disk with one blank volume. When you erase a volume, you replace that volume with a blank volume. If you're not sure what volume format to choose in step 4, choose Mac OS Extended (Journaled). If you wanted one of the other formats, you'd know it. To use a disk on a computer started with Mac OS 9, you must turn on the Mac OS 9 Drivers installed check box in step 4. With this option turned off, you can still use the disk in the Classic environment with Mac OS X. I tell you about Mac OS 9.x and the Classic environment in Chapter 18. In steps 5 and 6, the explanations that appear beneath each option (Figures 43 and 44) should be enough information to help you decide which option is right for you. If you're concerned about unauthorized persons recovering data from files you erase, be sure to check out the Secure Empty Trash command, which is covered in Chapter 3.
To partition a disk 1. | Open the Disk Utility icon in the Utilities folder (Figure 1).
| 2. | In the Disk Utility window that appears, click the Partition tab.
| 3. | Select the disk you want to partition (Figure 46).
Figure 46. Use Disk Utility's Partition pane to set up partitions on a disk. 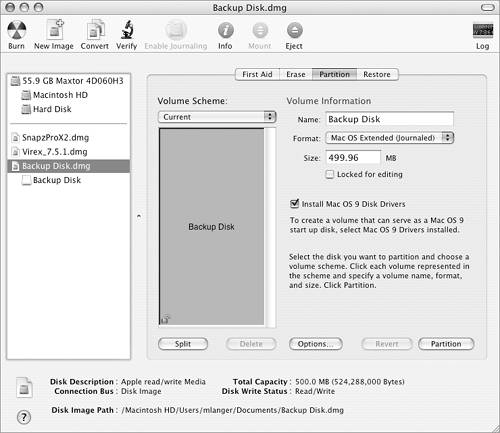
| 4. | Choose an option from the Volume Scheme pop-up menu (Figure 47). The area beneath the pop-up menu changes (Figure 48).
Figure 47. The Volume Scheme pop-up menu. 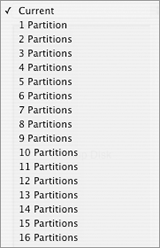
Figure 48. When the volume scheme is set for multiple volumes, you can set options for each one. 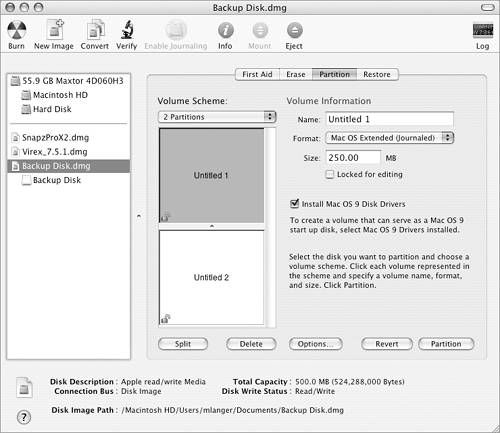
| 5. | In the Volume Scheme area, select a volume. Then set options in the Volume Information area as desired:
Name is the name of the volume. Format is the volume format. The options may include Mac OS Extended (Journaled), Mac OS Extended, Mac OS Extended (Case-sensitive, Journaled), Mac OS Extended (Case-sensitive), Mac OS Standard, UNIX File System, and Free Space. Size is the amount of disk space allocated to that partition. Locked for editing prevents changes to the partition's settings. Install Mac OS 9 Disk Drivers enables the partition to be used as a Mac OS 9.x startup disk (if the computer supports starting from Mac OS 9.x).
| 6. | Repeat step 5 for each partition.
| 7. | Click Partition.
| 8. | A warning dialog like the one in Figure 49 appears. Click Partition.
Figure 49. If you're sure you want to change the volume scheme, click Partition. 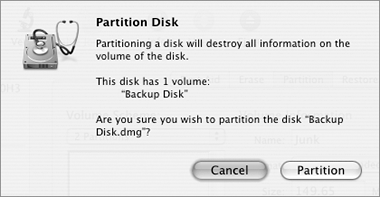
| 9. | Wait while your computer erases the disk and creates the new partitions. When it's finished, icons for each formatted partition appear on the desktop.
|
Caution!
Tips If you're not sure what volume format to choose in step 5, choose Mac OS Extended (Journaled). If you wanted one of the other formats, you'd know it. If you select Free Space as the format for any partition in step 5, that partition cannot be used to store files. You can also change the partition size in step 5 by dragging the divider between partitions in the Volume Scheme area (Figure 50). Figure 50. Another way to change the size of the partition is to drag the divider between two partitions. 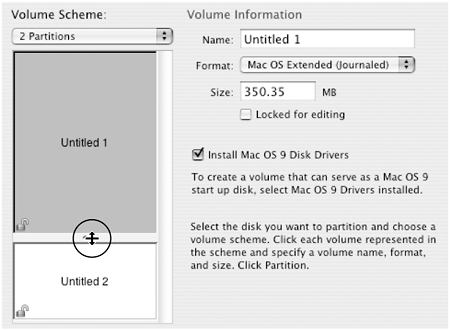
If you are partitioning removable media that may be used with non-Apple computers, before step 7, click the Options button in the Partition pane. Then choose PC Partition Scheme in the dialog sheet that appears (Figure 51) and click OK. Figure 51. When partitioning removable media, you may need to set the Partition Scheme. 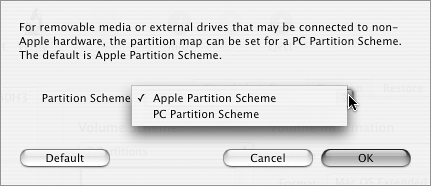
To create a blank disk image file 1. | Open the Disk Utility icon in the Utilities folder (Figure 1).
| 2. | Click the New Image button in Disk Utility's toolbar.
| 3. | In the top half of the dialog that appears (Figure 52) enter a name and specify a disk location in which to save the disk image file.
Figure 52. Use a dialog like this to set options for a new disk image. 
| 4. | Set options in the bottom part of the dialog:
Size is the size of the disk. Choose an option from the pop-up menu (Figure 53). If you choose Custom, use a dialog sheet (Figure 54) to set the size. Figure 53. The Size pop-up menu enables you to select from a number of common disk sizes… 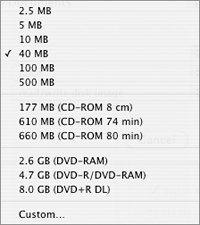
Figure 54. …or choose Custom and use this dialog to enter a custom size. 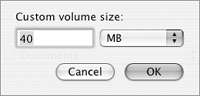
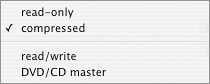
Encryption is file encryption to apply to the disk image file. Choose an option from the menu. The selections are none and AES-128. Format refers to the type of disk image. Make sure read/write disk image is chosen.
| 5. | Click Create. Disk Utility creates a disk image file to your specifications and mounts it on the desktop (Figure 55).
Figure 55. After creating the disk image, Disk Utility mounts it as a disk on your desktop. Here's the disk image created with the settings in Figure 47. 
|
Tips The size of a disk image file is determined by the size specified in step 4. Once you have created and mounted a blank disk image, you can copy items to it as if it were a regular disk. The items you copy to the disk are automatically copied into the disk image file. Copying files is discussed in Chapter 2.
To create a disk image file from a folder 1. | Open the Disk Utility icon in the Utilities folder (Figure 1).
| 2. | Choose File > New > Disk Image from Folder.
| 3. | Use the Select Folder to Image dialog that appears (Figure 56) to locate and select the folder you want to create a disk image of. Then click Image.
Figure 56. Start by selecting the folder you want to create a disk image of. 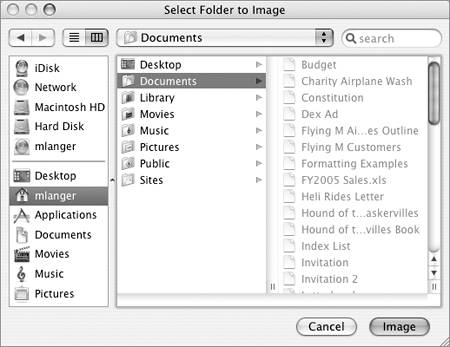
| 4. | In the top half of the New Image From Folder dialog that appears (Figure 57), enter a name and choose a disk location for the image file.
Figure 57. Use the New Image From Folder dialog to set options for the image file. 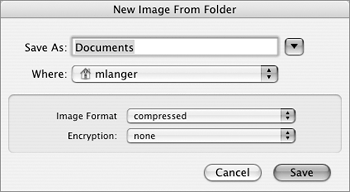
| 5. | In the bottom half of the dialog, set options as desired:
| 6. | Click Save. Disk Utility creates a disk image file containing the contents of the folder and mounts it on the desktop.
|
Tips The size of a disk image file is determined by the amount of data in the folder and the Image Format option you chose in step 5. If you choose read/write from the Image Format pop-up menu (Figure 58), you can add files to the mounted disk image disk. Otherwise, you cannot.
To create a disk image file from another disk 1. | Open the Disk Utility icon in the Utilities folder (Figure 1).
| 2. | On the left side of the window, select the volume you want to create an image of.
| 3. | Choose File > New > Disk Image from Disk Name.
| 4. | In the top half of the Convert Image dialog that appears (Figure 59), enter a name and choose a disk location for the image file.
Figure 59. Use the Convert Image dialog to set options for a disk image based on a disk. 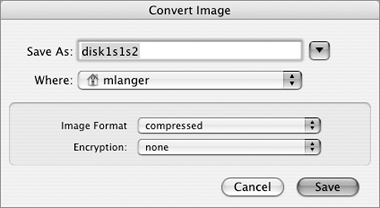
| 5. | In the bottom half of the dialog, set options as desired:
| 6. | Click Save. Disk Utility creates a disk image file containing the contents of the disk and mounts it on the desktop.
|
Tips The size of a disk image file is determined by the amount of data in the original disk and the Image Format option you chose in step 5. If you choose read/write from the Image Format pop-up menu (Figure 58), you can add files to the mounted disk image disk. Otherwise, you cannot. You cannot save a disk image file on the same disk you are creating an image of. For example, if you wanted to back up your hard disk to an image file, you must save that image to another disk.
To mount a disk image Double-click the disk image file's icon in the Finder (Figure 60). Figure 60. A disk image file's icon. 
Or 1. | Open the Disk Utility icon in the Utilities folder (Figure 1).
| 2. | Select the name of the disk image you want to mount in the list on the left side of the main window (Figure 61).
Figure 61. Select the name of the disk image file you want to mount. 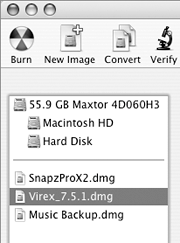
| 3. | Click the Open button in the toolbar.
|
Or 1. | Open the Disk Utility icon in the Utilities folder (Figure 1).
| 2. | Choose File > Open.
| 3. | Use the Select Image to Attach dialog that appears (Figure 62) to locate, select, and open the disk image file.
Figure 62. Use the Select Image to Attach dialog to locate, select, and open a disk image file. 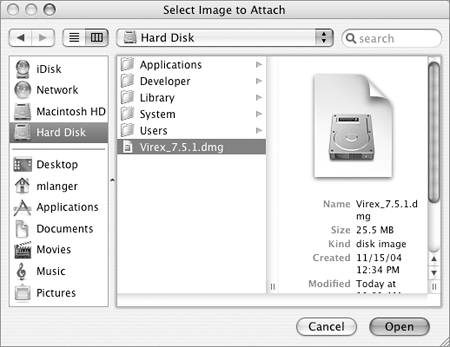
|
The disk image file's disk icon appears on the desktop and, if Disk Utility is open, in the list of disks and volumes (Figure 63). Figure 63. The disk image's disk icon appears in the list of disks and volumes. 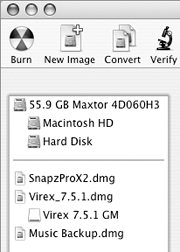
Tip
To unmount a disk image, disk, or partition In the Finder, drag the mounted disk icon to the Trash. Or 1. | In the Disk Utility main window, select the icon for the disk you want to unmount (Figure 64).
Figure 64. Select the disk you want to unmount and click the Unmount button. 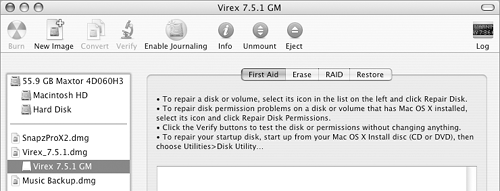
| 2. | Click the Unmount button in the toolbar.
|
Although the icon disappears from the desktop, all of its contents remain in the disk image file. Tip
To burn a CD or DVD from a disk or disk image 1. | Open the Disk Utility icon in the Utilities folder (Figure 1).
| 2. | In the main Disk Utility window, select the disk you want to copy to CD or DVD (Figure 61). The disk can be a physical disk or a disk image.
| 3. | Click the Burn button in the toolbar.
| 4. | A dialog like the one in Figure 65 appears. Insert a CD-R or DVD-R disc in your drive as instructed and click Burn.
Figure 65. A dialog like this one prompts you to insert a disc. 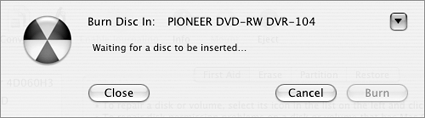
Wait while Disk Utility writes to the disc. A progress dialog like the one in Figure 66 appears as it works.
Figure 66. Disk Utility displays a progress dialog as it creates the disc. 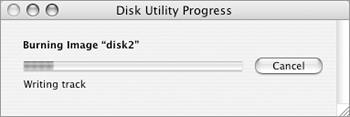
| 5. | When the disc finished, Disk Utility ejects the disc and displays a dialog like the one in Figure 67. Click OK.
Figure 67. A dialog like this appears when the disc is finished. 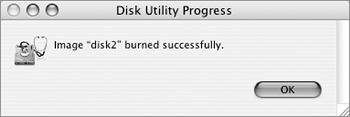
|
Tips You must have a Combo Drive, SuperDrive, or compatible disc writer to create or "burn" CD or DVD discs. If a disk image file that you want to burn to disc does not appear in the Disk Utility window, mount it as instructed on the previous page. Then follow these instructions.
|