| In order to take advantage of the multiple users feature of Mac OS X, you need to set up user accounts. The Mac OS X Setup Assistant, which I discuss in Chapter 1, does part of the setup for you. Immediately after you install Mac OS X, the Setup Assistant prompts you for information to set up the Admin user. If you are your computer's only user, you're finished setting up users. But if additional peoplecoworkers, friends, or familywill be using your computer, it's in your best interest to set up a separate user account for each one, then specify what each user is allowed to do on the computer. You do all this with the Accounts preferences pane (Figure 2). Figure 2. The Accounts preferences pane with the Admin user selected. 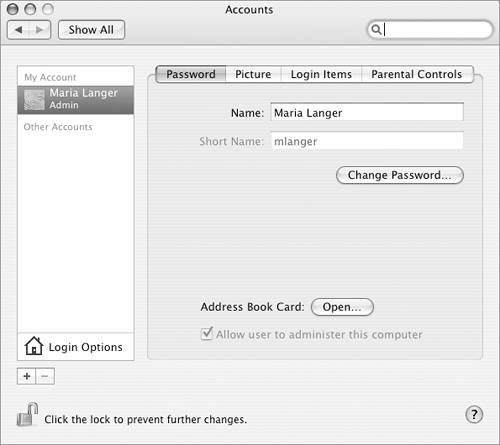
In this section, I explain how to add, modify, set capabilities for, and delete user accounts.  Tips Tips
I tell you more about accessing another user's folders and files later in this chapter. You also use the Accounts preferences pane to modify settings for your own account and to set up Login Options and Login Items, as I discuss later in this chapter.
To open the Accounts preferences pane 1. | Choose Apple > System Preferences (Figure 1) or click the System Preferences icon on the Dock.
Figure 1. The Apple menu. 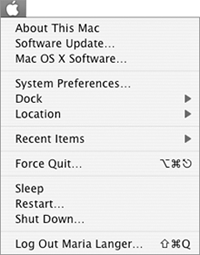
| 2. | In the System Preferences window that appears, click the Accounts icon (in the System area) to display the Accounts preferences pane (Figure 2).
|
Tip When you first access the Accounts preferences pane, its options may be locked. If so, you will not be able to make changes. If the padlock icon at the bottom of the preferences pane looks locked, click it to display an authenticate dialog like the one in Figure 3. Enter an administrator name (if one isn't already there) and password in the text boxes and click OK. The padlock will unlock so it looks like the one in Figure 2. You can now make changes as discussed throughout this chapter. I tell you more about locking and unlocking preferences in Chapter 21. Figure 3. Use the Authenticate dialog to unlock Accounts preferences, if necessary. 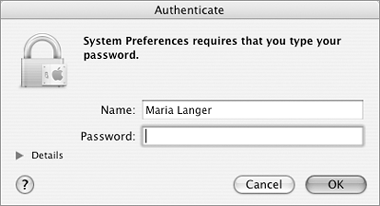
To add a new user 1. | In the Accounts preferences pane (Figure 2), click the + button at the bottom of the accounts list to display a blank new user dialog sheet Figure 4.
Figure 4. Creating a new user account is as simple as filling in a form. 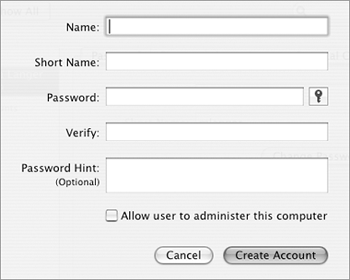
| 2. | Enter the name of the user in the Name box.
| 3. | Enter an abbreviated name for the user in the Short Name box. This name should be in lowercase characters and should not include spaces.
| 4. | Enter a password for the user in the Password and Verify boxes. The password should be at least six characters long.
| 5. | If desired, enter a hint for the password in the Password Hint box.
| 6. | If the user should be given administrator privileges, turn on the Allow user to administer this computer check box.
| 7. | Click Create Account. The new account appears in the list of accounts on the left side of the Accounts preferences pane (Figure 5).
Figure 5. The new account appears in the accounts list. 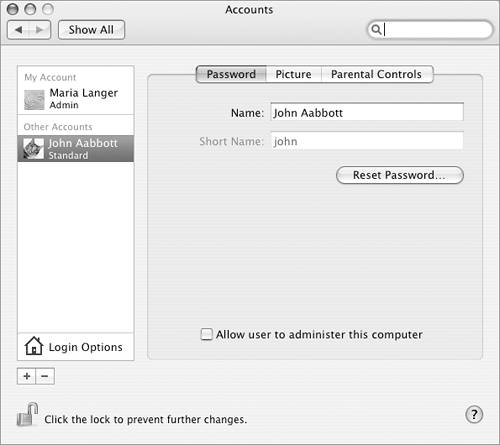
| 8. | Click the System Preferences window's close button to save your settings and quit System Preferences.
A folder for the new user appears in the Users folder.
|
Tips In step 4, you can use the Password Assistant to generate a random password. Click the Key button beside the Password box to display the Password Assistant (Figure 6), choose an option from the Type pop-up menu, drag the slider to modify the password length, and consider the password that appears in the Suggestion box. This feature is brand new in Mac OS X 10.4. Figure 6. Mac OS X 10.4's new Password Assistant helps you come up with a secure password that you might even be able to remember. 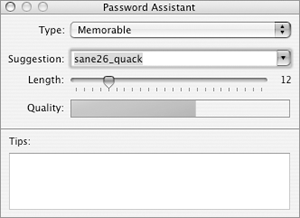
After step 7, a dialog like the one in Figure 7 may appear, asking if you want to turn off automatic login. Click the button for the option you prefer; I tell you about automatic login later in this chapter. Figure 7. If automatic login is turned on when you create a new user, a dialog like this appears so you can turn if off, if you like. 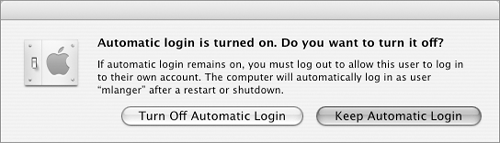
To modify an existing user's settings 1. | Display the Accounts preferences pane (Figure 4).
| 2. | In the accounts list, select the name of the account you want to modify.
| 3. | Make changes as desired in each pane of the Accounts preferences pane for the user.
|
To give a user Administrator privileges 1. | In the Accounts preferences pane, click to select the name of the user you want to give Administrator privileges to (Figure 5).
| 2. | If necessary, click the Password button to display Password options (Figure 5).
| 3. | Turn on the check box labeled Allow user to administer this computer. The word Admin appears under the user name in the account list (Figure 8).
Figure 8. When you enable Administrator privileges for a user, the word Admin appears under his name. 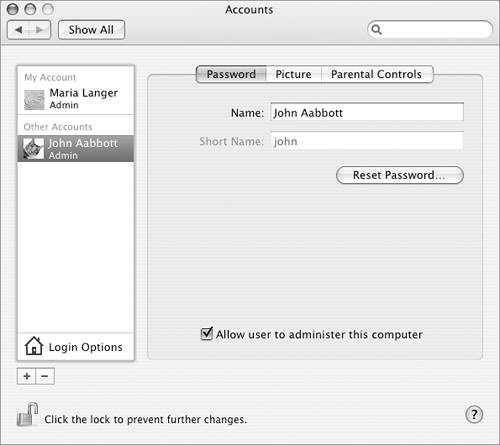
|
 Warning! Warning!
To change a user's password 1. | In the Accounts preferences pane, click to select the name of the user you want to change the password for (Figure 5).
| 2. | If necessary, click the Password button to display Password options (Figure 5).
| 3. | Click the Change Password or Reset Password button.
| 4. | A dialog like the one in Figure 9 or 10 appears, depending on whether you are changing your password (Figure 9) or resetting someone else's password (Figure 10). Enter the appropriate password information in each box.
Figure 9 & 10. Use a dialog like one of these to change your own password (above) or, if you have administrator privileges, to change someone else's password (below). 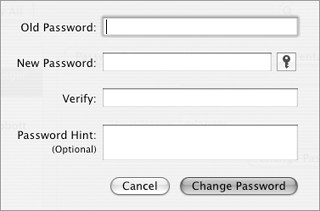
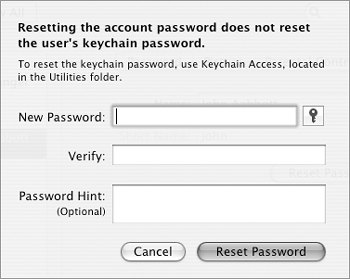
| 5. | Click Change Password (Figure 9) or Reset Password (Figure 10) to save your changes.
|
To change a user's picture 1. | In the Accounts preferences pane, click to select the name of the user you want to change the picture for (Figure 5).
| 2. | Click the Picture button to display Picture options (Figure 11).
Figure 11. The Picture options of the Accounts preferences dialog. 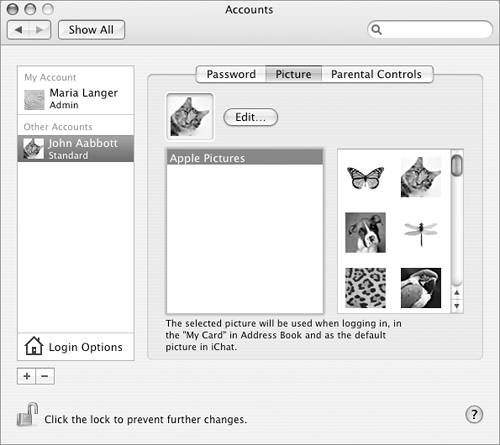
| 3. | Scroll through the pictures on the right side of the window to find one you like and click it to select it.
or
Click the Edit button to display the Images dialog. Then drag the icon for an image from a Finder window into the image area of the Images dialog (Figure 12) so the image appears in the window (Figure 13). You can drag the image into position and drag the slider to change the cropping frame for the image. Then click Set.
Figure 12. You can drag the icon for an image file from a Finder window into the Images window. 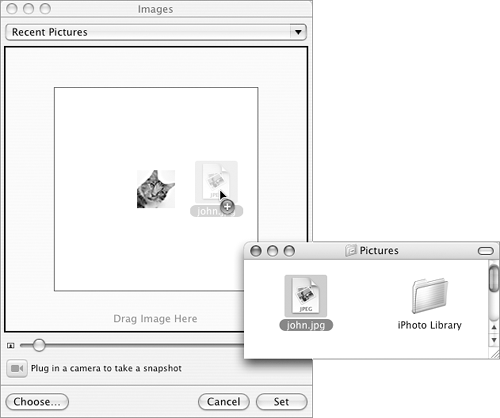
Figure 13. When the image appears in the window, you can drag it into position and use the slider to adjust the cropping box. 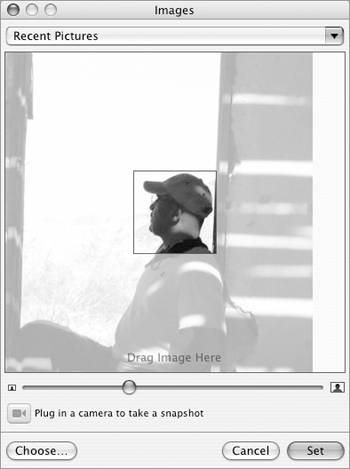
| 4. | The picture changes to the image you selected or inserted (Figure 14).
Figure 14. The image appears as the user's picture. 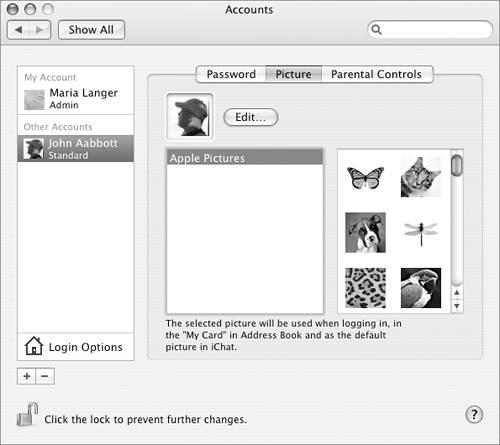
|
Tip
To specify login items 1. | In the Accounts preferences pane, click to select the name of the account you logged in with (Figure 2). Normally, this will be your account, but if you want to set login items for another user, you must log in with that user's account.
| 2. | Click the Login Items button to display its options (Figure 15).
Figure 15. Login items in the Accounts preferences pane. 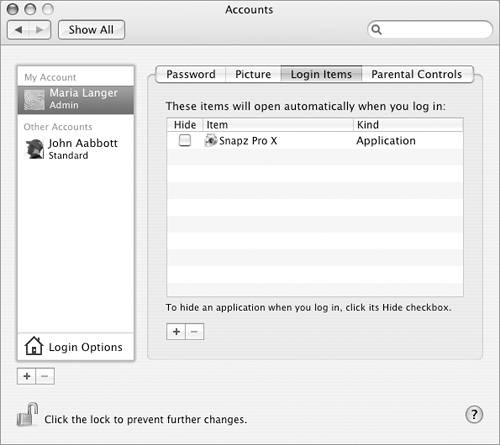
| 3. | To add a startup item, drag its icon into the list (Figure 16) or click the + button at the bottom of the list and use the dialog sheet that appears (Figure 17) to locate, select, and open the item. The item you dragged or selected appears in the list.
Figure 16. One way to add an item to the Login items list is to drag it in. 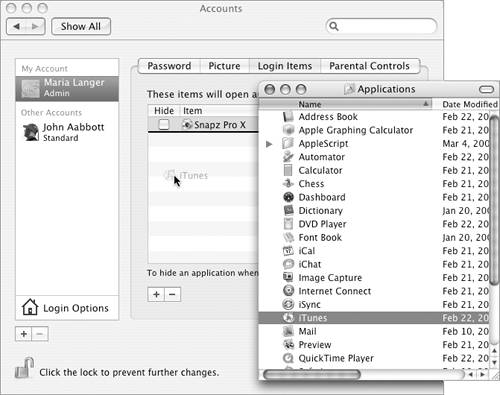
Figure 17. You can use a dialog sheet like this one to locate, select, and open the item you want to add as a startup item. 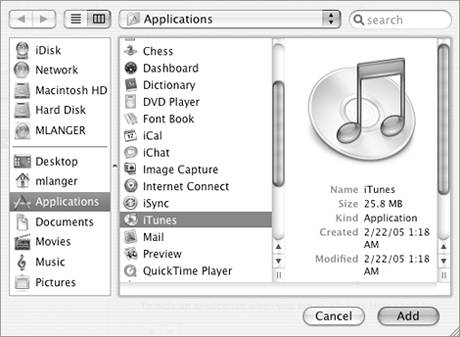
or
To remove an item from the list, click to select it and then click the button at the bottom of the list. The item disappears from the list.
| 4. | To automatically hide an item when it launches, turn on the Hide check box beside it.
|
Tips Login items, which were referred to as startup items in Mac OS X 10.3, are applications, documents, folders, or other items that are automatically opened when you log in or start up the computer. You can set the order in which items open by dragging them up or down in the list.
To set parental controls or limit a user's access 1. | In the Accounts preferences pane, click to select the name of the user you want to set access limitations for (Figure 5).
| 2. | Click the Parental Controls button to display Parental Controls options(Figure 18).
Figure 18. Parental Controls options enable you to control how your children-or other users-can access the computer. 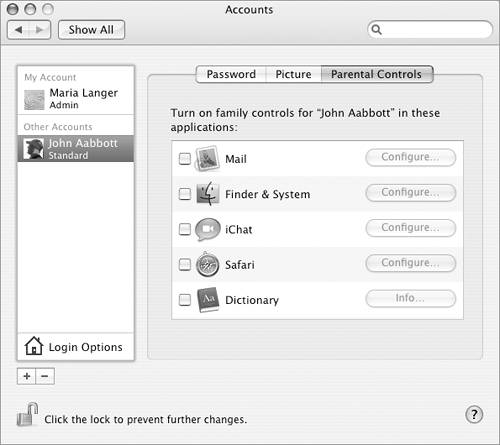
| 3. | To prevent the user from getting e-mail from e-mail addresses other than the ones you specify, turn on the Mail check box and, if necessary, click the Configure button to set options (Figure 19). Click the + button beneath the Person list and enter the complete e-mail address for a person you want to add to the list. If you turn on the Send permission e-mails to check box, e-mail from anyone who isn't included on the Person list will automatically be forwarded to the e-mail address you enter; this makes it possible to see who is trying to send e-mail to the user and what that e-mail contains.
Figure 19. Use this dialog to list the e-mail addresses of people who can send e-mail to the user. 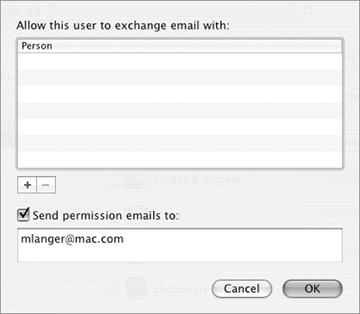
| 4. | To prevent the user from modifying important Finder and System settings and limit access to specific applications, turn on the Finder & System check box. Then click the Configure button to set options (Figure 20). Select the Some Limits radio button, then toggle check boxes to set limits and click OK.
Open all System Preferences enables the user to open and make changes in all System Preferences. Modify the Dock enables the user to add or remove Dock items. (This only affects the Dock as it appears for the user's account.) Administer printers enables the user to access Printer Setup Utility and use it to change the computer's printer setup. Change password lets the user change his password. To enable this option, you must turn on the Open all System Preferences check box. Burn CDs and DVDs enables the user to burn CDs and DVDs. Allow supporting programs enables applications that are not specifically listed in the dialog to open. This user can only use these applications enables you to specify exactly which applications the user can access. To allow the user to access all applications within a folder, turn on the check box beside the folder name. (Others refers to applications that are not in any of the other folders.) To allow the user to access some of the applications within a specific folder, click the triangle beside the folder name to display a list of all applications within the folder (Figure 21). Then turn on the check box beside each application the user can access. Figure 21. Clicking the triangle beside a folder name displays a list of all the applications within that folder. You can then enable or disable specific applications. 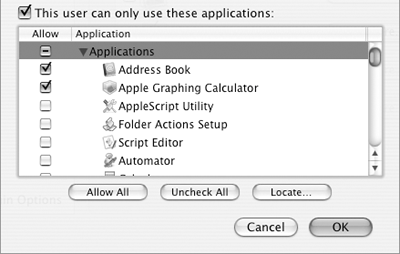
Figure 20. The Some Limits enables you to specify what a user can do and which programs he can access. 
| 5. | To limit who the user can chat with using iChat, turn on the iChat check box and click the Configure button to set options (Figure 22). Click the + icon to display a list of Buddies from the Address Book (Figure 23), select name, and click Select Buddy. Repeat this process for each buddy you want to allow and click OK.
Figure 22. Use this dialog to list the buddies the user can chat with. 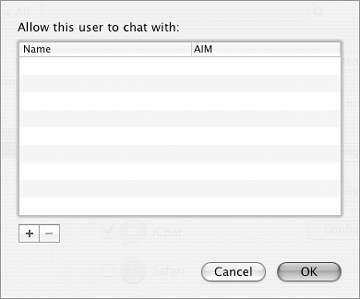
Figure 23. Select a name and click the Select Buddy button. 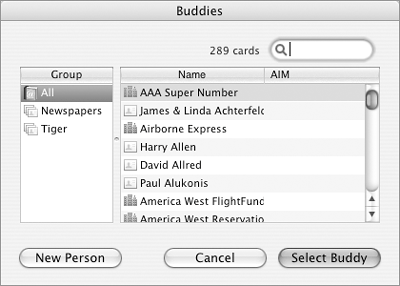
| 6. | To limit the Web sites that the user can access, turn on the Safari check box. You must then log in as the user, open Safari, and add bookmarks for domain names you want to allow. You'll have to enter an administrator name and password to make changes to the bookmarks bar.
| 7. | To prevent the user from viewing profanity in the Dictionary application, turn on the Dictionary check box.
|
Tips You cannot set Parental Controls options for an administrator. Parental Controls for Mail and iChat are a good way to prevent your children from getting e- mail from or chatting with people you don't know. Parental Controls for Safari are a good way to limit the Web sites your children access. Keep in mind that Parental Controls only work with the applications listed in the Parental Controls options of the Accounts preferences pane. To truly limit control, you must think through your control strategy and close up all loopholes. For example, if both Safari and Internet Explorer are installed on the computer, and you set up allowed sites on Safari for your children, you must disable Internet Explorer for their accounts to prevent them from using that to access other sites. Kids are smart. They'll find any loophole you leave them. I tell you about Mail, iChat, and Safari in Chapter 13, System Preferences in Chapter 21 and elsewhere throughout the book, and Dictionary in Chapter 8.
To enable Simple Finder for a user 1. | In the Accounts preferences pane, select the name of the user you want to enable Simple Finder for (Figure 5).
| 2. | Click the Parental Controls button to display Parental Controls options.
| 3. | Turn on the Finder & System check box and click the Configure button beside it.
| 4. | Select the Simple Finder radio button to display Simple Finder options (Figure 24).
Figure 24. Simple Finder options for a user account. 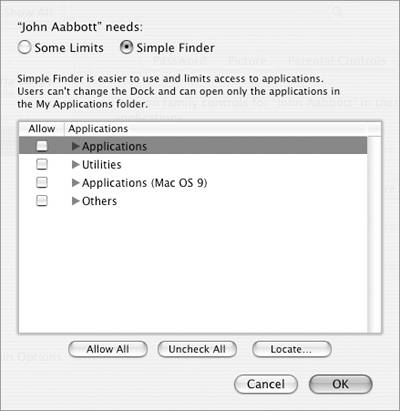
| 5. | Specify which applications a user is allowed to work with:
To allow the user to access all applications within a folder, turn on the check box beside the folder name. (Others refers to applications that are not in any of the other folders.) To allow the user to access some of the applications within a specific folder, click the triangle beside the folder name to display a list of all applications within the folder (Figure 21). Then turn on the check box beside each application the user can access.
|
Tip Simple Finder (Figure 25), as the name suggests, is a highly simplified version of the Finder. Designed for users with little or no knowledge of computers, it offers a safe, highly controlled environment for kids and novices. If you want to try Simple Finder, create a new user with Simple Finder enabled, then log in as that user. If you've been using a Mac for more than a few years, I guarantee you'll go nuts in about five minutes. (I didn't even last two.) Figure 25. Simple Finder is an extremely simple version of the Finder. 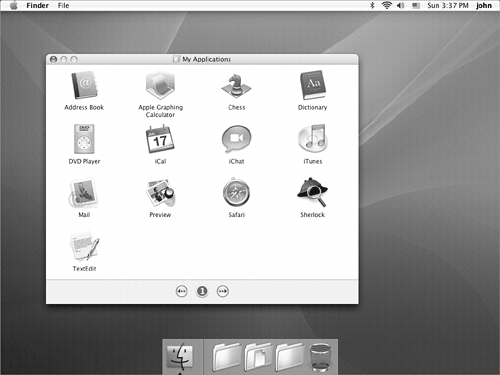
To delete a user account 1. | In the Accounts preferences pane, select the name of the user you want to delete.
| 2. | Click the button at the bottom of the accounts list.
| 3. | A dialog sheet like the one in Figure 26 appears. You have two options to delete the user:
Delete Immediately removes all traces of the user from the computer. OK removes the user from the Account list and saves the contents of the user's Home folder as a file in the Deleted Users folder inside the Users folder (Figure 27). Figure 27. The Users folder contains Home folders for each current user and a Shared folder that all users can access. If any users have been deleted, you may also find a Deleted Users folder which contains disk images of deleted users' Home folders. 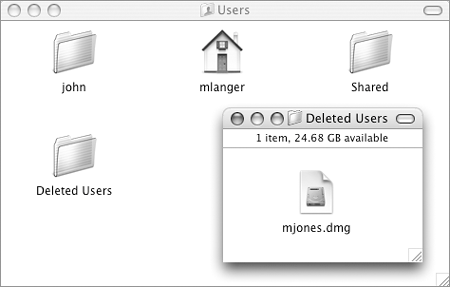
Figure 26. Mac OS X confirms that you really do want to delete the user and offers two options for doing it. 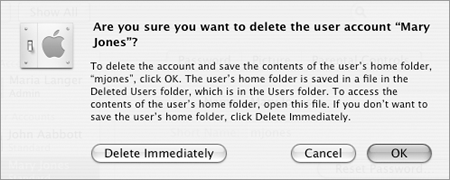
|
Tip
To set log in options 1. | In the Accounts preferences pane, click the Login Options button at the bottom of the accounts list (Figure 28).
Figure 28. The Login options in the Accounts preferences pane. 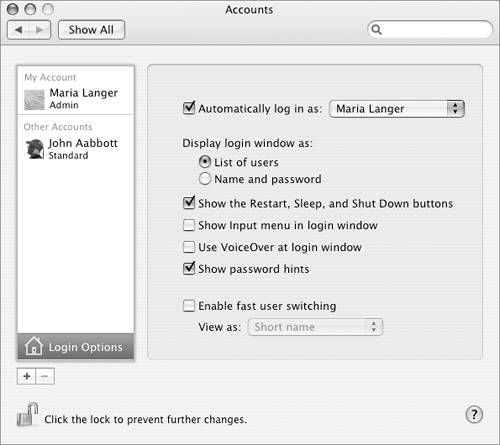
| 2. | To prevent the Login window from appearing at startup, turn on the Automatically log in as check box and choose a user from the pop-up menu. If you choose a user other than the name already selected, a dialog sheet like the one in Figure 29 appears. Enter the user's password and click OK.
Figure 29. Enter the user's password in this dialog sheet. 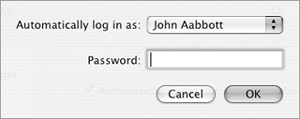
| 3. | Select a Display login window as option:
List of users displays the name of each user. Click a name to display a password box for the user and log in. Name and password displays boxes for the user name and password. Enter the user name and password to log in.
| 4. | Toggle check boxes to enable other options:
Show the Restart, Sleep, and Shut Down buttons shows these buttons in the login window. Show Input menu in login window displays the Input menu in the login window so a user can enter special characters during login. Use VoiceOver at login window enables the VoiceOver feature to provide voice prompts for the login window. Show password hints displays the password hint for an account after the user has tried entering his password three times without success. Turning this option on also displays a Forgot Password button in the login window; you can click this button to display an account's password hint. Enable fast user switching makes it possible for a user to log in without logging out another user. When you turn on the Enable fast user switching check box a Warning dialog like the one in Figure 30 appears. If you trust other computer users, click OK. Figure 30. This Warning dialog tells you a little about the fast user switching feature. 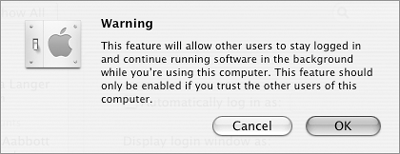
|
Tips Automatically logging in is especially useful if you're the only person who uses your computer and it's in a secure location. With the automatically log in feature enabled, the log in window only appears when you log out or purposely display it via the fast user switching option. Although I consider myself somewhat of a screenshot expert (there are over 2,000 shots in this book alone), I could not figure out a way to take a screenshot of a Login window in Mac OS X 10.4. Sorry! I explain how to log in and out of a Mac OS X computer in Chapter 2. The Name and Password option in step 2 is more secure, since it requires users to know user names to log in. I tell you about the Input menu in Chapter 21, VoiceOver in Chapter 22, and fast user switching later in this chapter.
|