| To share files, applications, and printers with other network users, you must set options in two System Preferences panes (Figure 1): Network allows you to enable AppleTalk and choose your AppleTalk zone and configuration. Sharing allows you to name your computer, enable types of sharing and access, and control how other users can run applications on your computer.
Figure 1. You configure sharing with two System Preferences panes: Network and Sharing. 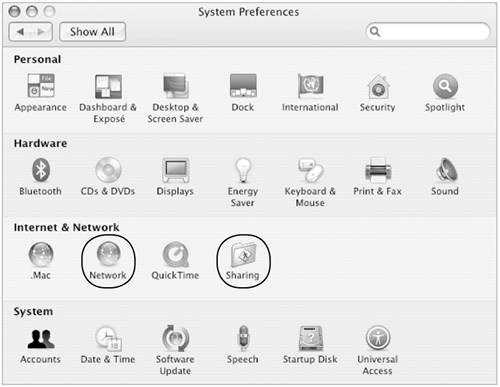
This part of the chapter explains how to set up sharing via an AirPort or Ethernet connection. It also explains how to share files once the configuration is complete.  Tips Tips
Although file sharing is possible with other protocols and types of connections, it is impossible for me to cover all configuration options here. If you're using a different type of network and don't have instructions for using it with Mac OS X, read through the instructions here. Much of what you read may apply to your setup. If your computer is on a large network, consult the system administrator before changing any network configuration options.
To view network status 1. | Choose Apple > System Preferences (Figure 2), or click the System Preferences icon in the Dock.
Figure 2. The Apple menu. 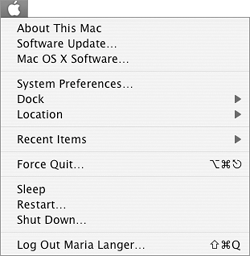
| 2. | In the System Preferences window that appears (Figure 1), click the Network icon.
An overview of your network status appears (Figure 3).
Figure 3. As shown here, my computer gets its Internet connection via AirPort, but is also connected to an Ethernet network via its built-in Ethernet port. It has an Internal modem, but it hasn t been configured. 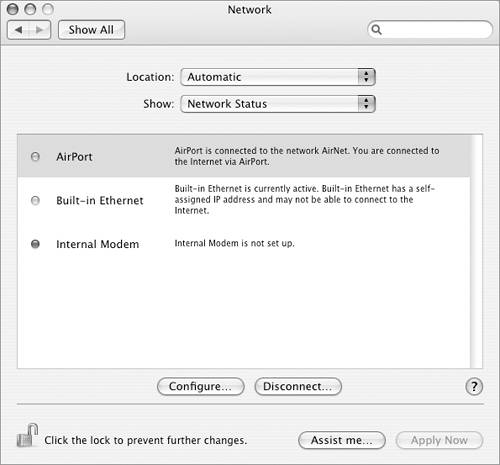
|
Tips If the Network preferences pane does not list network connections as shown in Figure 3, choose Network Status from the Show menu (Figure 4). Figure 4. The Show pop-up menu. 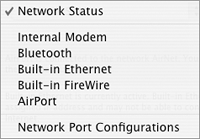
Network Status on your computer may not exactly match what is shown in Figure 3. For example, on my computer, I have both AirPort and Ethernet for network connections; if you have one or the other (but not both) only the one you have will appear in the list. As shown in Figure 3, Network Status will clearly indicate which network connection is used for Internet communications. I tell you more about connecting to the Internet in Chapter 13.
To set AppleTalk Network preferences 1. | Follow the steps on the previous page to open the Network Preferences pane and view Network Status (Figure 3).
Figure 5. The AppleTalk options in the Network preferences pane. 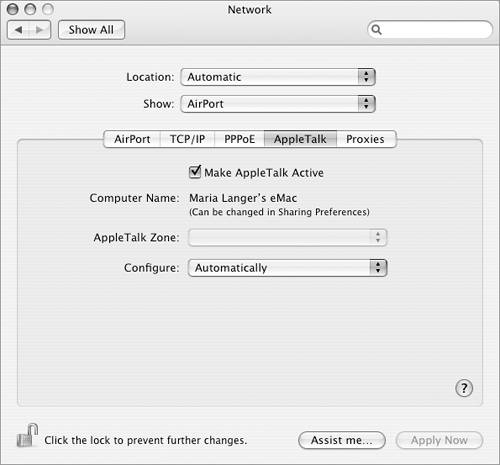
| 2. | Choose the network connection you want to set AppleTalk preferences for from the Show pop-up menu (Figure 4).
or
Double-click the connection you want to set AppleTalk preferences for in the list of connections (Figure 3).
| 3. | Click the AppleTalk button to display AppleTalk options (Figure 6).
Figure 6. If you choose Manually, you have to enter correct network identification information. 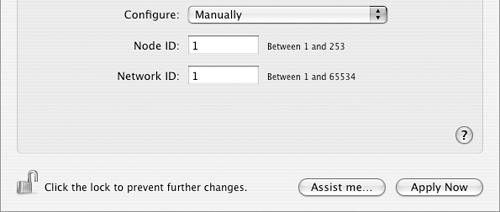
| 4. | Turn on the Make AppleTalk Active check box.
| 5. | Click Apply Now.
| 6. | If necessary, choose a zone from the AppleTalk Zone pop-up menu.
| 7. | Choose an option from the Configure pop-up menu:
Automatically automatically configures your computer with the correct network identification information. Manually displays Node ID and Network ID boxes for you to enter network identification information (Figure 6).
| 8. | If you made changes in step 6 or 7, click Apply Now again.
|
Tips AppleTalk zones are normally only present in large networks. In step 7, if you choose Manually, you must enter the correct information for AppleTalk to work.
To set the computer's identity 1. | Choose Apple > System Preferences (Figure 2), or click the System Preferences icon in the Dock.
| 2. | In the System Preferences window that appears (Figure 1), click the Sharing icon to display the Sharing preferences pane (Figure 7).
Figure 7. The Services options in the Sharing preferences pane. 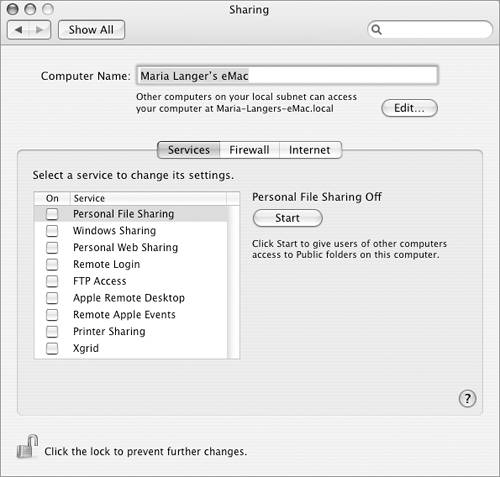
| 3. | Enter a name in the Computer Name box (Figure 8).
Figure 8. Enter a new name for your computer. 
| 4. | To change the identifier for your computer on the local subnet, click the Edit button to display a dialog like the one in Figure 9. Enter a new name in the Local Hostname box; the name you enter must end in .local, which cannot be changed. Click OK.
Figure 9. Use this dialog to change the identifier of your computer on the local subnet. 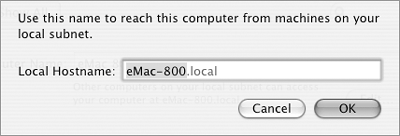
|
Tips By default, the local subnet identifier is the computer name with dashes substituted for spaces, followed by .local. Your computer name is not the same as your hard disk name. If your computer is on a large network, give your computer a name that can easily distinguish it from others on the network. Ask your system administrator; there may be organization-wide computer naming conventions that you need to follow.
To enable sharing services 1. | Choose Apple > System Preferences (Figure 2), or click the System Preferences icon in the Dock.
| 2. | In the System Preferences window that appears (Figure 1), click the Sharing icon in the Internet & Network row to display the Sharing preferences pane.
| 3. | If necessary, click the Services button to display its options (Figure 7).
| 4. | Turn on the check box beside each sharing service you want to enable:
Personal File Sharing lets Macintosh users access Public folders on your computer. Windows Sharing lets Windows users access shared folders using SMB, a Windows file sharing technology. Personal Web Sharing enables others to view Web pages in your Sites folder. Remote Login lets others access your computer using Secure Shell (SSH) client software, such as Terminal. FTP Access enables others to ex-change files with your computer using FTP client software. Apple Remote Desktop enables others to access the computer using Apple Remote Desktop software, a program that makes it possible to run one computer from another. Remote Apple Events lets applications on other Mac OS computers send Apple Events to your computer. Printer Sharing enables others to use printers connected to your computer. Xgrid enables Xgrid controllers on your network to distribute tasks to your computer to perform.
|
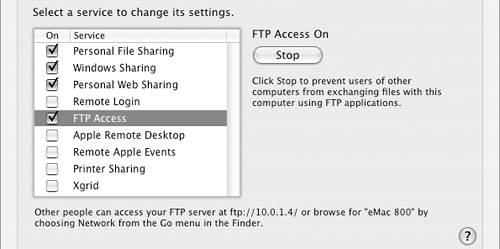
Tips In step 4, turning on the check box beside an item is the same as selecting the item and clicking the Start button that appears beside it. Likewise, turning off an item's check box is the same as selecting it and clicking the Stop button. When you select a service that is turned on, a note beneath the list of services explains how your computer can be accessed by that service. Figures 10, 11, and 12 show examples. Figure 10. A note beneath the services list explains how to access the selected service. These examples show Windows Sharing (top), Personal Web Sharing (middle), and FTP Access (bottom). 
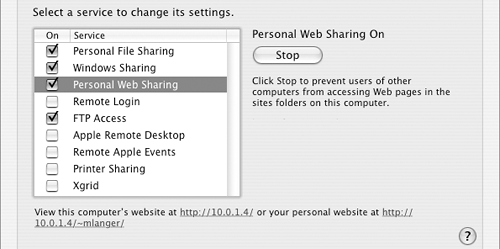
With Personal Web Sharing enabled, the contents of the Sites folder within your Home folder are published as Personal Web Sharing Web sites. To access a user's Web site, use the following URL: http://IPaddress/~username/ where IPaddress is the IP address or domain name of the computer and username is the name of the user on that computer. When a user accesses your computer via Remote Login, he accesses the Unix shell underlying Mac OS X. Keep in mind that turning on this option can open your computer to hackers who can use the Unix command-line interface to modify your system setup. Unix is covered in Chapter 19. Apple Remote Desktop and Xgrid are not part of Mac OS X and are not covered in this book. You can learn more about Apple Remote Desktop at www.apple.com/remotedesktop/ and Xgrid at www.apple.com/acg/xgrid/.
To disable sharing services 1. | Choose Apple > System Preferences (Figure 2), or click the System Preferences icon in the Dock.
| 2. | In the System Preferences window that appears (Figure 1), click the Sharing icon to display the Sharing preferences pane.
| 3. | If necessary, click the Services tab to display its options (Figure 7).
| 4. | Turn off the check box beside the sharing service you want to disable.
| 5. | If a dialog sheet like the one in Figure 13 appears, enter the number of minutes in which sharing will be disabled in the top box and click OK.
Figure 13. You can use a dialog like this to specify how long before sharing shuts down and include a personal message. 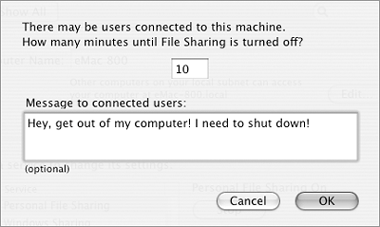
|
Tips In step 5, the value you enter determines how long before sharing is disabled. If you're in a hurry, enter a smaller value than the default value, which is 10. When you disable file sharing, a dialog like the one in Figure 14 appears on the screen of each connected user, warning them that the server (your computer) will be shutting down. Figure 14. Here's what a connected user sees when you shut down file sharing, using the settings shown in Figure 13. 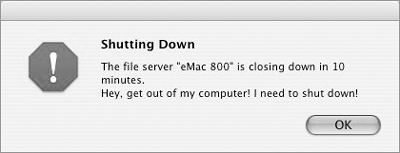
In step 5, you can also enter a message in the bottom box to send to connected users. Figures 13 and 14 show examples.
To set firewall options 1. | Choose Apple > System Preferences (Figure 2), or click the System Preferences icon in the Dock.
| 2. | In the System Preferences window that appears (Figure 1), click the Sharing icon to display the Sharing preferences pane.
| 3. | If necessary, click the Firewall button to display Firewall options (Figure 15).
Figure 15. The Firewall tab of the Sharing preferences pane lets you configure and enable Mac OS X's built-in firewall. 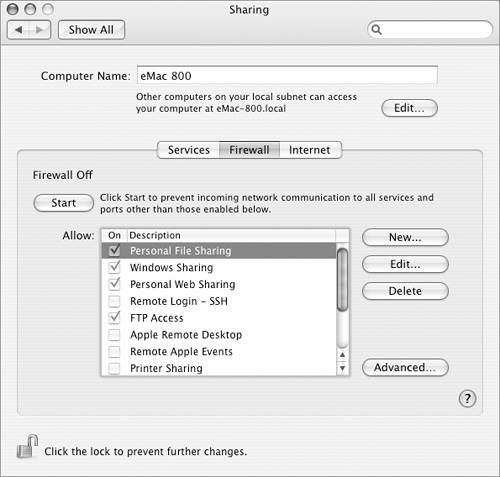
| 4. | To start firewall protection, click Start.
| 5. | Turn on the check box beside each type of sharing you want to exclude from firewall protection. The options are the same as those discussed in the section titled "To enable sharing services" earlier in this chapter, plus:
iChat Bonjour enables network users to conduct chats with you. iTunes Music Sharing enables network users to listen to your iTunes playlists. iPhoto Bonjour Sharing enables network users to see your iPhoto albums. (This requires iPhoto, which is not part of Mac OS X and not covered in this book.) Network Time enables your computer to update its internal clock via network time server.
|
Tips A firewall is security software that prevents incoming network access to your computer. In step 5, each type of sharing corresponds to one or more network ports. To add a port to the Description (Ports) list, click the New button. In the dialog that appears (Figure 16), choose an option from the Port Name pop-up menu (Figure 17), enter port numbers in the boxes beneath it, and click OK. The port is added to the list. Figure 16. Use a dialog like this to add a port to the Firewall tab's list. 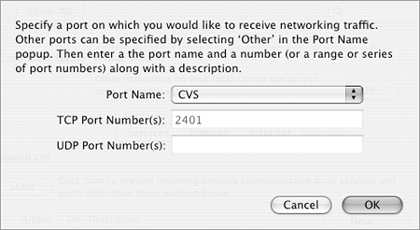
Figure 17. Mac OS X comes preconfigured with many commonly used ports. 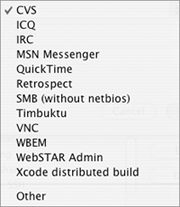
Clicking the Advanced button in the Fire-wall options of the Sharing preferences pane (Figure 15) displays more setup options, as shown in Figure 18. You can use these options to fine-tune the way the firewall feature works. Figure 18. Mac OS X 10.4 includes advanced options to fine-tune a firewall setup. 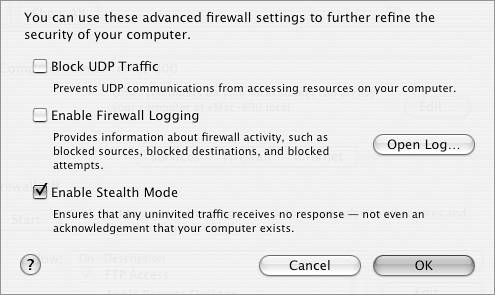
To stop firewall protection, click Stop in step 4 and skip step 5. (The Stop button appears in place of the Start button when the firewall is enabled.)
To share an Internet connection with other network users 1. | Choose Apple > System Preferences (Figure 2), or click the System Preferences icon in the Dock.
| 2. | In the System Preferences window that appears (Figure 1), click the Sharing icon to display the Sharing preferences pane.
| 3. | If necessary, click the Internet button to display Internet sharing options (Figure 19).
Figure 19. Internet sharing options make it possible to share an Internet connection with other computers on a network. 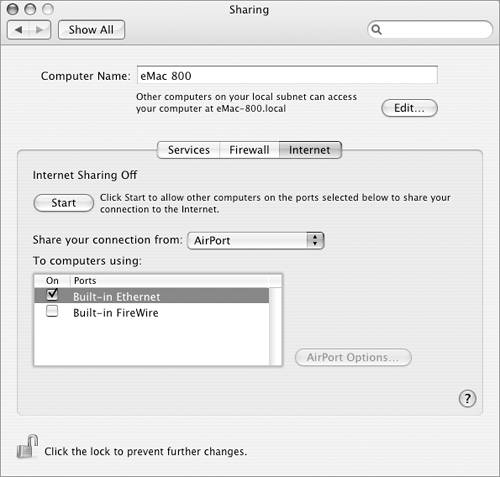
| 4. | Choose an option from the Share your connection from pop-up menu (Figure 20) to specify which Internet connection you want to share.
Figure 20. Use this pop-up menu to indicate which Internet connection you want to share. 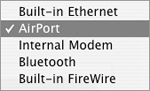
| 5. | Turn on the check box(es) to indicate how the computers you are sharing the Internet connection with are connected to your computer.
| 6. | Click Start.
| 7. | A dialog like the one in Figure 21 may appear. If you're sure you want to share the connection, click OK.
Figure 21. A dialog like this may appear when you start sharing an Internet connection. 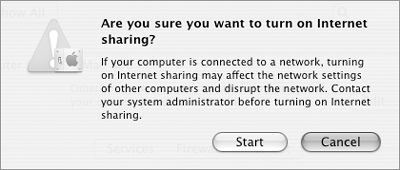
|
Tips When you share an Internet connection, the total connection speed is divided among the active connections. So, for example, if two computers are actively sharing a 256 Kbps cable modem connection with you, the speed of each connection will only be about 85 Kbps. To stop sharing an Internet connection with other network users, follow steps 1 through 3 above, then click the Stop button.
|