Using Windows Forms Controls
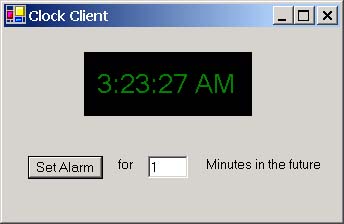
Using Windows Forms Controls With all the hype about ASP.NET and XML Web services, many people have completely neglected the fact that the .NET Framework is a full-featured development platform. The .NET Framework includes support for rich-user interfaces using Windows Forms. Most of the demos that you have built so far have been built using Windows Forms. The .NET Framework also includes tools for creating rich- user interface controls that are very similar in concept to ActiveX controls. These controls are called Windows Forms controls. Because the focus of this book is COM Interop, you are probably waiting for me to tell you that Windows Forms controls can be exposed as ActiveX controls to unmanaged clients . Unfortunately, it's not quite that simple. It turns out that there is such a wide variation in the implementation of ActiveX control containers that Microsoft was not willing to claim that Windows Forms controls can be hosted in any ActiveX control container. Officially, you can host Windows Forms controlsand use them as though they were ActiveX controlsin IE 6 (or greater) only. Unofficially, with a few incantations, you can host Windows Forms controls as ActiveX controls in many ActiveX control containers. Just keep in mind that, if you attempt to use a Windows Forms control as an ActiveX control in any container other than IE, you are on your own if anything goes wrong. In this chapter, I give you a brief overview of Windows Forms controls. You then build a very simple Windows Forms control, and I show you how to host a Windows Form control in IE and in other ActiveX control containers. An Introduction to Windows Forms ControlsIf you understand ActiveX controls, understanding Windows Forms controls should be simple. An ActiveX control is a COM object that supports a specified set of interfaces that make it easy to use in a visual development environment. A Windows Forms control is a managed class in a .NET assembly that derives from a specified base class. It also supports properties and design-time attributes that make the control easy to use in a visual development environment. Windows Forms controls have a user interface that is displayed within its client window. They also have properties and events, and their state can persist to a container provided by their client, just like ActiveX controls. An Example Windows Forms ControlThe easiest way to understand Windows Forms controls is to build one. I will build a simple Windows Form control and then use it in IE and also in Visual Basic 6. The control that I will build is a simple digital alarm clock that looks as shown in Figure 8-5. Figure 8-5. The digital clock control. The digital clock control supports the custom properties and methods shown in Table 8-3. Table 8-3. The properties and methods of the digital clock control
The DisplayFormat property allows you to control whether the digital clock uses 24-hour or 12-hour format for the time; the default is 12-hour format. The ShowSeconds property allows you to specify whether the clock shows seconds or not; the default is to show seconds. The SetAlarm method allows you to set the alarm on the digital clock. To use this method, pass a System.DateTime object to the SetAlarm method specifying the date and time that the alarm should go off. The digital clock fires an Alarm event back to its client at the specified time. The delegate for the Alarm event is called AlarmHandler. It is a standard event delegate that sends the object that generates the event (the sender) as the first parameter and an EventArgs object that contains the arguments for the event as the second parameter. A Windows Forms control automatically inherits support for a number of other stock properties, such as BackColor, ForeColor, and Font, from its base class: System.Windows.Forms.UserControl . Therefore, the list of properties that a consumer will see is far more complete than the list of members that I show in Table 8-3. Let's build this control using Visual Studio .NET, and then you can use it to learn how to use Windows Forms control from IE and most other ActiveX control containers. A summary of the steps to build this control is as follows :
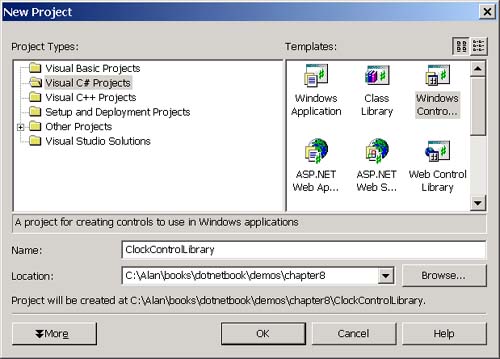
CREATE A WINDOWS CONTROL LIBRARY PROJECTPerform the following steps to create a Windows control library project:
Visual C# will create a project that contains a UserControl class that derives from System.Windows.Forms.UserControl . This base class contains most of the logic required to make your derived class behave like a Windows Forms control. All of the methods and interfaces that a Windows Forms control must implement in order to be hosted in a Windows Forms control container are contained in this base class, as well as the logic to allow the control to be hosted in an ActiveX control container. The only thing you need to do is to fill in the code that is specific to your control. In many cases, you will have to draw the UI by overriding the OnPaint method in the System.Windows.Forms.UserControl class. If you create a composite control that is just a conglomerate of other controls, such as a text box, a label, and a checkbox, you don't need to do this. You can just draw your control using the Visual Studio .NET form designer. Let's look first at the code to draw the UI. ADD THE LOGIC TO DRAW THE UIYou can implement the UI for a Windows Forms control in two ways:
You could implement the digital clock control either way, but I decided to override the OnPaint method because I believe that you will learn more if I do it this way. To implement the OnPaint method, first change the name of the class. This is initially called UserControl1 , but change it to ClockControl . In other words, go to the file called UserControl1 and change the bolded code shown below: namespace ClockControlLibrary { public class UserControl1 : System.Windows.Forms.UserControl { public UserControl1() { // code omitted for clarity... } // code omitted for clarity... } // code omitted for clarity... } This is what the new code should look like: namespace ClockControlLibrary { public class ClockControl : System.Windows.Forms.UserControl { public ClockControl() { // code omitted for clarity... } // code omitted for clarity... } // code omitted for clarity... } Notice that you change both the name of the class and the name of its constructor. Next I'll add some member variables to the ClockControl class as shown in bold: namespace ClockControlLibrary { public enum TimeFormat { Hour12=0, Hour24=1 } public class ClockControl : System.Windows.Forms.UserControl { private System.ComponentModel.Container components = null; private TimeFormat mFormat; private Boolean mShowSeconds; public ClockControl() { // // Code omitted for clarity... // mFormat=TimeFormat.Hour12; mShowSeconds=true; } } // // code omitted for clarity... // } The TimeFormat enumeration is used to specify whether the digital clock will show the hour portion of the time in 12-hour or 24-hour format. I could have used a Boolean, perhaps called Use12Hour (or something similar). However, I wanted to show you that, if you use an enumeration as the data type for a property in your Windows Forms controls, the property browser in your visual development environment will display the enumeration values in a dropdown list that you can choose from. The mShowSeconds property allows you to specify whether the digital clock will include seconds in the displayed time. Notice that, in the constructor for the control class, I initialize the time format to 12 hour and set the ShowSeconds property to true. Now I'll override the OnPaint method to draw the control. The OnPaint method on System.Windows.Forms.Usercontrol will be called whenever the control needs to redraw itself. Like most event handlers, the OnPaint method has a single argument that contains an instance of an EventArgs -derived class called PaintEventArgs . The properties of this derived class contain the arguments for the event. The PaintEventArgs class contains only two properties: (1) a clipping rectangle and (2) a graphics object that you use to paint the screen. The graphics object is an instance of the System.Drawing.Graphics class. This class encapsulates a GDI+ drawing surface. You can think of the System.Drawing.Graphics class as the managed code equivalent of a Device context. You call methods on this object to draw to the screen, a printer, or other graphics output devices. The code for the OnPaint method is as follows: 1. public class ClockControl : UserControl 2. { 3. //Code omitted for clarity... 4. protected override void OnPaint(PaintEventArgs e) 5. { 6. String strTmFormat, strTm; 7. if (mFormat==TimeFormat.Hour12) 8. strTmFormat="hh:mm"; 9. else 10. strTmFormat="HH:mm"; 11. if (mShowSeconds) 12. strTmFormat+=":ss"; 13. if (mFormat==TimeFormat.Hour12) 14. strTmFormat+=" tt"; 15. strTm=DateTime.Now.ToString(strTmFormat); 16. SizeF txtSz= 17. e.Graphics.MeasureString(strTm,Font); 18. RectangleF rect = new RectangleF(19. (ClientRectangle.Width-txtSz.Width)/2, 20. (ClientRectangle.Height-txtSz.Height)/2 , 21. txtSz.Width, 22. txtSz.Height); 23. Brush frClrBrush=new SolidBrush(ForeColor); 24. e.Graphics.DrawString(25. strTm,Font,frClrBrush, rect); 26. } 27. // Code omitted for clarity... 28. } Line 6 declares two strings. The string strTmFormat will hold the format string for the time, and strTm will hold the time itself. Lines 7 through 10 determine the format for the hours and minutes portion of the time. The DateTime type contains an overload of the ToString method that takes a format string, which allows you to specify the format of the textual representation of the date. I won't give an exhaustive explanation of the contents of this format string; you can see the documentation for the System.DateTimeFormatInfo class in the .NET Framework SDK for that. I can tell you that hh means to show the hour of the time portion of the date in 12-hour format (that is, 5 o'clock in the afternoon is displayed as 5:00 PM ). HH means to display the hour in 24-hour format (that is, 5 o' clock in the afternoon is displayed as 17:00). In both cases, single-digit hours will have a leading zero. The format specifier mm means that the minute portion of the time should be displayed with a leading zero for single-digit minutes. The format specifier ss means to display the seconds, and tt specifies that you want to display AM and PM with the time, which is only necessary if you are using 12-hour format. The default format string (12-hour format with seconds showing) is the following: hh:mm:ss tt. Lines 11 and 12 append the seconds designator ss to the format string if the ShowSeconds property is set to true. Lines 13 and 14 append the AM / PM designator only if the DisplayFormat property is set to show hours in 12-hour format. Line 15 calls the ToString method on the DateTime object that you get from the Now static method, which returns the current date and time. You pass the format statement that you constructed on lines 7 through 14 to the ToString method. Lines 16 and 17 call the MeasureString method on the System.Drawing.Graphics class. This method returns a System.Drawing.SizeF structure that will contain the rectangular region that the text will occupy when it is drawn in the specified font. Notice that the second parameter to the MeasureString is a property of the control called Font. This property is inherited from the System.Windows.Forms.Usercontrol class, and it contains the current value of the Font property for the control. Note The Font property is one of a number of stock properties (BackColor and ForeColor are two notable others) that are exposed, by default, on all Windows Forms controls. If you do not want to expose any of these properties, you can override the property in your user control class and provide a read-only implementation. Lines 18 through 22 calculate a bounding rectangle for the time string that will center the string in the client area of the control. Line 23 creates a solid brush using the ForeColor property of the control. The ForeColor property contains the foreground color of the control. Lines 24 and 25 use this brush and the bounding rectangle that you calculated on lines 18 through 22 to draw the formatted time string. It draws the string in the center of the client area of the digital clock control using the currently selected foreground color . Now that you understand how this code works, there's just one problem. As currently coded, it won't work properly. The time on the clock won't be updated unless you force the control to redraw itself every second. You can do this using a timer. With the .NET Framework, two types of timers are available:
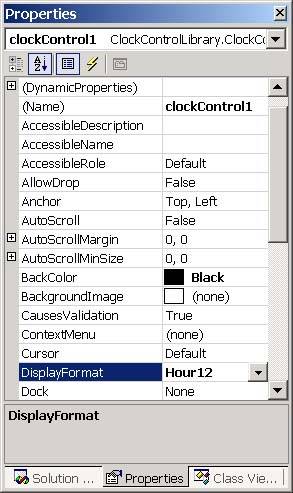
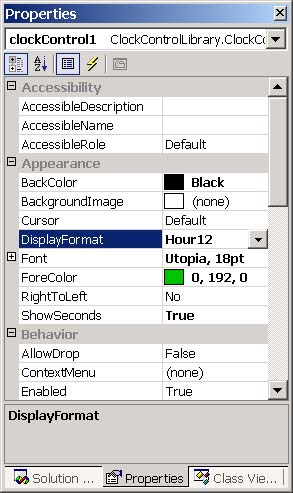
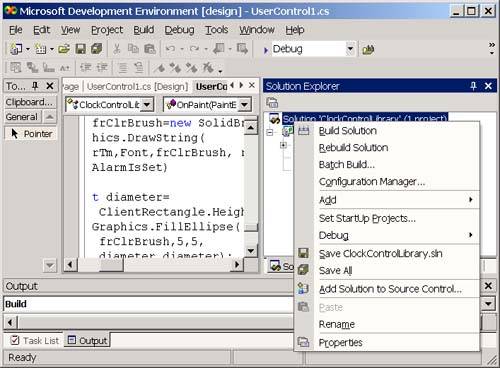
Interestingly, I found that the Windows-based timer would work just fine when I used a Windows Forms client, but it would not update the window correctly when I used the control in IE. The server-based timer worked like a champ everywhere. Because of this, I used the server-based timer for the clock control. To add a server-based timer, you need to add the code shown in bold to the ClockControl class: 1. // other "using" statements omitted for clarity... 2. using System.Timers; 3. namespace ClockControlLibrary 4. { 5. // Code omitted for clarity... 6. public class ClockControl : UserControl 7. { 8. // Other private variable declarations omitted... 9. private System.Timers.Timer mTimer; 10. public ClockControl() 11. { 12. // Code omitted for clarity... 13. mTimer=new System.Timers.Timer(1000); 14. mTimer.Elapsed+=new 15. ElapsedEventHandler(timer_Elapsed); 16. mTimer.Enabled=true; 17. } 18. private void timer_Elapsed(object sender, 19. System.Timers.ElapsedEventArgs e) 20. { 21. Refresh(); 22. } 23. // Code omitted for clarity... 24. } 25. } Line 1 adds a using statement for the System.Timers namespace. Line 9 adds a private field to the ClockControl that will contain an instance of the System.Timers.Timer class. You add the code shown in lines 13 through 16 to the end of the constructor for the ClockControl class. Line 13 instantiates a new timer using an interval of 1,000 milliseconds (1 second). Lines 14 and 15 add a handler for the Elapsed event, which is fired at the end of each interval. Lines 18 through 22 show the handler for the Elapsed event. This method simply calls the Refresh method, which is implemented in the System.Windows.Forms.UserControl class and which invalidates the client area of the control and triggers a call to OnPaint for the control to redraw itself. Note Actually the Refresh method is implemented in the System.Windows.Forms.Control class, which is a base class of System.Windows.Forms.UserControl. Line 16 sets the Enabled property of the Timer object to true, which will cause it to start firing Elapsed events every second. The UI for the digital clock control is essentially complete. However, we still need to do a few more things to make the control easier to use. Even though the clock contains private fields that determine whether the clock will display seconds or the hour in 12- or 24-hour format, consumers of the control have no way to set these values in their visual design environment. In order for consumers to do this, you must add properties to the control. ADD PROPERTIES TO THE CONTROLI will add a ShowSeconds property to the control, which will specify whether the control will display seconds, and a DisplayFormat property, which will specify whether the control will show hours in 12- or 24-hour format. Add the following code to the ClockControl class to support the ShowSeconds and DisplayFormatProperties: namespace ClockControlLibrary { public class ClockControl : UserControl { // // The rest of the ClockControl code is omitted... // [Category("Appearance")] [Browsable(true)] public TimeFormat DisplayFormat { get { return mFormat; } set { mFormat=value; } } [Category("Appearance")] [Browsable(true)] public Boolean ShowSeconds { get { return mShowSeconds; } set { mShowSeconds=value; } } } } Most of the code here is actually not particularly interesting. It is the same code that you would write to expose properties from any class. The part that is interesting is the use of the Category and Browsable attributes. These two attributes, which you can find in the System.ComponentModel namespace, allow you to control if and how the property is displayed in the property browser of a visual development environment. The Browsable attribute allows you to specify whether an attribute should be visible at all in the property browser of a visual development environment. Set this attribute to true to make a property visible in a property browser at design time. If a property is not appropriate for design-time editing in the property browser of a visual development environment, set the Browsable attribute to false. The default is true, so, if you do not use the Browsable attribute on a property, the property will be visible. Most property browsers allow you to group the properties of a control by category or to sort them alphabetically. The Category attribute allows you to specify which category a property should be displayed in. Figure 8-7 shows the properties of the digital clock control sorted alphabetically . Figure 8-8 shows the properties of the digital clock control grouped by category. In the case of the digital clock control, I placed both the ShowSeconds and DisplayFormat properties in the Appearance category. Figure 8-7. The properties of the clock control sorted alphabetically. Figure 8-8. The properties of the clock control grouped by category. ADD THE ALARM EVENTLike ActiveX controls, most Windows Forms controls support at least one event. The digital clock control supports an event called Alarm. I will add a SetAlarm method to the digital clock control that allows you to specify the date and time when the alarm event should fire. When the alarm is set, you see a small circle in the upper left corner of the control. When the specified time is reached, the digital clock fires an Alarm event that the client can catch and provide some audible or visible alert to the user. In order to implement this functionality, add the code shown in bold to the ClockControl class: 1. namespace ClockControlLibrary 2. { 3. public delegate void AlarmEventHandler 4. ( 5. object sender, 6. EventArgs e 7.); 8. // TimeFormat enumeration omitted... 9. public class ClockControl : UserControl 10. { 11. // Other private fields omitted... 12. private Boolean mbAlarmIsSet; 13. private DateTime mAlarmTime; 14. public event AlarmEventHandler Alarm; 15. private void timer_Elapsed(object sender, 16. System.Timers.ElapsedEventArgs e) 17. { 18. if (mbAlarmIsSet==true) 19. { 20. if (Alarm != null && 21. DateTime.Now > mAlarmTime) 22. { 23. mTimer.Enabled=false; 24. Alarm(this,EventArgs.Empty); 25. mbAlarmIsSet=false; 26. mTimer.Enabled=true; 27. } 28. } 29. Refresh(); 30. } 31. protected override void 32. OnPaint(PaintEventArgs e) 33. { 34. // The rest of the implementation of 35. // OnPaint is omitted... 36. if (mbAlarmIsSet) 37. { 38. int diameter= 39. ClientRectangle.Height/10; 40. e.Graphics.FillEllipse( 41. frClrBrush,5,5, 42. diameter,diameter); 43. } 44. } 45. public void SetAlarm(DateTime tm) 46. { 47. mbAlarmIsSet=true; 48. mAlarmTime=tm; 49. } 50. } 51. } Lines 3 through 7 declare a delegate for the Alarm event called AlarmEventHandler. This delegate has the standard, 2-parameter prototype for an event delegate. The first parameter is a System.Object instance that points to the object that generated the event, and the second parameter is an Event-Args-derived object that contains the parameters for the event. In this case, there are no event-specific parameters, so I am using the EventArgs class itself rather than deriving an event-specific EventArgs class. Line 12 declares a Boolean member variable called mbAlarmIsSet that is used to indicate if the alarm is set. Line 13 declares a System.DateTime instance that is used to store the date and time at which the alarm should fire. Line 14 declares an event called Alarm that uses the delegate that I declared on lines 3 through 7. Lines 18 through 28 contain the logic that I added to the timer_Elapsed method to fire the Alarm event when you reach the specified alarm time. Line 18 checks to see if the alarm is set. If it is set, lines 20 and 21 check if the client has added a callback handler and if the current time is greater than the alarm time. If both of these conditions are true, line 23 disables the timer to prevent timer events from accumulating while the client is responding to the Alarm event. Line 24 then fires the Alarm event. Line 25 turns off the alarm. (You may want to add the option to have a recurring alarm. I'll leave the implementation of this to the reader). Line 26 reenables the timer so that the control will continue to update itself. Lines 36 through 43 in the OnPaint method print a small circle in the upper left portion of the digital clock's client area if the alarm is set. Lines 45 through 49 show the implementation of the SetAlarm method, which the control's consumer can call to set the alarm. The implementation of this method is simple. You set the mbAlarmIsSet field to true so that the timer_Elapsed callback will start checking the alarm. You then store the specified alarm time in the mAlarmTime field. ADD DESIGN-TIME ATTRIBUTESThe control is almost complete. The last step is to add a design-time attribute that specifies a default event for the control. If you have used Visual Basic, you know that, after you drag and drop a control onto a form, you can double-click the control. Visual Basic then automatically adds a callback for the most commonly used event on the control. For instance, if you drag and drop a command button onto a form, Visual Basic will add a callback for the Clicked event when you double-click the control. Visual Basic can do this only if the control specifies a default event, that is, the event that consumers will tend to handle most often. To define a default event, add the DefaultEvent attribute to the ClockControl class as shown in bold here: [DefaultEvent("Alarm")] public class ClockControl : UserControl { // Implementation of the ClockControl class omitted... } TESTYou are now ready to test the Windows Form control. The easiest way to test the control is to add a client project to the user control's solution. To do this, perform the following steps:
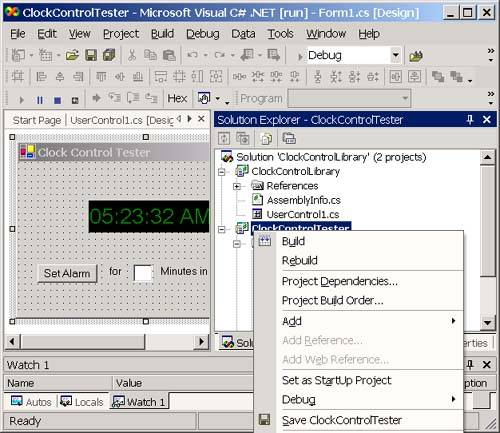
You should also set the new Windows Forms project as the startup project for the solution, that is, the project that will start running when you use the Debug Start or Debug Start without debugging. Perform the following steps to do this:
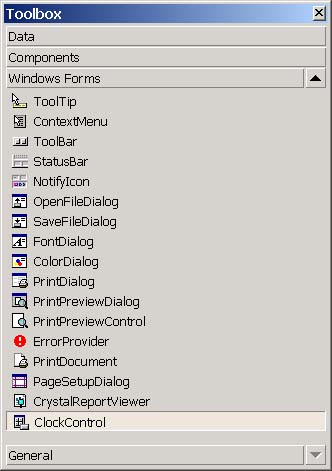
Visual Studio .NET will create a project for you that contains a form. If you look at the toolbox, though, you'll notice that there is a special entry for the ClockControl as shown in Figure 8-11. Figure 8-11. The Clock Control displayed in the Visual Studio .NET toolbox. You do not have to reference the digital clock control explicitly from the client project. Visual Studio .NET will create a reference for you when you add a Windows Forms project to a solution that contains a Windows Forms control. Drag and drop an instance of the digital clock control onto the form. Set the properties of the control as shown in Table 8-4. Table 8-4. The property values for the digital clock control
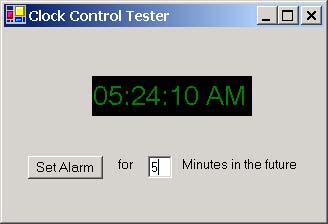
Now add the controls shown in Figure 8-12 to the application. Figure 8-12. The test application for the digital clock control. Name the controls as shown in Table 8-5. Table 8-5. The property values for the digital clock control
Now double-click the Set Alarm button to create a Clicked event handler and add the following code: private void cmdSetAlarm_Click(object sender, System.EventArgs e) { double dblNumMins; try { dblNumMins=double.Parse(txtNumMins.Text); clockControl1.SetAlarm(DateTime.Now.AddMinutes(dblNumMins)); } catch(FormatException) { MessageBox.Show("Please enter a number"); } catch(Exception ex) { MessageBox.Show("The following error occurred: " + ex.Message); } } Now double-click the digital clock control. This will add a handler for the Alarm event because you made this event the default event for the control. Add the following code for this handler: private void clockControl1_Alarm(object sender, System.EventArgs e) { System.Windows.Forms.MessageBox.Show("The alarm went off"); } Try the application out. Enter a number of minutes in the text box, and you should see a message box pop up when the number of minutes that you specified for the alarm elapses. Hosting Controls in IEThe only ActiveX control container that can officially host Windows Forms controls is IE. The following file shows an example of an HTML file that uses the digital clock control: <html> <head> <title>Test Clock Control</title> </head> <script language="VBScript"> <!-- Sub chkShowSeconds_OnClick() ClockControl1.ShowSeconds=chkShowSeconds.Checked end sub --> </script> <body> <table border="0" width="64%"> <tr> <td width="100%" colspan="2"> <p align="center">Testing the Digital Clock Control </td> </tr> <tr> <td width="100%" align="center" colspan="2"> <object classid= "http:ClockControlLibrary.dll#ClockControlLibrary.ClockCont rol" id="ClockControl1" width="168" height="64"> <param name="BackColor" value="Black"> <param name="ForeColor" value="Green"> </object> </td> </tr> <tr> <td width="22%"></td> <td width="78%"><p><input type="checkbox" name="chkShowSeconds" value="Show Seconds" checked> Show Seconds</p></td> </tr> </table> </body> </html> The syntax for using a Windows Forms control as an ActiveX Control is simple. You must first use the object tag as you would for a regular ActiveX control. The main difference is that, instead of putting a GUID for the classid parameter, you identify the Windows Forms control using the following syntax: URL/AssemblyFileName#FullQualifiedClassName The value that I used in this example for the classid parameter of the object tag is shown here: "http:ClockControlLibrary.dll#ClockControlLibrary.ClockControl" In this case, I used the abbreviated syntax, http:ClockControlLibrary.dll , for the URL/AssemblyFileName combination, which indicates that the assembly resides in the same directory as the HTML file. If the assembly resides at some other URL, you need to specify the full path to the assembly. You can then use the param subtag with name/value pairs to specify properties for the control. Here I have set the BackColor to black and the ForeColor to green. You will need to create an IIS virtual directory and add both the HTML file and the clock control assembly to the directory. Now, when you navigate to the HTML page in your browser, IE will download the ClockControlLibrary and cache it in the download cache. You can view the download cache in the download subfolder of the GAC. On my machine, the download cache is located at D:\WINNT\assembly\Download\ . If you navigate to this folder, you will see all the assemblies that have been downloaded by IE from intranet or Internet sites. This folder uses the same shell viewer that you use to view the GAC. You can clear the download cache by executing the following command at a Visual Studio .NET command prompt: gacutil /cdl As you learned in Chapter 3 when I discussed code access security, when IE downloads an assembly, it will assign security privileges to the assembly based on evidence that it is able to collect. Part of that evidence is the zone where the assembly came from. An assembly that is downloaded from the Internet or your intranet obviously has fewer privileges than an assembly that is accessed directly from your hard drive. When you download an ActiveX control from the Internet or the intranet, it is allowed to run on your machine, but it is only partially trusted. If the Windows Forms control has a strong name, you must attach the AllowPartiallyTrustedCallers attribute to the control's assembly in order for it to be usable in the download scenario. You can do this by adding the following code to the AssemblyInfo.cs file: [assembly: System.Security.AllowPartiallyTrustedCallers] Keep in mind that this attribute, which is very poorly documented in the .NET Framework SDK, is only necessary if you assign a strong name to the assembly that contains your Windows Forms control. Hosting Windows Forms Controls in Other ContainersAlthough it is not supported, you can host Windows Forms controls in other ActiveX control containers, such as Visual Basic 6. Using Windows Forms controls in any ActiveX control container was supported in beta versions of the .NET Framework. Unfortunately, there is so much difference in the implementation of the various ActiveX control containers that Microsoft eventually decided that it would be impossible to guarantee that Windows Forms controls would work in all ActiveX control containers. Therefore, Microsoft decided to officially drop support for all ActiveX control containers except IE. Unofficially, you can use Windows Forms controls in many ActiveX control containers. The fact that it's not supported just means that, if you run into any problems, Microsoft is not going to help you solve them. A Windows Forms control already implements all of the COM interfaces required of an ActiveX control. The main things missing are a number of registry entries that are expected of an ActiveX control. You need to add the following subkeys beneath the control's entry under HKEY_CLASSES_ROOT\CLSID\{CLSIDForControl} where {CLSIDForControl} is the CLSID for the Clock control:
The Control entry indicates that the COM class is an ActiveX control. See the documentation for the OLEMISC enumeration in the Platform SDK to understand the MiscStatus entry and what the value 131457 means. The Version subkey contains a two-part version number that you can construct from the major and minor versions of the assembly. The TypeLib entry contains the GUID (the LIBID) of the generated assembly. You will also need to add the following subkey under HKEY_CLASSES_ROOT\CLSID\{CLSIDForControl}\Implemented Categories: {40FC6ED4-2438-11CF-A3DB-080036F12502} This GUID is the CATID of the Component Category for ActiveX controls. We need a way to easily insert these entries into the registry. The .NET Framework provides a mechanism that you can use to execute your own code when a user runs the Assembly Registration Tool (regasm.exe) to register an assembly for use by a COM client. You can use this mechanism to add the additional registry entries that you need to expose the Windows Forms control as an ActiveX control. To do this, perform the following steps:
ADD COMREGISTER AND COMUNREGISTER FUNCTIONSWhen a user runs regasm.exe to register a managed code assembly for use by a COM client, regasm.exe looks for a COM register function within the assembly. If such a function is present, regasm.exe executes it. This is your opportunity to exert some control of how your assembly is exposed to COM clients. To create a COM register function, add a static void function that accepts a System.Type parameter to your Windows Forms control's class and then mark it with the ComRegisterFunction attribute, which you can find in the System.Runtime.InteropServices namespace. The following code shows a COM register function for the clock control that adds the registry entries needed for the control to be visible to any ActiveX control container: 1. public class ClockControl : UserControl 2. { 3. // Implementation of the ClockControl class omitted... 4. [ComRegisterFunction] 5. private static void RegisterForCOM(Type aType) 6. { 7. String strCtrlKey, strVersion; 8. Guid typeLibGUID; 9. strCtrlKey="CLSID\"+ 10. aType.GUID.ToString("B"); 11. RegistryKey key= 12. Registry.ClassesRoot.OpenSubKey(13. strCtrlKey,true); 14. key.CreateSubKey("Control"); 15. key.CreateSubKey("Implemented Categories\{40FC6ED4-2438-11CF-A3D8-080036F12502}"); 16. key.CreateSubKey(17. "MiscStatus").SetValue("","131457"); 18. typeLibGUID= 19. Marshal.GetTypeLibGuidForAssembly(20. aType.Assembly); 21. key.CreateSubKey("TypeLib").SetValue(22. "",typeLibGUID.ToString("B")); 23. Version asmVersion= 24. aType.Assembly.GetName().Version; 25. strVersion=asmVersion.Major.ToString()+ 26. "."+asmVersion.Minor.ToString(); 27. key.CreateSubKey(28. "Version").SetValue("",strVersion); 29. key.Close(); 30. } 31. } Lines 7 and 8 declare variables. Lines 9 through 13 use the RegistryKey class, which resides in the Microsoft.Win32 namespace to open the CLSID registry key for the clock control (HKEY_CLASSES_ROOT\CLSID\{CLSIDForControl}). The System.Type parameter that regasm will pass to the RegisterForCOM function contains the Type object for the class that is being registered. Line 10 uses the GUID property of this type object and converts it to a string. You then pass this GUID (after prepending CLSID\\ to it) to the OpenSubKey method of the ClassesRoot property, which returns a RegistryKey object that represents the HKEY_CLASSES_ROOT registry key. Note Passing B to the ToString method on the GUID class indicates that you want the string representation of the GUID to be in registry format, that is 32 characters separated by hyphens and enclosed by brackets. Line 14 adds the Control subkey. Line 15 adds a subkey that contains the CATID for ActiveX controls to the Implemented Categories' subkey for the Clock control. Lines 16 and 17 add the MiscStatus entry for the control. Lines 18 through 20 use the GetTypeLibGuidForAssembly method on the System.Runtime.InteropServices.Marshal class to retrieve the GUID (LIBID) that is assigned to a type library when it was exported from the specified assembly. Lines 21 and 22 add a TypeLib subkey that contains this value. Lines 23 through 26 generate a string that contains the major and minor versions of the assembly separated by a ".". Lines 27 and 28 add a Version subkey that contains this value. Finally, line 29 closes the CLSID key for the clock control. Note Because the code shown previously uses the RegistryKey class, which resides in the Microsoft.Win32 namespace, you need to add the following using statement to compile this code: using Microsoft.Win32; . You can also create a function that will be called when a user unregisters a managed assembly for use by unmanaged clients. This method has the same signature as the COM register function, but it is marked with the Com-UnregisterFunction attribute. Add this function to the ClockControl class directly beneath the COM register function as shown in the following: 1. public class ClockControl : System.Windows.Forms.UserControl 2. { 3. // Implementation of the ClockControl class omitted... 4. [ComRegisterFunction] 5. private static void RegisterForCOM(Type aType) 6. { 7. // Implementation of the RegisterForCOM method omitted... 8. } 9. [ComUnregisterFunction] 10. private static void UnregisterForCOM(Type aType) 11. { 12. try 13. { 14. Registry.ClassesRoot.DeleteSubKeyTree(15. "CLSID\"+aType.GUID.ToString("B")); 16. } 17. catch (ArgumentException) 18. { 19. 20. } 21. } 22. } 23. } The code here is fairly simple. You call the DeleteSubKeyTree method on the Microsoft.Win32.RegistryKey class to delete all the subkeys beneath the CLSID entry for the control. |

| | |
| Team-Fly |
| Top |
EAN: 2147483647
Pages: 119