Code Access Security
Code Access Security In the modern computing environment, you may receive code from several different sources: from your local hard drive, from your corporate intranet, from a network drive, from email, or from the Internet. Depending on where the code originates from and other properties of the code, such as who authored the code, you may want to assign different permissions to the code. For instance, if the code originated from your hard drive, you may want to allow it to do just about anything. If it originated from your local intranet or from a network drive on your corporate intranet, you may not want to prevent the code from writing to your local files, but you may allow it to read your files. If the code came from the Internet, you probably would want to prevent it from doing most things. The Code Access Security functionality in .NET provides you with the capability to define, in a very precise way, the permissions that code will be granted based on evidence that includes (among other things) the location where the code originated from. The basic idea is that certain code groups with membership conditions are based on evidence that the CLR can gather about the assembly. This evidence includes the zone, site, or URL where the assembly originated from, who published the assembly, the strong name of the assembly, the hash of the assembly, or whether the assembly came from the same directory or a child directory of its client application. Each code group has a permission set associated with it. A permission set is a named set of permissions that you can grant as a single unit to a code group . Some of the individual permissions that comprise a permission set include the following:
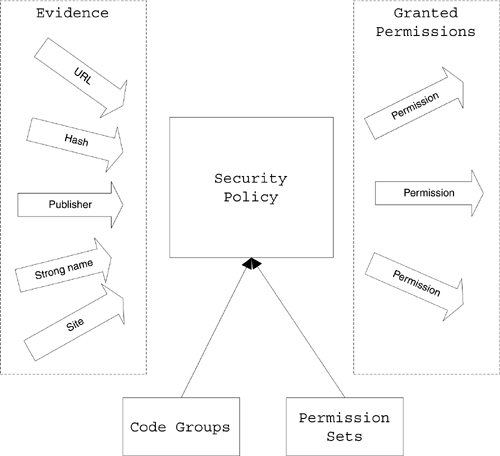
If an assembly matches the membership condition for a code group, it is granted all of the permissions in the permission set associated with that code group. When the CLR loads an assembly, it gathers the evidence associated with the assembly, that is, where the code originated from (local hard disk, intranet, Internet, and so forth), its publisher, hash and strong name, and so forth and presents this evidence to the security policy in effect on the machine. The security policy is the set of rules that the CLR uses to determine which permissions to grant to an assembly based on its presented evidence as shown in Figure 3-17. Figure 3-17. Security policy. The steps that the CLR performs to determine the permissions that it will grant to an assembly are as follows :
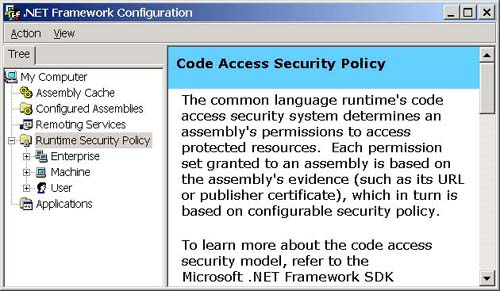
The assembly may affect this final set of granted permissions by refusing certain permissions and requesting minimum and optional permissions, but I discuss this more when I drill-down deeper into security policy later in this chapter. Now that you have a high-level idea of how permissions are granted to an assembly, let's discuss how those permissions used? All of the .NET Framework class library methods that access protected resources demand permission to use the resource before they actually use it. For instance, before it executes any of the code in an assembly, the CLR demands permission to execute code. When you open a disk file, the class library method that you use will demand FileIO permission. Any action that may have security implications, such as attempting to read or write environment variables or the registry, to open a UI window, or to execute unmanaged code will lead to a permission demand. Each type of permission has a class associated with it in the System.Security namespace. Each of these permission classes derives from a class called System.Security.CodeAccessPermission . The CodeAccessPermission class contains a method called Demand. This is the method that the CLR and the .NET Framework class library call to demand a particular permission. When you demand a permission, the CLR will walk upward through the current call stack, and, if any of the callers in the stack have not been granted the requested permission, it will throw a security exception. This stack walk is a critical part of code access security. It prevents a "Trojan horse" attack, where an assembly that has not been granted a particular permission can cause damage simply by loading another piece of code that does the damage on its behalf . If the Trojan horse assembly calls a method in a dangerous assembly, the stack walk will wind its way back up to the original caller (the Trojan horse), and, if this assembly was not granted the permission to perform the operation, the CLR will throw a security exception. One exception to this behavior (which is important given that this book talks about COM Interop and using unmanaged code) is that code access security does not affect managed code. Therefore, a Trojan horse assembly can simply call unmanaged code (either a Windows API method or a COM object) to do its dirty work. Fortunately, before the CLR makes a call to unmanaged code, it will demand the permission to execute unmanaged code. If this permission has not been granted, a security exception will be thrown. Therefore, if you are worried about Trojan horse programs like this, you can simply not grant the execute unmanaged code permission to any assemblies. In fact, by default, only code that originates from your local hard drive is allowed to execute unmanaged code anyway. Code that comes from either the Internet or your local intranet will not be able to execute unmanaged code unless you explicitly allow it to. The preceding explanation was a very high-level view. Let's look at code groups and permission sets and security policies at a slightly lower level, and then I will conclude with an example. Code GroupsA code group is comprised of a membership condition and a permission set. If an assembly matches the membership condition for the code group, it is granted the permissions in the code group's associated permission set. When you install the .NET Framework, a number of code groups are defined for you already, and you can create additional ones. To see the code groups that currently reside on your machine, we'll use the .NET Framework Configuration Tool, which is a convenient snap-in for the Microsoft Management Console (MMC). Note You can also view and edit the code groups on your machine using the Code Access Security Policy tool ( caspol .exe), which is a command-line tool that is included with the .NET Framework SDK. The .NET Framework Configuration Tool is much easier to use, so I have used it throughout this chapter. To view the code groups on your machine in the .NET Framework Configuration Tool, perform the following steps:
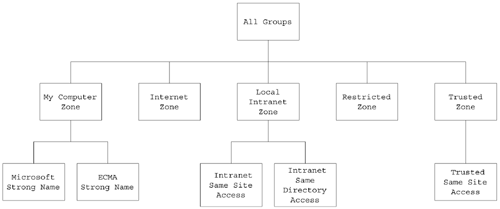
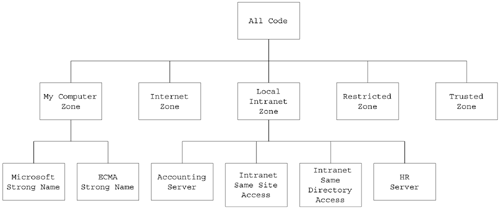
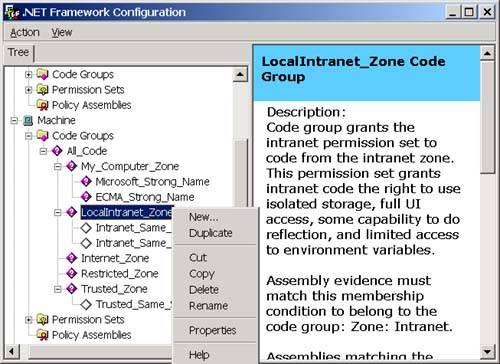
Notice that three levels of code groups are displayed in the .NET Framework Configuration Tool: Enterprise, Machine, and User. I discuss these various levels and the hierarchical structuring of the code groups more when I talk about security policy. For now, let's looks at the machine node. The root of the code group tree contains a code group called All_Code that all assemblies will match. If you want to apply a set of permissions to all assemblies (for a given policy level), you can put the permission in the permission set associated with the All_Code code group. Notice that all of the code groups directly beneath the All_Code code group are based on zones. In other words, the membership condition for the code group is that the assembly must have originated from the specified zone. (See the sidebar in this chapter about zones to learn how zones are created and edited.) The Intranet_Same_Site_Access, Intranet_Same_Directory_Access, and Trusted_Same_Site_Access code groups are custom code groups with custom permission sets that allow a component downloaded from a trusted or intranet site to connect back to the Web site where it originated from (Intranet_Same_Site_Access and Trusted_Same_Site_Access) and allow a component downloaded from an intranet site to access the directory that it originated from (Intranet_Same_Directory_Access). You cannot edit these code groups with the .NET Framework Configuration Tool, but, fortunately, you can edit all the others.
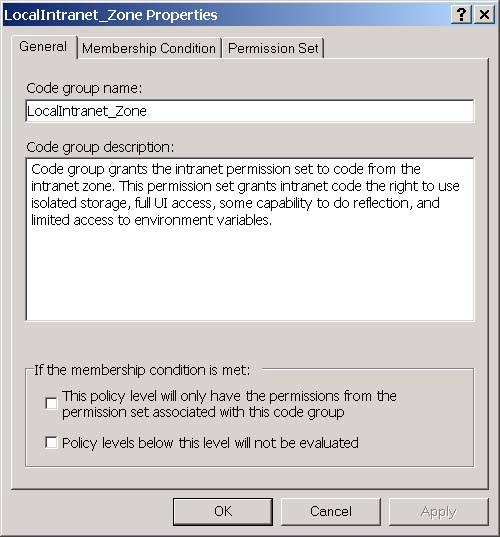
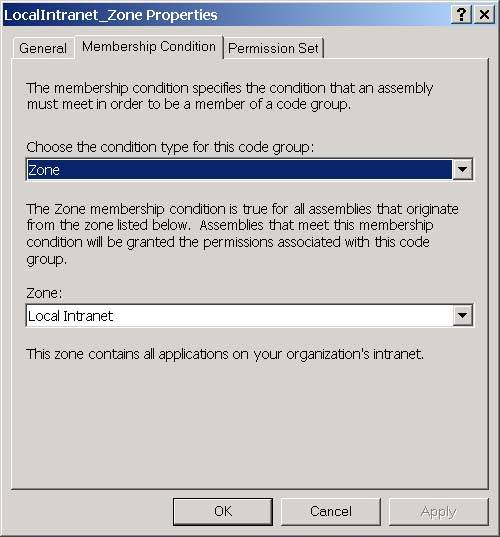
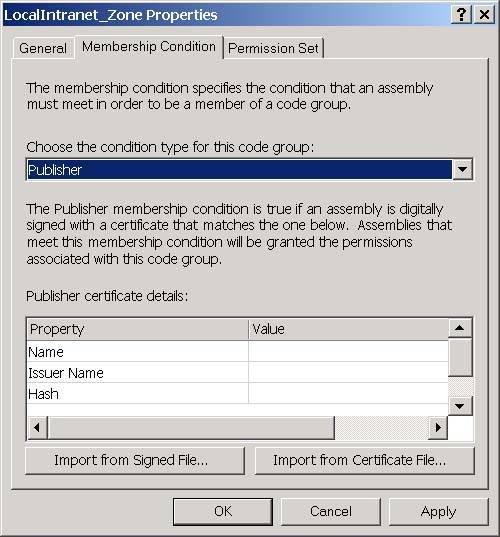
You can view and edit the membership condition and permission sets associated with a code group by right-clicking the code group and selecting Context Properties. You will then see the code properties dialog as shown in Figure 3-21 for the Local Intranet. Zone. Figure 3-21. The General tab of the code group properties dialog. On the General tab, notice that each code group has a name and a description. I will explain the two checkboxes on this page when I talk about security policy later in this chapter. The Membership Condition tab is how you specify the criterion that the CLR should use to determine if an assembly is a member of the code group. The Membership Condition tab of the properties dialog is shown in Figure 3-22. Figure 3-22. The Membership Condition tab of the code group properties dialog. The controls that you see on this window are a function of the condition type that you select for the code group. The default condition type is Zone, and, when you select this condition type, you will be presented with a dropdown that allows you to select the zone for the code group as shown in Figure 3-22. If you selected Publisher as your condition type instead, you will see controls that allow you to enter a digital signature for a publisher as shown in Figure 3-23. Figure 3-23. The Membership Condition tab of the code group properties dialog with Publisher selected for the condition type. You can choose the condition type from the top-most dropdown. The possible options are shown in Table 3-14: Permission SetsAfter an assembly matches the membership condition for a code group, it is granted the permissions in the permission set associated with the code group. Permission sets allow you to group permissions together so that you can add them as a single unit to a code group. When you install the .NET Framework, it will create the permission sets shown in Figure 3-24 on your machine. Figure 3-24. Permission sets. You can also add your own permission sets. Each permission set contains a list of permissions. The set of individual permissions that permission sets are built from is shown in Table 3-15. The Security permission is perhaps the most interesting because you must grant the Enable Assembly Execution permission for an assembly to run at all, and you must grant the Allow Calls to Unmanaged assemblies permission in order to use unmanaged code through COM Interop. Permission Sets are a convenience that frees you from the need to add each of these permissions individually to your code groups. You simply compile these permissions into permission sets, and then you can assign these permission sets to a code group. Table 3-14. Available condition types for code group membership conditions
Table 3-15. Available permissions to add to a permission set
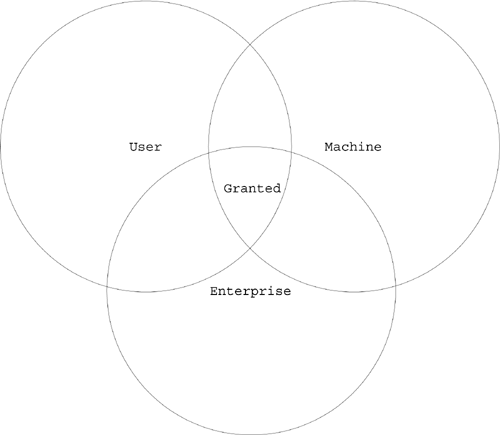
Security PolicySimply saying that an assembly is granted the permissions in the permission sets associated with the code groups that it matches is actually an oversimplification. In reality, the mapping from a set of matched code groups to a list of permissions that the assembly is granted is quite complicated. This mapping of matched code groups to permissions is called security policy. I mentioned earlier that there are four levels of code groups. Three of these levels are visible in the .NET Framework Configuration Tool: Enterprise, Machine, and User. You can see these in Figure 3-25. Figure 3-25. The three code group levels visible in the .NET Framework Configuration Tool. The fourth level is the Application Domain level, which you can set programmatically. In Figure 3-25, you can also see that, within each level, the code groups are laid out in a hierarchy as shown in Figure 3-26. Figure 3-26. Code group hierarchy. When the CLR loads an assembly, it will walk the code group hierarchy once for each of the four levels. It determines the set of permissions at each level as the union of the permissions in the permission sets associated with the matched code groups at that level. After the CLR determines the permissions granted for a particular level, it then calculates the permissions granted from security policy as the intersection of the permissions granted at each level as shown in Figure 3-27. Figure 3-27. Granted permissions. If you are not familiar with set theory, this means that, in order for a particular permission, let's say File IO, to be granted to an assembly, it must be a part of the calculated permissions for each level. Therefore, by default, only the Machine level is relevant because the Enterprise and User levels initially have the All_Code code group associated with them, and the permission set associated with the All_Code code group is Full Trust, that is, all permissions are granted. A system administrator can use the Enterprise or User Permissions then to prevent certain permissions from being granted even if they would ordinarily be granted based on the code groups and permission sets at one of the other levels. At each level, the walk of the code group hierarchy begins at the All_Code code group, which matches every assembly. Note The All_Code code group is a convenient place to put permissions that you would like every assembly to have. By default, this code group does not have a permission set associated with it. If an assembly's evidence matches the membership condition for a code group, the CLR will also check the children of the code group for matches. For example, consider that I modified the default hierarchy shown in Figure 3-26 so that I added two custom code groups. The membership condition for each of these code groups uses the Site condition with the specified site for one of the code groups being the Human Resources (HR) server and other site being the Accounting server on the corporate LAN. The code group hierarchy at the Machine level will now look as shown in Figure 3-28. Figure 3-28. A modified code group hierarchy. Based on this hierarchy, a Microsoft .NET-based application loaded from your local hard drive will match the following code groups at the Machine Level: All Code, My Computer zone, and Microsoft strong name. A .NET application downloaded from the HR server on your corporate intranet will match the following code groups: All Code, Local intranet zone, HR server, Intranet same site access, and Intranet same directory access. Note You can alter the way the tree is traversed. You can do this using the Exclusive and LevelFinal attributes on a code group. If the Exclusive attribute is applied to a code group at a policy level, the CLR will grant the permissions in that code group for the policy level and ignore the other code groups at that policy level. You can obviously only have one code group at a given policy level with the Exclusive attribute. The policy levels are arranged in a hierarchy with Enterprise at the highest level, following by machine, user, and then AppDomain. If the LevelFinal attribute is applied to a code group at a policy level, as long as the assembly matches a code group at that policy level, no code groups at a lower level will be checked. After the CLR determines the permissions at each level by traversing the code group hierarchy at each level, it calculates the granted permissions by taking the intersection of the permissions granted at each of the four levels. This total is called the permissions from policy and is still not the final set of permissions that the CLR will grant to the assembly. An assembly is allowed to refuse permissions. In general, an assembly should not accept more permissions than it needs. An assembly can also request the minimum set of permissions that it requires to run. If the assembly is not granted at least the minimum set of permissions, it will fail to load. This prevents the CLR from loading an assembly and then failing with a security exception every time the assembly tries to do anything. An assembly can also request optional permissions. These are permissions that the assembly can run without, but can take advantage of if they are available. The CLR will not grant more privileges than the set of minimum plus optional permissions. The final formula for the set of granted permissions is as follows: P granted =P min + (P optional If you are not familiar with set theory, this formula reads in English: the set of granted permissions P granted equals the minimum requested permissions (P min ) plus the set of permissions that are both declared optional permissions by the assembly (P optional ) and granted by policy (P policy ), minus the list of permissions that are explicitly refused by the assembly (P refused ). ExampleI think a lot of these concepts can be made clearer with an example. Earlier in this chapter when I talked about assembly binding, I showed you an example application, which you can download from the Web site, called the AssemblyMetaDataViewer, which you can see here in Figure 3-29. Figure 3-29. The assembly metadata viewer. This application loads assembly files, so it will call .NET Framework class library methods that will demand the file IO permission. Make sure the multifile assembly that you built in this chapter is loaded into the GAC by performing the following steps:
Now run the AssemblyMetaDataViewer application. Enter "multifile" into the Assembly Name textbox and click the Load button. The tool calls the Load method in the System.Reflection.Assembly class, and then it displays the location that it loaded the assembly from. Running the tool from your hard drive verifies that the AssemblyMetaDataViewer is allowed to open and read an assembly file when you run it from your local machine. Let's try running the AssemblyMetaDataViewer application by downloading it from the intranet. First, create an IIS virtual directory by performing the following steps:
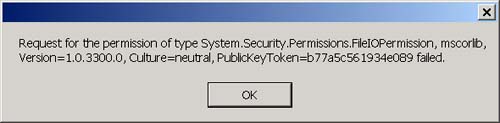
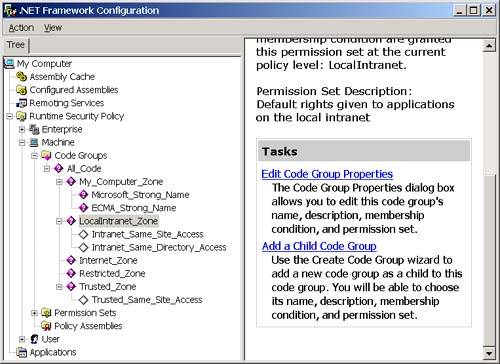
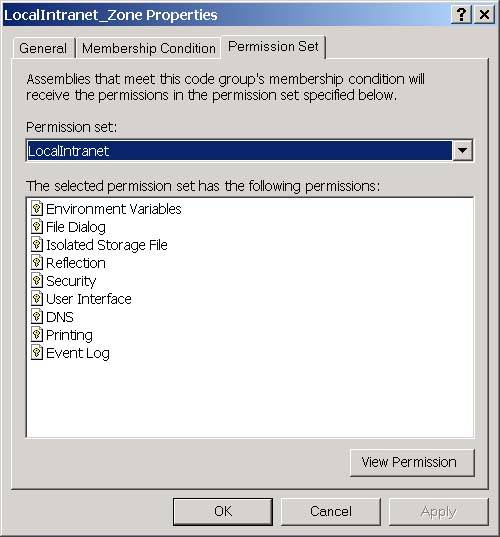
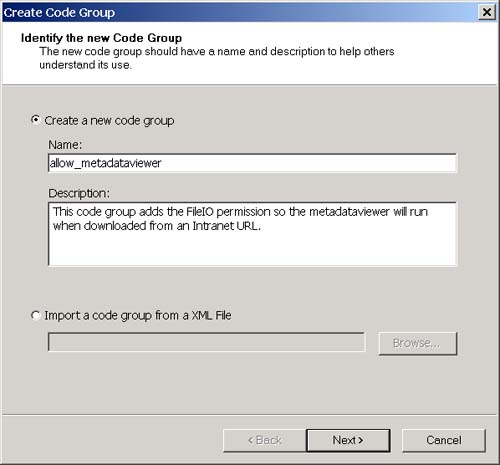
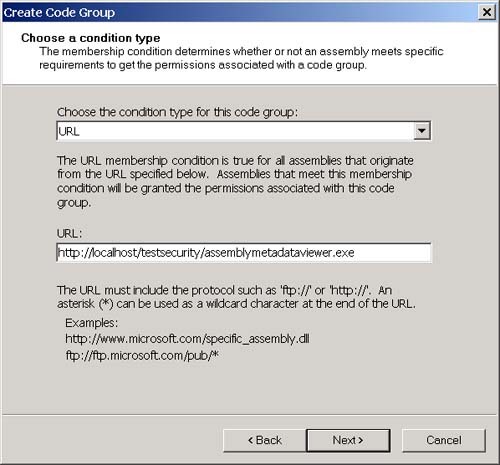
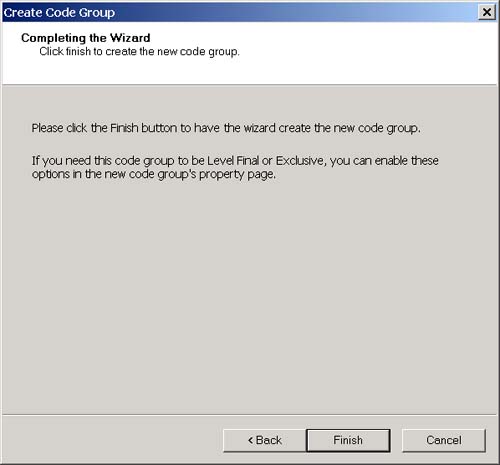
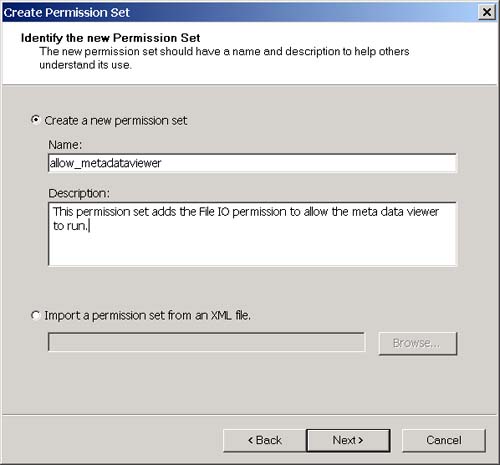
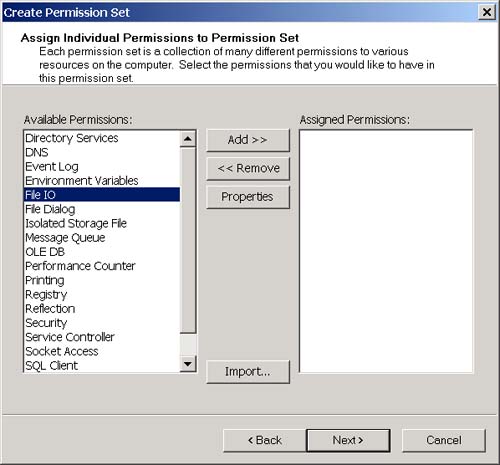
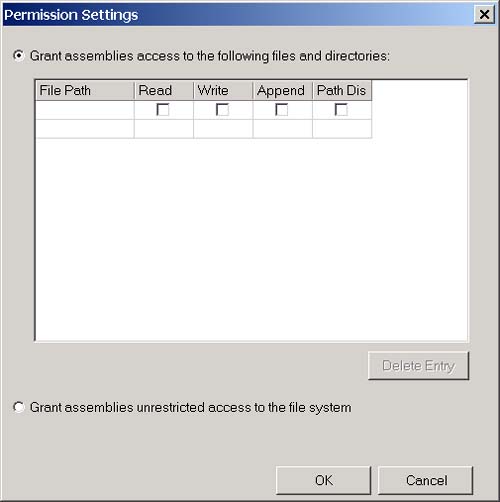
Now, open Internet Explorer and navigate to the following URL: http://localhost/testsecurity/assemblymetadataviewer.exe The assemblymetadataviewer application should appear. Now enter "multifile" again and click the Load button. You should see the error message shown in Figure 3-30. Figure 3-30. The security error when running over the intranet. What happened ? First, let's go back to the .NET Framework Configuration Tool and see if we can figure out which code groups the assembly will match when we access it from the intranet. The .NET Framework Configuration Tool is shown in Figure 3-31. Figure 3-31. The three code group levels visible in the .NET Framework Configuration Tool. At the machine level (remember this is the only level that matters by default because the other levels grant everything), the assembly will match the All Code and Intranet zone groups. The All Code code group has the Nothing permission set associated with it, and the LocalIntranet_Zone code group has the Local Intranet permission set associated with it. Figure 3-32 shows the list of permissions in the Local Intranet permission set. Figure 3-32. Permissions in the Local intranet permission set. Notice that this permission set does not include the FileIO permission that you need to use the AssemblyMetaDataViewer. So how do you fix this? To state this more specifically , how can you allow the assemblymetadataviewer application to run in an Intranet environment? You have a number of choices. You could add the FileIO permission to the Local intranet permission set. This has the side effect of granting the FileIO permission to all assemblies that originate from you Intranet. A better choice would be to add a new code group beneath the Local intranet code group with a URL membership condition. We can set the granted permissions associated with this code group to allow the FileIO permission only to assemblies that originate from the URL of the metadataviewer application. Using this approach also allows me to demonstrate how to create a new code group and a new permission set. To add the code group and new permission set, perform the following steps:
The membership condition for the allow_metadataviewer code group is: all assemblies that originate from URL http://localhost/testsecurity/assemblymetadataviewer.exe, and the permission set granted to an assembly that matches this membership condition contains the File IO permission. The metadataviewer will obviously match the membership condition for this group and therefore will be granted the permission. Try running the metadataviewer again by pointing Internet Explorer at the following URL: http://localhost/testsecurity/assemblymetadataviewer.exe You should now be able to enter "multifile" (or any other assembly name for that matter) and load the assembly without problem. Now if you are following along with this example, you are probably thinking that it would be too much trouble for someone to perform these steps manually for each machine on a corporate LAN that needs to use an application. That's where the Code Access Security Policy tool (caspol.exe) comes in handy. Caspol.exe is a command-line tool that is included with the .NET Framework SDK that allows you to perform all the steps I just performed with the .NET Framework Configuration Tool in a command-line environment. You can create scripts that perform the same steps that I did manually and then run the caspol.exe utility on those scripts to apply your Code Access Security Settings to a machine. You could even do this automatically when a user logs in. See the .NET Framework SDK documentation to learn more about the Code Access Security Policy tool.. |


 P policy ) - P refused
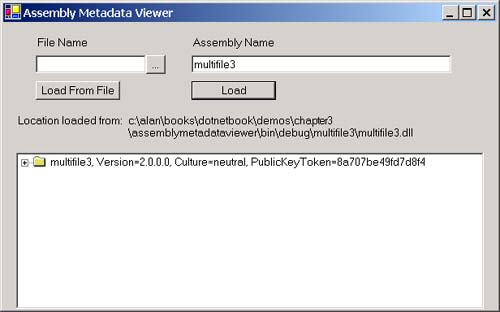
| | |
| Team-Fly |
| Top |
EAN: 2147483647
Pages: 119