Creating Your First Struts Application
|
| < Day Day Up > |
|
Now that you have Struts downloaded and installed, you can begin the development of your own sample Struts application. Our sample application consists of a simple set of JSP screens that queries a user for a stock symbol, performs a simple stock lookup, and returns the current price of the submitted stock. We use this example to describe the steps that must be performed when creating any Struts application.
Because Struts is modeled after the MVC design pattern, you can follow a standard development process for all of your Struts Web applications. This process begins with the identification of the application Views, the Controller objects that contain the application business logic, and the Model components being operated on. This process can be described using these steps:
-
Define and create all of the Views, in relation to their purpose, that will represent the user interface of your application.
-
Create and deploy all ActionForms used by the created Views. We discuss ActionForms later in this chapter.
-
Create the application's Controller components.
-
Define the relationships that exist between the Views and the Controllers (struts-config.xml).
-
Make the appropriate modifications to the web.xml file; describe the Struts components to the Web application.
-
Run the application.
These steps provide a high-level description of the Struts development process. In the sections that follow, we describe each of these steps in much greater detail.
Creating the Views
To begin the development of your application, you need to first describe the Views that will represent the presentation layer of your application. Two Views are associated with our sample application: index.jsp and quote.jsp. When creating Views in a Struts application, you are most often creating JSPs that are a combination of JSP/HTML syntax and some conglomeration of prepackaged Struts tag libraries.
As we discussed in Chapter 2, "An Overview of the Java Servlet and JavaServer Pages Architectures," the JSP/HTML syntax of a Struts View is similar to any other Web page and does not merit discussion, but the specialized Struts custom tag libraries do. We focus on the Struts tag libraries and more View details in Chapter 6, "Building the Presentation Layer," but for now we use simple JSP, without tags, to gain further insight into exactly how a Struts transaction works.
The Index View
The Index View, which is represented by the file index.jsp, is our starting View. It is the first page our application users will see, and its purpose is to query the user for a stock symbol and submit the inputted symbol to the appropriate action. The source for index.jsp is found in Listing 3.1.
Listing 3.1: index.jsp.
<%@ page language="Java" %> <%@ taglib uri="/WEB-INF/struts-html.tld" prefix="html" %> <html> <head> <title>Wrox Struts Application</title> </head> <body> <table width="500" border="0" cellspacing="0" cellpadding="0"> <tr> <td> </td> </tr> <tr> <td height="68" width="48%"> <div align="left"> <img src="/books/2/574/1/html/2/images/wxmainlogowhitespace.gif"> </div> </td> </tr> <tr> <td> </td> </tr> <tr> <td> </td> </tr> </table> <html:form action="Lookup" name="lookupForm" type="ch03.LookupForm" > <table width="45%" border="0"> <tr> <td>Symbol:</td> <td><html:text property="symbol" /></td> </tr> <tr> <td colspan="2" align="center"><html:submit /></td> </tr> </table> </html:form> </body> </html>
As you look over the source for the Index View, notice that it looks much like any other HTML page containing a form used to gather data, with the exception of the actual form and input tags. Instead of using the standard HTML Form tag, like most HTML pages, the index.jsp uses a Struts-specific Form tag: <html:form />. This tag, with its subordinate input tags, encapsulates Struts form processing. The form tag attributes used in this example are described in Table 3.1.
| Attribute | Description |
|---|---|
| action | Represents the URL to which this form will be submitted. This attribute is also used to find the appropriate ActionMapping in the Struts configuration file, which we describe later in this section. The value used in our example is Lookup, which maps to an ActionMapping with a path attribute equal to Lookup. |
| name | Identifies the key that is used to look up the appropriate ActionForm that will represent the submitted form data. We use the value LookupForm. An ActionForm is an object that is used by Struts to represent the form data as a JavaBean. Its main purpose is to pass form data between View and Controller components. We discuss the LookupForm implementation later in this section. |
| type | Names the fully qualified classname of the form bean you want to use in this request. For this example, we use the value wrox.LookupForm, which is an ActionForm object containing data members matching the inputs of this form. |
This instance of the <html:form /> tag is also the parent to two other HTML tags. The first of the tags is the <html:text> tag. This tag is synonymous with the HTML text input tag; the only difference is the property attribute, which names a unique data member found in the ActionForm bean class named by the form's type attribute. The named data member will be set to the text value of the corresponding input tag.
The second HTML tag that we use is the <html:submit> tag. This tag simply emulates an HTML submit button. The net effect of these two tags is:
-
Upon submission, the ActionForm object named by the <html:form /> tag is created and populated with the value of the <html:text /> tags.
-
Once the ActionForm object is populated with the appropriate values, the Action object referenced by the <html:form /> is invoked and passed a reference to the populated ActionForm. We look at this process in the "Creating the Controller Components" section of this chapter.
To use the previous two HTML tags, you must first add a taglib entry in the ch03app application's web.xml file that references the URI /WEB-INF/struts-html.tld. This TLD describes all of the tags in the HTML tag library. The following snippet shows the <taglib> element that must be added to the web.xml file:
<taglib> <taglib-uri>/WEB-INF/struts-html.tld</taglib-uri> <taglib-location>/WEB-INF/struts-html.tld</taglib-location> </taglib>
Second, you must copy the struts-html.tld from the lib directory of the extracted Struts archive to the <CATALINA_HOME>/webapps/ch03app/WEB_INF/ directory.
In our sample application, we do use a single image. This image file, hp_logo_wrox.gif, can be found in the images directory of our sample application's source tree.
The ActionForm
The ActionForm used in this example contains a single data member that maps directly to the symbol input parameter of the form defined in the Index View. As we stated in the previous section, when an <html:form /> is submitted, the Struts Framework populates the matching data members of the ActionForm with the values entered in the <html:input /> tags. The Struts Framework does this by using JavaBean introspection; therefore, the accessors of the ActionForm must follow the JavaBean standard naming convention.
In our example, ch03.LookupForm, we have a single data member symbol. To satisfy the JavaBean standard, the accessor used to set the symbol data member must be prefixed with set and get followed by the data member name, with its first letter being capitalized. Listing 3.2 contains the source for our ActionForm.
Listing 3.2: The LookupForm implementation LookupForm.java.
package ch03; import javax.servlet.http.HttpServletRequest; import org.apache.struts.action.ActionForm; import org.apache.struts.action.ActionMapping; public class LookupForm extends ActionForm { private String symbol = null; public String getSymbol() { return (symbol); } public void setSymbol(String symbol) { this.symbol = symbol; } public void reset(ActionMapping mapping, HttpServletRequest request) { this.symbol = null; } }
There is really nothing special about this class. It is a simple JavaBean that extends org.apache.struts.action.ActionForm, as must all ActionForm objects, with a get and set accessor that match its single data member. It does have one method that is specific to an ActionForm bean: the reset() method. The reset() method is called by the Struts Framework with each request that uses the LookupForm. The purpose of this method is to reset all of the LookupForm's data members and allow the object to be pooled for reuse.
The reset() method is passed a reference to an ActionMapping class. At this point you can ignore this class; we fully describe it in Chapters 4 and 8.
To deploy the LookupForm to our Struts application, you need to compile this class, move it to the <CATALINA_HOME>/webapps/ch03app/WEB-INF/classes/ch03 directory, and add the following line to the <form-beans> section of the <CATALINA_HOME>/webapps/ch03app/WEB-INF/struts-config.xml file:
<form-beans> <form-bean name="lookupForm" type="ch03.LookupForm"/> </form-beans>
This entry makes the Struts application aware of the LookupForm and how it should be referenced.
The Quote View
The last of our Views is the quote.jsp. This View is presented to the user upon successful stock symbol lookup. It is a simple JSP with no Struts-specific functionality. Listing 3.3 contains its source.
Listing 3.3: quote.jsp.
<html> <head> <title>Wrox Struts Application</title> </head> <body> <table width="500" border="0" cellspacing="0" cellpadding="0"> <tr> <td> </td> </tr> <tr> <td height="68" width="48%"> <div align="left"> <img src="/books/2/574/1/html/2/images/wxmainlogowhitespace.gif"> </div> </td> </tr> <tr> <td> </td> </tr> <tr> <td> </td> </tr> <tr> <td> </td> </tr> <tr> <td> Current Price : <%= request.getAttribute("PRICE") %> </td> </tr> <tr> <td> </td> </tr> </table> </body> </html>
As you look over this JSP, notice that it contains a single JSP functional line of code. This line of code retrieves the current price from the HttpServletRequest of the submitted stock symbol. This value is placed in the HttpServletRequest by the Action object that services this request, as shown in the next section.
Creating the Controller Components
In a Struts application, two main components make up the Controller: the org.apache.struts.action.ActionServlet and the org.apache.struts.action.Action classes. In most Struts applications, there is one org.apache.struts.action.ActionServlet implementation and many org.apache.struts.action.Action implementations.
Other components are associated with the Struts Controller—we discuss these components in Chapter 4, "Actions and the ActionServlet."
The org.apache.struts.action.ActionServlet is the Controller component that handles client requests and determines which org.apache.struts.action.Action will process the received request. When assembling simple applications, such as the one we are building, the default ActionServlet satisfies your application needs, and therefore, you do not need to create a specialized Controller implementation. When the need arises, however, it is a simple process. For our example, let's stick with the ActionServlet as it is delivered in the Struts packages. We cover the process of extending the Controller in Chapter 4.
The second component of a Struts Controller is the org.apache.struts.action.Action class. As opposed to the ActionServlet, the Action class must be extended for each specialized function in your application. This class is where your application's specific logic begins.
For our example, we have only one process to perform: looking up the value of the submitted stock symbol. Therefore, we are going to create a single org.apache.struts.action.Action bean named LookupAction. The source for our Action is shown in Listing 3.4. As you examine this listing, be sure to pay close attention to the execute() method.
Listing 3.4: The LookupAction bean.
package ch03; import java.io.IOException; import javax.servlet.ServletException; import javax.servlet.http.HttpServletRequest; import javax.servlet.http.HttpServletResponse; import org.apache.struts.action.Action; import org.apache.struts.action.ActionForm; import org.apache.struts.action.ActionForward; import org.apache.struts.action.ActionMapping; public class LookupAction extends Action { protected Double getQuote(String symbol) { if ( symbol.equalsIgnoreCase("SUNW") ) { return new Double(25.00); } return null; } public ActionForward execute(ActionMapping mapping, ActionForm form, HttpServletRequest request, HttpServletResponse response) throws IOException, ServletException { Double price = null; // Default target to success String target = new String("success"); if ( form != null ) { // Use the LookupForm to get the request parameters LookupForm LookupForm = (LookupForm)form; String symbol = lookupForm.getSymbol(); price = getQuote(symbol); } // Set the target to failure if ( price == null ) { target = new String("failure"); } else { request.setAttribute("PRICE", price); } // Forward to the appropriate View return (mapping.findForward(target)); } }
Notice that this class extends the org.apache.struts.action.Action class and contains two methods: getQuote() and execute(). The getQuote() method is a simple method that returns a fixed price (if SUNW is the submitted symbol).
The second method is the execute() method, where the main functionality of the LookupAction is found. This is the method that must be defined by all HTTP Action class implementations. Before we can examine how the logic contained in the execute() method works, let's look at the four parameters passed to it (see Table 3.2).
| Component | Description |
|---|---|
| ActionMapping | The ActionMapping class contains all of the deployment information for a particular Action object. This class is used to determine where the results of the LookupAction will be sent once its processing is complete. |
| ActionForm | The ActionForm represents the form inputs containing the request parameters from the View referencing this Action bean. The reference being passed to our LookupAction points to an instance of our LookupForm. |
| HttpServletRequest | The HttpServletRequest attribute is a reference to the current HTTP request object. |
| HttpServletResponse | The HttpServletResponse is a reference to the current HTTP response object. |
A second Action.execute() method is available for servicing non-HTTP requests. We take a look at this method in Chapter 4.
Now that we have described the parameters passed to the execute() method, we can move on to describing the actual method body. The first notable action taken by this method is to create a String object named target with a value of success. This object is used as a key to determine the View that will present successful results of this action.
The next step performed by this method is to get the request parameters contained in the LookupForm. When the form was submitted, the ActionServlet used Java's introspection mechanisms to set the values stored in this object. Note that the reference passed to the execute() method is an ActionForm that must be cast to the ActionForm implementation used by this action. The following code snippet contains the source used to access the request parameters:
// Use the LookupForm to get the request parameters LookupForm lookupForm = (LookupForm)form; String symbol = lookupForm.getSymbol();
Once we have references to the symbol parameters, we pass these values to the getQuote() method. This is a simple user-defined method that returns the Double value 25.00. If the symbol String contains any values other than SUNW, then null is returned and we change the value of our target to failure. This has the effect of changing the targeted View. If the value is not null, then we add the returned value to the request with a key of PRICE.
At this point, the value of target equals either success or failure. This value is then passed to the ActionMapping.findForward() method, which returns an ActionForward object referencing the physical View that will actually present the results of this action. The final step of the execute() method is to return the ActionForward object to the invoking ActionServlet, which then forwards the request to the referenced View for presentation. This step is completed using the following line of code:
return (mapping.findForward(target));
To deploy the LookupAction to our Struts application, compile the LookupAction class, move the class file to the <CATALINA_HOME>/webapps/ch03app/WEB-INF/classes/ch03 directory, and add the following entry to the <action-mappings> section of the <CATALINA_HOME>/webapps/ch03app/WEB-INF/struts-config.xml file:
<action path="/Lookup" type="ch03.LookupAction" name="lookupForm"> <forward name="success" path="/quote.jsp"/> <forward name="failure" path="/index.jsp"/> </action>
This entry contains the data that will be stored in the ActionMapping object that is passed to the execute() method of the LookupAction. It contains all of the attributes required to use this instance of the LookupAction, including a collection of keyed <forward> sub-elements representing the possible Views that can present the results of the LookupAction.
Once you have made all of the previously listed additions, you should have a complete struts-config.xml file that looks similar to Listing 3.5.
Listing 3.5: The complete struts-config.xml file.
<?xml version="1.0" encoding="ISO-8859-1" ?> <!DOCTYPE struts-config PUBLIC "-//Apache Software Foundation//DTD Struts Configuration 1.1//EN" "http://jakarta.apache.org/struts/dtds/struts- config_1_1.dtd"> <struts-config> <form-beans> <form-bean name="lookupForm" type="ch03.LookupForm"/> </form-beans> <action-mappings> <action path="/Lookup" type="ch03.LookupAction" name="lookupForm" > <forward name="success" path="/quote.jsp"/> <forward name="failure" path="/index.jsp"/> </action> </action-mappings> </struts-config>
Deploying Your Struts Application
At this point you have all of the necessary Struts components deployed and modified. You now need to tell the web application itself about your application components. To do this, you must make some simple changes to the web.xml file.
The first change is to tell the Web application about our ActionServlet. This is accomplished by adding the following servlet definition to the <CATALINA_HOME>/webapps/ch03app/WEB-INF/web.xml file:
<servlet> <servlet-name>action</servlet-name> <servlet-class> org.apache.struts.action.ActionServlet </servlet-class> <init-param> <param-name>config</param-name> <param-value>/WEB-INF/struts-config.xml</param-value> </init-param> <load-on-startup>l</load-on-startup> </servlet>
This entry tells the Web application that we have a servlet named action that is implemented by the class org.apache.struts.action.ActionServlet, which as we stated earlier is the default ActionServlet provided with Struts.
It defines a servlet initialization parameter, config, which tells the ActionServlet where to find the struts-config.xml file.
And finally, it contains a <load-on-startup> sub-element that causes the ActionServlet to be loaded when the application is started. The ActionServlet must be loaded when the application starts. This guarantees the availability of the necessary Struts resources prior to the receipt of the first request.
Once you have told the container about the ActionServlet, you need to tell it when it should be executed. To do this, you add a <servlet-mapping> element to the <CATALINA_HOME>/webapps/ch03app/WEB-INF/web.xml file:
<servlet-mapping> <servlet-name>action</servlet-name> <url-pattern>*.do</url-pattern> </servlet-mapping>
This mapping tells the Web application that whenever a request is received with .do appended to the URL, then the servlet named action should service the request.
Once you have made all of the previously listed additions, you should have a complete web.xml that looks similar to Listing 3.6.
Listing 3.6: The complete web.xml file.
<?xml version="1.0" encoding="ISO-8859-1"?> <!DOCTYPE web-app PUBLIC "-//Sun Microsystems, Inc.//DTD Web Application 2.3//EN" "http://java.sun.com/j2ee/dtds/web-app_2_3.dtd"> <web-app> <!-- Standard ActionServlet Configuration --> <servlet> <servlet-name>action</servlet-name> <servlet-class> org.apache.struts.action.ActionServlet </servlet-class> <init-param> <param-name>config</param-name> <param-value>/WEB-INF/struts-config.xml</param-value> </init-param> <load-on-startup>1</load-on-startup> </servlet> <!-- Standard ActionServlet Mapping --> <servlet-mapping> <servlet-name>action</servlet-name> <url-pattern>*.do</url-pattern> </servlet-mapping> <!-- Standard Welcome File List --> <welcome-file-list> <welcome-file>index.jsp</welcome-file> </welcome-file-list> <!-- Struts Tag Library Descriptors --> <taglib> <taglib-uri> /WEB-INF/struts-html.tld </taglib-uri> <taglib-location> /WEB-INF/struts-html.tld </taglib-location> </taglib> </web-app>
Walking through the ch03app Web Application
At this point, you should have completed all of the steps described in the previous section and have a deployed ch03app Web application. In this section, we examine this sample application and discuss each of the steps performed by Struts along the way. The purpose is to provide you with a walkthrough that ties together all of the previously assembled components.
To begin using this application, restart Tomcat and open your Web browser to the following URL:
-
http://localhost:8080/ch03app/
If everything went according to plan, you should see a page similar to Figure 3.1.
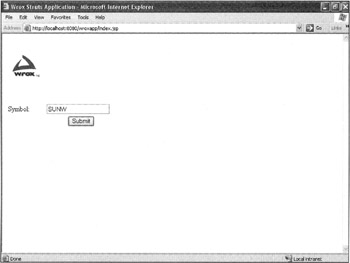
Figure 3.1: The ch03app Index View.
When this page loads, the following actions occur:
-
The <html:form> creates the necessary HTML used to represent a form and then checks for an instance of the wrox.LookupForm in session scope. If it finds an instance of the wrox.LookupForm, then the value stored in the ActionForm's symbol data member is mapped to the input element value on the form and the HTML form is written to the response. This is a helpful technique that can be used to handle errors in form data. (We see examples of handling form errors in Chapter 10, "Managing Errors.") The Index View is then presented to the user.
-
Before we move on, we must take a look at the HTML source generated when the Index View is evaluated. If you view the source generated by your browser, you should see that the action attribute of the <form /> tag has been modified:
<form name="lookupForm" method="post" action="/ch03app/Lookup.do"> <table width="45%" border="0"> <tr> <td>Symbol:</td> <td><input type="text" name="symbol" value=""></td> </tr> <tr> <td colspan="2" align="center"> <input type="submit" value="Submit"> </td> </tr> </table> </form>
If you remember the original action attribute, its value was simply Lookup. As you look over the modified action, notice that the new value has the string .do appended to it. This modification was performed by the Struts <html:form /> to connect this Struts request to the <servlet-mapping> associated with the ActionServlet. We see this process in action in the following steps.
-
To move on to the next step, enter the value SUNW into the Symbol text box and click the Submit button. This invokes the following functionality.
-
The Submit button causes the browser to invoke the URL named in the <html:form /> tag's action attribute, which in this case is Lookup.do. When the JSP/servlet container receives this request, it looks in the web.xml file for a <servlet-mapping> with a <url-pattern> that ends with .do. It finds the following entry, which tells the container to send the request to a servlet that has been deployed with the <servlet-name> of action:
<!-- Standard Action Servlet Mapping --> <servlet-mapping> <servlet-name>action</servlet-name> <url-pattern>*.do</url-pattern> </servlet-mapping>
-
The container finds the following <servlet> entry with a <servlet-name> of action that points to the ActionServlet, which acts as the Controller for our Struts application:
<servlet> <servlet-name>action</servlet-name> <servlet-class> org.apache.struts.action.ActionServlet </servlet-class> </servlet>
-
The ActionServlet then takes over the servicing of this request by retrieving the previously created LookupForm, populating its symbol data member with the value passed on the request, and adding the LookupForm to the session with a key of lookupForm.
-
Next, the ActionServlet looks for an <ActionMapping> entry in the struts-config.xml file with a <path> element equal to Lookup. It finds the following entry:
<action path="/Lookup" type="ch03.LookupAction" name="lookupForm" input="/index.jsp"> <forward name="success" path="/quote.jsp"/> <forward name="failure" path="/index.jsp"/> </action>
-
It then creates an instance of the LookupAction class named by the type attribute. It also creates an ActionMapping class that contains all of the values in the <ActionMapping> element.
-
It then invokes LookupAction.execute() with the appropriate parameters. The LookupAction.execute() method performs its logic and calls the ActionMapping.findForward() method with a String value of either success or failure.
-
The ActionMapping.findForward() method looks for a <forward> sub-element with a name attribute matching the target value. It then returns an ActionForward object containing the results of its search, which is the value of the path attribute /quote.jsp (upon success) or /index.jsp (upon failure).
-
The LookupAction then returns the ActionForward object to the ActionServlet, which in turn forwards the request object to the targeted View for presentation. The results of a successful transaction are shown in Figure 3.2.
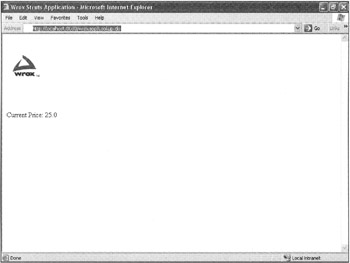
Figure 3.2: The ch03app Quote View.
If you submit any value other than SUNW, you will be sent back to index.jsp, which is the failure path of the LookupAction. If this does happen, you will see that the input value on the index page is pre-populated with your originally submitted value. This is some of the handy error-handling techniques provided by the Struts application.
|
| < Day Day Up > |
|
EAN: 2147483647
Pages: 183