| Creating Details with the Pattern Brush Overview: Create interlocking chain links by drawing and cutting duplicate curve sections; select the link artwork and create a new Pattern brush; draw a path and paint it with the new brush. 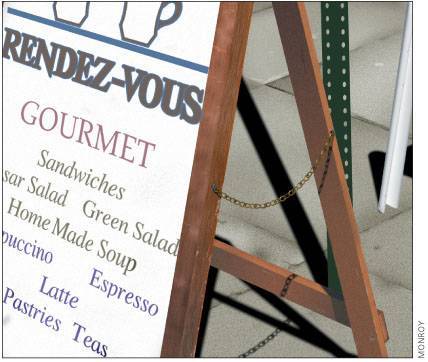 One look at a Bert Monroy image and you will immediately recognize the intricacy and rich realism of his style of illustration. When crafting an image like the Rendezvous Cafe, Monroy travels between Illustrator and Photoshop, stopping long enough in Illustrator to construct the intricate shapes and details that turn his scenes into slices of life in Photoshop. The easel chain is one such detail that Monroy created in Illustrator using a custom-made Pattern brush. Drawing, cutting, copying, and reflecting curves. To build a chain-link Pattern brush, Monroy first created one link that was interconnected with half-links on either side (the half-links would connect with other half-links to form the chain once the Pattern brush was applied to a path). To create the pattern unit with the Ellipse tool, begin the center link by drawing an ellipse with a thick stroke. Copy the ellipse, Paste in Back; then turn the ellipse into a guide (View > Guides > Make Guides). You'll use this guide later when making the half-links. Now select the original ellipse and use the Scissors tool to cut the ellipse near each of the four control points (choose View > Outline to better see the points). Shift-select the four curved paths with the Direct Selection tool and select Object > Path > Outline Stroke. Illustrator automatically constructs four closed-curve objects.
At the left, the ring drawn with the Ellipse tool and given a thick stroke; in the middle, the ellipse cut into four curve sections shown in Outline view (sections are separated to show them better); on the right, the four curve sections shown in Outline view, after using the Object > Path > Outline Stroke command 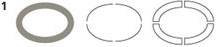
On the left, the two left curve sections copied and pasted, and colors changed to light brown in the middle; on the right, the two sections are slid to the right to form the right half link 
On the left, the half-link selected and reflected using the Reflect tool (the X in the middle of the guide ellipse served as the axis); on the right, both half-links in position  To make the right half-link, select the left two curve objects and duplicate them to make the right half-link by dragging the two objects to the right while holding down the Opt/Alt key; then change the color of the copies. For the left half-link, select the two curves you just dragged and colored, choose the Reflect tool, hold down the Opt/Alt key and click in the center of the ellipse guide (the center point is an X). In the Reflect dialog box, click the Vertical Axis button and click Copy to create a mirror-image of the right half-link for the left half-link. Note The center link must be aligned exactly in-between the two half-links, so that the half-links join when applied to a path as a Pattern brush.
Finishing the link. The two adjoining half-links should look like they're entwined with the link. Monroy selected the top objects of both the left and right half-links and moved them behind the center link (Object > Arrange > Send to Back). You can create a different look by selecting the top of the left half-link, and the bottom of the right half-link, and moving them to the back.
Finished link artwork; at the left, the links as Monroy created them; at the right, an alternative version of the interconnected links  Making and using a Pattern brush. To make the brush, select the artwork and drag it into the Brushes palette. Choose New Pattern Brush in the New Brush dialog box; in the next dialog box, name the brush and click OK (leave the default settings as you find them). You can now apply the chain pattern to a path by selecting the path and clicking on the brush in the Brushes palette.
The Pattern Brush Options dialog box showing default settings 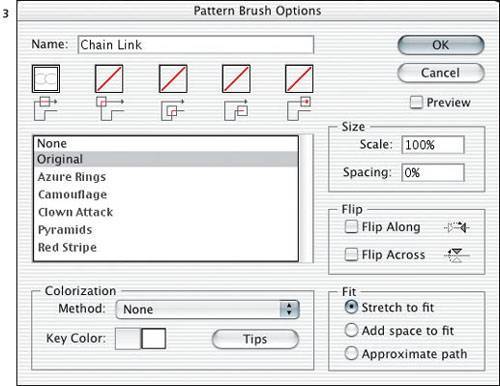
Original path on top; below, path painted with Chain Link Pattern brush 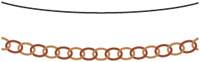 Depending on the size of your original links artwork, you may need to reduce the size of the brush artwork to fit the path better. You can do this by reducing the original artwork with the Scale tool and making a new brush, or by double-clicking the brush in the Brushes palette and editing the value in the Scale field of the dialog box.
Drop Shadows Even if your artwork is destined for Photoshop, you can make a drop shadow for it in Illustrator. Select the artwork, then choose Effect > Stylize > Drop Shadow. Copy the object (which automatically copies all of its appearances) and paste in Photoshop (Edit > Paste > Paste as Pixels). |
|