| The General panel of Preferences is pretty much a melting pot of settings (Figure C.1). These settings are also the ones that alter the behavior of features the most. Figure C.1. The General Preferences panel offers quick access to settings like Keyboard Increment. 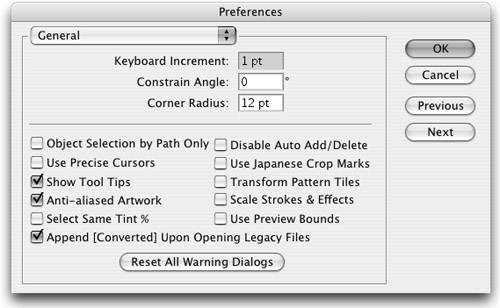
Keyboard Increment. When moving artwork around on your screen, using the mouse or even a pressure-sensitive pen doesn't always give you the control you need. The Keyboard Increment setting determines the distance a selected object moves when you tap any of the four arrow keys on your keyboard. Some call this the nudge amount. Don't be fooled into thinking that this setting should always be as small as possible. When you're working with a grid or in scale (designing floor plans, schematics, etc.), it can be extremely helpful to set your keyboard increment to a specific value (like .25 inch). In this way, you can easily tap an arrow two times and know you've moved the object exactly .5 inch. It's no coincidence that when you open the Preferences dialog box, the Keyboard Increment value is highlighted. Power users know they can quickly press Command-K (Control-K), enter a value, press Enter, and then nudge their objects precisely.  | In general, the preferences in Illustrator are application-based, meaning they aren't saved in the file, rather in Illustrator's application preferences file. This also means that if you open a file that was created on another computer, your preferences don't change. |
Constrain Angle. When you draw objects in Illustrator, they are aligned to the Constrain Angle setting, which is normally set to 0 degrees. However, there are times when you want to draw your document on a specific angle and changing the constrain angle affects all tools and modifier keys in Illustrator. Corner Radius. When you're creating a shape with the Rounded Rectangle tool, this setting defines the default corner radius for the rounded corners. Note that this preference sets the default behavior, which you can easily override on a per-object basis in the Rounded Rectangle tool dialog box. | The preferences are saved in a text file called Adobe Illustrator Prefs, and if you're brave, you can edit it in a text editor. If Illustrator's behavior seems odd for any reason, such as tools gone missing from the Toolbox or frequent crashes are occurring, you can try to delete your preferences file (Illustrator automatically creates a new one the next time you quit the application). |
Object Selection by Path Only. When working in Preview mode, Illustrator allows you to select an object by clicking its path, or anywhere within its fill area (if it has a fill attribute applied). Although this is convenient, there are times, especially when you're working with complex artwork, when this behavior makes it difficult to select objects. Turning this preference on allows you to select objects only by clicking their paths, not their fills. Use Precise Cursors. Some of Illustrator's tool icons are cute, like the Symbol Sprayer and the Smudge tools, but they can be hard to position precisely. Even with the Pen tool, it can be hard to know exactly where the real tip of the cursor is. When Use Precise Cursors is active, all cursors are replaced by a simple X icon, which clearly defines the spot you're clicking (Figure C.2). You can also toggle this setting by pressing the Caps Lock key on your keyboard. Figure C.2. The normal Paintbrush cursor (left) can be difficult to use, while the Paintbrush cursor with Precise Cursors turned on (right) is far easier to position. 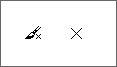
Show Tool Tips. Illustrator has a lot of iconstiny chicklet icons, as we like to call them. Sometimes it's hard to know what a tool or button is just by looking at it, so if you hold your cursor over the icon for a second, a little window pops up identifying the name of the feature. These are called tool tips and they are turned on by default. Although they are helpful, some people may think that they get in the way, hence this preference.  | You can delete the preferences files at launch by pressing (Command-Option-Shift) [Ctrl-Alt-Shift] while launching Illustrator. Keep the keys pressed until you see the dialog appear. |
Anti-aliased Artwork. Computer screens are low-resolution devices (generally between 72 and 100 ppi), and artwork may appear jagged onscreen. This is especially true with the sharp vector shapes you create with Illustrator. Although the files print fine, looking at jagged artwork all day may cause eyestrain, and doesn't accurately display the way the graphics will eventually print. This option (on by default) applies antialiasing to Illustrator's Preview mode so your art onscreen appears clean and smooth. Antialiasing is always turned off in Outline view mode. Note that this setting affects how the art appears onscreen only, and does not in any way affect how the art prints. Select Same Tint %. Illustrator has a feature that allows you to select all objects that are filled or stroked with the same color. When you use this feature, all objects that are filled with tint percentages of that same color are also selected. This preference setting only selects objects that are filled with the same tint percentages of that color (resulting in fewer objects being selected). Append [Converted] Upon Opening Legacy Files. When you open files that were created in previous versions of Illustrator (what Illustrator refers to as legacy files), you may have to adjust text objects. In order to prevent you from accidentally overwriting your original files, Illustrator tacks on the word [converted] to your file name when it opens legacy files. For more information about text and legacy files, see Chapter 6, Typography. Disable Auto Add/Delete. Illustrator tries its best to help you get your work done, but sometimes its overzealousness gets in the way. By default, when you move your cursor over an existing path with the Pen tool, Illustrator thinks you want to add a point to the existing path and conveniently switches to the Add Anchor Point tool. This is great, unless, of course, you wanted to start drawing a new path with the Pen tool. Turning this preference on politely tells Illustrator, "Thanks, but no thanks." Use Japanese Crop Marks. Illustrator allows you to create simple crop marks automatically by choosing Object > Crop Area > Make. If you want something more than the standard eight paths, you can turn on this preference. At the very least, people who see your files will know that you're serious about crop marks (Figure C.3). Figure C.3. Regular crop marks (left) use 8 straight lines, while Japanese crop marks (right) are more complex. 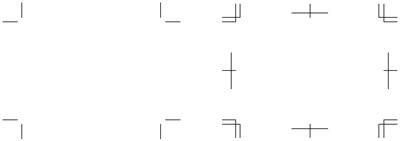
Transform Pattern Tiles. When you apply transformations (such as Scale or Rotate) to objects that are filled with patterns, the default behavior is that only the shape is transformed, not the pattern fill. Turning this preference on changes the default behavior so that pattern fills are transformed as well. Note that this preference sets the default behavior, which you can easily override as you need to using the setting in the Scale tool dialog box or by pressing the tilde key (~) during a transform function. Scale Strokes & Effects. Similar to patterns, when you apply transformations to objects that have strokes or effects applied, the default behavior is that only the shape is transformed, not the strokes or the effects. Turning this preference on changes the default behavior so that strokes and effects are transformed as well. Note that this preference sets the default behavior, which you can easily override as you need to using the setting in the Scale tool dialog box. Use Preview Bounds. One of the benefits of using Illustrator is that you can be extremely precise when drawing objects. Illustrator's Control, Transform, and Info palettes all provide exact feedback on coordinates, positioning, sizing, and more. By default, these palettes use the actual vector path to determine these numbers, not the visual boundaries of the object. For example, you may have a shape that has a thick stroke or a scale effect applied to it, which is not represented in the value you see in the Transform palette. With the Use Preview Bounds preference activated, all palettes use the visual boundary of a file as the value, not the underlying vector path. Reset All Warning Dialogs. Throughout the daily use of Illustrator, you'll no doubt come to meet a variety of warning dialog boxes. Sometimes these are helpful, and sometimes they can be quite annoying and you'll wish bad things upon them. You'll find that most of these dialog boxes contain a "Don't Show Again" button, which you can use to tell Illustrator that a simple beep would be just fine, thank you. Clicking Reset All Warning Dialogs brings back any warning dialogs that you asked Illustrator not to show again.
|