Lesson 2: Configuring Internet Connection Firewall
A firewall protects a computer from the outside world (specifically, the Internet) by blocking all network traffic except that which you specifically configure the firewall to allow through. This lesson introduces firewalls and looks at the software-based firewall included with Windows XP—the Internet Connection Firewall.
After this lesson, you will be able to
-
Explain how firewalls protect computers.
-
Configure Internet Connection Firewall.
-
Troubleshoot connectivity problems associated with Internet Connection Firewall.
Estimated lesson time: 40 minutes
Understanding Internet Connection Firewall
A firewall acts as a security system that creates a border between the computer or network and the Internet. This border determines what traffic is allowed in or out of the local network or computer. Firewalls help keep hackers, viruses, and other evils from infiltrating the computer and network. Any computer connected directly to the Internet, whether it is a standalone computer or a computer that provides Internet Connection Sharing (ICS) services for other computers on a network, should have ICF enabled.
ICF has the following characteristics:
-
ICF limits the data that comes into a computer or a network by scanning the data that tries to enter. Unwanted data is silently discarded.
-
ICF does not limit what happens on a standalone computer or inside the network, or the data that passes between computers on a local network.
-
Because ICF runs on a computer with Windows XP, it works independently of any networking hardware. You can use ICF with dial-up connections, digital subscriber line (DSL) modems, cable modems, and similar hardware.
-
You can configure ICF to keep a security log of discarded packets so an administrator can view the types of packets that have been dropped, lost, opened, or closed.
-
ICF does not protect against power surges, lightning, or natural disasters.
Caution You should not enable ICF on virtual private networks (VPNs). VPNs provide access to private networks through the Internet, and this access can incorporate the remote network’s remote access rules, routed connections, and authentication procedures. When you enable ICF on a computer that uses a VPN, it can cause problems with file and printer sharing between that computer and resources on the network.
ICF and the Small Office
ICF is generally enabled on computers in small office networks and home networks because it is designed for use on computers that connect directly to the Internet, and in smaller networks there are usually one or more computers that do. In larger companies, network computers connect to a proxy server that provides access to the Internet, and the network servers have their own firewall system that usually consists of multiple hardware- and software-based firewalls. You should not enable ICF on computers that do not access the Internet directly because ICF can interfere with communications between the computer and other computers on the network.
If a user wants to enable ICF or if you believe ICF has been enabled on a connection that does not access the Internet directly, you must access the Internet or the Properties dialog box of the local area connection and make the appropriate changes as follows:
-
From the Start menu, select Control Panel.
-
In the Control Panel window, select Network And Internet Connections.
-
In the Network And Internet Connections window, select Network Connections.
-
In the Network Connections window, right-click the connection that connects directly to the Internet and choose Properties.
-
In the Properties dialog box, select the Advanced tab.
-
To enable ICF, select the Protect My Computer And Network By Limiting Or Preventing Access To This Computer From The Internet check box. To disable ICF, clear this check box. Click OK.

Figure 10-5: Enabling Internet Connection Firewall via the local area connection’s Properties dialog box.
Do not enable ICF on a local area network connection that connects the user to the local area network. Do not enable ICF on a computer that accesses the Internet through a host computer’s Internet connection, either.
Configuring, Viewing, and Using ICF Log Files
Security logging, which is the collection of information that details Internet connections and other firewall activity, is not enabled by default when you enable ICF. However, you can configure ICF to log activity, including logging what is permitted and what is rejected to and from the home or small office network and the Internet. Logging consists of three basic tasks: enabling logging, accessing the log, and reading log entries.
Enabling ICF Logging
To view and use ICF log file information, you need to enable logging by following these steps:
-
Click Start, and then select Control Panel.
-
In the Control Panel window, select Network And Internet Connections.
-
In the Network And Internet Connections window, select Network Connections.
-
Right-click the connection that has ICF enabled, and then choose Properties. Select the Advanced tab.
-
On the Advanced tab, click Settings.
-
In the Advanced Settings dialog box, select the Security Logging tab. Under Logging Options, select the Log Dropped Packets and/or Log Successful Connections check boxes.
-
Log Dropped Packets Logs all dropped packets originating from the local network or the Internet.
-
Log Successful Connections Logs all successful connections originating from the network or the Internet.
-
-
Note the location of the security log. By default, it is in the \Windows\Pfirewall.log file. Click OK. Click OK in the Properties dialog box to close it.
Accessing the Log Files
After you enable logging, you can access the log file by browsing to its location and opening the file. The log file is most easily opened by browsing to it from Network Connections by following these steps:
-
Click Start, and then select Control Panel.
-
In the Control Panel window, select Network And Internet Connections.
-
In the Network And Internet Connections window, select Network Connections.
-
Right-click the connection that has ICF enabled, and choose Properties. Select the Advanced tab.
-
On the Advanced tab, click Settings.
-
In the Advanced Settings dialog box, select the Security Logging tab; and under Log File Options, click Browse.
-
Right-click the Pfirewall.txt file and choose Open. Notice that the text file has several headings, including Date, Time, Action, Protocol, and more.
Reading Log Entries
Log entries give insight about which packets have been successful in getting into the network, and which have been rejected. There are two sections of the log: the header and the body. The header includes information about the version of ICF, the full name of ICF, where the time stamp on the log learned of the time, and the field names used by the body of the log entry to display data. The body details the log data.
There are 16 data entries per logged item. These data entries include information about the date and time the log was written and information about the data that passed. Although this information is quite technical, in brief it tells which types of packets were opened, closed, dropped, and lost; which protocol was used in the data transmission; the destination Internet Protocol (IP) address of the data; the port used by the sending computer; the port of the destination computer; and the size of the packet logged.
| Exam Tip | You should know where log files are stored, whether logging is available, and what kind of information you can learn from log files. |
ICMP and ICF
Internet Control Message Protocol (ICMP) allows routers and host computers to swap basic control information when data is sent from one computer to another. ICMP error and configuration information is attached to the data and includes whether or not the data sent reaches its final destination, whether it can or cannot be forwarded by a specific router, and what the best route for the data is. ICMP tools such as Ping and Tracert are often used to troubleshoot network connectivity.
ICMP troubleshooting tools and their resulting messages can be helpful when used by a network administrator, but harmful when used by an attacker. For instance, a network administrator sends a ping request in the form of an ICMP packet that contains an Echo request message to the IP address being tested. The reply allows the administrator to verify that the computer is reachable. An attacker, on the other hand, can send a broadcast storm of pings that can overload a system so that it cannot respond to legitimate traffic. By configuring ICMP, you can control how a system responds (or does not respond) to such ping requests. By default, no ICMP messages are enabled or allowed.
Configuring Advanced ICMP Settings
Desktop technicians and network administrators use ICMP requests to troubleshoot network connectivity. Generally, you enable the ICMP options when you need them, and then disable them after you have completed troubleshooting. You can set advanced ICMP options by following these steps:
-
Open Control Panel and select Network And Internet Connections.
-
In the Network And Internet Connections window, select Network Connections.
-
Right-click the connection that has ICF configured, and then choose Properties.
-
On the Advanced tab, click Settings.
-
In the Advanced Settings dialog box, select the ICMP tab. Figure 10-6 shows the default settings. Notice that no ICMP requests are enabled. To enable an option, select it.
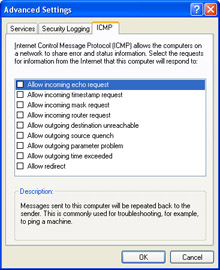
Figure 10-6: The default ICMP settings are shown here.
You can view what each option offers by selecting it on the ICMP tab. For instance, selecting the first option, Allow Incoming Echo Request, states that Echo messages sent to the computer will be repeated (echoed) back to the sender. This means that if a ping message is sent to the computer, an ICMP message will be sent back noting that the ping was received. Although this can be an excellent tool for troubleshooting network connectivity, it is not a good option to leave enabled all the time because it leaves the system vulnerable to Internet attacks.
ICMP Options
Table 10-1 details the available ICMP options shown in Figure 10-6. As a desktop support technician (DST), make sure that you do not allow or enable these options without a full understanding of them and the consequences and risks involved. Enable these options when troubleshooting connectivity, and then disable them when finished.
| ICMP Option | Description |
|---|---|
| Allow Incoming Echo Request | Controls whether a remote computer can ask for and receive a response from the computer. Ping is a command that requires you to enable this option. When enabled (as with other options), attackers can see and contact the host computer. |
| Allow Incoming Timestamp Request | Sends a reply to another computer stating that an incoming message was received and includes time and date data. |
| Allow Incoming Mask Request | Provides the sender with the subnet mask for the network of which the computer is a member. The sender already has the IP address; giving the subnet mask is all an attacker or administrator needs to obtain the remaining network information about the computer’s network. |
| Allow Incoming Router Request | Provides information about the routes the computer recognizes and will pass on information it has about any routers to which it is connected. |
| Allow Outgoing Destination Unreachable | The computer will send a “Destination Unreachable” message offering information about why discarded packets were not received. These messages refer to nonexistent and unreachable hosts on the network. |
| Allow Outgoing Source Quench | Offers information to routers about the rate at which data is received and tells routers to slow down if too much data is being sent and it cannot be received fast enough to keep up. |
| Allow Outgoing Parameter Problem | The computer sends a “Bad Header” error message when the computer discards data it has received that has a problematic header. This allows the sender to understand that the host exists, but that there were unknown problems with the message itself. |
| Allow Outgoing Time Exceeded | The computer sends the sender a “Time Expired” message when the computer must discard messages because the messages timed out. |
| Allow Redirect | Data sent from this computer will be rerouted if the path changes. This allows data to be pointed in the right direction so that data can flow more efficiently. |
As you gain experience, you will enable and disable these tools when troubleshooting the network and resource access.
Allowing Services in ICF
As far as ICF is concerned, services refer to applications that run on your computer and provide a service that can be accessed by other computers on the network or the Internet. Examples of services include a Web server, FTP server, mail servers, and so on. If you are running a service that you want people to be able to access, you must configure ICF to allow traffic related to the service through the firewall; you do this on the Services tab of the Advanced Settings dialog box for ICF, shown in Figure 10-7.

Figure 10-7: You must configure ICF to allow traffic for services your computer provides.
Each of the following servers or services requires you to manually configure the firewall to permit the service’s traffic:
-
FTP Server
-
Internet Mail Access Protocol version 3 (IMAP3), Internet Mail Access Protocol version 4 (IMAP4), Post Office Protocol 3 (POP3), or Simple Mail Transfer Protocol (SMTP) mail servers
-
Remote Desktop
-
Telnet Server
-
Web Server (HTTP)
-
Secure Web Server (HTTP Secure)
After you know what a user wants to configure, adding the service is easy. This is detailed next.
Adding a Service Definition
To configure a firewall to permit service traffic that you define, you must have the following, which might need to be obtained from an administrator, from the service’s documentation, or from the service’s website:
-
The name or IP address of the computer hosting the service
-
ICF or ICS enabled on the connection
-
The ability to log on as an administrator
-
The necessary permissions on the network, if one exists
-
The external port number for the service
-
The internal port number for the service
To permit traffic for a predefined service, such as FTP, POP3, IMAP4, HTTP, and others, you need only the name or IP address of the computer hosting the service on the network. To add a predefined service definition, follow these steps:
-
Click Start, and then select Control Panel.
-
In the Control Panel window, select Network And Internet Connections.
-
In the Network And Internet Connections window, select Network Connections.
-
Right-click the shared connection or the Internet connection being protected by ICF, and choose Properties.
-
In the Properties dialog box, on the Advanced tab, click Settings.
-
On the Services tab, select the check box for the service you want to add.
-
When prompted, type the name or IP address of the computer hosting the service on the network, as shown in Figure 10-8. Click OK.
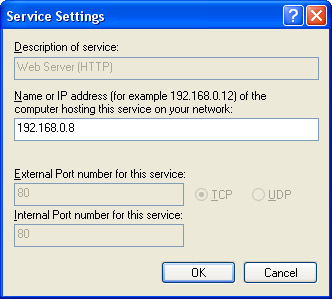
Figure 10-8: Adding the Web Server (HTTP) service involves inputting the appropriate information. -
After you add the service or services, click OK in the Advanced Security dialog box to close it, and click OK in the Properties dialog box to apply the changes.
Note You can add new service definitions by clicking the Add button on the Services tab (see step 4 earlier). In the Service Settings dialog box, type the required information.
Troubleshooting Internet Connection Firewall
There are a few fairly common problems that end users encounter when using ICF, including the inability to enable ICF on a connection, problems with file and print sharing, a network user’s inability to access a server on the network (such as a Web server), problems with Remote Assistance, and problems running Internet programs. The solutions to all of these problems (and others) are well-documented and easily available from the Microsoft Knowledge Base at http://support.microsoft.com.
When troubleshooting ICF, make sure that you remember to check the obvious first. The following are some basic rules that you must follow, and any deviation from them can cause many of the common problems that are encountered when using ICF:
-
ICF can be enabled only by administrators, and can be enabled only on outgoing connections such as connections to the Internet. ICF can be disabled from a group or domain policy, preventing access even by a local administrator.
-
ICF should be configured only on the computers on the network that connect directly to the Internet. If ICF is enabled on other computers on the network, problems with file and print sharing can ensue.
-
Network users cannot access a Web server, FTP server, game server, or other network server unless the appropriate service definition has also been added.
-
Remote Assistance can be affected if ICF has been enabled after a Remote Assistance invitation was created. This can be resolved by creating a new invitation while ICF is enabled or by disabling the firewall temporarily.
-
Internet programs might not work as expected when ICF is enabled. To work around the problem, temporarily disable ICF.
As with other troubleshooting sections in previous chapters, you can find solutions to common problems in the Windows Help and Support files, the Knowledge Base, TechNet, third-party websites, and newsgroups.
Practice: Configure Internet Connection Firewall
In this practice, you will enable ICF, enable a specific ICMP component, and disable ICF. The exercises in this practice require that you have a properly configured Internet connection.
Exercise 1: Enable Internet Connection Firewall
-
Log on to Windows XP using an account with administrator privileges.
-
From the Start menu, select My Computer.
-
In the My Computer window, in the Other Places section, select My Network Places.
-
In My Network Places, in the Network Tasks section on the left, click View Network Connections.
-
In the Network Connections window, right-click the connection that is connected to the Internet and select Properties.
-
In the Properties dialog box for the connection, in the Internet Connection Firewall section of the Advanced tab, select the Protect My Computer And Network By Limiting Or Preventing Access To This Computer From The Internet check box. Click OK.
Exercise 2: Enable an ICMP Component
-
Log on to Windows XP using an account with administrator privileges.
-
From the Start menu, select My Computer.
-
In the My Computer window, in the Other Places section, select My Network Places.
-
In My Network Places, in the Network Tasks section on the left, click View Network Connections.
-
In the Network Connections window, right-click the connection and select Properties.
-
In the Properties dialog box for the connection, on the Advanced tab, click Settings.
-
In the Advanced Settings dialog box, on the ICMP tab, select the Allow Incoming Echo Request check box. Click OK.
-
In the Local Area Connection Properties dialog box, click OK.
Exercise 3: Removing Internet Connection Firewall
-
Log on to Windows XP using an account with administrator privileges.
-
From the Start menu, select My Computer.
-
In the My Computer window, in the Other Places section, select My Network Places.
-
In My Network Places, in the Network Tasks section on the left, click View Network Connections.
-
In the Network Connections window, right-click the connection and select Properties.
-
In the Properties dialog box for the connection, on the Advanced tab, clear the Protect My Computer And Network By Limiting Or Preventing Access To This Computer From The Internet check box. Click OK.
-
In the Internet Connection Firewall message box, click Yes.
Lesson Review
The following questions are intended to reinforce key information presented in this lesson. If you are unable to answer a question, review the lesson materials and try the question again. You can find answers to the questions in the “Questions and Answers” section at the end of this chapter.
-
A small office user has a network that consists of four computers. One computer running Windows XP Professional Edition acts as the host and provides ICS services, and the other three computers access the Internet through this host computer’s Internet connection. The administrator of the network wants to protect the network by using ICF. What must the administrator do?
-
Purchase and install a router that is compatible with Windows XP and ICF.
-
Upgrade to DSL or a cable modem; ICF does not work with a dial-up connection.
-
Enable ICF on the host computer.
-
Enable ICF on all four network computers.
-
-
You are troubleshooting a network connection and need to use the Ping command to see if a host is reachable. Which ICMP option should you enable on the host computer?
-
Allow Incoming Router Request
-
Allow Incoming Echo Request
-
Allow Outgoing Source Quench
-
Allow Redirect
-
Lesson Summary
-
Internet Connection Firewall is a software-based firewall built into Windows XP. You can enable ICF for any network connection and configure what types of traffic it allows to enter or leave the computer.
-
Internet Control Message Protocol allows routers and host computers to swap basic control information when data is sent from one computer to another. ICMP tools such as Ping and Tracert are often used to troubleshoot network connectivity.
-
Most of the problems you will encounter with ICF involve users not being able to enable ICF for a particular connection and users having connectivity problems resulting from having ICF turned on and blocking necessary traffic.
EAN: N/A
Pages: 237