Lesson 1: Understanding Security Permissions
You assign permissions to files, folders, printers, and other network resources to protect them from unauthorized access. In a workgroup, the owner of the resource determines the level of access (if any) and assigns the permissions; in a domain, network administrators set permissions, and resources are accessed through the network servers. As a tier 1 desktop support technician (DST), you will work with Simple File Sharing permissions on a Windows XP workgroup, as well as shared folders and NTFS permissions on workgroups and domains.
After this lesson, you will be able to
-
Configure and troubleshoot Simple File Sharing.
-
Configure and troubleshoot shared folders.
-
Configure and troubleshoot NTFS permissions.
Estimated lesson time: 50 minutes
Working with Windows XP Simple File Sharing
When you create a home office network with Windows XP, Simple File Sharing is enabled by default. This is exactly what it sounds like: a simple way for home users to share files on a network. When Simple File Sharing is enabled, users can share files easily, and in just one step.
With Simple File Sharing, users can do the following:
-
Share folders with everyone on the network
-
Allow users who access the folder to view the files, edit the files, or both
-
Make folders in his or her user profile private
Simple File Sharing does not permit users to do the following:
-
Prevent specific users and groups from accessing folders
-
Assign folder permissions to specific users and groups
-
View the Security tab of a shared folder’s Properties dialog box
To enable or disable Simple File Sharing or to see whether Simple File Sharing is in use, follow these steps:
-
Open Control Panel, select Appearance And Themes, and then select Folder Options.
-
Select the View tab, and under Advanced Settings, scroll down the list of choices to the last option.
-
Simple File Sharing is enabled if the Use Simple File Sharing (Recommended) check box is selected. To disable it, clear the check box. For the purposes of this section, verify that it is selected. Click OK.
Sharing a Folder on the Network
Once you have verified that Simple File Sharing is enabled, sharing a folder on the network is easy. Just follow these steps:
-
Right-click the Start menu, and choose Explore.
-
Locate the folder you want to share, right-click it, and choose Sharing And Security.
-
In the Properties dialog box, select the Share This Folder On The Network check box. This is shown in Figure 9-1. Notice that a share name is automatically assigned. This is the name that the users will see when they browse the network for this shared folder. Change the name if desired; if the share must be readable to older operating systems such as MS-DOS and Windows 3.1, the share name must be 12 characters or fewer.
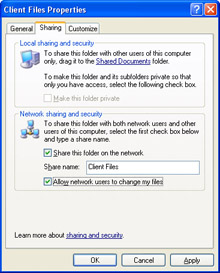
Figure 9-1: Simple File Sharing. -
To allow others to make changes to the files in the shared folder, also select the Allow Network Users To Change My Files check box. Click OK.
When sharing a folder on a network in this manner, you give permission for everyone on the network to access and read the files in the folder. With Simple File Sharing, you cannot choose who can and cannot access a folder. When you also choose to allow users to make changes to the files in the shared folder, you allow them to write to (or make changes to) those files.
| Exam Tip | Remember the limitations of Simple File Sharing when you are exploring a situation on the exam. Simple File Sharing is really an all-or-none proposition; the object is shared with everyone on the network or not shared at all. |
Two other options on the Sharing tab were not discussed. Under Local Sharing And Security, you can share a folder with other users of the same computer by dragging it to the Shared Documents folder. Anyone logged on to the workgroup or the computer can access the Shared Documents folder. The folder is accessed at C:\Documents And Settings\All Users\Documents, as shown in Figure 9-2. Sharing a folder in this manner works only for workgroups, though, not for domains.
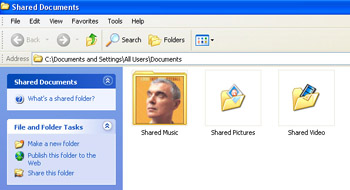
Figure 9-2: The Shared Documents folder can be used to share files on a computer or in a workgroup.
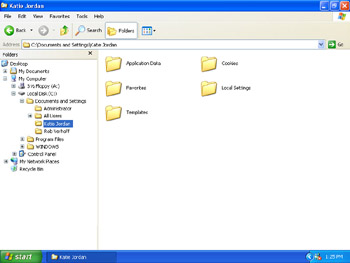
There is also the option to make a folder private. When you make a folder private, only the owner of the folder can access its contents. You can make folders private only if they are in the user’s personal user profile (and only if the disk is formatted with NTFS, the native file system for Windows XP—you will learn more about NTFS in Chapter 11). A personal user profile defines customized desktop environments, display settings, and network and printer connections, among other things. Personal user profile folders include My Documents and its subfolders, Desktop, Start Menu, Cookies, and Favorites.
To locate the list of local user profiles, right-click My Computer, select Properties, and from the Advanced tab, in the User Profiles section, select Settings. To view a personal user profile, browse to C:\Documents And Settings\User Name, as shown in Figure 9-3.
| Note | To learn more about user profiles, read Microsoft Knowledge Base articles 314478 and 294887. |
| Note | Simple File Sharing works for all computers running Windows XP, whether they are formatted to use the FAT or NTFS file system. |
Troubleshooting Simple File Sharing
There are only a few problems that you will run into when troubleshooting shares that are configured with Simple File Sharing, and they deal with user access to the shared resource. Assuming all network connections are functional, all computers and hubs are working properly, and Simple File Sharing is in use, Table 9-1 details some common problems and their solutions.
| Scenario/Report | Cause/Solution |
|---|---|
| A Microsoft Windows Me user reports that he cannot access a shared folder named Working Files On Computer 01. | If the share name is longer than 12 characters, computers running Microsoft Windows 98, Windows Me, Windows NT 4.0, or earlier operating systems cannot access the folder. Rename the share. |
| An owner of a file reports that users can access the file but cannot make changes. She wants users to be able to make changes. | On the Sharing tab of the shared folder, select the Allow Network Users To Change My Files check box. |
| The owner of a file dragged the file to the Shared Documents folder and logged off the computer. When others log on, no one can access or even view the Shared Documents folder. | Users are logging on to a domain. Users will need to log on to the workgroup to access the file. |
| A user wants to share a file and assign specific permissions from the Security tab. However, the Security tab is not available. | With Simple File Sharing, the Security tab is not available. This is by design. |
Working with Shared Folders
You can use share permissions with both file allocation table (FAT) and NTFS file systems, and share permissions offer more configuration options than Simple File Sharing. Compare the Sharing tab in Figure 9-1, which uses Simple File Sharing, with the Sharing tab in Figure 9-4, which has Simple File Sharing disabled. On the Sharing tab in Figure 9-4, notice the Permissions button. This opens the Permissions dialog box, which allows the user to configure specific share permissions.
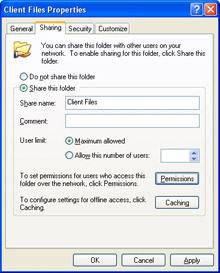
Figure 9-4: Share permissions.
There are three share permissions: Full Control, Read, and Change. You can configure these permissions only when Simple File Sharing is disabled, and you can use them to restrict who can access a particular resource and to what degree. You apply share permissions to folders, not files, and they are often adequate for securing a small home network. These three share permissions are as follows:
-
Read The Read permission is the most restrictive and allows the user to only view file names and subfolder names in a folder, view data in the folder, and run any program in the folder.
-
Change This permission is less restrictive than the Read permission and allows a user to perform all Read tasks, add files or subfolders, change data in the files and save those changes, and delete any files or subfolders in the folder.
-
Full Control This permission is the least restrictive and allows a user to perform all Change tasks and change the permissions of the folder or take ownership of the share.
When applying permissions, you choose Allow or Deny for each permission that is available. Allow applies that permission to the group that is selected; Deny denies that permission. Deny always means deny and overrides any other permissions that are applied to the folder. To keep troubleshooting minimal, it is best to use the Deny option sparingly.
| Caution | Share permissions apply only if the user is accessing the resource over a network. The permissions do no good if the user is sitting at the computer that contains the shares. In addition, share permissions apply to all subfolders in the folder. |
Sharing a Folder
To share a folder and apply share permissions, verify that Simple File Sharing is disabled on the View tab of the Folder Options dialog box, and then follow these steps:
-
Use Windows Explorer to browse to the folder to share, or locate it by other means.
-
Right-click the folder to share, and choose Sharing And Security.
-
On the Sharing tab, select Share This Folder.
-
In the Share Name area, type a name for the share. Keep the name under 12 characters. (You will be prompted if you use an invalid character.)
-
Type a comment if desired.
-
Next to User Limit, select Maximum Allowed or Allow This Number Of Users. If setting a user limit, enter the number of users to allow. By default, 10 is the maximum.
-
Click Permissions.
-
To add a group, click Add. To remove a group, select the group and click Remove. If applicable, in the Select Users Or Groups dialog box, add or remove any group. Separate multiple groups with semicolons. (You will learn more about groups later in this chapter.) Click OK.
-
In the Group Or User Names list, select a group for which you want to configure permissions. In the Permissions For <group name> area, make changes to the permissions as desired. Figure 9-5 shows this dialog box. Click OK, and click OK again to close the Properties dialog box.
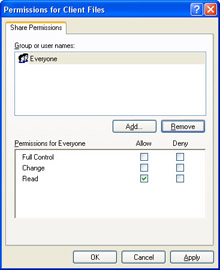
Figure 9-5: Set share permissions.
Troubleshooting Share Permissions
Problems can occur with share permissions just as they can with Simple File Sharing. Assuming that all network connections are functional, all computers and hubs are working properly, and Simple File Sharing is not in use, Table 9-2 details some common problems with share permissions and their solutions.
| Scenario/Report | Cause/Solution |
|---|---|
| All network users report that when they access a particular shared folder on the network, they get a message that access is denied. This does not happen with any other share. | The share permissions for that resource might be set to Deny for the Everyone group. Also, the computer that is hosting the share might be turned off or not available, or the owner might have changed the share permissions recently. |
| An owner of a file reports that users can access the file but cannot make changes. He wants all users to be able to make changes. | On the Sharing tab of the shared folder, click Permissions. In the Share Permissions dialog box, select the Everyone group, and select the Read and Change check boxes. |
| The owner of a share reports that she opened her shared folder this morning to find that some of the items in the folder had been deleted. She states that she did not assign the Full Control permission but did assign the Read and Change permissions to the Everyone group. She wants to know why users can delete her files. | By default, users with the Change permission for a folder can delete files in the folder. The user needs to reconfigure which files are in which shares, and who has access. |
| A user wants to share a file and assign specific permissions from the Security tab. However, the Security tab is not available. | The file system used is FAT, not NTFS. |
Working with NTFS Permissions
NTFS file and folder permissions are available on drives that are formatted with the NTFS file system, and the permissions include Full Control, Modify, Read And Execute, List Folder Contents, Read, Write, and several special permissions. As with share permissions, these are assigned by selecting Allow or Deny. NTFS permissions are applied when a user is sitting at the computer or accessing the file or folder over the network, making NTFS permissions a better choice for offices and corporations.
Without including every aspect of each permission, the six basic NTFS folder permissions that you should be familiar with are as follows:
-
Read This permission allows a user to view the files and subfolders.
-
Write This permission allows a user to create files and folders and write data to files and subfolders.
-
List Folder Contents This permission allows a user to traverse the folder, execute files, and view files and subfolders.
-
Read And Execute This permission allows a user to view the files and subfolders, traverse folders, and execute files.
-
Modify This permission allows a user to view files and subfolders, traverse folders, execute files, create files, write data, create folders, and append data.
-
Full Control This permission allows a user to have complete control over the folder, including deleting files and subfolders, taking ownership, and all other tasks.
Sharing a File or Folder
To apply NTFS permissions, verify that Simple File Sharing is disabled on the View tab of the Folder Properties dialog box and that the drive that contains the folder on which you want to configure permissions is formatted using NTFS, and then follow these steps:
-
Right-click the folder to assign NTFS permissions to, and select Sharing And Security.
-
On the Security tab, in the Group Or User Names list, select the group or user for which you want to set NTFS permissions. To add a user or group that is not listed, click Add and in the Select Users Or Groups dialog box, enter the object names to select, and click OK.
-
To change permissions for a group, select that group from the Security tab under Group Or User Names, and select or clear the permissions to apply or deny. Figure 9-6 shows the default NTFS permissions given to the Power Users group when the group is added to the Group Or User Names list.
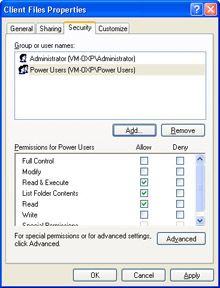
Figure 9-6: Set NTFS permissions. -
To access the advanced settings and to set special permissions, click Advanced.
-
In the Advanced Security Settings dialog box, notice the four tabs: Permissions, Auditing, Owner, and Effective Permissions. Select the Permissions tab.
-
From the Permissions tab, the default selection is Inherit From Parent The Permission Entries That Apply To Child Objects. Include These With Entries Explicitly Defined Here. When this check box is selected, the file, folder, or object will inherit the permission entries from the parent folder (or object). When this selection is cleared, the object will not inherit the permission entries. For more information about inheritance, see the Windows Help file “Changing Inherited Permissions.”
-
From the Permissions tab, the option to Replace Permission Entries On All Child Objects With Entries Shown Here That Apply To Child Objects is not selected. When selected, the permission entries on the child objects are reset so that they are identical to the current parent object. Click OK.
Optionally, you can create share permissions at the same time that you create NTFS permissions. Simply make the appropriate changes from the Sharing tab. Keep in mind that share and NTFS permissions are independent of each other, and when you give a user NTFS permissions for a folder, that user cannot access the folder across the network unless you have also shared the folder and given the user share permissions.
Troubleshooting NTFS Permissions
Issues can occur with NTFS permissions just as they can with Simple File Sharing and share permissions. Assuming that all network connections are functional, all computers and hubs are working properly, and Simple File Sharing is not in use, Table 9-3 details some common problems and their solutions.
| Scenario/Report | Cause/Solution |
|---|---|
| A user reports that he applied the NTFS permissions Read and Write for the group that will access a folder. However, when a member of the group opens the folder, she cannot run the programs in it. He needs the users to be able to run the programs without giving them excess privileges. | The user can add the Read And Execute permission to the group. This gives users who access the folder the ability to execute files in the folder without adding any other privileges. |
| A user wants to apply NTFS permissions, but all of the options on the Security tab under Allow are unavailable and cannot be set. | The permissions for this folder have been inherited from the parent folder. To make the permissions accessible for this file, select the This Folder Only check box in Apply Onto when setting the permissions on the parent folder. |
| Although a network user is a member of the Power Users group, and this group has the Read NTFS permissions for a folder, the user cannot read the documents in the folder. | The user has been assigned a permission of Deny by another administrator or he or she is a member of another group that has been assigned the Deny permission for the folder. The user might also have the Deny share permission. |
| NTFS permissions cannot be applied because the Security tab is missing. | The file system used is FAT, not NTFS. |
When Both Share and NTFS Permissions Exist
When a user is assigned multiple share permissions, the combination of the permissions is referred to as the user’s effective permissions for the share. For instance, if the share permissions that are applied to a folder are Change and Read, the user can change and read the folder’s contents. Likewise, when a user is assigned multiple NTFS permissions, the user’s effective permissions for a folder are the combination of all NTFS permissions. For example, if the NTFS permissions Read, Write, and Modify exist, the user can read, write to, and modify the contents of the folder.
If a user is assigned both share and NTFS permissions for a folder, the user’s effective permissions get a little more complicated. First, you must determine the user’s effective shared permissions, and then determine the effective NTFS permissions. The final permissions on the folder are the more restrictive of the two.
Here is an example: A network user, Brenda Diaz, has access to a folder that has both share and NTFS permissions applied. The share permissions are Read and Change, and the NTFS permissions are Read and Read And Execute. Thus, Brenda’s cumulative share permission is Change, and her cumulative NTFS permission is Read And Execute. To calculate Brenda’s effective permissions, take the more restrictive of the two, which is Read And Execute. Brenda will not be able to change any data in the folder.
In all cases, if Deny is selected for a user, that user will not have access. Deny can be a share permission or an NTFS permission.
If you are working on home and small business networks, you are likely to find either Simple File Sharing or share permissions used to control access to files and folders on the network. Even when drives are formatted with the NTFS file system, most people on small networks just do not bother with NTFS permissions.
On large company networks, you find just the opposite. Administrators typically rely on NTFS permissions and leave the default share permissions (where Everyone has full access) in place. The reason for this is that NTFS permissions do a much better job of securing data. Because of the way share permissions and NTFS permissions interact, NTFS permissions secure data for both local and network access. Adding share permissions is really unnecessary and in fact complicates the web of permissions administrators must deal with. The exception to this is on systems running older versions of Windows (for example, Windows 98/Me) that do not support the NTFS file system; these systems must use share permissions if their data is to be shared on the network.
Here are some rules to follow when you are working with different kinds of networks. If you are working on a home network, the users are probably using Simple File Sharing. If you are working on a small business network, users might be using Simple File Sharing or share permissions. If all of the computers on the network are running Windows 2000 or Windows XP, you might suggest moving over to the security of NTFS permissions and not worrying about share permissions. If you are working on a large network, NTFS permissions are likely used and share permissions are not. Make sure you understand the policies of the network before you make any changes.
Built-In Local Groups and Their Privileges
Windows XP has several built-in local groups: Administrators, Power Users, Users, and Backup Operators. Network administrators add end users to these groups manually. Each group (and each member of it) has specific user rights and privileges, and default permissions for file and folder access. Adding users to a group makes managing those users much easier because instead of managing users separately, the administrator can manage the users as a single group.
To troubleshoot end-user access to shares in a workgroup or a domain, you will need to understand what each group’s default rights and permissions are. The four default user groups are covered in the next four sections.
Administrators
The Administrators group is the least restrictive group available. Administrators have full control of the computer, the files and folders on it, the local area network (if it exists), and the configured user accounts. Only a few users should be members of this group.
Besides being able to perform all of the tasks of any other group member, members of the Administrators group can also do the following:
-
Take ownership of files and folders
-
Back up and restore system data
-
Set local policies
-
Install service packs and Windows updates
-
Perform upgrades
-
Perform system repairs such as installing device drivers and system services
-
Audit the network and manage logs
Power Users
The Power Users group is the next least restrictive group. Power Users have more control over the computer than members of the Users group do but less than administrators. Only users who are trusted employees and competent computer users should be members of this group.
Besides being able to perform all of the tasks a member of the Users group can, Power Users can also do the following:
-
Modify computer-wide settings such as date, time, and power options
-
Run older and noncertified Microsoft applications
-
Install programs that do not modify operating system files or install system services
-
Create local user accounts and local groups
-
Manage local user accounts and local groups
-
Stop and start system services that are not started by default
-
Customize network printers
-
Take ownership of files
-
Back up and restore directories
-
Install device drivers
Users
The Users group is the most secure group and is much more restrictive than the Administrators and Power Users groups. The Users group is the most secure because members of this group cannot compromise the integrity of the operating system by modifying registry settings, operating system files, or application files. Most users should be members of this group.
Members of the Users group can do the following:
-
Shut down their own workstations
-
Lock the workstation
-
Create local groups
-
Manage the local groups they have created
-
Run programs that are certified by Microsoft as compatible and that have been previously installed by administrators
-
Retain ownership of files and folders that they create
Members of the Users group cannot do the following:
-
Modify systemwide registry settings, operating system files, or program files
-
Shut down servers
-
Manage local groups that they did not create
-
Run older applications or applications that are not certified by Microsoft
-
Share directories
-
Share printers
Backup Operators
The Backup Operators group can back up and restore files on the computer, regardless of the permissions on those files. Those files can include users’ files and folders, system state files, and other critical operating system files. They can also log on to the computer and shut it down, but they cannot change security settings.
Practice: Configure Security Permissions
In this practice, you will share a document locally and make a folder private. You will also share a document on the network using Simple File Sharing and using share permissions. Finally, you will also set NTFS permissions on a shared network folder.
Exercise 1: Share a Document by Using the Shared Documents Folder
-
Log on to Windows XP.
-
Right-click the desktop, point to New, and select Text Document. Type Shared Document for the name of the document, and press Enter.
-
Right-click Shared Document on the desktop, and select Cut.
-
From the Start menu, select My Computer.
-
In the My Computer window, open the Shared Documents folder.
-
In the Shared Documents folder, from the Edit menu, select Paste.
Exercise 2: Make a Folder Private
-
Log on to Windows XP.
-
From the Start menu, select My Documents.
-
In My Documents, on the File Menu, select New, and then select Folder. Type Private for the name of the new folder.
-
Right-click the Private folder, and select Properties.
-
In the Private Properties dialog box, on the Sharing tab, in the Local Sharing And Security section, select the Make This Folder Private check box. Click OK.
Exercise 3: Share Folders in a Workgroup by Using Simple File Sharing
-
Log on to Windows XP using an account with administrator permissions.
-
From the Start menu, select My Documents.
-
In My Documents, from the File menu, point to New and select Folder.
-
Type Documents for Network as the name of the folder, and press Enter.
-
Right-click the new folder, and select Sharing And Security.
-
In the Documents For Network Properties dialog box, on the Sharing tab, in the Network Sharing And Security section, select the Share This Folder On The Network check box. Also select the Allow Network Users To Change My Files check box. Click OK.
-
If you see a Sharing message box, click Yes.
Exercise 4: Share Folders in a Workgroup Without Simple File Sharing
-
Log on to Windows XP using an account with administrator privileges.
-
From the Start menu, select My Computer.
-
In My Computer, from the Tools menu, select Folder Options.
-
In the Folder Options dialog box, on the View tab, in the Advanced Settings window, scroll to the end and clear the Use Simple File Sharing (Recommended) check box. Click OK.
-
Close the My Computer window.
-
From the Start menu, select My Documents.
-
In My Documents, from the File menu, point to New and select Folder.
-
Type Documents for Administrators for the name of the folder, and press Enter.
-
Right-click the new folder, and select Sharing And Security.
-
In the Documents For Administrators Properties dialog box, on the Sharing tab, select Share This Folder. Click Permissions.
-
In the Permissions For Documents For Administrators dialog box, ensure that Everyone is selected in the Group Or User Names window. Click Remove. Click Add.
-
In the Select Users Or Groups dialog box, click Advanced.
-
In the second Select Users Or Groups dialog box, click Find Now.
-
In the search pane, select Administrators and click OK. (Make sure you select the Administrators group and not the Administrator user.)
-
In the first Select Users Or Groups dialog box, click OK.
-
In the Permissions For Documents For Administrators dialog box, under Permissions For Administrators, select the Change check box in the Allow column. Click OK.
-
In the Documents For Administrators Properties dialog box, click OK.
Exercise 5: Set NTFS Permissions on a Shared Network Folder
-
Log on to Windows XP using an account with administrator privileges.
-
From the Start menu, select My Documents.
-
In My Documents, on the File Menu, select New, and then select Folder. Type Power Users Documents for the name of the new folder.
-
Right-click the new folder, and select Properties.
-
In the Power Users Documents Properties dialog box, on the Sharing tab, select Share This Folder, and then click Permissions.
-
In the Permissions For Power User Documents dialog box, ensure that Everyone is selected in the Group Or User Names window. In the Permissions For Everyone pane, select the Full Control check box in the Allow column. Click OK.
-
In the Power User Documents Properties dialog box, switch to the Security tab, and then click Add.
-
In the Select Users Or Groups dialog box, in the Enter The Object Name To Select (Examples) text box, type Power Users. Click Check Names. Click OK.
-
In the Power User Documents Properties dialog box, on the Security tab, in the Group Or User Names window, make sure Power Users is selected.
-
In the Permissions For Power Users window, select the Write check box in the Allow Column, and then click OK.
Lesson Review
The following questions are intended to reinforce key information presented in this lesson. If you are unable to answer a question, review the lesson materials and try the question again. You can find answers to the questions in the “Questions and Answers” section at the end of this chapter.
-
The company you work for hires quite a few temporary workers, and those workers need access to workgroup computers to perform their jobs. These employees are added to the default Users group when they are hired. Because they are members of the Users group, they have Read And Execute, List Folder Contents, and Read permissions by default. However, these users also need to be able to write data to the folders to which they have access. What is the best way to make this change without giving the users too much access?
-
Add all new users to the Power Users group.
-
Stop assigning NTFS permissions, and assign the Read and Change share permissions.
-
For the Users group on each share, assign the NTFS permission Write.
-
For the Users group on each share, assign the NTFS permission Full Control.
-
-
A user’s Windows 2000 Professional computer was recently upgraded to Windows XP Professional. A member of the Users group reports that he can no longer run the older applications necessary to perform his job. You have looked for a newer version of the application but cannot find one. The user is a Microsoft Certified Desktop Technician and a Microsoft Certified Professional and has been with the company for many years, so you feel he is competent and will pose no threat if given extra leniency. You need to allow this user to run his older application. What is the best course of action?
-
Move this end user from the Users group to the Power Users group.
-
Decrease the default security settings for all members of the Users group.
-
Purchase a new program that is Microsoft certified and train the users in the company to use it. Uninstall the older application.
-
Move this end user from the Users group to the Administrators group.
-
Lesson Summary
-
There are several ways to configure sharing on a network, including using Simple File Sharing, setting share permissions, and setting NTFS permissions.
-
When share and NTFS permissions are applied, the cumulative permissions of both are determined, and the most restrictive of those create the user’s effective permission.
EAN: N/A
Pages: 237