Lesson 3: Sharing a Printer
On a network, many users might need to access a printer. In a business environment, users might require access to a number of different printers that have special features, such as color or high-speed capabilities. In a home or small office environment, there might be only a single printer available for all users to share. Most businesses need to control who has access to certain printers, whereas in the home or small office all users normally have unlimited access to the printer. Both Windows XP Professional and Windows XP Home Edition allow you to share a printer. However, as you learned in the previous lesson, you cannot limit access to a shared printer in Windows XP Home Edition.
After this lesson, you will be able to
-
Share a printer.
-
Install additional printer drivers for a shared printer.
-
Connect to a shared printer.
Estimated lesson time: 15 minutes
Sharing a Printer
To make a local printer available to network users, you must share the printer. There are two ways to share a printer:
-
During printer installation
-
By using the Sharing tab of the printer’s Properties dialog box after you have installed the printer
During the installation of a local printer, Windows gives you the option to share the printer on the Printer Sharing page of the Add Printer Wizard, shown in Figure 9-21. To share the printer, select Share Name and then type a share name. You must perform any additional configuration and administration of the shared printer, such as permissions assignments, after the printer is installed. To share a printer during installation, you must be a member of the Administrators or Power Users groups on the Windows XP Professional print server or have a user account of the Computer Administrator type on Windows XP Home Edition.
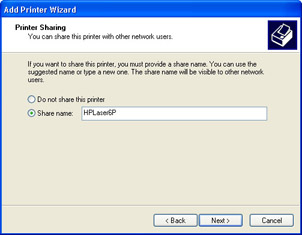
Figure 9-21: Share a printer during installation.
If a printer is already installed, you can share it by using the Sharing tab of the printer’s Properties dialog box. To share an existing printer, your user account must have the Manage Printers permission. To share a printer that has already been installed, follow these steps:
-
Open the printer’s Properties dialog box.
-
On the Sharing tab, select Share This Printer.
-
Type the share name for the printer, and then click OK.
Installing Additional Print Drivers for Non–Windows XP Operating Systems
Windows XP printer drivers are compatible with Windows 2000, but they are not compatible with previous versions of Windows. If a computer on the network that is running Windows NT, Windows 98, or Windows 95 connects to a shared printer on a computer running Windows XP Professional, the connecting computer cannot use the Windows XP printer drivers. Instead, the computer running the older version of Windows prompts the user to provide drivers.
To avoid forcing users running previous versions of Windows to supply their own drivers, you can supply the drivers for them. Windows XP Professional allows you to install printer drivers for other versions of Windows. When you make drivers for previous versions of Windows available, those drivers are installed automatically when a user of an older version of Windows connects to the printer.
You can install additional drivers by clicking the Additional Drivers button on the Sharing tab of the printer’s Properties dialog box. When you select any of the environments that are listed, as shown in Figure 9-22, you are prompted to provide a path to the printer drivers for that operating system. Windows XP then installs the drivers. From that point forward, when users running an operating system for which you have installed drivers connect to the shared printer, they receive the printer drivers automatically.
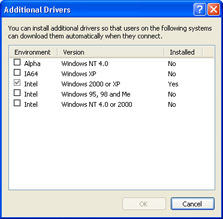
Figure 9-22: Install non-Windows XP print drivers so other users do not have to.
Connecting to Shared Printers
Windows XP provides many different methods to access shared printers, including the following:
-
Using the Add Printer Wizard
-
Browsing My Network Places
-
Using the Run dialog box
-
From within an application
Remember that printer access is controlled through the assignment of permissions. If a user does not have at least the Print permission to a printer, that user cannot establish a connection to the printer.
Connecting by Using the Add Printer Wizard
You can connect to a shared printer by running the Add Printer Wizard. On the Local Or Network Printer page, choose A Network Printer Or A Printer Attached To Another Computer. The Add Printer Wizard asks you to specify the name of the shared printer that you want to connect to. If you do not know the name of the printer, you can use the following search options:
-
If the computer is a member of a Windows 2000 Server or Windows Server 2003 domain, you are given the option to Find A Printer In The Directory. This option enables you to search Active Directory directory service for a printer. After you locate the printer that you want to connect to, select it and click OK to continue with the installation.
-
Choosing the Connect To This Printer option gives you the opportunity to enter the path of the printer or to click Next to browse My Network Places in search of the printer.
-
Choosing the Connect To A Printer On The Internet Or On Your Intranet option allows you to specify the printer’s URL.
Connecting by Browsing My Network Places
If you know the name of the computer that shares the printer, you can browse My Network Places to connect to the printer. After you locate the printer, you can right-click the printer and choose Connect, or you can drag and drop the printer to the Printers And Faxes folder on your computer.
Connecting by Using the Run Dialog Box
If you know the location to the printer (or at least the name of the print server that the printer is attached to), you can enter the path in the Run dialog box (available by selecting Run from the Start menu). Entering the full Universal Naming Convention (UNC) path of the printer (for example, \\Computer1\HPLaser6P) automatically connects you to the printer. Entering just the name of the server (for example, \\Computer1) displays all the resources on that computer. You can then right-click the printer and select the Connect option, just as if you had browsed for it in My Network Places.
Connecting from Within Applications
When you are working in an application and it is time to print, you usually have the option to choose any printer that you currently have installed. Some applications also permit you to install a new printer from within the application’s Print dialog box.
Figure 9-23 shows the Print dialog box in Notepad. Clicking the Find Printer button opens a dialog box that allows you to locate and install an available printer.
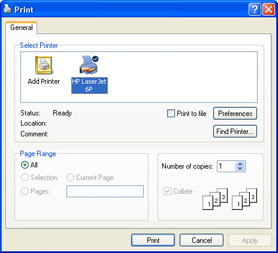
Figure 9-23: Install a printer from within certain applications by using the Find Printer button.
Lesson Review
The following questions are intended to reinforce key information presented in this lesson. If you are unable to answer a question, review the lesson materials and try the question again. You can find answers to the questions in the “Questions and Answers” section at the end of this chapter.
-
List several ways in which a user can connect to a shared printer.
Lesson Summary
-
You can share a printer that is connected to a computer running Windows XP by using the Sharing tab on the printer’s Properties dialog box.
-
Users can connect to a shared printer by using the Add Printer Wizard, by browsing My Network Places, by using the Run dialog box, or from within certain applications.
-
To avoid forcing users of previous versions of Windows to supply drivers, Windows XP Professional allows you to install printer drivers for non–Windows XP clients. When those drivers are installed, the installation of the printer on computers with previous versions of Windows is automatic.
EAN: N/A
Pages: 195