Lesson 2: Troubleshooting Internet Explorer Problems
DSTs are often called on to troubleshoot problems with Internet Explorer, and these service calls generally consist of two types. They are user requests to make Internet Explorer work faster and smarter, look better, have more functionality, or resolve simple interface issues; or the calls are user requests to resolve problems that have to do with the inability to view Web pages properly.
-
Identify and resolve common user requests involving Internet Explorer.
-
Resolve problems viewing Web pages.
Estimated lesson time: 30 minutes
Resolving Common User Requests
End users will have various requests that involve how Internet Explorer looks and performs, and they will ask you to resolve problems with the interface. You can resolve many of these problems by customizing the Standard toolbar, changing what is selected in the View menu, or personalizing the Advanced settings in the Internet Options dialog box.
| Note | Connectivity Issues This section assumes that Internet Explorer is connected to the Internet properly. Chapter 10 focuses on connectivity problems. |
Missing Toolbar, Links Bar, or Status Bar
A common complaint from end users is that an Internet Explorer toolbar is missing, or a toolbar that they used to have is not available anymore. The toolbars that you can configure include the Standard toolbar, the Address bar, and the Links bar. Users might also complain that they cannot see the information at the bottom of the screen that shows which security zone they are in, denoting a missing Status bar. You can add and remove these toolbars by using the View menu; and you can customize the placement of the Standard toolbar, Address bar, and Links bar by dragging and dropping.
To show or hide any of the toolbars, follow these steps:
-
Open Internet Explorer, and from the View menu, point to Toolbars.
-
The Toolbars list contains Standard Buttons, Address Bar, Links, Lock The Toolbars, and Customize selection. Toolbars marked with a check are showing; toolbars without a check do not show. To select or clear a toolbar, select it from the list. Figure 11-11 shows an example of all three toolbars. In this example, the Links bar is on the same line as the Address bar.
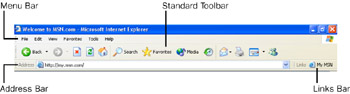
Figure 11-11: You can customize Internet Explorer toolbars to suit any user’s needs.
To customize the placement of the Standard toolbar, Address bar, or Links bar, follow these steps:
-
In Internet Explorer, make sure that the toolbars are unlocked by going to the View menu, pointing at Toolbars, and ensuring that the Lock The Toolbars command does not have a check next to it. If it does, choose the command to toggle it off.
-
Position the pointer at the far left of the toolbar you want to move.
-
Click and hold the mouse button; the pointer will change to a four-headed arrow.
-
Drag the toolbar to a new position to combine it with an existing toolbar or to move its position onscreen.
-
Position the pointer on the light dotted lines that separate combined toolbars until the pointer becomes a two-headed arrow. Drag to resize the toolbar.
Note The Standard toolbar, Address bar, and Link bar must remain at the top of the Internet Explorer window. You cannot move them to the left, right, or bottom of the screen (as you can the Windows taskbar).
Locked Toolbar
If a user complains that the toolbar is locked and cannot be moved, click View, point to Toolbars, and clear the Lock The Toolbars command.
Personalizing the Favorites Menu
When users call to report that they cannot access all their favorites or that they have saved favorites but the favorites are not listed in the Favorites list, it is most likely because the Personalized Favorites menu option is enabled in the Advanced options of Internet Explorer. Personalized menus keep the Favorites list clean by hiding links that are not used very often. The list shows only the links that are accessed frequently. Tell the users that they can access the less-frequently-accessed links by clicking the down arrow at the end of the Favorites list.
Enabling Personalized Favorites Menus
To disable or enable personalized favorites menus, follow these steps:
-
Open Internet Explorer, and from the Tools menu, select Internet Options.
-
On the Advanced tab, scroll down to the Browsing section, and select or clear the Enable Personalized Favorites Menu check box. Click OK.
Note Applying the change to personalized favorites might require that you close and restart Internet Explorer.
Importing and Exporting Internet Favorites
If you use Internet Explorer on multiple computers, you can easily share favorite items among computers by exporting them on one computer and then importing them on another. Exporting favorites is also a good way to back them up, share them with a friend, or even create a single Web page with links to all your favorites.
Exporting Internet Favorites
To export Internet Favorites to an .htm file, follow these steps:
-
On the File menu of Internet Explorer, select Import and Export.
-
On the Welcome page of the Import/Export Wizard, click Next.
-
Select the Export Favorites option and click Next.
-
You can specify the primary Favorites folder or any particular subfolder for your export. When you select a folder for export, all subfolders in that folder are also exported. Select the folder you want to export and click Next.
-
Click Browse, select a location and name for the export file, and click Save. Click Next and then click Finish.
-
Internet Explorer informs you that the export is successful. Click OK.
The exported file is saved as a Web page. Double-click it to open it in Internet Explorer, and you can see a list of all your favorites—complete with hyperlinks. You can transfer this file to another computer and import it, back it up to a safe place, or even use it as a Web page.
Importing Internet Favorites
To import Internet Favorites from an .htm file, follow these steps:
-
On the File menu of Internet Explorer, select Import and Export.
-
On the Welcome page of the Import/Export Wizard, click Next.
-
Select the Import Favorites option and click Next.
-
Click Browse, locate and select the .htm file you want to import, and then click Save.
-
Click Next and then select a folder in which the imported favorites will be placed. Click Next and then click Finish.
-
Internet Explorer informs you that the import is successful. Click OK.
Using AutoComplete
AutoComplete is a feature that helps end users work, browse, and purchase items on the Internet faster than normal by automatically listing possible matches for Web addresses, forms, and user names and passwords on forms. Although this can be a good feature for a computer administrator who does not share a computer, for the average home user or the owner of a small, home-based business, it is not a good idea under all circumstances.
You should not use AutoComplete when the computer is located in a nonsecure environment, such as a break room, lunchroom, or kiosk; or when two or more people share a computer and computer account. In addition, if a computer is transferred to a new user or sold to another person, the AutoComplete form and password information should be cleared.
Enabling or Disabling AutoComplete
As a DST, you will be asked to enable or disable AutoComplete (depending on the circumstance), enable or disable Internet Explorer’s capability to save passwords, and clear the AutoComplete history. To do these tasks, follow these steps:
-
Open Internet Explorer, and from the Tools menu, select Internet Options.
-
On the Content tab, and in the Personal Information area, select AutoComplete.
-
To enable or disable AutoComplete, in the AutoComplete Settings dialog box, select or clear the Use AutoComplete for: Web Addresses, Forms, and User Names And Passwords On Forms check boxes.
-
To clear the AutoComplete history for forms, select the Clear Forms button.
-
To clear the AutoComplete history for passwords, select the Clear Passwords button.
-
To remove the capability of Internet Explorer to save any passwords in the future, clear the Prompt Me To Save Passwords check box.
-
Click OK to close the AutoComplete Settings dialog box, and click OK to close the Internet Options dialog box.
Exam Tip Do not confuse AutoComplete with Inline AutoComplete. Inline AutoComplete completes entries in the Address bar of Internet Explorer as you type (based on entries you used before) and offers a list of choices under the Address bar or other links that start the same way. AutoComplete offers choices under the Address window as well, but does not complete the entry in the Address bar as you type.
Using Inline AutoComplete
Inline AutoComplete completes entries in the Address bar as you type (based on entries you have used before) and offers a list of choices under the Address bar for other links that start the same way.
Enabling InlineAutoComplete
You can enable Inline AutoComplete using the Advanced options of Internet Explorer by following these steps:
-
Open Internet Explorer, and from the Tools menu, select Internet Options.
-
From the Advanced tab, scroll down to the end of the Browsing section.
-
Select the Use Inline AutoComplete check box. Click OK.
Using Default Search Actions
Users can perform searches in many ways, including using the Search Explorer bar, using a Web browser or search engine, or typing their requests in the Address bar. If a user’s choice is to search for information using the Address bar, there are several ways in which the results for that search can be shown. In addition, searching from the Address bar can be disabled. Following are the advanced choices for searching from the Address bar:
-
Display results and go to the most likely site.
-
Do not search from the Address bar.
-
Just display the results in the main window.
-
Just go to the most likely site.
Changing Default Actions
The default search action is to go to the most likely site. To change that default, follow these steps:
-
Open Internet Explorer, and from the Tools menu, select Internet Options.
-
Click the Advanced tab and scroll down to Search From The Address Bar.
-
In the When Searching list, select the appropriate choice and then click OK.
Script Errors
Users might report that script error notifications appear on their monitors while surfing websites, and they might also complain that they are continually asked if they want to debug those errors. You might also have users with the opposite problem; a developer or technician might need to see these errors when testing a new website. Whatever the case, script options exist in the Advanced options of Internet Explorer, and they can be easily enabled or disabled.
Enabling and Disabling Script Debugging
To enable or disable script debugging, or if a user should be notified of all script errors, follow these steps:
-
Open Internet Explorer, and from the Tools menu, select Internet Options.
-
On the Advanced tab, in the Browsing section, select or clear the following check boxes and then click OK: Disable Script Debugging and Display A Notification About Every Script Error.
-
Click OK to close the Internet Options dialog box.
Download Complete Notification
By default, Internet Explorer notifies users when a download is complete by leaving the download dialog box open and playing a sound. It is possible, however, that a user has turned the notification off (there is a check box on the download dialog box that makes this an easy thing to do), and he now wants to turn the feature back on.
Enabling Download Notification
To enable download complete notification, follow these steps:
-
Open Internet Explorer, and from the Tools menu, select Internet Options.
-
From the Advanced tab, and in the Browsing section, select the Notify When Downloads Complete check box.
-
Click OK to close the Internet Options dialog box.
As you learned in this section, you can resolve many problems by using the View menu or the Internet Options dialog box. The Content tab, Programs tab, and Advanced tab of the Internet Options dialog box allow you to change the program defaults and personalize Internet Explorer. The View menu enables personalization of the toolbars.
Resolving Problems with Viewing Web Pages
There are several reasons why users have trouble viewing Web pages properly, and many times the problem is the result of changes to the defaults that the users have made on their own. Problems can also occur because of default security settings. For example, a site is in the Restricted Sites zone, or the site requires cookies be placed on the computer and cookies are not allowed. Users might report specific errors as well; they get internal page faults; or they cannot hear sounds, see videos, or view pictures. These are common problems, and solutions to them are detailed in this section.
Screen Resolution
If a user reports problems with viewing a single Web page, but other pages look fine, check to see whether there is a note at the bottom of the page that says, “This page is best viewed using 800 x 600 screen resolution” or something similar. If it is a corporate website or one the user relies on heavily, the user might need to reconfigure his or her display settings permanently. Display settings are changed in Control Panel (see Chapter 7, “Supporting Display Devices, I/O Devices, and ACPI,” for more).
Cookie Handling
Many websites require that cookies be enabled on a user’s computer if the user wants to visit and browse the site. A user cannot view websites that have this requirement if the user’s privacy settings are configured to block all cookies, if the privacy settings are set to High, or if the company has a strict cookie policy that blocks first-party cookies or does not allow session cookies.
Allowing a user access to sites requires that the default privacy settings be changed. Changing privacy settings is detailed in Lesson 1, “Configuring Internet Explorer,” earlier in this chapter.
Sounds, Videos, and Pictures
Some of the Advanced options of Internet Explorer restrict what users can and cannot see on a Web page. These settings are often configured to speed up access to a page by not playing videos or showing pictures when the site is loaded, and sound can be disabled as well. If a user reports problems that are associated with sound, video, or pictures, check the advanced options first by following these steps:
-
Open Internet Explorer, and from the Tools menu, select Internet Options.
-
Click the Advanced tab and scroll down to the Multimedia section.
-
Verify that the appropriate items are selected:
-
Play Animations In Web Pages
-
Play Sounds In Web Pages
-
Play Videos In Web Pages
-
Show Pictures
-
-
On the Advanced tab, verify that the Show Image Download Placeholders check box is cleared. Click OK.
Invalid Page Faults
A page fault is a normal process that occurs when a program requests data that is not currently loaded into the computer’s real memory. When this occurs, Windows attempts to retrieve the data from the virtual memory that is stored to hard disk. If the data cannot be mapped to virtual memory, the result is an invalid page fault—and often a crashed application. Invalid page faults are often difficult to diagnose. Connectivity settings; a full Temporary Internet Files folder; and third-party Internet software including firewalls, file-sharing software, Internet optimizers, and on-screen animation programs can cause page faults. Network protocols, cookies, corrupted Favorites, services, and Internet software installations can also cause invalid page faults.
Invalid page faults can be represented in Internet Explorer by several different types of errors, including the following:
-
An actual invalid page fault error
-
Iexplore.exe has generated errors and must be shut down
-
The page could not be displayed
-
Could not open the search page
-
An access violation occurred in MSHTML.DLL
If specifics about the error are provided in the error message (as in the last item on the previous list), see the Microsoft Knowledge Base and type in the exact error message as the keywords for a search. Downloading and installing a particular update might solve this particular error. These are the easiest of all page faults to find solutions for. If no specifics are given, you will have to resolve the errors using trial-and-error troubleshooting techniques.
| Note | Before you do too much troubleshooting, verify that the user has the most recent version of Internet Explorer and the latest service packs for both the operating system and Internet Explorer. To check the version number and which service packs are installed, open Internet Explorer, and from the Help menu, select About Internet Explorer. |
If you are at the user’s desk when the error occurs, use the Internet Explorer Reporting tool to report the error, and then view the error details. If the error report gives any indication of the cause of the error, disable the program or service associated with it. If that process does not work, and if the user has the most up-to-date service packs installed, continue troubleshooting in the following order:
-
Verify that the proxy settings for the LAN, if they exist, are correctly configured. You can locate these settings by clicking LAN Settings on the Connections tab of the Internet Options dialog box.
-
Disable third-party browser extensions or other third-party downloaded components. Applications like these can often be disabled from the notification area or from the application itself, and uninstalling the component from Control Panel is the best option if one of these programs caused the page fault.
-
Delete all temporary Internet files. You can do this on the General tab of the Internet Options dialog box.
-
Delete cookies. You can do so on the General tab of the Internet Options dialog box.
-
Troubleshoot the Favorites folder. It is possible that corruption in the Favorites folder or some of the files it holds is to blame. Try moving the contents of the user’s Favorites folder to a temporary folder. If that solves the problem, add the shortcuts back to the Favorites folder a few at a time. If the problem recurs, it is usually easy to find the culprit..
-
Verify that the system has enough RAM and that the RAM is performing properly.
Lesson Review
The following questions are intended to reinforce key information presented in this lesson. If you cannot answer a question, review the lesson materials and try the question again. You can find answers to the questions in the “Questions and Answers” section at the end of this chapter.
-
A company has placed a computer in a break room so that users can access the computer during their lunch and coffee breaks. How should the computer be configured? (Choose all that apply.)
-
Disable AutoComplete.
-
Clear forms and clear passwords from the AutoComplete Settings dialog box.
-
Disable Personalized Favorites.
-
Set Privacy settings to block all cookies.
-
Configure a custom level for the Internet zone to disable the installation of desktop icons.
-
-
One of your users has recently upgraded his computer from Windows 98 to Windows XP Professional. The computer is connected to the Internet using a cable modem. The upgrade went fine, but he noticed that the Web pages that he sees in Internet Explorer do not always seem to be up to date. What do you suspect is the problem?
-
The Temporary Internet Files folder is full.
-
The Temporary Internet Files settings are not configured to check for newer versions of stored pages.
-
Internet Explorer is configured to use a dial-up connection instead of a LAN connection.
-
The network adapter or cable modem is malfunctioning.
-
Lesson Summary
-
Many of the interface requests that you receive can be resolved by customizing the Standard toolbar, changing what is selected in the View menu, or personalizing the Advanced settings in the Internet Options dialog box.
-
Many problems can cause problems viewing Web pages, including connectivity issues, security zone configuration, privacy settings, Internet Explorer configuration, and even the graphics settings in Windows XP.
EAN: N/A
Pages: 195