SMTP Connector
As with the Internet Mail Connector (IMC) in Exchange Server 5.5, the primary use of the SMTP Connector in Exchange 2000 Server is for external communication, either to the Internet or to a non-Exchange 2000 environment. Like the Routing Group Connector, it is a unidirectional connector.
When connected to the Internet, the SMTP Connector uses a smart host (another SMTP server to which messages are sent for routing) or MX records in DNS for next-hop routing. When configured internally between two routing groups, the connector relays link state information between routing groups but still depends on the MX records in DNS for next-hop information.
The SMTP Connector is different from the Routing Group Connector in that it can use encryption and authentication. If encryption is necessary for some of your messages, you'll need to use the SMTP Connector. Another feature of the SMTP Connector is its ability to authenticate in a remote domain before sending a message to it. However, like the Routing Group Connector, the SMTP Connector lets you schedule messages to be sent at a time when bandwidth usage is low.
The SMTP Connector allows you to create scopes that permit only certain servers in your Exchange organization to use the connector. Instead of limiting the replication of this connector to the servers inside the scope, you can now choose to allow either all servers in the organization to use this connector or only the servers in the local routing group (Figure 13-7).
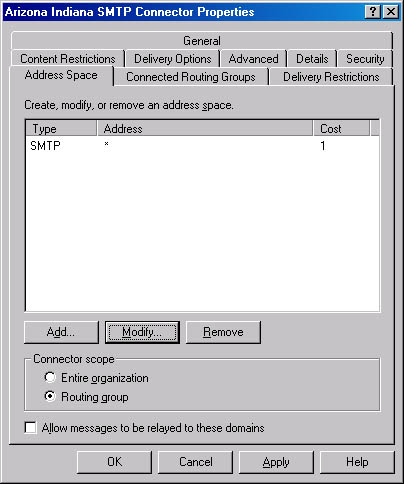
Figure 13-7. Configuring the scope of the SMTP Connector.
Finally, you'll want to use the SMTP Connector if your bandwidth is less than 64 Kbps and higher than 16 Kbps. If your sole reason for choosing the SMTP Connector is that you want to use SMTP between your routing groups, choose the Routing Group Connector instead. The Routing Group Connector uses SMTP as its transport protocol.
Creating an SMTP Connector
You create an SMTP Connector in the same manner as you create a Routing Group Connector: right -click the routing group, point to New, and choose SMTP Connector. Once you've done so, you're presented with the connector's property sheet with the General tab displayed (Figure 13-8), where you will name the connector and make some choices regarding DNS. The Use DNS To Route To Each Address Space On This Connector option causes the connector itself to work with DNS to make direct connections to the destination SMTP server, based on the MX records and preference values. If you would rather forward mail upstream because multiple direct connections either take too long or are too costly, select the Forward All Mail Through This Connector To The Following Smart Host option. You can enter either the fully qualified domain name (FQDN) of the smart host or its IP address here. If you choose to enter the IP address, you must place it inside brackets—for example, [192.168.2.200]. Also, the value you specify here will override the value in the Smart Host setting on the Advanced Delivery dialog box, which you display by clicking Advanced on the Delivery tab of the SMTP virtual server's property sheet.
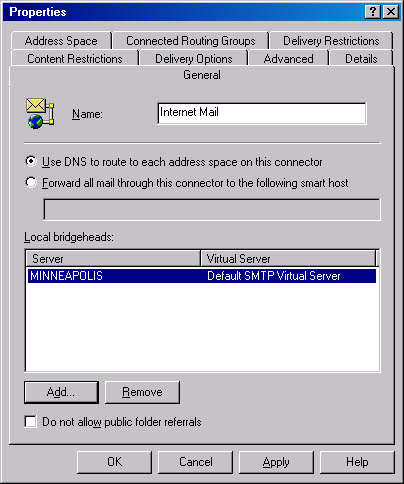
Figure 13-8. General tab of the SMTP Connector's property sheet.
Delivery Options Tab
The Delivery Options tab of the SMTP Connector's property sheet has one feature that the property sheet for the Routing Group Connector doesn't have: Queue Mail For Remote Triggered Delivery. This feature allows clients to connect periodically to your Exchange 2000 server and download messages. To make this process secure, your clients must connect using an account in your domain. When you click the Add button to specify the accounts that are authorized to use TURN/ATRN, you'll find that only local domain accounts are available. This restriction occurs because it is your Exchange 2000 server that is holding mail for others to retrieve, and hence they need to be authenticated in your domain. Therefore, you need to specify which Windows 2000 accounts can download mail. The client must issue a TURN command to trigger the download from Exchange 2000 Server.
Advanced Tab
Figure 13-9 shows the Advanced tab of the SMTP Connector's property sheet, which has a number of important configuration options that you'll need to consider as you set up the connector. First, you can set the SMTP Connector to send HELO instead of EHLO. Traditionally, when an SMTP client connects to an SMTP server, the first command that is sent is the HELO command. This command starts the session and identifies the sender of the coming message. By default, Exchange 2000 Server sends the EHLO command, which is a start command that also indicates that the Exchange 2000 server is able to use the Extended SMTP (ESMTP) commands. Not all SMTP servers are capable of communicating using these extended commands. If you need to connect to an SMTP server that doesn't understand ESMTP commands, select this check box to have Exchange Server send the HELO start command instead. To see a list of SMTP commands, refer to Chapter 16.
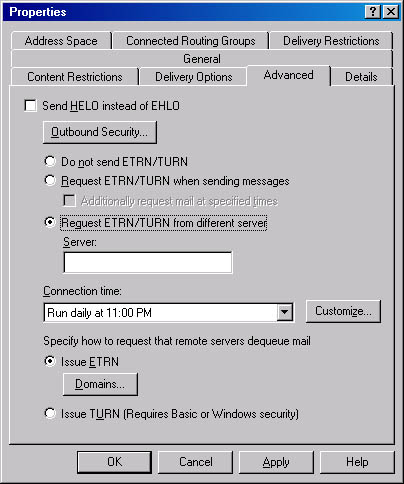
Figure 13-9. Advanced tab of the SMTP Connector's property sheet.
Also on the Advanced tab, you can use the Outbound Security button to provide authentication credentials to the remote domain. The Do Not Send ETRN/TURN option prevents this connector from requesting a dequeuing off a remote server. This option is selected by default. When selected, it permits this connector to be used only for basic sending and receiving of messages via SMTP; no remote dequeuing requests can be made. You'll want to leave this option selected most of the time.
If you want to send a dequeuing message along with other messages that are being sent to an SMTP server, select the Request ETRN/TURN When Sending Messages option. If you choose this option, you can also request dequeuing at certain times by selecting the Additionally Request Mail At Specified Times check box and then choosing the dequeuing time under Connection Time. You would use these settings, for example, when your Exchange server connects to another Exchange server via a dial-up connection. Once connected, your Exchange server would send any mail destined for the receiving server. Within the same session, a request would be sent to the other Exchange server to dequeue any messages that are destined for mailboxes located within your Exchange environment.
To request dequeuing from a server other than the one to whom the message was sent, select the Request ETRN/TURN From Different Server option and then enter the server's name. Select this option when you have one server that will handle your outbound messages and another server that holds your inbound messages for your organization.
If you would like to request dequeuing at certain times, select the Connection Time drop-down list and choose one of the default options, or click the Customize button and set the schedule that is needed. You might use this setting if your Exchange server did not have a permanent connection to the Internet and you wanted to retrieve your e-mail from your ISP periodically, using a dial-up connection.
Finally, under Specify How To Request That Remote Servers Dequeue Mail, select either the Issue ETRN option or the Issue TURN option. To use ETRN, you must have a static IP address, whereas with TURN, you do not need a static IP address. In addition, ETRN requires that the domain to be dequeued be specified, so if you click on the Domains button, you can add the local domain name that you want dequeued.
Address Space Tab
When you connect to a foreign system, you must specify an address space that the connector will use. An address space is a set of address information associated with a connector or gateway that specifies the domains to which this connector will send messages. Typically, an address space is a subset of a complete address; usually, it is just the domain name.
You specify the address space on the Address Space tab of the connector's property sheet (Figure 13-10). If this SMTP Connector will be used for your organization's Internet mail, you can choose "*" as the address space, which means that any string of characters will be valid and messages can be routed to any domain over this connector.
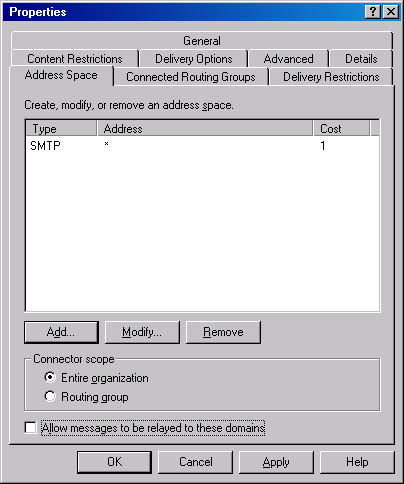
Figure 13-10. Address Space tab of the SMTP Connector's property sheet.
You can specify address spaces for SMTP, X.400, Lotus cc:Mail, Microsoft Mail, Lotus Notes, and Novell GroupWise types of addresses. If the address space that you need to use is not one of these types, select Other and enter the address space.
You can prevent messaging relay by not selecting the Allow Messages To Be Relayed To These Domains check box. This will ensure that unsolicited e-mails cannot be routed through your SMTP server back out to the Internet. However, if this SMTP Connector is being used as a relay point between two foreign SMTP systems, select this check box and add the destination name of the domain to which messages should be relayed to the address space area above.
Finally, if you want to limit the use of this SMTP Connector to those servers that are members of the same routing group, select the Routing Group option in the Connector Scope area. The default is to allow all servers in the organization to use this connector. Since servers that are not in the same routing group are assumed to exist across either a slow connection or a nondedicated connection, it is a good idea to enable this setting to keep servers in remote routing groups from routing messages to the Internet or a foreign mail system over this connector.
REAL WORLD Setting Up the SMTP Server as a Relay ServerLet's assume that your organization is known by two different names in the marketplace: oaktree.com and sugarmaple.com. Let's further assume that you want all messages to enter the organization through the SMTP Connector on a server that is a member of the oaktree.com domain. Here are the steps you would take to make sure that all messages for both domain names are routed correctly:
- Enter an A record in DNS for this server's host name and IP address.
- Enter two MX records in DNS, one for each domain, both pointing to this server's IP address.
- Create the SMTP Connector for the oaktree.com domain.
- Add sugarmaple.com as a valid address space.
- Select the Allow Messages To Be Relayed To These Domains check box.
- Create an MX record and an A record in your internal DNS tables to point to the internal SMTP server that is serving the sugarmaple.com domain.
Now messages addressed to either sugarmaple.com or oaktree.com will be routed to the same server, and those messages addressed to sugarmaple.com will be relayed to the sugarmaple.com Exchange 2000 server.
Connected Routing Groups Tab
If you do not configure an address space on the Address Space tab, you must use the Connected Routing Groups tab to indicate which routing groups are connected to the local routing group. The purpose here is to inform the connector which routing groups are adjacent to it to enable internal routing of messages. The routing groups are recorded by administrative group membership, so your choice will always involve selecting the administrative group as well. If your organization is small, with one routing group and one administrative group, enter an address space on the Address Space tab and leave this tab blank.
EAN: N/A
Pages: 193