Exchange 2000 Policies
Policies are a new feature in Exchange 2000 Server and are designed to increase administrative flexibility while reducing administrative effort. A policy is a set of configuration parameters that applies to one or more Exchange objects in the same class. For example, you can create a policy that affects certain settings on some or all of your Exchange servers. If you ever want to change these settings, all you need to do is modify the policy and it will be applied to the appropriate server's organization.
There are two types of policies: system policies and recipient policies. System policies apply to a server, a mailbox store, or a public folder store. These policies appear in the Policies container under the administrative group responsible for administering the policy (Figure 12-11).
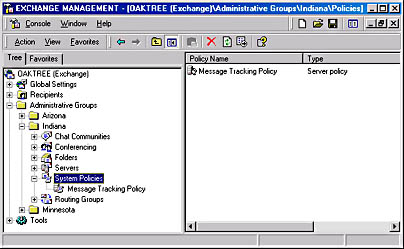
Figure 12-11. System policy object.
Recipient policies apply to mail-enabled objects and specify how to generate email addresses. They appear under the Recipients container as recipient policy objects (Figure 12-12).
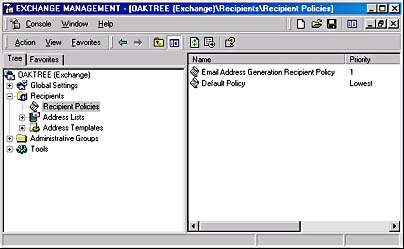
Figure 12-12. Recipient policy objects.
Creating a Policy
Generally speaking, creating a policy involves navigating to the appropriate Policies container, right-clicking the container, and then selecting the kind of policy you want to create. Recipient containers provide only one option: recipient policies. Policy containers in administrative groups give you the option of creating any type of system policy: a server policy, a mailbox store policy, or a public folder store policy.
When working with system policies, be sure to create the policy object in the administrative group that will be responsible for administering the policy. Failure to do so could lead to the wrong people having administrative control over your critical policies. Let's take a look at how to create each of the four types of policies, starting with server policies.
Creating a Server Policy
A server policy will enforce message tracking and log file maintenance settings. It is not used to enforce security or other settings on the servers in the administrative group. To create a server policy, right-click the System Policies container, point to New, and then choose Server Policy. You will see the New Policy dialog box (Figure 12-13), where you specify the tabs that will appear in the policy's property sheet. With a server policy, you'll have only one choice: the General tab. Check the box for this tab, and then click OK. You'll see the configuration box where the policy will be created.
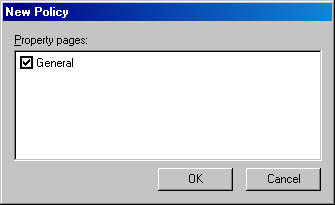
Figure 12-13. New Policy dialog box.
Next you need to enter the name of your policy on the General tab of the policy's property sheet. As Figure 12-14 shows, there are actually two General tabs. The first is for naming the policy. Choose a name that describes the task the policy is intended to accomplish, such as Message Tracking Policy or Enable Subject Logging Policy. Good naming at this stage will save you time in the long run because you won't need to look at the policy's properties to determine what the policy does.
The General (Policy) tab (Figure 12-15) is the actual policy that is applied to the Exchange servers in your organization. It is named General (Policy) because you are potentially configuring the General tabs of the property sheets of all of your servers. (We discuss how to apply this policy to servers throughout your organization later in this chapter.) If you compare this tab to the General tab in a server's property sheet, you will find that they are identical, except for the identifying information at the top of the tab.
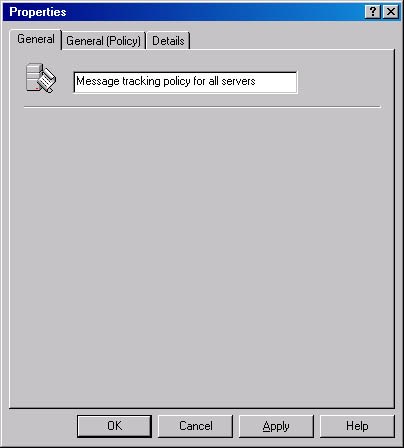
Figure 12-14. Naming a policy on the General tab.

Figure 12-15. General (Policy) tab.
On the General (Policy) tab, you can enable subject logging and display for all of your Exchange 2000 servers. This setting works in tandem with the Enable Message Tracking option. Together, these two settings ensure that messages passed in your organization can be tracked. Enabling these two options is useful for troubleshooting if some users are not receiving messages from other users. You can track the message through your organization to determine where it is getting stuck to pinpoint where your transport problems exist. For more information on message tracking and subject logging, refer to Chapter 23.
You'll notice that the lower third of the General (Policy) tab is dimmed. In your server's property sheet, this area allows you to enable front end server services for the server. However, you cannot set a policy to make all of the Exchange servers front end servers. If you need a group of servers to act as front end servers, you'll have to configure each server's property sheet. For more on front end/back end architecture, see Chapter 2.
Once a policy is in force, it cannot be overridden at the local server level. The message tracking policy we've been using as an example was set on the Indianapolis server in the Indiana administrative group. However, we applied it to all three servers in the organization—Indianapolis, Minneapolis, and Tucson. Figure 12-16 illustrates that the message tracking options are dimmed in the property sheet for the Minneapolis server because these values have been set by a policy.

Figure 12-16. Property sheet for the Minneapolis server, showing dimmed message tracking options.
At this point, you might be wondering how we applied the policy to the three servers. Here are the steps you need to take to apply your policy once it has been created. After creating a server policy, you can apply that policy to any combination of servers in your organization. Simply right-click the policy object, and then choose Add Item. You see a dialog box listing all of the servers in your Exchange organization in the upper part of the box (Figure 12-17). To apply the policy to a server, highlight the server and then click Add. The server will be moved to the lower part of the dialog box. Repeat this procedure for all of the servers to which you want the policy to apply. Once you click OK, the policy is applied immediately to those servers. To verify this, select the policy object you just created in the Exchange System snap-in. The servers you added should appear in the details pane (Figure 12-18).
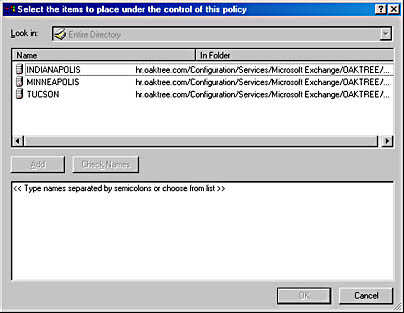
Figure 12-17. Selecting servers to which the policy will apply.
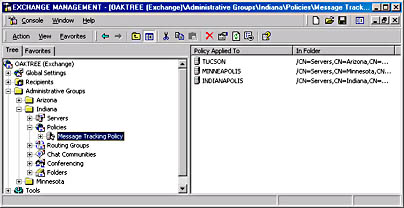
Figure 12-18. Servers to which the selected policy applies.
To remove a server from a policy, follow these steps:
1. Navigate to the server policy object in the Exchange System snap-in.
2. Highlight the server you want to remove in the details pane.
3. Right-click the server and choose Remove From Policy.
Should you make changes to an existing policy after you have saved your changes, you will be presented with a message box asking if you want to apply the changes in the policy to all of the objects immediately. You can select either Yes or No. Selecting Yes will force the policy to be applied immediately to the target objects. Selecting No will cause the policy changes to be applied at normal replication intervals.
Creating a Public Folder Store Policy
Public folder store policies encompass a number of configuration options, including maintenance schedules, limits, and full-text indexing. They are applied on a per-store basis across public folder tree boundaries.
The procedure for creating a public folder store policy is similar to the one for creating a server policy, described in the previous section. However, you have the option of specifying five tabs on the property sheet for a public folder store policy:
- General
- Database
- Replication
- Limits
- Full-Text Indexing
On the General (Policy) tab, you can enable support for Secure/Multipurpose Internet Mail Extensions (S/MIME) and specify that text should be converted to a fixed-sized font (10-point Courier). On the Database (Policy) tab, you can specify when you would like daily maintenance to run on your public folders. On the Replication (Policy) tab, you can specify how often you would like replication of public folders to occur as well as the replication size limit and the number of minutes that equates to the Always interval. On the Full-Text Indexing (Policy) tab, you can specify the update interval and the rebuild interval for your public folders. Finally, on the Limits (Policy) tab (Figure 12-19), you can specify storage limits, deletion settings, and age limits for all items in all folders in the public folder store.
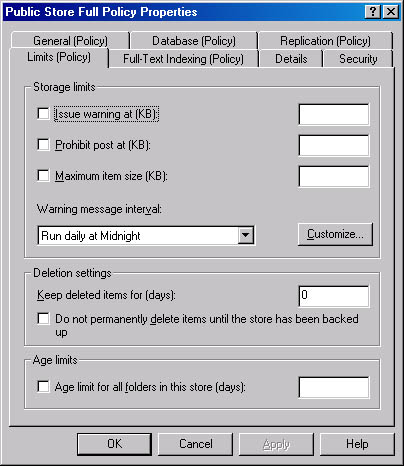
Figure 12-19. The Limits (Policy) tab of the property sheet for a public folder store policy.
To apply the policy to your public folders, you'll need to associate it with them just as you did for the server policy in the previous section. By default, no policy is actually applied to its intended recipient; you must associate it with the object by choosing Add Public Store from the policy's shortcut menu.
Unlike server policies, which have only one tab on their property sheet, a public folder store policy can have up to seven tabs. This doesn't mean that you have to use all of the tabs in a given policy. If you would like to add tabs to or delete tabs from an existing public folder store policy, all you need to do is right-click the policy and choose Change Property Pages. Then choose the tabs you want to add or delete, and configure them as needed.
Creating a Mailbox Store Policy
A mailbox store policy allows you to configure a number of settings for mailboxes, including the default public folder store, the maintenance schedule, a message journaling recipient that will receive copies of all e-mails that flow through the organization, and full-text indexing. When creating a mailbox store policy, you can choose to include the General, Database, Limits, and Full-Text Indexing tabs in the policy's property sheet.
NOTE
Message journaling is a concept that was introduced with Exchange 5.5, Service Pack 1. Essentially, it sends copies of most e-mails to a common recipient for use later in either legal or governmental proceedings.
On the General (Policy) tab, you can specify a default public folder store for the mailbox stores that will be associated with this policy. This ability is very handy if you need to create a large number of mailbox stores and want to associate most or all of them with a particular public folder store. The General (Policy) tab also allows you to specify the default offline address list that your selected mailbox stores will use. You can choose to archive messages on this store. In addition, you can enable client support of S/MIME signatures and a fixed-sized font for all incoming messages.
The only item you can set on the Database (Policy) tab is the time at which daily maintenance will run. If you are creating a public folder store policy as well, consider staggering their maintenance times to allow for better system performance during the online maintenance routine. In your planning, be sure to consider other routines that run during off-hours too, including backup programs, online defragmentation of the database, and replication.
NOTE
The major tasks the store runs for online maintenance include making sure that the correct free/busy and offline address book folders exist for an administrative group and, if they don't exist, creating them; purging database indexes that were previously created but haven't been used recently; deleting items over the time limit that have exceeded the deleted items retention time (called a hard delete); expiring items in public folders over their age limit; purging deleted mailboxes from the store that are over their retention limit; detecting mailboxes that are no longer connected to a user object as well as detecting mailboxes that have been reconnected to a user.
On the Limits (Policy) tab (Figure 12-20), you can specify storage limits and deletion settings. Based on mailbox size, you can also choose when you would like the System Attendant service to notify users that they have exceeded their limits. Using the Customize button to create a customized schedule allows you to set more than one time during a 24-hour period when users exceeding their limits will be notified by system e-mail that they need to take action to reduce the size of their mailbox.
When you apply a mailbox store policy, you do so on a store-by-store basis, not on a per-storage-group or per-server basis. Also, the mailbox store does not need to be mounted for you to be able to associate it with the policy.

Figure 12-20. The Limits (Policy) tab of the property sheet for a mailbox store policy.
Creating a Recipient Policy
A recipient policy is essentially a way to create an LDAP filter rule for address-generation purposes. With this filtering tool, you can specify what kind of e-mail address is generated for each recipient object. For instance, you can indicate that your users based in Minneapolis who have the string of characters "Minneapolis" in their City field should be given an SMTP address of msp.hr.oaktree.com instead of the default hr.oaktree.com, and the policy will change the SMTP addresses for all corresponding Minneapolis users. With the LDAP filter rules, you finally have the flexibility and administrative control you need to create the exact e-mail addresses your organization requires.
Instead of specifying each recipient object that you want to associate with the policy, you use the LDAP filter rules to define the type and class of the recipient objects to associate with the policy. Once you have created the policy, it is applied in the background, based on the time schedule set in the Address List service run by the System Attendant.
One huge advantage of using recipient policies is the ability to set multiple SMTP or X.400 addresses for each user in your organization. If your company has several divisions, each of which is known in the marketplace for its own brand name, you can create a policy that will assign multiple, dissimilar SMTP addresses to each mail-enabled user to ensure that your users get all of their e-mail, regardless of which domain name it is addressed to.
Let's take a look at how to create this type of policy, and then we'll see how to configure it. To create a recipient policy, navigate to the Recipients container, right-click the Recipient Policies subcontainer, and choose New Recipient Policy. Figure 12-21 shows the initial dialog box that appears.
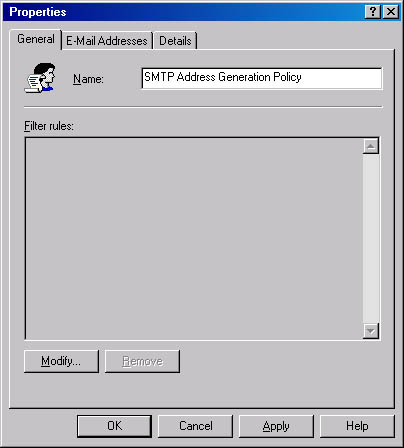
Figure 12-21. General tab of the property sheet for a recipient policy.
On the General tab, you can click Modify to change the filter rules. When you do so, you are presented with the Find Exchange Recipients dialog box (Figure 1222). This is the same dialog box that you see when you use the Find command in Active Directory, except that here your choices create the filter rules that will select the addresses to which the policy will apply.
The Storage tab of the Find Exchange Recipient dialog box (Figure 12-23) lets you apply this policy to all mailboxes, only to mailboxes on a certain server, or only to mailboxes in a certain store. This feature gives you added flexibility in applying the policy.
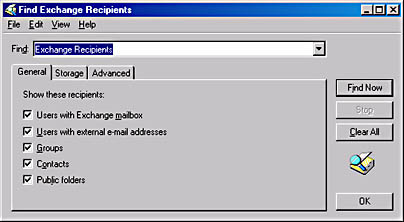
Figure 12-22. Find Exchange Recipients dialog box.
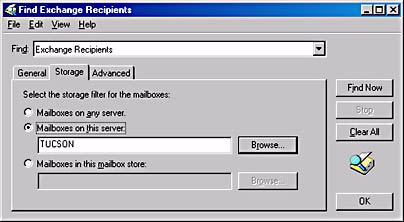
Figure 12-23. Storage tab of the Find Exchange Recipients dialog box.
On the E-Mail Address Policy tab, you can choose which e-mail addresses you want to have created for your user objects. By default, an SMTP address and an X.400 address are created for each recipient object. Exchange 2000 Server requires both an X.400 address and an SMTP address for each mail-enabled object. You cannot disable the generation of these two address types.
Managing Policy Conflicts
It is possible that two different policies will conflict when applied to the same object. When this occurs, the default behavior is for the newer policy to replace the older policy. However, if the Do Not Allow The Removal Of This Policy From The Items It Applies To check box is selected, the newer policy will not be able to override the older policy, and you will receive a message indicating that the object has been placed under the control of a conflicting policy (Figure 12-24). You will then be asked if you want to remove the object from the control of the conflicting policies. Choosing Yes will apply the new policy, and choosing No will keep the old policy.
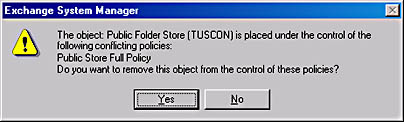
Figure 12-24. Message indicating a conflicting policy.
EAN: N/A
Pages: 193