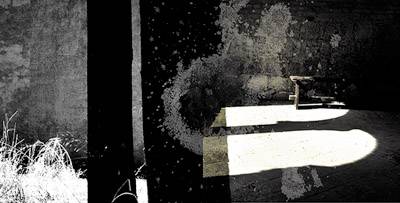
1. | Open the Orcia Landscape photo.
|
2. | Double-click the background layer and rename it Landscape.
|
3. | Drag the Landscape layer to the New Layer icon in the Layers palette to duplicate the Landscape layer.
|
4. | Choose Filter, Other, High Pass to launch the High Pass dialog box.
|
5. | Set the Radius slider to 3.6 pixels and click OK to apply the effect.
|
6. | Set the blending mode for the Landscape Copy layer to Darken.
|
7. | Select Merge Down from the Layers palette menu to merge the two Landscape layers.
|
8. | Select the Crop tool and Shift-drag to draw a square cropping area in the lower-center of the image. Double-click within the crop selection to apply the crop.
|
9. | Drag the Landscape layer to the New Layer icon in the Layers palette to duplicate the Landscape layer.
|
10. | Double-click the Landscape Copy layer title and give the new layer the name Flipped Landscape.
|
11. | Choose Image, Transform, Flip Vertical to flip the layer.
|
12. | Select the Move tool, press the Shift key to constrain horizontal movement, and drag the Flipped Landscape layer 130 pixels higher in the composition.
|
13. | Select the Darken blending mode from the Layers palette for the Flipped Landscape layer to complete the foliage texture layers.
|
14. | Choose Image, Canvas Size. In the dialog box that appears, set the Width value to 3210, and set the anchor box to the upper-left corner. Click OK to enlarge the canvas.
|
15. | Open the Galgano Bench photo.
|
16. | Select the Crop tool and Shift-drag to draw a square cropping area around the center of the image. Double-click within the crop selection to apply the crop.
|
17. | Choose Select, All to copy the cropped Galgano Bench photo.
|
18. | Choose Edit, Copy, activate the image composite, and choose Edit, Paste.
|
19. | Select the Move tool from the toolbox and drag the new layer to the blank canvas area on the right.
|
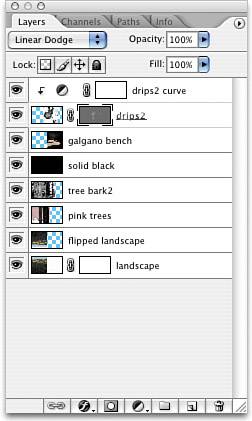
20. | Double-click the layer name in the Layers palette and rename it Galgano Bench.
|
21. | Select Hard Light from the Blending Mode pull-down menu in the Layers palette.
|
22. | Open the Pink Trees photo.
|
23. | Choose Filter, Sharpen, Unsharp Mask. Set the Amount slider to 60%, the Radius slider to 0.7 pixels, and leave the Threshold slider at 0. Click OK to sharpen.
|
24. | Choose Image, Adjustments, Hue/Saturation. In the dialog box, move the middle Saturation slider to -52.
|
25. | Select the Rectangular Marquee tool and Shift-drag a square selection, focusing on the pink wall, allowing the trees to bleed off the right edge.
|
26. | Choose Edit, Copy, activate the composite image, and choose Edit, Paste.
|
27. | In the Layers palette, drag the pasted image beneath the Galgano Bench layer, double-click the new layer to highlight it, and name it Pink Trees.
|
28. | Select Linear Light from the Layers palette Blending Mode menu.
|
29. | Click the Create a New Layer icon in the Layers palette, double-click the layer title to select it, and name the new layer Solid Black.
|
31. | Set foreground color to black, select the Paintbucket from the toolbox, and click to fill the new layer with black.
|
31. | Set the blending mode for this new layer to Color.
|
32. | Open the Sant Olivetto Woods photo.
|
33. | Choose Select, All.
|
34. | Choose Edit, Copy, activate the image composite, and choose Edit, Paste.
|
35. | Select the Move tool and drag the pasted layer to the upper-left corner of the composition.
|
36. | In the Layers palette, drag the Tree Bark 2 layer below the Solid Black layer in the layer stack, just above Pink Trees. Double-click the layer name and name the layer Tree Bark 2.
|
37. | Set the layer's blending mode to Soft Light and set its Opacity value to 62%.
|
38. | Open the Drips 2 scanned image file.
|
39. | Choose Select, All. Then choose Edit, Copy, activate the image composite, and choose Edit, Paste. Name the new layer Drips2.
|
40. | Select the Move tool and drag the pasted layer to the center of the composition.
|
41. | Select Linear Light from the Blending Mode pull-down menu in the Layers palette.
|
42. | Choose Image, Adjust, Curves.
|
43. | Set the curve points to Input: 255, Output: 0; Input: 66, Output: 101; and Input: 0, Output: 255.
|
44. | Click the Add Layer Mask icon in the Layers palette to add a mask.
|
45. | Set the foreground color to an RGB value of R128, G128, B128 (50% gray), select the Paintbucket tool, and click in the image to mask the entire image by 50%.
|
46. | Select the Brush tool, set the foreground color to white, and lower the Opacity slider to 10% in the Options bar. Lighten the mask around the left side of the central drip shape.
|