Task 1 Welcome to Photoshop, Bridge, Camera Raw, and ImageReady
| This task is a basic introduction to Photoshop, ImageReady, Camera Raw, and Bridge. In this task, you launch each program and evaluate the general workspace. 1. Launch PhotoshopIn Windows, click the Start button and select All Programs, Adobe Photoshop CS2. On a Mac, open the folder labeled Adobe Photoshop CS2 and double-click the Adobe Photoshop CS2 icon. Click items on the Welcome Screen to gain easy access to tutorials and documentation of new features; click the Close button to launch Photoshop's main screen areas.  2. The Basic Photoshop Screen AreasAfter closing the Welcome Screen, you'll see the full range of Photoshop controls. The toolbox is on the left side of the screen and contains all the Photoshop tools. The most commonly used Photoshop palettes appear on the right, and the menu bar appears across the top of the screen. The Options bar runs under the menu bar and contains the modifiers for each tool you select, the Go to Bridge button, and the Palette Well. 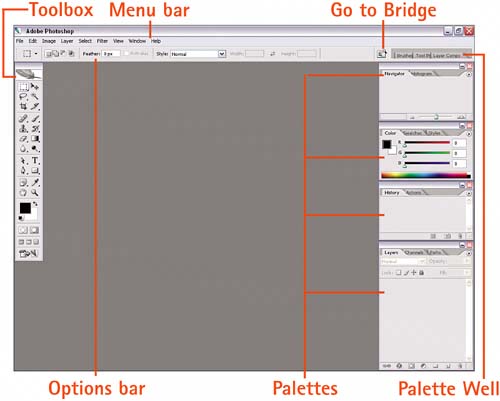 3. Launch ImageReadyIn Windows, click the Start button and select Programs, Adobe ImageReady CS2. On a Mac, open the folder labeled Adobe Photoshop CS2 and double-click the Adobe ImageReady CS2 icon. The ImageReady desktop looks very similar to the Photoshop desktop. Closer examination, however, reveals that some of the tool icons and palettes are different and that the Slice, Table, and Image Map palettes appear in the lower-right corner of the screen.  4. The Basic Bridge Screen AreasIn Windows, click the Start button and select Programs, Adobe Bridge. On a Mac, open the Adobe Bridge folder and double-click the Bridge icon. If Photoshop is already open, click the Go to Bridge button located on the Options bar. Along the top are the menu commands. The large content area contains thumbnails of the images in the current folder; at the very bottom are the status information and display buttons. 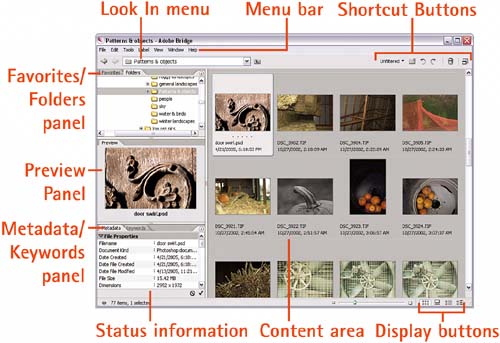 5. The Basic Camera Raw Screen AreasCamera Raw isn't a standalone application, but whenever you open a Raw file in Photoshop or Bridge, you are presented with the Camera Raw interface. The title shows some basic file information. Below that are the tools, view options, and RGB values display. To the right of the image area are the Histogram display and adjustment sliders. Under the image area are the Zoom controls and Workflow options. At the bottom right are buttons for Save (saves the adjusted image as a file), Open (opens the adjusted image in Photoshop), Done (saves just the adjustments), and Cancel (discards any changes and closes Camera Raw). 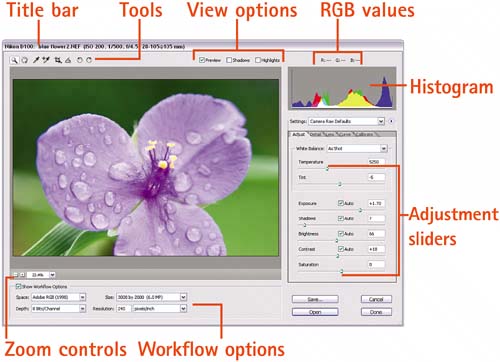 6. Adobe Help Center Screen AreasThe Help command in all CS2 applications now launches the Adobe Help Center. Beneath the top row of buttons are the Navigation and Commands buttons, along with the Search box. On the left side are the Help Topics titles, and along the bottom are the Previous Topic and Next Topic buttons. 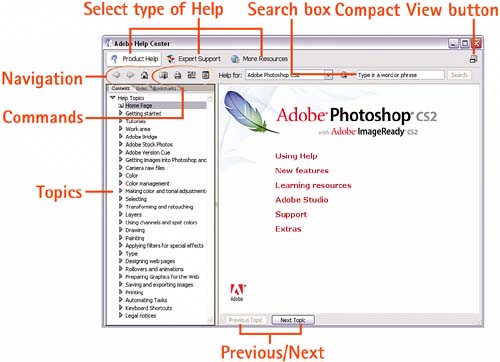
|
EAN: 2147483647
Pages: 184
- Challenging the Unpredictable: Changeable Order Management Systems
- Enterprise Application Integration: New Solutions for a Solved Problem or a Challenging Research Field?
- The Effects of an Enterprise Resource Planning System (ERP) Implementation on Job Characteristics – A Study using the Hackman and Oldham Job Characteristics Model
- Distributed Data Warehouse for Geo-spatial Services
- A Hybrid Clustering Technique to Improve Patient Data Quality