Implementing Server-side Playlists
The Contoso producers will perform the following tasks to create a mockup of a movie info channel:
-
Write the main server-side playlist file. We will see how to do this using the SMIL scripting language and a text editor, such as Notepad. We will also be introduced to the Playlist Editor.
-
Write the wrapper playlist, adding the intro image file and dynamic ad.
-
Write the ASP page that sends random ads to the wrapper playlist. Contoso will host the page from a Web server.
-
Create a new broadcast publishing point and add the two playlists.
-
Start the publishing point. Make sure the playlist is running correctly and check playback.
Writing the Main Server-side Playlist
To see how playlists work, we will run through a few examples of the playlists created for the info channels, reviewing the underlying concepts along the way. If you want details on the scripting language and the concepts, see the Playlist reference sections of the Windows Media Services online Help or the Windows Media Services SDK.
To make it easier to create playlists, you can use the Playlist Editor, which is included with the Windows Media Services installation. The editor displays a server-side playlist in a graphical interface that enables you to easily add and modify elements. In this section, we will see examples of creating the script in both a text editor and the Playlist Editor. Figure 11.5 shows the main server-side playlist for the mockup channel as it appears when opened in the Playlist Editor.
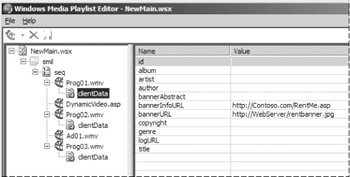
Figure 11.5: Editing a server-side playlist in Playlist Editor.
The area on the left provides a tree view. Each node in the tree is a playlist element, which is the basic component of a server-side playlist. You configure an element by setting its attributes. When you select an element in the tree view, the attributes are displayed on the right. You can add and remove elements, and change the position of elements in the list by dragging them. You can change the value of an attribute on the right by selecting the attribute and typing.
The tree view provides a visual representation of how a playlist is constructed. If two elements are at the same level in the tree, they are peers. For example, Prog1.wmv and Prog2.wmv are peers. Elements can also be contained inside other elements. We say the contained element is the child of the containing element. For example, a clientData element is a child of the Prog1.wmv element.
To understand how to create a playlist with elements and attributes, and what it means to contain elements inside other elements, you can see how this example was constructed. The example uses three types of elements:
-
smil. This element defines the script as a server-side playlist. Every playlist has a smil element at its root. All elements contained in a smil element are part of the playlist. Also, elements contained in a smil element are played sequentially, starting with the first child element in the list. The seq element can be used within a playlist to play content sequentially.
-
media. This element contains digital media. The first element in the playlist is a media element, Prog01.wmv. As you can see, there are a total of five media elements in the playlist. Because they are contained in a smil element, they play in order from top to bottom. Note that the second media element is an ASP page. When that element becomes active, the Windows Media server accesses the page to receive a server-side playlist, which contains digital media content. The source of a media element can be any supported source type, such as a file, a live stream, another publishing point, or another playlist.
-
clientData. This element contains descriptive text and banner links that are used to display information and banners in Windows Media Player 9 Series. The example shown here includes banners for three media elements with clientData elements. The clientData elements contained in the media elements have two banner attributes set: bannerURL is the URL of the banner image (see figure 11.3), and bannerInfoURL is the link associated with the banner. Because the clientData elements are children of the media elements, the banners are only displayed when those media elements are active. If you were to add a clientData element containing title information to the smil element, for example, the title would display for the entire playlist.
The node at the top of the tree displays the file name and is not a playlist element. The playlist plays starting with the first media element and continues down the list.
After creating a playlist in the editor, you save it as a playlist file with a .wsx extension, and then you can add it as the source of a publishing point or a wrapper, depending on its intended use. A playlist is a plain text file. The following is the example playlist as it would appear in a text editor like Notepad.
<?wsx version="1.0"?> <smil repeatCount="indefinite"> <media src="/books/2/544/1/html/2/Prog01.wmv"> <clientData bannerInfoURL="http://WebServer/RentMe.asp" bannerURL="http://WebServer/rentbanner.jpg"/> </media> <media src="/books/2/544/1/html/2/httpd://WebServer/DynamicVideo.asp"/> <media syncEvent="Wrap" src="/books/2/544/1/html/2/Prog02.wmv"> <clientData bannerInfoURL="http://WebServer/RentMe.asp" bannerURL="http://WebServer/rentbanner.jpg"/> </media> <media dur="30s" src="/books/2/544/1/html/2/Ad01.wmv"/> <media src="/books/2/544/1/html/2/Prog03.wmv"> <clientData bannerInfoURL="http://WebServer/RentMe.asp" bannerURL="http://WebServer/rentbanner.jpg"/> </media> </smil>
This code shows a few more attributes not displayed in figure 11.5:
-
repeatCount. With this attribute in the smil element set to indefinite, the entire playlist will loop continuously. If you were to set the repeatCount of another element, such as a media element, only that element and its child elements would repeat.
-
syncEvent. This element is used primarily to activate an element in a wrapper playlist. In this case, when the media element with the syncEvent becomes active, playback switches to the element in the wrapper that has a begin attribute equal to the syncEvent value, Wrap. We will explain this further when Contoso creates the wrapper.
-
dur. This element sets the length of time a media element plays. In this case, Ad01.wmv will play for 30 seconds, even if it is two minutes long.
Writing the Wrapper Playlist
The Contoso producers assigned a wrapper playlist to the info channel publishing point. When end users play the channel, they are actually playing the wrapper playlist, which contains the main playlist. Figure 11.6 shows the playlist in the Playlist Editor.
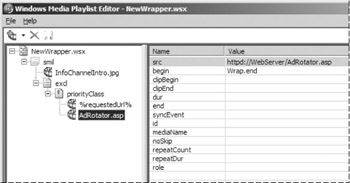
Figure 11.6: Editing a wrapper playlist in Playlist Editor.
Wrappers are typically smaller than source playlists because they are used to play ads only before, during, and after the main playlist. The wrapper example uses two new elements:
-
excl. Unlike a smil or seq element that plays child elements sequentially, an excl element plays child elements based on the value of their begin attributes. An element with a begin value of 0s (zero seconds) plays first.
-
priorityClass. This element can only be contained in an excl element. A priorityClass element enables you to control how one child element interrupts the playback of another.
To understand what happens when an end user begins streaming from the publishing point, let’s look at the wrapper playlist script:
<?wsx version="1.0"?> <smil> <media src="/books/2/544/1/html/2/C:\WMPub\WMRoot\InfoChannelIntro.jpg" dur="10s"/> <excl> <priorityClass peers="pause"> <media begin="0s" src="/books/2/544/1/html/2/%requestedUrl%"/> <media src="/books/2/544/1/html/2/httpd://WebServer/AdRotator.asp" begin="Wrap.end"/> </priorityClass> </excl> </smil>
When an end user begins streaming, the elements contained in the smil element begin to play sequentially. The first element is the media element, InfoChannelIntro.jpg. This image file plays for a duration of 10 seconds (dur=“10s”), then the next media element becomes active. The next media elements are contained in a priorityClass element, which is contained in an excl element. Because the media elements are child elements of an excl and priorityClass, the begin values determine which plays next.
The begin attribute of the first media element in the priorityClass is zero seconds, so it becomes the next active media element. The source (src) of the media element is %requestedURL%. When a media element with this source becomes active in a wrapper, playback switches to the stream that was requested by the end user: the source of the publishing point. For Contoso, the source is the main playlist. The source will continue to be active until it stops or ends, at which point control will return to the wrapper. If no other media elements are left to play in the wrapper, playback ends.
The other way to return control to a wrapper is to call syncEvent from the main playlist. In the main playlist, Prog02.wmv contains a syncEvent with a value of Wrap. When this element becomes active, control is returned to the wrapper, and the media element with a begin value equal to Wrap. In this example, the begin value is Wrap.end, which triggers the switch to the wrapper at the end of the element that is currently playing. Therefore playback will switch after Prog02.wmv.
The media element in the wrapper sources from an ASP page. AdRotator.asp returns a server-side playlist containing a local Windows Media file that is selected at random. In practice, an ASP page could be connected to an ad server. As the ad plays, the main playlist continues to play. End users who connect while the dynamic ad is active, and therefore miss the switch back to the wrapper, will receive Ad01.wmv from the main playlist. At the end of the dynamic ad, playback returns to the main playlist, picking up with the next element, Prog03.wmv.
Writing the ASP Pages
The last pieces of the mockup info channel are the ASP pages that return the dynamic video in the main playlist and the dynamic ad in the wrapper. DynamicVideo.asp contains the following script:
<% OPTION EXPLICIT %> <HTML> <smil> <% Response.Write("<media src="/books/2/544/1/html/2/"rtsp://WMS01/prog04.wmv"" />") %> </smil> </HTML> The script simply returns the URL of Prog04.wmv in a playlist. In practice, you could use a similar ASP page to simply slot in Windows Media files that you did not have final addresses for when you created the playlist. In this case, the producer did not have the address of Prog04.wmv, so she entered DynamicVideo.asp. Then, when she finally got the address, she created the ASP page. If a media element in a playlist is not a supported source, it is skipped, so DynamicVideo.asp will be skipped until it is available on the server.
The ad rotator is implemented with the following script:
<% OPTION EXPLICIT %> <HTML> <smil> <% Randomize dim Index Index=Int(3*Rnd+1) select Case Index case 1 Response.Write("<media src="/books/2/544/1/html/2/"c:\wmpub\wmroot\Ad02.wmv"" />") case 2 Response.Write("<media src="/books/2/544/1/html/2/"c:\wmpub\wmroot\Ad03.wmv"" />") case 3 Response.Write("<media src="/books/2/544/1/html/2/"c:\wmpub\wmroot\Ad04.wmv"" />") end select %> </smil> </HTML> Each time the ASP page is opened, one of three ads is selected at random and returned to the playlist. You can use this form for creating far more complex and useful ad server engines. For example, you can use query strings in the playlist to send information to the ASP page, such as a user’s name, IP address, and cookie information. For more information, see the Windows Media Services SDK.
EAN: 2147483647
Pages: 258