Creating Custom Animations
| Using slide transitions and animation schemes are good ways to begin making a slide show more alive. But if you really want to make a presentation move to your drumbeat, you need to learn how to use custom animations. In fact, when you become familiar with animating individual slide elements, you'll find yourself using animation schemes less often, so that you don't end up with animations you're not interested in using. Animating BulletsTypically, you don't want to get too carried away with bullet animations. You simply want to get the information onscreen, in the proper order, and with the proper timing. You might want to add a sound effect, or make the slides appear with a special transition, but you certainly don't want to make each bullet come on the scene differently. Nevertheless, you can learn about the elements of custom animations by working first with bullets. To customize a slide's bullet text, follow these steps:
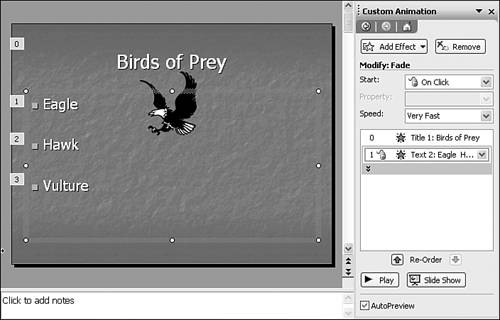
The slide now displays numbered boxes that indicate the order in which the objects appear on the slide (see Figure 11.8). The task pane also displays additional choices for modifying the animation, depending on the style you selected: Figure 11.8. Numbered boxes indicate the order in which objects are animated.
When you first add an animation to bullets, the animation applies to all the bullets as a group. In the task pane, PowerPoint displays only the first of the bullets. However, you can click the double arrow beneath the transition to expand the contents to display each bullet (see Figure 11.9). You can click the double arrow again to hide the contents. Figure 11.9. You can expand or hide detailed lists of animations. Changes you make to a group apply to all the hidden elements in the group. In fact, you can make some important changes by clicking the drop-down arrow at the right of the animated group and choosing Effect Options. Or you can double-click the animation in the list. PowerPoint displays a dialog box that is named for the animation style you're changing for example, Wipe (see Figure 11.10). The choices you see in this dialog box vary, depending on the animation style. Poke around to find out what you can do with the animation style you've selected. Wipe options, for example, include the following: Figure 11.10. The name of the animation effects dialog box depends on the animation style selected.
Finally, you can change individual bullets, although you should make sure there's a purpose in doing so. To change a single bullet, click the double arrow beneath the animation in the task pane to expand the contents. Then click the individual bullet you want to change and modify it just as you would a group of bullets, as described earlier in this section. There really are so many choices that it's impossible to cover all the variations here. Play around and try things out. The more you do, the sooner you'll find a handful of animations that work well for you. Then you can begin to apply animations to your slides quickly and effectively. Previewing Custom Animations
Using Sound EffectsI've hinted for some time that I'd talk about sound effects. Are you ready? Sound effects are nothing more than digital sound clips that you associate with animation events. For example, you can specify that a fanfare should play each time a positive bullet appears and that a groaning sound effect should play with each negative bullet by associating sound effect files with each corresponding bullet. To associate a sound effect with a bullet, follow these steps:
In the animation effects dialog box (refer to Figure 11.13), you can select a sound clip of your own. For example, you could use the Windows recorder to record your own voice and then select that sound in this dialog box. You could also digitize a clip of music or a portion of a famous speech and then select it here. You could even search the Internet to find specialized sound effects, remembering, of course, to observe copyright laws. To add a sound of your own to an animation, you follow these steps:
Sound effects used along with bullet animations need to be used with a purpose. For example, you could associate a clip from Martin Luther King's "I Have a Dream" speech with a bullet point that reads "Martin Luther King." Typically, however, novice presenters tend to go overboard in using sound effects for bullet animation. I know because I did it, too. It's just so much fun. You quickly learn, however, that unless a sound effect helps communicate better, it's best not to use it. Nevertheless, what you've learned here works even better with other animated objects such as graphic images or individual text boxes. Animating Graphic and Text ObjectsAs easy as it is to animate bullets, animation can often be even more powerful and effective when used with individual slide objects such as graphics or text boxes. For example, after displaying a bullet for the eagle on the Birds of Prey slide, you could make a picture of an eagle appear. You could even associate a sound of an eagle as the object appears. To animate an individual PowerPoint object, follow these steps:
Repeat these steps for all objects you want to animate. You can even add more than one animation to an object. For example, you could have a bird appear, and its next animation could be to exit. You can animate lines or circles that highlight important points. You can add objects one-by-one to create a group or collage. Figure 11.14 illustrates some possible animations. The bullet appears by itself. On a mouse click, the eagle flies in from the right. Another mouse click makes a circle and arrow wipe right to simulate pointing at the image. Figure 11.14. Animations can do the same things you can do at a chalkboard, only better. In short, think about each slide the way you've always wished you could present a slide; display items the way that makes the most sense for what you're trying to communicate. Customizing Animation Order and TimingIt's one thing to have things appear onscreen, but it's quite another to make them appear when you want them and in the order you want them. Fortunately, PowerPoint makes it easy to adjust animation order as well as animation timing. Consider, for example, Figure 11.15, which you see after you access the Custom Animation task pane: Figure 11.15. Numbered boxes indicate the animation order of onscreen objects.
To change the animation order, follow these simple steps:
Some animations work best if you click to make them start. For example, you might want to click to start each bullet item to ensure that you have enough time to talk about one before you display the next. However, if you have lots of animations, having to click each animation to advance can be tedious and unnecessary. For example, after a bullet appears, you can have its associated graphic image appear automatically. You can even have the graphic exit automatically when the next bullet item appears. You are the best judge as to what needs to appear when and how automatic you should make the bullets. You can find the following timing options by clicking the drop-down list at the right of the animation in the task pane list or by clicking the Start drop-down list box:
Note that Start With Previous and Start After Previous change the animation order number so that both objects have the same number. One action (mouse click) causes both objects to do their thing. Often, it's useful to add a timed delay to an automatic animation. This gives the audience a chance to mentally absorb one bit of information before you add another. For example, you could make a graphic image appear, followed in a couple seconds by a text box description. To add a delay, follow these steps:
Figures 11.18 through 11.21 illustrate an animation progression. While Figure 11.17 is showing, you announce and introduce the topic. Figure 11.17. You introduce the slide show by showing only the title. Figure 11.18. An eagle flies in to illustrate the "Eagle" bullet. Figure 11.19. The eagle leaves as the "Hawk" bullet is introduced, followed by the appearance of a hawk. On the first mouse click, the bullet "Eagle" appears, and after two seconds, an eagle image flies in from the right, accompanied by a wind sound effect that simulates flying (see Figure 11.18). On the next mouse click, the eagle flies out to the left, and at the same time, the bullet "Hawk" appears. After two seconds, a hawk image flies in from the right, again accompanied by the wind sound effect (see Figure 11.19). On the final mouse click, the hawk flies out to the left, and at the same time the bullet "Vulture" appears. After two seconds, a vulture image zooms in from a fade. Because the vulture is sitting, flying in wouldn't be appropriate. The vulture is also perfectly still, so no sound effect is required (see Figure 11.20). Figure 11.20. The hawk leaves, and a vulture appears. Believe me when I say that these animations are a lot more fun to watch on a computer than they are in this book. Nevertheless, you should be able to see that animation options are nearly as limitless as you want to make them. No longer do you need to think in terms of sequential slides to simulate changes onscreen. Nor do you have to resort to a chalkboard to show changes or add emphasis to illustrations. A few well-prepared, animated slides not only can help you get your point across better, but they can save lots of time by helping you illustrate your points quickly and clearly. If you've ever tried to explain a concept or procedure instead of illustrating it, you'll understand how an animated PowerPoint slide can make a positive difference. Animating Charts and DiagramsLike other types of slides, data charts and diagrams can also benefit from animation. However, instead of selecting and animating individual objects, you treat chart and diagram objects as a group, animating parts in sequence. Consider, for example, a bar chart that illustrates your company's sales figures for the entire year. At a board meeting, you want to talk about sales progress over each quarter, but you want to do so by quarter, not revealing activity for the entire year. You can apply animation to a data chart by following these steps:
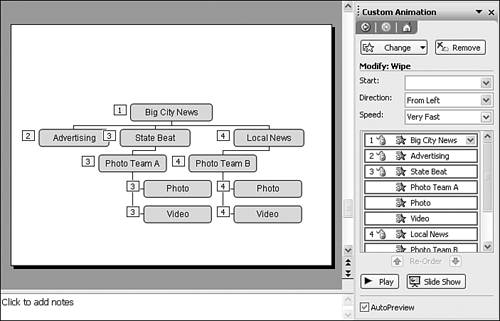
Figure 11.22 shows the chart after displaying the third-quarter results. Clicking once more displays the fourth-quarter results. Figure 11.22. Presenting just one data set at a time helps viewers focus on important details, such as the East's huge increase in the third quarter. You animate diagrams in a similar manner. Consider, for example, an organization chart that shows two major branches or sections of the organization. Suppose you want to reveal one branch of the organization at a time. To animate a diagram, follow these steps:
You want to display an entire branch at once, but unfortunately that isn't one of the options. Instead, you have to click to display each position in the branch, one-by-one. You can change individual elements by clicking the double arrow to expand the contents. Then you change the animation for each of the positions in the State Beat branch to start with the State Beat shape. This is a little more work, but it illustrates how flexible PowerPoint can be in letting you animate nearly anything in any order or timing. Figure 11.24 shows the organization chart with its animation order numbering. Note that each item in the State Beat branch is numbered 3, which simply means that the third animated object is the entire State Beat branch. Figure 11.24. You can modify individual diagram elements to make them appear how and when you want them to.
|

EAN: 2147483647
Pages: 154