Importing an XML Data File into the Mapped Document
| Let's consider the problem of how to get XML conforming to our customer-order schema, such as the XML shown in Listing 22.1 earlier in this chapter, imported into our formatted Word document shown in Figure 22.21 earlier in this chapter. Word does not provide a menu command to import XML, as Excel does. Instead, Word relies on something called an XSLT file to transform XML conforming to our customer-order schema to a formatted Word document in WordML format. An XSLT file contains a set of instructions for transforming XML from one format to another format. Fortunately, you do not have to understand the XSLT language or WordML to create an XSLT file. Word provides a developer tool to help generate the XSLT file you need. Then you can use the XSLT file to transform the customer-order XML into the nicely formatted document shown in Figure 22.21. First, we will first provide a brief checklist of the steps to do this; then we will consider the steps in more detail. To create the XSLT file, follow these steps:
To convert the book-order XML manually using the XSLT file, follow these steps:
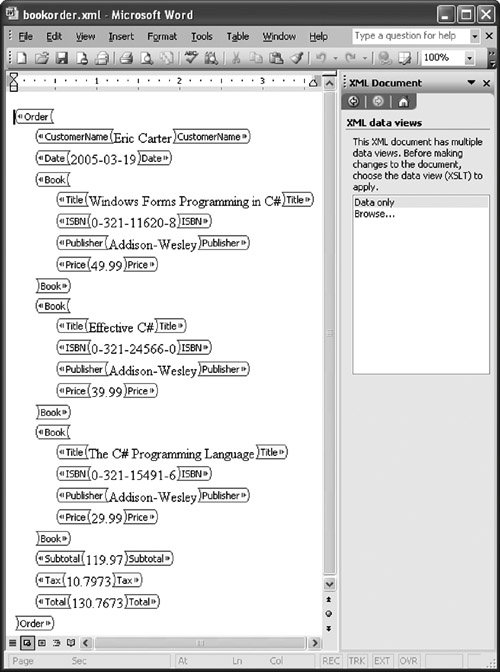
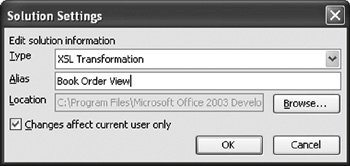
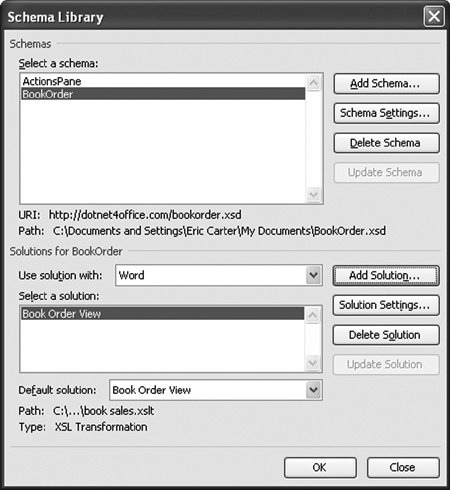
To use the XSLT file automatically when book-order XML is opened, use the Schema Library dialog box to add the XSLT file created by the wml2xslt.exe tool as a solution associated with the book-order schema. Whenever you open book-order XML conforming to the book-order schema, Word will automatically apply the XSLT transform to give back the formatted Word document shown in Figure 22.21. Creating the XSLT FileThe first step in creating an XSLT file is taking the document you created as shown in Figure 22.21 and saving it in the WordML file format. To do this, choose Save As from the File menu. From the File Type drop-down list, choose XML Document. Then make sure that the Apply Transform and Save Data Only check boxes are not checked. Give the resulting WordML XML file a name such as Book Sales.xml. Save the file to a location where you can find it in the next step. Then click the Save button. Book Sales.xml is a WordML-format document. It can be used as input to the WordprocessingML Transform Inference Tool to create an XSLT file that can transform XML conforming to our book-order schema back to the Book Sales formatted Word document. The WordprocessingML Transform Inference Tool is available for download at http://www.microsoft.com/downloads/details.aspx?FamilyID=2cb5b04e-61d9-4f16-9b18-223ec626080e. Download and install the tool on your machine. It typically will install in the directory C:\Program Files\Microsoft Office 2003 Developer Resources\Microsoft Office 2003 WordprocessingML Transform Inference Tool. The Transform Inference Tool is a console application called wml2xslt.exe. Open a command prompt, and navigate to the directory where wml2xslt.exe is installed. For simplicity, we have copied the Book Sales.xml WordML file to the same directory where wml2xslt.exe is installed. At the command line, type this command: WML2XSLT.EXE "book sales.xml" -o "book sales.xslt" "book sales.xml" is the input WordML file. "book sales.xslt" is the output XSLT file that wml2xslt.exe creates. After this command runs, Book Sales.xslt is created in the same directory where wml2xslt.exe is installed. Manually Converting the Book-Order XML File Using the XSLT FileNow take the XML in Listing 22.1 and save it to a file called Book Order.xml. Edit the content of the file in some way so that it is different from the XML that was in Book Sales.xmlfor example, change the customer name and some of the book titles. This will help convince you later that the XSLT file really works with arbitrary XML that conforms to the book-order schema. Now, from within Word, choose Open from the File menu. In the list of File Types, choose XML Files (*.xml). Browse to the Book Order.xml file, and click Open. Word opens the XML file in a nice data-only view, as shown in Figure 22.24. Figure 22.24. Opening Book Order.xml and displaying it in Word's XML data-only view. This view of the XML is nice and all, but we would like to get it back to the formatted document in Figure 22.21. When you open the XML data file, the XML Document task pane automatically appears. This task pane is the key to converting back to the formatted document view. Click the Browse option in the task pane to browse to the Book Sales.xslt XSLT file you created using wml2xslt.exe. After you have located the XSLT file, click Open. Then Word will transform Book Order.xml to a formatted Word document that looks like the document in Figure 22.21 but has the specific data changes you made to the Book Order.xml file. If you go to the XML Structure pane and check the Show XML Tags in the Document option, you will see that the formatted Word document created by using the XSLT file on the Book Order.xml file still has the XML mapping applied to it properly. Automatically Applying an XSLT File When XML Conforming to the Book-Order Schema Is OpenedWord provides a way of bypassing the extra steps of browsing to the XSLT file whenever you open the XML data file. Using the Schema Library, you can associate an XSLT file with an XML schema so that whenever XML conforming to that schema is opened, the XSLT file will be applied automatically to the XML. Follow these steps:
Figure 22.27. Word automatically applies the book-order view solution and XSLT.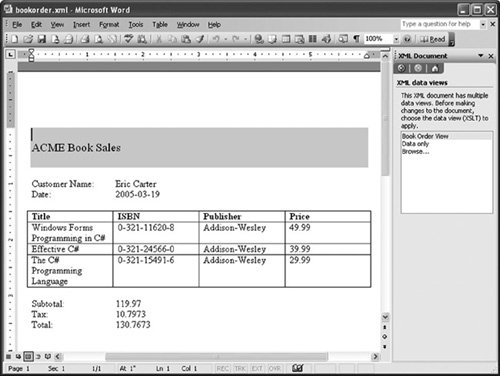 |
EAN: 2147483647
Pages: 221