Using the Security Configuration Wizard
Microsoft includes a tool with Windows Server 2003 Service Pack 1 and Windows Server 2003 R2 called the Security Configuration Wizard (SCW). This tool includes templates for different types of server roles; the wizard asks you about the server roles, network security settings, and services that should be running on the server. The wizard then disables unnecessary services and helps to lock down or harden the server.
The SCW is a very powerful Windows tool that is helpful in ensuring that your servers are secured to the best point possible. However, if you do not configure the policy correctly or if you do not take into consideration the roles that the server is supporting or the software that the server is supporting, then you will break something.
You might have wondered if the SCW includes templates for Exchange 2007 roles. It does not, and you should not attempt to use the SCW with Exchange 2000/2003 templates. However, there is a procedure for updating a server's templates with Exchange 2007-ready templates.
The SCW has a "rollback" feature that will prove very useful when you're tuning your server's security configuration. If you have a plain-vanilla installation of Exchange with no additional software or options, the defaults will all work fine. In other situations, though, some fine-tuning may be required.
Preparing the Security Configuration Wizard for Exchange 2007
Exchange 2007 includes two files that you can use to register the necessary templates and settings for the SCW so that it recognizes Exchange Server 2007 roles and requirements:
-
Exchange2007.xml includes the necessary configuration and extensions to register an Exchange Server 2007 Mailbox, Hub Transport, Client Access, Unified Messaging, or clustered mailbox server role with the Security Configuration Wizard.
-
Exchange2007Edge.xml includes the necessary configuration and extensions to register an Exchange Server 2007 Edge Transport server role with the Security Configuration Wizard.
These files are found (by default) in the C:\Program Files\Microsoft\Exchange Server\scripts folder. To register a Mailbox, Hub Transport, Client Access, Unified Messaging, or clustered mailbox server with the SCW, change to the scripts folder and use the following command:
scwcmd register /kbname:"Ex2007KB" /kbfile:"Exchange2007.xml"
To register the SCW extensions for an Exchange 2007 Edge Transport server role, change to the scripts folder and use this command:
scwcmd register /kbname:"Ex2007KB" /kbfile:"Exchange2007Edge.xml"
The Security Configuration Wizard is pretty simple to use. You can find a shortcut to the SCW in the Administrative Tools folder. Do not run this tool on an Exchange 2007 server until you have registered the Exchange 2007 extensions, though. In order to run the SCW, you must be a member of the server's local Administrators group. When you launch the SCW, the first screen just introduces you to the SCW. Once you click Next, you are taken to the Configuration Action screen. Here you are prompted to select the action you want to perform.
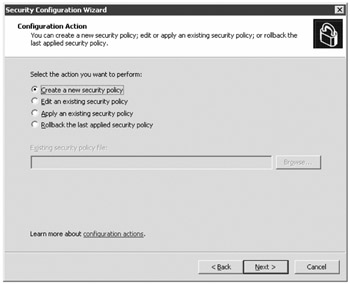
There are four possible actions you can choose from the Configuration Action page of the wizard:
-
Create a New Security Policy will walk you through the wizard and create a new set of security policy settings. This is the step you choose when you run the SCW for the first time.
-
Edit an Existing Security Policy lets you make adjustments to a policy you have previously created.
-
Apply an Existing Security Policy lets you apply or re-apply a policy you have previously created.
-
Rollback the Last Applied Security Policy allows you to roll back security settings you have recently applied. This is very, very helpful if you have applied a policy that breaks something.
| Tip | If you are not sure about a specific setting when running the SCW, it is best to take the defaults or recommended settings. |
For this example, select Create a New Security Policy. On the next page of the wizard, you specify a server to use for defining the baseline of the security policy you are going to create. This can be another server on your network or it can be the local server. You must have administrative permissions on the server that you are selecting. When you click Next, the SCW will analyze the current security settings and it will give you an opportunity to view the configuration database. The configuration database will show you all of the options and server roles that are currently available and known to the SCW. You can view the configuration database to verify that it knows about Exchange 2007 server roles. Click Next until you come to the Select Server Roles page of the wizard. From this page, you can see the server roles that the SCW has detected.
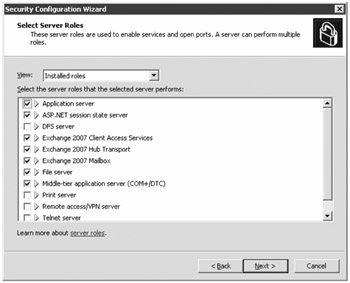
If the View drop-down box shows that Installed Roles is selected, you will see the roles that the SCW detected on the server. From here, you can clear check boxes next to server roles that are unnecessary on this particular server. Notice in the screen shot that the Print Server server role was detected, but the check box is cleared. When the policy is applied, the Print Spooler service will be disabled. This means that this machine will not be able to use either locally installed printers or shared printers.
The next page of the wizard is the Select Client Features page. This page shows you the services and software that are used by client applications. From here you can see client-side services such as the DHCP client, the DNS registration client, the Automatic update client, and more.
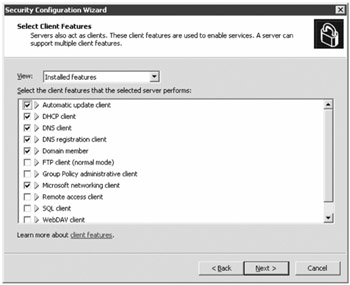
Take care not to disable a service that you may need to support Exchange. It is deceptively easy to break something important, such as domain membership or DNS lookups.
The Select Administration and Other Options page shows you the components that are used to manage a server and provide other networking services. For example, the Browser and the Browse Master services are in this list. For an Exchange 2007 server, these options will be cleared, which means this server will not participate in the My Network Places feature of Windows. While browser functionality is not required for Exchange server or Exchange clients, other software might require it, so review this list carefully.
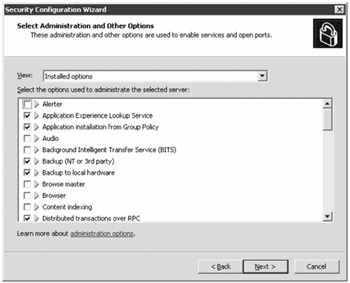
The SCW determines which options are most likely required to administer an Exchange 2007 server, but it is important to realize that some fine-tuning may be necessary. The next screen of the wizard is the Select Additional Services page; here you can select additional software that is not defined in the SCW extensions. When you get to the Handling Unspecified Services page, you are presented with options to disable services that are not defined or leave them alone.
Unless you are sure you know that disabling services will not affect the required functionality of the Exchange server, we recommend you choose the Do Not Change the Startup Mode of the Service option.
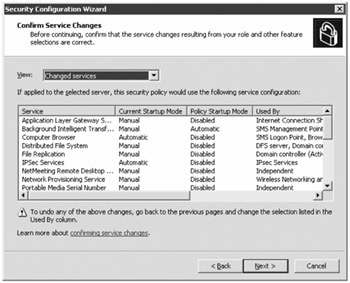
The Confirm Service Changes page of the SCW allows you to view the current state of the service and what will be changed once you implement this particular SCW setting. By default, only the services that are affected by the SCW are listed.
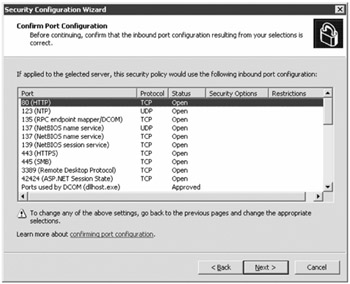
Review the list of services that will be modified and ensure that no critical services that you require are going to be disabled. When you are sure that everything meets your requirements, click Next to move on to the network security section of the wizard. This section is optional, but you may want to consider running it if you want to tighten down the ports that being used on the network. On the first screen of the network security portion of the SCW, you can select the Skip. This Section check box and skip the network security section all together. When you have finished selecting the applications that are allowed to listen on network ports, you are asked to confirm the port changes.
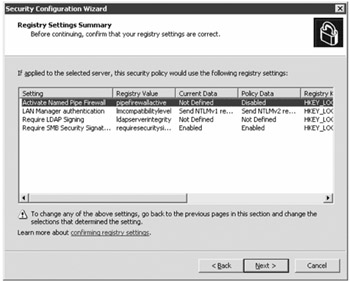
The next section is the Registry section of the SCW. This title is a little misleading since what it is configuring or locking down is specifically Windows configuration settings that can help reduce the possibility of attacks such as password cracking and protocol attacks. The actual Registry settings that are affected in this section are in the HKLM\System\CurrentControlSet\LanManServer\Parameters key and the HKLM\System\CurrentcontrolSet\Control\LSA key. You can skip this section also.
The Require SMB Security Signatures property page allows you to specify that server message block (SMB) signing is required for all SMB traffic; this will generate slightly more CPU load and it will prevent clients older than Windows NT 4 SP6 from connecting to file or printer shares. However, this can reduce the possibility of a man-in-the-middle type of attack in which a user's session is hijacked.
The Outbound Authentication Methods wizard page allows you to configure the types of authentication that can be used when connecting to a remote server. By default, Domain Accounts authentication is the only method selected; this means that all computers to which you connect from this server must be domain members.
On the Outbound Authentication Using Domain Accounts wizard page, you can specify the types of operating systems you will be connecting to. The default is that all remote operating systems will be Windows NT 4 (or compatible) or later. Depending on the configuration on the Outbound Authentication using Local Accounts page, you may also see the Inbound Authentication Methods wizard page, which allows you to configure the LAN Manager/NTLM authentication level. Finally, on the Registry Settings Summary screen, you can verify the types of changes that are about to be made.
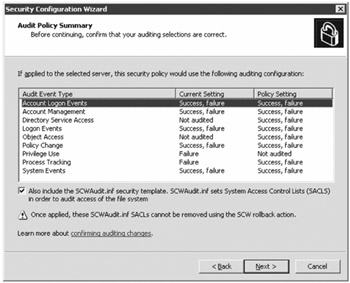
The next section is the System Audit Policy section, used to enable auditing settings. These are the same auditing settings that you can enable in the local security policy or via a group policy object (GPO). You can disable auditing, audit only successful events, or audit both success and failures. The Audit Policy Summary page of the wizard allows you to confirm which settings you are making.
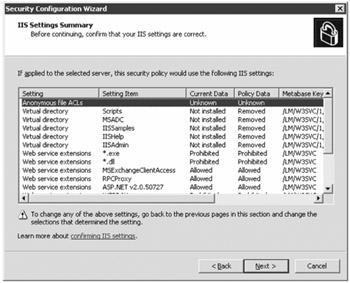
In the Internet Information Services section, you specify that web service extensions are enabled and which virtual directories will be allowed. Much of the configuration that you perform on the Internet Information Services section is similar to using the Microsoft IIS Lock Down tool. Unless you are running additional web applications on your Exchange servers, we recommend taking the defaults. The IIS Settings Summary page shows you the current settings and the changes that will be made.
Finally, on the Security Policy File Name page, you are at the point that you are ready to save your security policy. Enter a name for your security policy file and provide a description. One of the really nice features of the SCW is that you can click the View Security Policy button and view all of the settings of your security policy. Figure 20.2 shows an example. The SCW Viewer will also let you print out the security policy if you like to keep hard copy records of your configuration.
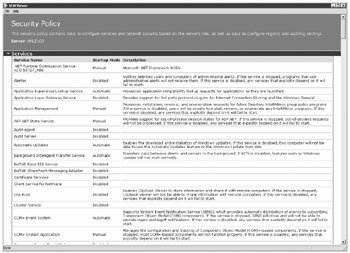
Figure 20.2: Viewing your security policy
Once you save the policy, the next page of the wizard will ask you if you want to apply the security policy now or apply it later. You may also need to reboot the server after the policy changes have been applied. We recommend creating and testing a security policy prior to putting a server into production so that you don't have to worry about rebooting during working hours. You can always save your policy and apply it later, though.
EAN: 2147483647
Pages: 198