Installing the Geronimo Server
The exact installation procedure depends on which binary distribution you have downloaded and also on your host operating system. In all cases, you need to preselect the directory on your machine that you will install the server on.
For the following discussion, it is assumed that you are installing the server on:
-
c:\geronimo - For the Windows operating system
-
/home/jeff/geronimo - For an Unix system
If you have downloaded the ZIP file on a Windows machine, just unzip the distribution to your destination directory. This will create c:\geronimo\geronimo-1.1 (assuming that you are running the 1.1 release).
On an Unix system, change into your installation directory and the use the following command to unarchive the file:
tar zxvf <downloaded tar.gz file name>
This command unarchives the server’s binary into the /home/jeff/geronimo-1.1 directory.
This completes the initial installation of your Geronimo server. This installation comes with a preconfigured server that is designed to run on most system configurations.
The next sections show you how to customize this default configuration.
Customizing Geronimo after Installation
The initial installation provides a starter configuration for your Geronimo server. You can readily modify the configuration if required. This can be accomplished by editing the config.xml file.
The config.xml File
The config.xml is located in the var/config directory of your Geronimo installation. This file contains a list of modules that will be loaded and started when the Geronimo server starts up. In fact, many operations performed via the Web console (covered in Chapter 8) involve changes in this configuration file.
In addition to controlling which module is started, the file can also be used to customize some attributes of Geronimo components that are installed. This will include changing the port and hostnames/IP address of the default installation.
Generally, the Geronimo server will examine the config.xml during startup to determine the following:
-
Which modules to load and start
-
The attributes of server components (called GBeans in Geronimo) that should be overridden
Note, however, that config.xml should never be modified while Geronimo is running. This is because Geronimo may write the changed module configurations back to config.xml. Any modifications you make while Geronimo is running will be lost.
In addition, since Geronimo automates the writing of the config.xml from its own internal module configuration structure, any comments you placed in the original config.xml will also be lost after Geronimo restart. Therefore, remember to only edit config.xml when Geronimo is not running - and to make frequent backup of this file.
| Important | Never edit config.xml while the Geronimo server is running. Make frequent back-ups of known-good version of this file. |
As an example, the module configuration entry that configures the port and hostname of the Tomcat Web connectors is shown in the following listing:
<module name="geronimo/tomcat/1.1/car"> <gbean name="TomcatResources"/> <gbean name="TomcatWebConnector"> <attribute name="host">0.0.0.0</attribute> <attribute name="port">8080</attribute> <attribute name="redirectPort">8443</attribute> </gbean> <gbean name="TomcatAJPConnector"> <attribute name="host">0.0.0.0</attribute> <attribute name="port">8009</attribute> <attribute name="redirectPort">8443</attribute> </gbean> <gbean name="TomcatWebSSLConnector"> <attribute name="host">0.0.0.0</attribute> <attribute name="port">8443</attribute> </gbean> <gbean name="geronimo/tomcat/1.1/car?ServiceModule=geronimo/tomcat/1.1/car,j2eeType=GBean, name=TomcatWebContainer"> <attribute name="catalinaHome">var/catalina</attribute> </gbean> </module>
You can modify any of these values and start the server to have the host and port changed.
Any listed modules in the config.xml will be loaded and started by default. To prevent one or more of the modules from loading and starting by Geronimo, set the attribute load="false" in the <module> element. For example, if you look up the CORBA support module, with name geronimo/j2ee-corba/1.1/car, you will see the following module configuration:
<module load="false" name="geronimo/j2ee-corba/1.1/car"> <gbean name="NameServer"> <attribute name="dbDir">var/cosnaming.db</attribute> <attribute name="port">1050</attribute> </gbean> <gbean name="Server"> <attribute name="args">-ORBInitRef, NameService=corbaloc::localhost:1050/NameService</attribute> </gbean> <gbean name="UnprotectedServer"> <attribute name="args">-ORBInitRef, NameService=corbaloc::localhost:1050/NameService</attribute> </gbean> </module> Note the load attribute of the module is set to "false", telling the Geronimo server not to load the CORBA support module during startup. This is by default - and you definitely want to prevent the CORBA support module from loading if you are using the JDK 5 VM (Java SE 5).
Running the Geronimo Server
Once you’ve installed Geronimo using the binary archives, you can start the server. First, change directory to the installation directory that you have selected. From the installation directory, change directory to the bin subdirectory. From the bin subdirectory, type in the following command:
startup
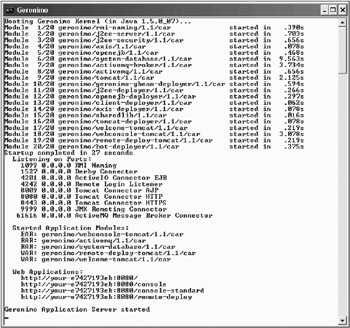
On an Unix system, you run the startup.sh script using sh startup.sh. This will start the Geronimo server running the core J2EE services. The startup status is displayed on another console window, or in the backgroup with Unix systems. The name of each module is displayed as it is started, as well as the time it took in starting it. Once the server has started up completely, your console should look similar to Figure 1-3.

Figure 1-3: Startup screen for server10
Table 1-3 describes some of the services that are started by Geronimo 1.1. . The port for each service will reflect any customization you may have made in config.xml. The list you see may be different if you are using versions beyond 1.1.
| Service | Port |
|---|---|
| Geronimo Naming Service (RMI-based) | 1099 |
| OpenEJB EJB container (ActiveIO) | 4201 |
| Remote authentication (login) server | 4242 |
| Tomcat container connectors | 8080 (HTTP) , 8443 (secured socket - HTTPS), and 8009 (AJP 13) |
| Jetty container connectors | 8080 (HTTP) and 8443 (HTTPS) and 9090 (HTTP) and 8009 (AJP 13) |
| JMX Remoting (Management) Connector | 9999 |
| ActiveMQ | 61616 |
| Derby RDBMS system | 1527 |
| Important | To shut down your Geronimo server run the shutdown (or shutdown.sh) script from the bin subdirectory. It will prompt you with userid (enter system) and password (enter manager). You can also shut down Geronimo from the Web console (covered in Chapter 8). |
Verifying Your Installation of Geronimo
To verify that everything is running well with your Geronimo installation, you can use the deployer tool (a tool that you will use a lot, and find out a lot more about in Chapter 6) to list all the system configurations that are a built-in part of your server.
From the bin subdirectory under your installation directory, type the following command:
deploy --user system --password manager list-modules
This is how you access the deployer tool. You must supply the username system and password manager. This is set up by the default configuration at installation.
After installation, if you need to change the password, edit the users.properties file under the <installation directory>/geronimo-1.1/var/security directory. Chapter 8 provides more details on how to use the Web console to add new administrative users.
| Important | Of course, you can save the repetitive step of changing directory to the bin subdirectory if you add that directory into your PATH environment variable. |
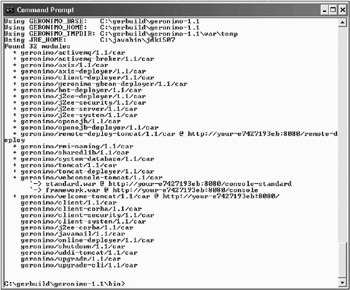
The list-modules command of the deployer tool will display all the system configurations in the server. After an initial installation, your list-modules command output should be similar to Figure 1-4.

Figure 1-4: Output from list-modules command
Each line in Figure 1-4 represents a module deployed in the Geronimo server. The ones with a “+” sign on the left are the ones that have been started, and are currently running. The URL to some of the Web-accessible modules is also shown.
Congratulations, you have just successfully installed and run Geronimo!
EAN: 2147483647
Pages: 148