Configuring MPLS-Signaled LSPs
To configure MPLS-signaled LSPs, create an LSP that runs from the ingress router to the egress router. To create the LSP, configure only the ingress router; you do not have to configure any other routers. You can configure the LSP so that the JUNOS software makes all forwarding decisions, or you can configure some or all routers in the path . The LSP is set up by RSVP, through RSVP signaling messages. The JUNOS software automatically negotiates, assigns , releases, and reuses labels. Automatically assigned labels have a value from 1,024 through 1,048,575. Configuring the Ingress Router for MPLS-Signaled LSPsTo configure signaled LSPs, you first create one or more named paths on the ingress router. For each path, you can specify some or all transit routers in the path, or you can leave it empty. Each path name can contain up to 32 characters and can include letters , digits, periods, and hyphens. The name must be unique within the ingress router. After a named path is created, you can configure primary and secondary LSPs using the named path. You can specify the same named path on any number of LSPs. To create an empty path, include the path statement but do not specify a name. Here, any path between the ingress and egress routers is accepted. In actuality, the path used tends to be the same path as is followed by destination-based, best-effort traffic. [edit protocols mpls] path path-name ; To create a path in which you specify some or all transit routers in the path, include the following form of the path statement: [edit protocols mpls] path path-name { ( address host-name ) <strict loose>; } Specify one or more transit router addresses in order, starting with the ingress router (optional) or the first transit router, and continuing sequentially along the path up to the egress router (optional) or the router immediately before the egress router. For each router address, you specify the type, which can be one of the following:
The second step in configuring signaled LSPs is to create one or more LSPs and define the properties associated with the LSP on the ingress router. To configure an LSP, include the label-switched -path statement: [edit protocols mpls] label-switched-path lsp-path-name { disable; to address ; from address ; adaptive; admin-group { exclude group-names ; include group-names ; } auto-bandwidth { adjust-interval seconds; adjust-threshold percent; maximum-bandwidth bps; minimum-bandwidth bps; monitor-bandwidth; } bandwidth bps; class-of-service cos-value ; fast-reroute { fast-reroute bps; exclude group-names; hop-limit number; include group-names; } hop-limit number ; ldp-tunneling; metric number; no-cspf; no-decrement-ttl; optimize-timer seconds ; preference preference ; priority setup-priority hold-priority ; (random least-fill most-fill); (record no-record); retry-limit number ; retry-timer seconds ; standby; primary path-name { adaptive; admin-group { exclude group-names ; include group-names ; } bandwidth bps ; class-of-service cos-value ; hop-limit number ; no-cspf; optimize-timer seconds ; preference preference ; priority setup-priority hold-priority ; (record no-record); standby; } secondary path-name { adaptive; admin-group { exclude group-names ; include group-names ; } bandwidth bps ; class-of-service cos-value ; hop-limit number ; no-cspf; optimize-timer seconds ; preference preference ; priority setup-priority hold-priority ; (record no-record); standby; } } Each LSP must have a name, lsp-path-name , which can be up to 32 characters long and can contain letters, digits, periods (.), and hyphens (-). The name must be unique within the ingress router. For ease of management and identification, configure unique names across the entire domain. Configuring the Ingress and Egress Router AddressesSpecify the address of the egress router by including the to statement. When you are setting up an LSP, the to statement is the only required statement. All other statements are optional. [edit protocols mpls label-switched-path lsp-path-name ] to address ; After the LSP is established, the address of the egress router is installed as a host route in the routing table. Then, this route can be used by BGP to forward traffic. To have the software send BGP traffic over an LSP, the address of the egress router is the same as the address of the BGP next hop. You can specify the egress router's address as any one of the router's interface addresses or as the BGP router ID. If you specify a different address, even if the address is on the same router, BGP traffic is not sent over the LSP. The local router always is considered to be the ingress router, which is the beginning of the LSP. The software automatically determines the proper outgoing interface and IP address to use to reach the next router in an LSP. By default, the router ID is chosen as the address of the ingress router. To override the automatic selection of the source address, specify a source address in the from statement. The outgoing interface used by the LSP is not affected by the source address that you configure. [edit protocols mpls label-switched-path lsp-path-name ] from address ; Configuring the Primary and Secondary LSPsBy default, an LSP routes itself hop by hop toward the egress router. The LSP tends to follow the shortest path as dictated by the local routing table, usually taking the same path as destination-based, best-effort traffic. These paths are "soft" in nature because they automatically reroute themselves whenever a change occurs in a routing table or in the status of a node or link. To configure the path so that it follows a particular route, create a named path using the path statement. Then apply the named path by including the primary or secondary statement. A named path can be referenced by any number of LSPs. [edit protocols mpls label-switched-path lsp-path-name ] primary path-name { ... } secondary path-name { ... } The primary statement creates the primary path, which is the LSP's preferred path. The secondary statement creates an alternative path. If the primary path can no longer reach the egress router, the alternative path is used.
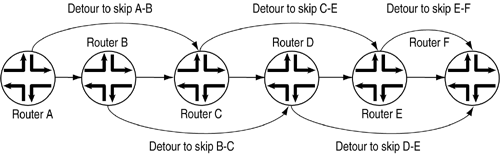
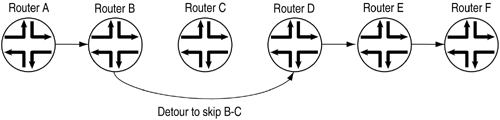
When the software switches from the primary to a secondary path, it continuously attempts to revert to the primary path, switching back to it when it is again reachable , but no sooner than the retry time specified in the retry-timer statement. You can configure zero or one primary path. If you do not configure a primary path, the first secondary path that is established is selected as the path. You can configure zero or more secondary paths. All secondary paths are equal, and the software tries them in the order that they are listed in the configuration. The software does not attempt to switch among secondary paths. If the current secondary path is not available, the next one is tried. To create a set of equal paths, specify secondary paths without specifying a primary path. If you do not specify any named paths, or if the path you specify is empty, the software makes all the routing decisions necessary to reach the egress router. Configuring Fast RerouteFast reroute provides a mechanism for automatically rerouting traffic on an LSP if a node or link in an LSP fails, thus reducing the loss of packets traveling over the LSP. Fast rerouting is accomplished by precomputing and preestablishing a number of detours along the LSP. Figure 11.11 illustrates an LSP from Router A to Router F, showing some of the detours that are established for the LSP. Each detour is established by an upstream node with the intent of avoiding the link toward the immediate downstream node and the immediate downstream node itself. Each detour might traverse through one or more label-switched routers that are not shown in the figure. Figure 11.11. Detours Established for an LSP Using Fast Reroute If a node detects either that a downstream link has failed (using a link-layer specific liveness detection mechanism) or that a downstream node has failed (for example, using the RSVP neighbor hello protocol), the node quickly splices the traffic onto the detour and, at the same time, signals the ingress router about the link or node failure. Figure 11.12 illustrates the detour taken when the link between Router B and Router C fails. If the network topology is not rich enough, some of the detours might not succeed. For example, the detour from Router A to Router C in Figure 11.12 cannot traverse link A-B and Router B. If such a path is not possible, the detour is not established. Figure 11.12. Detour after the Link from Router B to Router C Fails The time required for a fast-rerouting detour to take effect depends on two independent time intervals:
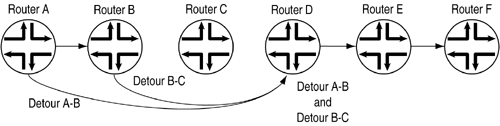
Fast reroute is a short-term patch to reduce packet loss. Because detour computation might not reserve adequate bandwidth, the detours might introduce congestion on the alternate links. The ingress router is the only router that is fully aware of LSP policy constraints and, therefore, is the only router able to come up with adequate long- term alternate paths. Fast reroute protects traffic against any single point of failure between the ingress and egress routers. If there are multiple failures along an LSP, it is possible that fast reroute itself might fail. Also, fast reroute does not protect against failure of the ingress or egress routers. Detours are created using RSVP and, like all RSVP sessions, they require extra state and overhead in the network. For this reason, each node establishes at most one detour for each LSP that has fast reroute enabled. Creating more than one detour for each LSP increases the overhead but serves no practical purpose. To reduce network overhead further, each detour attempts to merge back into the LSP as soon as possible after the failed node or link. If you can consider an LSP that travels through N router nodes, it is possible to create N 1 detours. For instance, in Figure 11.13, the detour tries to merge back into the LSP at Router D instead of at Router E or Router F. Merging back into the LSP makes the detour scalability problem more manageable. If topology limitations prevent the detour from quickly merging back into the LSP, detours merge with other detours automatically. Figure 11.13. Detours Merging into Other Detours A router on which MPLS is enabled (referred to as a label-switched router ) uses certain procedures to determine which LSP to select when the router receives path messages from different interfaces with identical SESSION and SENDER_TEMPLATE objects. When this occurs, the label-switched router needs to merge the path states. The router on which MPLS is enabled uses the following procedure to determine when and how to merge path states:
Computing and setting up detours are done independently at each node. On a node, if an LSP has fast reroute enabled and if a downstream link or node can be identified, the router performs a CSPF computation using the information in the local TED. For this reason, detours rely on the IGP's supporting traffic engineering extensions. Without the TED, detours cannot be established. Detour computations might not succeed the first time. If a computation fails, the router recomputes detours approximately once every refresh interval until the computation succeeds. To enable fast reroute on an LSP, include the fast-reroute statement on the ingress router: [edit protocols mpls label-switched-path lsp-path-name ] fast-reroute { bandwidth bps ; (exclude group-names no-exclude); hop-limit number ; (include group-names no-include); } You do not need to configure fast reroute on the LSP's transit and egress routers. When fast reroute is enabled, the ingress router signals all the downstream routers that fast reroute is enabled on the LSP, and each downstream router does its best to set up detours for the LSP. If a downstream router does not support fast reroute, it ignores the request to set up detours and continues to support the LSP. A router that does not support fast reroute causes some of the detours to fail but otherwise has no impact on the LSP. By default, no bandwidth is reserved for the rerouted path. To allocate bandwidth for the rerouted path, include the bandwidth statement. The bandwidth does not need to be identical to that allocated for the LSP. Hop-limit constraints define how many more routers a detour is allowed to traverse compared to the LSP itself. By default, the hop limit is set to 6. For example, if an LSP traverses four routers, any detour for the LSP can be up to 10 (that is, 4 + 6) router hops, including the ingress and egress routers.
By default, a detour inherits the same administrative (coloring) group constraints as its parent LSP when CSPF is determining the alternate path. Administrative groups, also known as link coloring or resource class, are manually assigned attributes that describe the "color" of links, such that links with the same color conceptually belong to the same class. If you specify the include statement when configuring the parent LSP, all links traversed by the alternate session must have at least one color found in the list of groups. If you specify the exclude statement when configuring the parent LSP, none of the links must have a color found in the list of groups. Associating Addresses with an LSPBy default, a host route toward the egress router is installed in the inet.3 routing table. (The host route address is the one you configure in the to statement.) Installing the host route allows BGP to perform next-hop resolution. It also prevents the host route from interfering with prefixes learned from dynamic routing protocols and stored in the inet.0 routing table. Unlike the routes in the inet.0 table, routes in the inet.3 table are not copied to the Packet Forwarding Engine, and hence they cause no changes in the system forwarding table directly. You cannot ping or traceroute through these routes. The only use for inet.3 is to permit BGP to perform next-hop resolution. To examine the inet.3 table, use the show route table inet.3 command. To inject additional routes into the inet.3 routing table, include the install statement: [edit protocols mpls label-switched-path lsp-path-name ] install { destination / mask <active>; } The specified routes are installed as aliases into the routing table when the LSP is established. Installing additional routes allows BGP to resolve next hops within the specified prefix and to direct additional traffic for these next hops to a particular LSP. Including the active option with the install statement installs the specified prefix into the inet.0 routing table, which is the primary forwarding table. The result is a route that is installed in the forwarding table any time the LSP is established, which means you can ping or traceroute the route. Use this option with care, because this type of prefix is very similar to a static route. You use alias routes for routers that have multiple addresses being used as BGP next hops or for routers that are not MPLS-capable. In either of these cases, the LSP can be configured to another MPLS-capable system within the local domain, which then acts as a "border" router. The LSP then terminates on the border router and, from that router, Layer 3 forwarding takes the packet to the true next-hop router. In the case of an interconnect, the domain's border router can act as the proxy router and can advertise the prefix for the interconnect if the border router is not setting the BGP next hop to itself. In the case of a POP that has routers that do not support MPLS, one router (for example, a core router) that supports MPLS can act as a proxy for the entire POP and can inject a set of prefixes that cover the POP. Thus, all routers within the POP can advertise themselves as IBGP next hops, and traffic can follow the LSP to reach the core router. This means that normal IGP routing would prevail within the POP. For BGP next-hop resolution, it makes no difference whether a route is in the inet.0 or inet.3 routing table; the route with the best match (longest mask) is chosen. Among multiple best-match routes, the one with the highest preference value is chosen. Configuring Path Connection Retry InformationThe ingress router might make many attempts to connect and reconnect to the egress router using the primary path. You can control how often the ingress router tries to establish a connection using the primary path and how long it waits between retry attempts. The retry timer configures how long the ingress router waits before trying to connect again to the egress router using the primary path. The default retry time is 30 seconds. The time can be from 1 through 600 seconds. To modify this value, include the retry-timer statement: [edit protocols mpls label-switched-path lsp-path-name ] retry-timer seconds ; By default, no limit is set to the number of times an ingress router attempts to establish or reestablish a connection to the egress router using the primary path. To limit the number of attempts, include the retry-limit statement: [edit protocols mpls label-switched-path lsp-path-name ] retry-limit number ; The limit can be a value up to 10,000. When the retry limit is exceeded, no more attempts are made to establish a path connection. At this point, intervention is required to restart the primary path. If you set a retry limit, it is reset to 1 each time a successful primary path is created. Configuring the Dynamic and Static LSP MetricsIf you do not configure a specific metric, an LSP uses dynamic metrics by default, attempting to track the IGP metric toward the same destination (the to address of the LSP). IGP metrics considered include OSPF, IS-IS, RIP, and static routes. BGP and other RSVP and LDP routes are excluded. For example, if the OSPF metric toward a router is 20, all LSPs toward that router automatically inherit metric 20. If the OSPF toward a router later changes to a different value, all LSP metrics change accordingly . If there are no IGP routes toward the router, the LSP raises its metric to 65,535. Note that in this case, the LSP metric is completely determined by the IGP; it bears no relationship to the actual path the LSP is currently traversing. If LSP reroutes (such as through reoptimization), its metric does not change, and thus it remains transparent to users. Using dynamic metrics is the default behavior; no configuration is required. To manually assign a fixed metric value to an LSP, include the metric statement: [edit protocols mpls label-switched-path lsp-name] metric number ; The LSP metric is used in several situations:
Configuring CSPF Tie-BreakingWhen selecting a path for an LSP, CSPF uses a tie-breaking process if there are several equal-cost paths. To configure a random tie-breaking rule for CSPF to use to choose among equal-cost paths, include the random statement:
[edit protocols mpls path label-switched-path lsp-path-name ] random; To prefer the path with the least-utilized links, include the least-fill statement: [edit protocols mpls path label-switched-path lsp-path-name ] least-fill; To prefer the path with the most-utilized links, include the most-fill statement: [edit protocols mpls path label-switched-path lsp-path-name ] most-fill; Configuring Load Balancing LSPs without CSPFAn LSP tends to load-balance its placement by randomly selecting one of the equal-cost next hops and using it exclusively. The random selection is made independently at each transit router and is made by comparing IGP metrics alone. No consideration is given to bandwidth or congestion levels. Disabling Normal TTL DecrementingBy default, the TTL field value in the packet header is decremented by 1 for every hop the packet traverses in the LSP, thereby preventing loops . If the TTL field value reaches 0, packets are dropped, and an ICMP error packet might be sent to the originating router. If normal TTL decrementing is disabled, the TTL field of IP packets entering LSPs is decremented by only 1 when transiting the LSP, making the LSP appear as a one-hop router to diagnostic tools, such as traceroute . This is done by the ingress router, which pushes a label on IP packets with the TTL field in the label initialized to 255. The label's TTL field value is decremented by 1 for every hop the MPLS packet traverses in the LSP. On the penultimate hop of the LSP, the router pops the label but does not write the label's TTL field value to the IP packet's TTL field. Instead, when the IP packet reaches the egress router, the IP packet's TTL field value is decremented by 1. When you use traceroute to diagnose problems with an LSP, traceroute sees the ingress router, although the egress router performs the TTL decrementing. Note that this assumes that traceroute is initiated outside the LSP. The behavior of traceroute is different if it is initiated from the ingress router of the LSP. In this case, the egress router would be the first router to respond to traceroute . You can disable normal TTL decrementing in an LSP so that the TTL field value does not reach 0 before the packet reaches its destination, thus preventing the packet from being dropped. You can also disable normal TTL decrementing to make the MPLS cloud appear as a single hop, thereby hiding the network topology. There are two ways to disable TTL decrementing:
Allocating Bandwidth AutomaticallyAn MPLS tunnel can automatically adjust its bandwidth allocation based on the volume of traffic flowing through the tunnel. You can configure an LSP with minimal bandwidth, and then MPLS can dynamically adjust the LSP's bandwidth allocation based on current traffic patterns. The bandwidth adjustments do not interrupt traffic flow through the tunnel. At the end of a specified time interval, the current maximum average bandwidth usage is compared to the allocated bandwidth for the LSP. If the LSP needs more bandwidth, an attempt is made to set up a new path where bandwidth is equal to the current maximum average usage. If the attempt is successful, the LSP's traffic is routed through the new path, and the old path is removed. If the attempt fails, the LSP continues to use its current path. You might not be able to use automatic bandwidth allocation to adjust the bandwidth of fast-reroute LSPs. Because the LSPs use fixed filter (FF) reservation style, when a new path is signaled, the bandwidth might be double-counted. This can prevent a fast-reroute LSP from ever adjusting its bandwidth when automatic bandwidth allocation is enabled. To enable automatic bandwidth allocation, first configure MPLS statistics by including the following statements. In the interval statement, configure the interval for calculating the average bandwidth usage. This setting applies to all LSPs configured on the router. [edit] protocols { mpls { statistics { file filename; interval seconds; auto-bandwidth; } } } Then, configure automatic bandwidth by including the following statements. You can maintain the LSP's bandwidth between minimum and maximum bounds by specifying values for the minimum-bandwidth and maximum-bandwidth statements. Specify the bandwidth reallocation interval in seconds using the adjust-interval statement. [edit protocols mpls label-switched-path label-switched-path-name ] auto-bandwidth { adjust-interval seconds; minimum-bandwidth bps; maximum-bandwidth bps; } You can specify how sensitive the automatic bandwidth adjustment for an LSP is to changes in bandwidth utilization. The threshold is used to trigger automatic bandwidth adjustments. When configured, the LSP adjust bandwidth for the current interval is compared to the LSP's current bandwidth. If the percentage difference in bandwidth is greater than or equal to the specified adjust-threshold percentage, the LSP's bandwidth is adjusted to the adjust bandwidth. To adjust the bandwidth threshold, include the following statements: [edit protocols mpls label-switched-path label-switched-path-name ] auto-bandwidth { adjust-threshold percent; } You can switch to a passive bandwidth utilization monitoring mode. In this mode, no automatic bandwidth adjustments are made, but the maximum average bandwidth utilization is continuously monitored and recorded. To switch to passive bandwidth utilization monitoring mode, include the monitor-bandwidth statement: [edit protocols mpls label-switched-path label-switched-path-name ] auto-bandwidth { monitor-bandwidth; } If you have configured an LSP with primary and secondary paths, the automatic bandwidth allocation statistics are carried over to the secondary path if the primary path fails. For example, consider a primary path whose adjustment interval is half complete and whose maximum average bandwidth usage is currently calculated as 50 Mbps. If the primary path suddenly fails, the time remaining for the next adjustment and the maximum average bandwidth usage are carried over to the secondary path. Disabling Constrained-Path LSP ComputationIf the IGP is a link-state protocol that supports extensions to allow the current bandwidth reservation on each router's link to be reported , constrained path LSPs are computed by default.
The JUNOS implementations of IS-IS and OSPF include the extensions that support constrained-path LSP computation. In IS-IS, these extensions are enabled by default. (To disable this support, include the disable statement at the [edit protocols isis traffic-engineering] hierarchy level.) In OSPF, to enable this support, include the traffic-engineering statement. Constrained-path LSP computation works as follows: LSPs advertise their link information in the IGP's link-state packets. These packets are flooded throughout the network and hence provide information to all nodes. This link information is placed into the TED and provides each ingress router with LSP topology information and recent LSP bandwidth reservation information. When computing complete paths for LSPs, the ingress router uses the information in the TED, along with the requirements you configure for the LSP, including bandwidth (configured with the bandwidth statement), hop limit (configured with the hop-limit statement), and the address of the egress router (configured with the to statement). Constrained-path LSPs have a greater chance of being established quickly and successfully because the LSP computation takes into account the current bandwidth reservation and because constrained-path LSPs reroute themselves away from node failures and congestion.
When constrained-path LSP computation is enabled, you can configure the LSP so that it is periodically reoptimized.
When an LSP is being established or when an existing LSP fails, the constrained-path LSP computation is repeated periodically at the interval specified by the retry timer until the LSP is set up successfully. When the LSP is set up, no recomputation is done. By default, constrained-path LSP computation is enabled. You might want to disable constrained-path LSP computation when all nodes do not support the necessary traffic engineering extensions. To disable constrained-path LSP computation, include the no-cspf statement: [edit protocols mpls label-switched-path lsp-path-name ] or [edit protocols mpls label-switched-path lsp-path-name (primary secondary)] no-cspf; Configuring Administrative GroupsAdministrative groups, also known as link coloring or resource class, are manually assigned attributes that describe the "color" of links, such that links with the same color conceptually belong to the same class. You can use administrative groups to implement a variety of policy-based LSP setups. Administrative groups are meaningful only when constrained-path LSP computation is enabled. To configure administrative groups, follow these steps:
Configuring the LSP PreferenceYou can configure multiple LSPs between the same pair of ingress and egress routers, for example, if you want to balance the load among the LSPs because all LSPs, by default, have the same preference level. To prefer one LSP over another, set different preference levels for individual LSPs. The LSP with the lowest preference value is used. The default preference of all LSPs is 7, which is lower (more preferred) than all learned routes except for direct interface routes. To change the default preference value, include the preference statement: preference preference ; Configuring Whether to Record Path RoutesThe JUNOS implementation of RSVP supports the record route object, which allows an LSP to actively record the routers through which it transits. You can use this information for troubleshooting and to prevent routing loops. By default, path route information is recorded. To disable recording, include the no-record statement: no-record; Configuring the MPLS CoS ValueWhen IP traffic enters an LSP tunnel, the ingress router marks all packets with a class-of-service (CoS) value, which is used to place the traffic into a transmission priority queue. On the router, for SDH/SONET and T3 interfaces, each interface has four transmit queues. The CoS value is encoded as part of the MPLS header and remains in the packets until the MPLS header is removed when the packets exit from the egress router. The routers within the LSP use the CoS value set at the ingress router.
MPLS class of service works in conjunction with the router's general CoS functionality. If you do not configure any CoS features, the default general CoS settings are used. For MPLS class of service, you might want to prioritize how the transmit queues are serviced by configuring weighted round- robin and to configure congestion avoidance using Random Early Detection (RED). When traffic enters an LSP tunnel, the CoS bits in the MPLS header are set in one of two ways. In the first way, the number of the output queue into which the packet was buffered and the packet loss priority (PLP) bit are written into the MPLS header and are used as the packet's CoS value. This behavior is the default, and no configuration is required. In the second way, you set a fixed CoS value on all packets entering the LSP tunnel. This means that all packets entering the LSP receive the same class of service. To do this, include the class-of-service statement: class-of-service cos-value ; The CoS value can be a decimal number from 0 through 7. This number corresponds to a 3-bit binary number. The high-order two bits of the CoS value select which transmit queue to use on the outbound interface card. The low-order bit of the CoS value is treated as the PLP bit and is used to select the RED drop profile to use on the output queue. If the low-order bit is 0, the non-PLP drop profile is used, and if the low-order bit is 1, the PLP drop profile is used. It is generally expected that RED will more aggressively drop packets that have the PLP bit set. Table 11.2 summarizes how MPLS CoS values correspond to the transmit queue and PLP bit. Note that in MPLS, the mapping between the CoS bit value and the output queue is hard-coded. You cannot configure the mapping for MPLS; you can configure it only for IPv4 traffic flows. Table 11.2. MPLS CoS Values
Because the CoS value is part of the MPLS header, the value is associated with the packets only as they travel through the LSP tunnel. The value is not copied back to the IP header when the packets exit from the LSP tunnel. Configuring an LSP to Be AdaptiveAn LSP occasionally might need to reroute itself. Reasons include the following:
You can configure an LSP to be adaptive when it is attempting to reroute itself. When it is adaptive, the LSP holds onto existing resources until the new path is successfully established and traffic has been cut over to the new LSP. To retain its resources, an adaptive LSP does the following:
By default, adaptive behavior is disabled. You can include the adaptive statement in two different hierarchy levels. If you include the following form of the adaptive statement, adaptive behavior is enabled on all primary and secondary paths of the LSP. This means both the primary and secondary paths share the same bandwidth on common links. [edit protocols mpls label-switched-path lsp-path-name ] adaptive; If you include the following form of adaptive statement, adaptive behavior is enabled only on the path on which it is specified. Double-counting of bandwidth occurs between different paths. [edit protocols mpls label-switched-path lsp-path-name (primary secondary)] adaptive; Configuring Priority and PreemptionWhen there is insufficient bandwidth to establish a more important LSP, you might want to tear down a less important existing LSP to free up the bandwidth. You do this by preempting the existing LSP. Whether an LSP can be preempted is determined by two properties associated with the LSP:
You cannot configure an LSP with a high setup priority and a low hold priority because permanent preemption loops might result if two LSPs are allowed to preempt each other. You must configure the hold priority to be higher than or equal to the setup priority. The setup priority also defines the relative importance of LSPs on the same ingress router. When the software starts, when a new LSP is established, or during fault recovery, the setup priority determines the order in which LSPs are serviced. Higher priority LSPs tend to be established first and hence enjoy more optimal path selection. To configure the LSP's preemption properties, include the priority statement at the [edit protocols mpls] , [edit protocols mpls label-switched-path lsp-path-name ] , or [edit protocols mpls label-switched-path lsp-path-name (primary secondary)] hierarchy level: priority setup-priority hold-priority ; Both setup-priority and hold-priority can be a value from 0 through 7. The value 0 corresponds to the highest priority, and the value 7 to the lowest. By default, an LSP has a setup priority of 7 (that is, it cannot preempt any other LSPs) and a hold priority of 0 (that is, other LSPs cannot preempt it). These defaults are such that preemption does not happen. When you are configuring these values, the set-up priority should always be less than or equal to the hold priority. Optimizing Signaled LSPsAfter an LSP has been established, topology or resource changes might, over time, make the path less than optimal. A subsequent recomputation might be able to determine a more optimal path. If reoptimization is enabled, an LSP can be rerouted through different paths by constrained-path recomputations. However, if reoptimization is disabled, the LSP has a fixed path and cannot take advantage of newly available network resources. The LSP is fixed until the next topology change breaks the LSP and forces a recomputation. Reoptimization is not related to failover. A new path is always computed when topology failures occur that disrupt an established path. Because of the potential system overhead involved, you need to control carefully the frequency of reoptimization. Network stability might suffer when reoptimization is enabled. By default, optimize-timer is set to 0 (that is, it is disabled).
To enable path reoptimization, include the optimize-timer statement: optimize-timer seconds ; After reoptimization is run, the result is accepted only if it meets the following criteria:
When all the above conditions are met, then:
To disable items 2, 3, 4, and 6 above, enter the clear mpls optimize- aggressive command or include the optimize-aggressive statement to make the reoptimization process more aggressive. Not only does aggressive optimization tend to reroute more often, but it also limits the reoptimization algorithm to be based on the IGP metric only. [edit protocols mpls] optimize-aggressive; Configuring the Path Bandwidth and Maximum Path LengthEach LSP has a bandwidth value. This value is included in the sender's Tspec field in RSVP path setup messages. To specify a bandwidth value, include the bandwidth statement. Specify the bandwidth value in bits per second, with a higher value configuring a greater user traffic volume. The default bandwidth is 0 bits per second. bandwidth bps ; A nonzero bandwidth requires transit routers to reserve capacity along the outbound links for the path. This is done using RSVP's reservation scheme. Any failure in bandwidth reservation (such as failures at RSVP policy control or admission control) might cause the LSP setup to fail. By default, each LSP can traverse a maximum of 255 hops, including the ingress and egress routers. To modify this value, include the hop-limit statement. The number of hops can be from 2 through 255. (A path with two hops consists of the ingress and egress routers only.) hop-limit number ; Configuring the Standby StateBy default, secondary paths are set up only as needed. To have the system maintain a secondary path in a hot-standby state indefinitely, include the standby statement: standby;
Maintaining a path in a hot-standby state enables swift cutover to the secondary path when downstream routers on the current active path indicate connectivity problems. The hot-standby state has two advantages:
When the primary path is considered to be stable again, traffic is automatically switched from the standby secondary path back to the primary path. The switch is performed no faster than twice the retry-timer interval and only if the primary path exhibits stability throughout the entire switch interval. The drawback of the hot-standby state is that more state information must be maintained by all the routers along the path, which imposes additional overhead on each of the routers. Configuring the LSP Hold TimeWhen an LSP changes from being up to being down, or from down to up, this transition takes effect immediately in the router software and hardware. However, when advertising LSPs into IS-IS, you might want to damp LSP transitions, thereby not advertising the transition until a certain period of time has transpired (known as the hold time). In this case, if the LSP goes from up to down, the LSP is not advertised as being down until it has remained down for the hold-time period. Transitions from down to up are advertised into IS-IS immediately. Note that LSP damping only affects IS-IS advertisements of the LSP; other routing software and hardware react immediately to LSP transitions. To damp LSP transitions, include the advertisement-hold-time statement. The time can be a value from 0 through 65,535 seconds. The default is 5 seconds. [edit protocols mpls] advertise-hold-time seconds; Configuring LDP TunnelingTo correctly identify an LDP session associated with an RSVP LSP, ensure that the RSVP LSP end point address is the same as the transport address of the LDP peer. Using Fate Sharing to Configure Alternate Backup PathsYou can create a database of information that CSPF uses to compute one or more backup paths to use in case the primary path becomes unstable. The database describes the relationships between elements of the network, such as routers and links. Because these network elements share the same fate, this relationship is called fate sharing. You can configure backup paths that minimize the number of shared links and fiber paths with the primary paths as much as possible to ensure that, if a fiber is cut, the minimum amount of data is lost and a path still exists to the destination. For a backup path to work optimally, it must not share links or physical fiber paths with the primary path. This ensures that a single point of failure will not affect the primary and backup paths at the same time. To configure fate sharing, include the fate-sharing statement: [edit routing-options] fate-sharing { group group-name { cost value; from address <to address >; } } Each fate-sharing group must have a name, which can be up to 32 characters long and can contain letters, digits, periods (.), and hyphens (-). You can define up to 512 groups. Fate-sharing groups contain three types of objects:
All objects in a group share certain similarities. For example, you can define a group for all fibers sharing the same fiber conduit, all optical channels that share the same fiber, all links that connect to the same LAN switch, all equipment sharing the same power source, and so on. All objects are treated as /32 host addresses. For a group to be meaningful, it should contain at least two objects. You can configure groups with zero or one object, but they are ignored during processing. An object can be in any number of groups, and a group can contain any number of objects. Each group has a configurable cost attributed to it, which represents the level of impact this group has on CSPF computations. The higher the cost, the less likely a backup path shares with the primary path any objects in the group. The cost is directly comparable to traffic engineering metrics. By default, the cost is 1. Changing the fate-sharing database does not affect existing established LSPs until the next reoptimization of CSPF. The fate-sharing database does influence fast-reroute computations. When CSPF computes the primary paths of an LSP (or secondary paths when the primary path is not active), it ignores the fate-sharing information. You always want to find the best possible path (least IGP cost) for the primary path. When CSPF computes a secondary path of an LSP while that LSP's primary path is active, the following occurs:
Enabling RSVPFor all routers that should participate in signaled LSPs, you must enable RSVP because it is used to set up LSPs. To do this, include the following statements in the configuration. In general, we recommend that you enable RSVP on all router interfaces, except for those on the AS border. [edit] interfaces { interface-name { unit logical-unit-number { family mpls; } } } protocols { mpls { interface all; } rsvp { interface all; } } Configuring MPLS over GRE Tunnels
MPLS LSPs can use GRE tunnels to cross routing areas, ASs, and ISPs. Bridging MPLS LSPs over an intervening IP domain is possible without disrupting the outlying MPLS domain. LSPs can reach any destination that the GRE tunnels can reach. MPLS applications can be deployed without requiring all transit nodes to support MPLS, or requiring all transit nodes to support the same label distribution protocols (LDP or RSVP). If you use CSPF, you must configure OSPF or IS-IS through the GRE tunnel. Traffic engineering is not supported over GRE tunnels; for example, you cannot reserve bandwidth or set priority or preemption. Configuring Static LSPsTo configure static LSPs, configure the ingress router and each router along the path up to and including the egress router. For the ingress router, configure which packets to tag (based on the packet's IP destination address), the next router in the LSP, and the tag to apply to the packet. Manually assigned labels can have values in the range 16 through 1,023. Optionally , you can apply preference and CoS values to the packets. For the intermediate routers in the path, configure the next router in the path and the tag to apply to the packet. Again, you can optionally apply preference and CoS values to the packets. For the egress router, you generally just remove the label and continue forwarding the packet to the next hop. However, if the previous router removed the label, the egress router examines the packet's IP header and forwards the packet toward its IP destination. The ingress router checks the IP address in the incoming packet's destination address field and, if it finds a match in the routing table, applies the label associated with that address to the packets. The label has forwarding information associated with it, including the address of the next-hop router and the route preference and CoS values. To configure static LSPs on the ingress router, include the static-path statement: [edit protocols mpls] static-path inet { prefix { next-hop ( address interface-name address / interface-name) push out-label ; class-of-service value ; preference preference ; } } Specify the criteria to use to analyze an incoming packet. The inet option creates an LSP that handles IPv4 packets. All static MPLS routes created using the inet option are installed in the default IPv4 routing table ( inet.0 ), and the creating protocol is identified as static . This is no different from creating static IPv4 routes at the [edit routing-options static] hierarchy level. In the prefix option, configure the IP destination address to check when analyzing incoming packets. If the address matches, the specified label, out-label , is assigned to the packet and the packet enters an LSP. Each prefix that you specify is installed as a static route in the routing table. You can specify one or more prefix statements at the [edit protocols mpls static-path] hierarchy level. In the next-hop statement, specify the IP address of the next hop to the destination as the IP address of the next hop, the interface name (for point-to-point interfaces only), or as address / interface-name to specify an IP address on an operational interface. When the next hop is on a directly attached interface, the route is installed in the routing table. You cannot configure a LAN or point-to-multipoint (NMBA) interface as a next-hop interface. Finally, specify the label properties applied to the packet in the LSP. In the push statement, specify one label itself. The label is a 20-bit integer, so it can be a number in the range 0 through 1,048,575 (2 20 1). Dynamic MPLS assigns the labels 100,000 through 1,048,575, so if your network uses both static and dynamic MPLS, Juniper Networks recommends that you use labels 16 through 1,023 and 10,000 through 99,999 only for static MPLS. (Labels 0 through 15 are reserved and require special semantics. Labels 1,024 through 9,999 are reserved for future applications.) Also specify the preference of this route and the CoS value to apply to the packet. To determine whether a static ingress route is installed, use the show route table inet.0 protocol static command. The following is a sample output. The push keyword identifies that a label is to be added in front of IP packet. 10.0.0.0/8 *[Static/5] 00:01:48 > to 11.1.1.1 via so-0/0/0, push 123 Intermediate and egress routers perform similar functionsthey modify the label that has been applied to a packet. An intermediate router can change the label. An egress router removes the label (if the packet still contains a label) and continues forwarding the packet to its destination. To configure static MPLS on intermediate and egress routers, include the interface statement. You can include any number of label-map statements in the configuration. [edit protocols mpls] interface interface-name { label-map in-label { (next-hop < address ; interface-name >) (reject discard); (pop (swap < out-label >); class-of-service value ; preference preference; type type ; } } Specify the criteria to use to analyze the labeled packet. Two criteria are used: the interface on which the packet was received (specified in the opening interface statement itself) and the packet's label (specified in the label-map statement). In the next-hop statement, configure the IP address of the next hop to the destination, specified as the IP address of the next hop, the interface name (for point-to-point interfaces only), or address / interface-name to specify an IP address on an operational interface. When the specified next hop is on a directly attached interface, this route is installed in the routing table. You cannot configure a LAN or point-to-multipoint (NBMA) interface as a next-hop interface. Configure one of the following operations to perform on the labeled packet:
Configure label properties to apply to the packet, all of which are optional:
The static routes are installed in the default MPLS routing table, mpls.0 , and the creating protocol is identified as static . To verify that a static route is properly installed, use the show route table mpls.0 protocol static command. The following is an example of the output: 123* [Static/5] 00:00:38 > to 12.2.2.2 via so-5/0/0.0, swap 456 |
EAN: 2147483647
Pages: 185