17.2 Creating SSL Servers with FreeBSD
| only for RuBoard - do not distribute or recompile |
17.2 Creating SSL Servers with FreeBSD
In this section, we demonstrate how to install and configure the Apache web server with mod_ssl on the FreeBSD operating system.
17.2.1 History
The history of the Apache web server is well documented and will only briefly be recounted here. Basically, Tim Berners-Lee wrote the original web server while on staff at CERN. Rob McCool at the National Center for Supercomputing Applications wrote a web server that implemented the same HTTP protocol; the server was called NCSA httpd. By the time that McCool left NCSA in 1994, that server had become the most popular web server on the Internet, and at that point the project stalled. A group of webmasters got together and decided to resurrect the project. They took a number of patches and improvements and created the first release of the Apache ("a patchy") web server in April 1995.
When the first Apache web server was released, it did not implement Netscape's Secure Sockets Layer encryption system. This technical restriction came about because of two legal restrictions intellectual property law and export control law. From an intellectual property perspective, the SSL protocol required the use of the RSA public key algorithm, which was protected by patent, and the RC2 or RC4 algorithms, which RSA claimed were protected by trade secret, even though the two algorithms had been reverse-engineered and posted to the Internet.
And even if an implementation of SSL was created that did not infringe upon the RSA property rights, U.S. export control law at the time would have prohibited the cryptographic source code from being exported outside the U.S.
The obvious way around these legal problems was for someone outside of the U.S. to reimplement SSL. And that's exactly what happened. In 1995 two Australian programmers, Eric Young and Tim Hudson, created an independent SSL implementation and posted it to the Internet. Called SSLeay, the Young/Hudson program was reasonably complete, quite primitive, and somewhat buggy. But SSLeay was distributed in source-code form and with a license that allowed it to be incorporated into any other program, provided that credit was given to Young and Hudson.
In 1999, RSA Data Security hired Young and Hudson to set up an RSA Australian subsidiary. This move was largely designed to get around U.S. export controls of the time. Because the SSLeay code had been developed and was maintained outside the U.S., RSA was free to sell the product anywhere in the world it wished (with the exception of several "outlaw" countries to which export was blocked by Australia). RSA began selling the product as RSA BSafe SSL-C and continued development on its own.
Meanwhile, as Young and Hudson began concentrating on commercial software, a new group of programmers from around the world started working on refining the SSLeay program. The software was renamed OpenSSL. Work on OpenSSL has continued more or less continuously ever since.
Initially, there was a large set of patches that needed to be applied to the Apache source code to make it handle SSL connections. The Apache-SSL project integrated Apache with SSLeay, creating an easy to install system. Apache-SSL was commercialized under the trademark Stronghold by Community Connexion, a.k.a. C2Net, an Internet service provider turned software developer that was eventually purchased by RedHat Software. Meanwhile, in April 1998 Ralf S. Engelschall created an SSL Apache module called mod_ssl.
The differences among all of these various Apache and SSL combinations are rather subtle. The Apache-SSL project says that it emphasizes reliability, performance, and security while dismissively stating that the mod_ssl project emphasizes features. On the other hand, mod_ssl integrates more cleanly with the Apache code base and is somewhat easier to administer. Although many people think that this sort of competition between various open source projects is a needless and wasteful duplication of effort, the competition driven by this "capitalism of ideas" does seem to be more efficient at motivating individuals.
17.2.2 Obtaining the Programs
You can download each of the open source SSL programs from their respective web sites, as shown in Table 17-2. If you are not up to building your own web server, you can download RPM archives or packages for your particular operating system.
| Program | Purpose | Location |
|---|---|---|
| Apache | Base web server | www.apache.org |
| OpenSSL | SSL implementation | www.openssl.org |
| Apache-SSL | Original integration of Apache and SSLeay | www.apache-ssl.org |
| mod_ssl | Builds SSL system directly into Apache | www.modssl.org |
17.2.3 Installing Apache and mod_ssl on FreeBSD
FreeBSD Version 4.3 has two different Apache and SSL combinations in the ports directory: /usr/ports/www/apache13-modssl for mod_ssl, and /usr/ports/www/apache13-ssl for Apache-SSL. These systems rely on the copy of OpenSSL that is preinstalled with FreeBSD 4.3, which makes installation considerably easier than with previous releases of FreeBSD or other free Unix operating systems.
To install a basic HTTP server with SSL, you can simply cd into one of these directories and type make install. The FreeBSD ports system will search the source code on a variety of FTP servers, download the code, apply any FreeBSD-specific patches, compile it, and install it.
Before you use the ports system, you should use the cvsup command to make sure that you have a current copy of the /usr/ports directory some ports change almost weekly. Also, most security problems are addressed in the ports collections soon after they are reported. Once you have verified that your ports collection is up-to-date, simply cd and type make:[1]
[1] Note that it is necessary to type make install as root. This is because various packages in the /usr/ports directory require other packages to be compiled and installed before you can use them. Using the ports system means that you need to implicitly trust the FreeBSD project for the code that you run on your computer. Of course, by running FreeBSD, you are implicitly trusting the project, so the additional risk of using the ports system is probably negligible.
unix# cd /usr/ports/www/apache13-modssl unix# make >> apache_1.3.20.tar.gz doesn't seem to exist in /usr/ports/distfiles/. >> Attempting to fetch from http://www.apache.org/dist/httpd/. Receiving apache_1.3.20.tar.gz (1973138 bytes): 100% 1973138 bytes transferred in 15.0 seconds (128.87 kBps) >> mod_ssl-2.8.4-1.3.20.tar.gz doesn't seem to exist in /usr/ports/distfiles/. >> Attempting to fetch from http://www.apache.org/dist/httpd/. fetch: mod_ssl-2.8.4-1.3.20.tar.gz: Not Found >> Attempting to fetch from http://www.modssl.org/source/. Receiving mod_ssl-2.8.4-1.3.20.tar.gz (751936 bytes): 0% ...
And so it goes for another hour or so. From a "full" installation of FreeBSD 4.3, the install of apache13-modssl performs the following steps:[2]
[2] The version numbers included in this list are for demonstration purposes only. As time goes on, these version numbers will certainly change.
-
Downloads Apache 1.3.20.
-
Downloads mod_ssl-2.8.4.
-
Downloads, compiles, and installs mm-1.1.3 (shared memory library).
-
Compiles and installs mod_ssl.
-
Compiles and installs Apache.
When all of the downloads and compiles are finished, you will see the following:
<=== src/support +---------------------------------------------------------------------+ | Before you install the package you now should prepare the SSL | | certificate system by running the 'make certificate' command. | | For different situations the following variants are provided: | | | | % make certificate TYPE=dummy (dummy self-signed Snake Oil cert) | | % make certificate TYPE=test (test cert signed by Snake Oil CA) | | % make certificate TYPE=custom (custom cert signed by own CA) | | % make certificate TYPE=existing (existing cert) | | CRT=/path/to/your.crt [KEY=/path/to/your.key] | | | | Use TYPE=dummy when you're a vendor package maintainer, | | the TYPE=test when you're an admin but want to do tests only, | | the TYPE=custom when you're an admin willing to run a real server | | and TYPE=existing when you're an admin who upgrades a server. | | (The default is TYPE=test) | | | | Additionally add ALGO=RSA (default) or ALGO=DSA to select | | the signature algorithm used for the generated certificate. | | | | Use 'make certificate VIEW=1' to display the generated data. | | | | Thanks for using Apache & mod_ssl. Ralf S. Engelschall | | rse@engelschall.com | | www.engelschall.com | +---------------------------------------------------------------------+ <=== src ===> Creating Dummy Certificate for Server (SnakeOil) [use 'make certificate' to create a real one] unix#
Despite the instructions, you can go ahead and type make install. This will install a cryptographically enabled web server with the "Snake Oil" self-signed certificate:
unix# make install ===> Installing for apache+mod_ssl-1.3.20+2.8.4 ===> apache+mod_ssl-1.3.20+2.8.4 depends on shared library: mm.11 - found ===> [mktree: Creating Apache installation tree] ./src/helpers/mkdir.sh /usr/local/bin ./src/helpers/mkdir.sh /usr/local/sbin ./src/helpers/mkdir.sh /usr/local/libexec/apache ... <=== [config] ===> Generating temporary packing list Installing /usr/local/etc/rc.d/apache.sh startup file. ===> Compressing manual pages for apache+mod_ssl-1.3.20+2.8.4 ===> Registering installation for apache+mod_ssl-1.3.20+2.8.4 ===> SECURITY NOTE: This port has installed the following startup scripts which may cause network services to be started at boot time. /usr/local/etc/rc.d/apache.sh If there are vulnerabilities in these programs there may be a security risk to the system. FreeBSD makes no guarantee about the security of ports included in the Ports Collection. Please type 'make deinstall' to deinstall the port if this is a concern. unix#
The default configuration built from the /usr/ports uses the pathnames and directories described in Table 17-3. Although use of these pathnames cleanly integrates the Apache web server with the rest of the FreeBSD system, it does have the disadvantage of scattering the installation all over the operating system. You may wish to modify the installation so that all executables, log files, and configuration information are stored beneath /usr/local/apache.
| Path | Purpose |
|---|---|
| /usr/local/sbin/apachectl | Apache control program; used for starting and stopping server |
| /usr/local/sbin/httpd | Apache executable program |
| /usr/local/etc/apache/ | Apache configuration files, including access.conf, httpd.conf, magic, mime.types, and srm.conf |
| /usr/local/etc/apache/ssl.crl | mod_ssl certificate revocation list directory |
| /usr/local/etc/apache/ssl.crt | mod_ssl certificate directory |
| /usr/local/etc/apache/ssl.csr | mod_ssl certificate signing request directory |
| /usr/local/etc/apache/ssl.key | mod_ssl private key directory |
| /usr/local/etc/apache/ssl.prm | mod_ssl DSA parameter files |
| /usr/local/www/data | The actual web pages |
| /var/log/httpd-access.log | Apache access log file |
| /var/log/httpd-error.log | Apache error log file |
17.2.4 Verifying the Initial Installation
Your cryptographically enabled server is now installed, a public/secret key pair has been created, and your server has been equipped with a "Snake Oil" test certificate. Now what?
The test certificate will allow you to begin immediately using your server's cryptographic features. However, because the certificate is not signed by a recognized certification authority, when users click into your web site they should be informed by their browser that the server has not been properly authenticated.
Before you go further, check your web server to make sure that it operates both without and with encryption. Then you will need to install a proper server certificate either a self-signed certificate from your own certification authority, or a certificate signed by a well-known CA such as VeriSign.
To test the server, you can either set up a nameserver that points to your server, or you can test to the server's IP address. In this example we'll test with the IP address of our server, which happens to be 204.17.195.80.
-
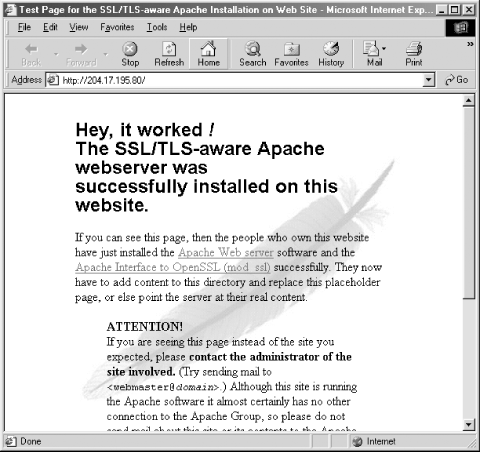
First enter the URL of the server into a web browser using http: as the protocol. In this example, we entered the URL http://204.17.195.80/ into a web browser. The resulting page is shown in Figure 17-1.
Figure 17-1. Verify that the web server you installed works to serve HTTP connections by going to the server's IP address with a web browser.
-
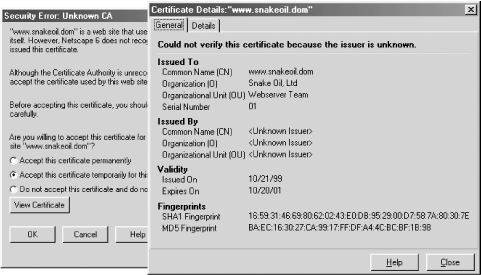
Next enter the same URL, but substitute https: for http:. Your web browser should generate a warning that the certificate is issued by an organization that you do not trust, and that the name on the certificate does not match the DNS address of the server. Internet Explorer's warning is shown in Figure 17-2, while Netscape's warning is shown in Figure 17-3.
Figure 17-2. Internet Explorer warns that the "Snake Oil" certificate is not valid. If you choose to view the certificate, you'll see it is issued by the Snake Oil CA for the domain www.snakeoil.dom.
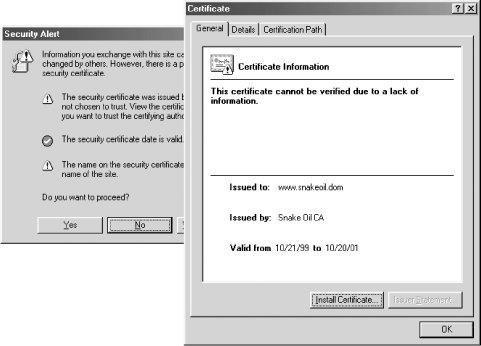
Figure 17-3. Netscape Navigator warns that the "Snake Oil" certificate is not valid. If you choose to view the certificate, you'll see it is issued by the Snake Oil CA for the domain www.snakeoil.dom.
To complete the installation of your server, you need to either set up your own certification authority and create a proper server certificate for your own domain, or obtain (that is, purchase) a certificate from another CA.
17.2.5 Signing Your Keys with Your Own Certification Authority
In this section, we will use OpenSSL to perform the following steps:
-
Create a public/private key pair for the fictitious Nitroba certification authority.
-
Create an X.509 signing request for the CA.
-
Have the CA sign its own key.
-
Create a public/private key pair for our server, unix.vineyard.net.
-
Create a signing request from unix.vineyard.net to Nitroba, asking Nitroba to sign the unix.vineyard.net key.
-
Take the key signing request we created for the unix.vineyard.net server and sign it with the unix.vineyard.net public key.
-
Encrypt the CA private key with a passphrase to prevent unauthorized use.
-
Decline to encrypt the server key with a passphrase.
This may seem complicated, but in fact it is all done automatically by the OpenSSL makecert.ca script, as shown in Example 17-1.
Example 17-1. Creating CA and server certificates using OpenSSL's makecert.ca script
unix# cd /usr/ports/www/apache13-modssl; make certificate TYPE=custom ===> Creating Test Certificate for Server SSL Certificate Generation Utility (mkcert.sh) Copyright (c) 1998-2000 Ralf S. Engelschall, All Rights Reserved. Generating custom certificate signed by own CA [CUSTOM] _____________________________________________________________________ _ STEP 0: Decide the signature algorithm used for certificates The generated X.509 certificates can contain either RSA or DSA based ingredients. Select the one you want to use. Signature Algorithm ((R)SA or (D)SA) [R]:R _____________________________________________________________________ _ STEP 1: Generating RSA private key for CA (1024 bit) [ca.key] 3660275 semi-random bytes loaded Generating RSA private key, 1024 bit long modulus .....++++++ ........................++++++ e is 65537 (0x10001) _____________________________________________________________________ _ STEP 2: Generating X.509 certificate signing request for CA [ca.csr] Using configuration from .mkcert.cfg You are about to be asked to enter information that will be incorporated into your certificate request. What you are about to enter is what is called a Distinguished Name or a DN. There are quite a few fields but you can leave some blank For some fields there will be a default value, If you enter '.', the field will be left blank. ----- 1. Country Name (2 letter code) [XY]:US 2. State or Province Name (full name) [Snake Desert]:MA 3. Locality Name (eg, city) [Snake Town]:Nitroba Village 4. Organization Name (eg, company) [Snake Oil, Ltd]:Nitroba Networks 5. Organizational Unit Name (eg, section) [Certificate Authority]: 6. Common Name (eg, CA name) [Snake Oil CA]:Nitroba CA 7. Email Address (eg, name@FQDN) [ca@snakeoil.dom]:keys@nitroba.com 8. Certificate Validity (days) [365]:3650 _____________________________________________________________________ _ STEP 3: Generating X.509 certificate for CA signed by itself [ca.crt] Certificate Version (1 or 3) [3]: Signature ok subject=/C=US/ST=MA/L=Nitroba Village/O=Nitroba Networks/OU=Certificate Authority/ CN=Nitroba CA/Email=keys@nitroba.com Getting Private key Verify: matching certificate & key modulus read RSA key Verify: matching certificate signature ../conf/ssl.crt/ca.crt: /C=US/ST=MA/L=Nitroba Village/O=Nitroba Networks/OU=Certificate Authority/CN=Nitroba CA/Email=keys@nitroba.com error 18 at 0 depth lookup:self signed certificate OK _____________________________________________________________________ _ STEP 4: Generating RSA private key for SERVER (1024 bit) [server.key] 3660275 semi-random bytes loaded Generating RSA private key, 1024 bit long modulus ........++++++ .......................++++++ e is 65537 (0x10001) _____________________________________________________________________ _ STEP 5: Generating X.509 certificate signing request for SERVER [server.csr] Using configuration from .mkcert.cfg You are about to be asked to enter information that will be incorporated into your certificate request. What you are about to enter is what is called a Distinguished Name or a DN. There are quite a few fields but you can leave some blank For some fields there will be a default value, If you enter '.', the field will be left blank. ----- 1. Country Name (2 letter code) [XY]:US 2. State or Province Name (full name) [Snake Desert]:Massachusetts 3. Locality Name (eg, city) [Snake Town]:Vineyard Haven 4. Organization Name (eg, company) [Snake Oil, Ltd]:Vineyard.NET, Inc. 5. Organizational Unit Name (eg, section) [Webserver Team]:UNIX Division 6. Common Name (eg, FQDN) [www.snakeoil.dom]:unix.vineyard.net 7. Email Address (eg, name@fqdn) [www@snakeoil.dom]:unix@vineyard.net 8. Certificate Validity (days) [365]: _____________________________________________________________________ _ STEP 6: Generating X.509 certificate signed by own CA [server.crt] Certificate Version (1 or 3) [3]: Signature ok subject=/C=US/ST=MA/L=Vineyard Haven/O=Vineyard.NET, Inc./OU=UNIX Division/CN=unix. vineyard.net/Email=unix@vineyard.net Getting CA Private Key Verify: matching certificate & key modulus read RSA key Verify: matching certificate signature ../conf/ssl.crt/server.crt: OK _____________________________________________________________________ _ STEP 7: Enrypting RSA private key of CA with a pass phrase for security [ca.key] The contents of the ca.key file (the generated private key) has to be kept secret. So we strongly recommend you to encrypt the server.key file with a Triple-DES cipher and a Pass Phrase. Encrypt the private key now? [Y/n]: y read RSA key writing RSA key Enter PEM pass phrase: Verifying password - Enter PEM pass phrase: Fine, you're using an encrypted private key. _____________________________________________________________________ _ STEP 8: Encrypting RSA private key of SERVER with a pass phrase for security [server.key] The contents of the server.key file (the generated private key) has to be kept secret. So we strongly recommend you to encrypt the server.key file with a Triple-DES cipher and a Pass Phrase. Encrypt the private key now? [Y/n]: n Warning, you're using an unencrypted RSA private key. Please notice this fact and do this on your own risk. _____________________________________________________________________ _ RESULT: CA and Server Certification Files o conf/ssl.key/ca.key The PEM-encoded RSA private key file of the CA which you can use to sign other servers or clients. KEEP THIS FILE PRIVATE! o conf/ssl.crt/ca.crt The PEM-encoded X.509 certificate file of the CA which you use to sign other servers or clients. When you sign clients with it (for SSL client authentication) you can configure this file with the 'SSLCACertificateFile' directive. o conf/ssl.key/server.key The PEM-encoded RSA private key file of the server which you configure with the 'SSLCertificateKeyFile' directive (automatically done when you install via APACI). KEEP THIS FILE PRIVATE! o conf/ssl.crt/server.crt The PEM-encoded X.509 certificate file of the server which you configure with the 'SSLCertificateFile' directive (automatically done when you install via APACI). o conf/ssl.csr/server.csr The PEM-encoded X.509 certificate signing request of the server file which you can send to an official Certificate Authority (CA) in order to request a real server certificate (signed by this CA instead of our own CA) which later can replace the conf/ssl.crt/server.crt file. Congratulations that you establish your server with real certificates. unix#
The certificate that is created is stored in an ASCII file encoded in the PEM certificate format. The Nitroba certificate is shown in Example 17-2.
Example 17-2. The Nitroba certificate, encoded using the PEM format
-----BEGIN CERTIFICATE----- MIIDMjCCApugAwIBAgIBATANBgkqhkiG9w0BAQQFADCBpTELMAkGA1UEBhMCVVMx CzAJBgNVBAgTAk1BMRgwFgYDVQQHEw9OaXRyb2JhIFZpbGxhZ2UxGTAXBgNVBAoT EE5pdHJvYmEgTmV0d29ya3MxHjAcBgNVBAsTFUNlcnRpZmljYXRlIEF1dGhvcml0 eTETMBEGA1UEAxMKTml0cm9iYSBDQTEfMB0GCSqGSIb3DQEJARYQa2V5c0BuaXRy b2JhLmNvbTAeFw0wMTA3MDgwMzAwMjRaFw0wMjA3MDgwMzAwMjRaMIGmMQswCQYD VQQGEwJVUzELMAkGA1UECBMCTUExFzAVBgNVBAcTDlZpbmV5YXJkIEhhdmVuMRsw GQYDVQQKExJWaW5leWFyZC5ORVQsIEluYy4xFjAUBgNVBAsTDVVOSVggRGl2aXNp b24xGjAYBgNVBAMTEXVuaXgudmluZXlhcmQubmV0MSAwHgYJKoZIhvcNAQkBFhF1 bml4QHZpbmV5YXJkLm5ldDCBnzANBgkqhkiG9w0BAQEFAAOBjQAwgYkCgYEAp27A cMnfnLhITAY4RZAmEoyl1gt0Dwj9Rj7cX3QniAs66fI+UtKEeAfOTPYgxUEk/NbY JmxLyaMdJDoHoc4Zc0y4cFIXVbZUyYAoadPgCjJwOR8vE3sUlmzQO5ZLWZGWUUhW 1kpZPKusuAlEBjlzpsDscX/isdKxpvG0A23tpkECAwEAAaNvMG0wHAYDVR0RBBUw E4ERdW5peEB2aW5leWFyZC5uZXQwOgYJYIZIAYb4QgENBC0WK21vZF9zc2wgZ2Vu ZXJhdGVkIGN1c3RvbSBzZXJ2ZXIgY2VydGlmaWNhdGUwEQYJYIZIAYb4QgEBBAQD AgZAMA0GCSqGSIb3DQEBBAUAA4GBABatsM3U/LjtKlq4yrfFS9A0upQfS4AA6cgl UMrxonYY41/gyUS6V20AWZZiUYyH3ym/vr7buWD2EOjTKsNYd1unCz3v0zsjhSfb Z6Xg3qOPqlX/2SOvoemcV2iqc2fQ9wHdYAJIzWgV9dTIRsPoa1OIKaA/iivQBZq7 j+mehS9M -----END CERTIFICATE-----
To use these certificates we must follow these steps:
-
View the web server's configuration file and determine the location where mod_ssl expects to find the web server's certificate and private key.
-
Install the certificate and the private key for the Unix server in the directory where they are expected by the web server.
-
Put a copy of the Nitroba CA key where it can be loaded into our web browser.
-
Load the Nitroba key into the web browser.
-
Verify that the web page is accessible without generating an error message.
OpenSSL Command LineIf you don't want to use the mkcert.sh command, run OpenSSL from the command line. First, use the openssl program to create an RSA key. Then use it to create a certificate signing request (CSR). Finally, either sign the request yourself, or provide the CSR to a third-party CA to sign for you. To use OpenSSL to create a server key, with /dev/random as a source of random numbers, use: # openssl genrsa -out server.key -rand /dev/random 1024 To do this you 0 semi-random bytes loaded Generating RSA private key, 1024 bit long modulus .........++++++++++++ .........................................++++++++++++ e is 65537 (0x10001) # To create a signing request you will need an OpenSSL configuration file that tells OpenSSL which variables need to be filled in for the CSR. The command line is: unix# openssl req -config openssl.cnf -new -key server.key -out server.csr Using configuration from openssl.cnf You are about to be asked to enter information that will be incorporated into your certificate request. What you are about to enter is what is called a Distinguished Name or a DN. There are quite a few fields but you can leave some blank For some fields there will be a default value, If you enter '.', the field will be left blank. ----- Country Name (2 letter code) [AU]:US State or Province Name (full name) [Some-State]:Massachusetts Locality Name (eg, city) []:Belmont Organization Name (eg, company) [Internet Widgits Pty Ltd]:Unix Wizards Organizational Unit Name (eg, section) []: Common Name (eg, YOUR name) []:unix.vineyard.net Email Address []:unix@vineyard.net Please enter the following 'extra' attributes to be sent with your certificate request A challenge password []:my password An optional company name []: unix# You can use the OpenSSL ciphers command to decode this string: unix# cat server.csr -----BEGIN CERTIFICATE REQUEST----- MIIB6TCCAVICAQAwgYwxCzAJBgNVBAYTAlVTMRYwFAYDVQQIEw1NYXNzYWNodXNl dHRzMRAwDgYDVQQHEwdCZWxtb250MRUwEwYDVQQKEwxVbml4IFdpemFyZHMxGjAY BgNVBAMTEXVuaXgudmluZXlhcmQubmV0MSAwHgYJKoZIhvcNAQkBFhF1bml4QHZp bmV5YXJkLm5ldDCBnzANBgkqhkiG9w0BAQEFAAOBjQAwgYkCgYEA4ap7x1pyG3qc b4BD+AsEdJPLu+lVNgrjLCHPL1FcVIHoi/7Dkm+nP1o+Sm/w56g6ZZUo2fwBj+/f LtofkoYq19yA1ja+dSntk65qcyFJRmEvgp9nx28vcIFFQR59UnvoA58ZmC7JZkbs VPiiwOdOIInQmoV/mba28MRPTzjvvzMCAwEAAaAcMBoGCSqGSIb3DQEJBzENEwtt eSBwYXNzd29yZDANBgkqhkiG9w0BAQQFAAOBgQAeZNpyY33INxsYBpupI+MmYng6 pZNYTZy1gCTOsU53jI4YldBDrI/OTLLaqaBc7Ohg8i55Ue7A6Zhb1eFa0RZu6t1v 4wb7Dk+0gtX/J6WqRYee72niO/d7QCYdaTwMkD08ktw8oUANaYjUrdZ1X6XJINpy klvIk1a2fZozPsmZDQ== -----END CERTIFICATE REQUEST----- unix# |
17.2.5.1 The Apache mod_ssl configuration file
The behavior of mod_ssl is controlled by the Apache httpd.conf configuration file. By default, this file is installed in /usr/local/etc/apache/httpd.conf. General configuration information for mod_ssl is throughout the file. The configuration of the specific keys and certificates is done on a per-host basis in the VirtualHost section, which is usually at the end.
Near the beginning of the Apache 1.3 configuration file is a list of modules that should be loaded when the server starts up. At the end of this list is the <IfDefine SSL> conditional directive, and then an AddModule directive. This will add the mod_ssl module if SSL was defined when the web server was compiled:
... AddModule mod_unique_id.c AddModule mod_so.c AddModule mod_setenvif.c <IfDefine SSL> AddModule mod_ssl.c </IfDefine>
The next reference to SSL is to the port on which this copy of Apache is configured. If SSL support is included, the web server is commanded to listen on ports 80 and 443:
# # Port: The port to which the standalone server listens. For # ports < 1023, you will need httpd to be run as root initially. # Port 80 ## ## SSL Support ## ## When we also provide SSL we have to listen to the ## standard HTTP port (see above) and to the HTTPS port ## <IfDefine SSL> Listen 80 Listen 443 </IfDefine>
The next SSL reference adds the MIME types for SSL certificates and certificate revocation lists:
## ## SSL Global Context ## ## All SSL configuration in this context applies both to ## the main server and all SSL-enabled virtual hosts. ## # # Some MIME-types for downloading Certificates and CRLs # <IfDefine SSL> AddType application/x-x509-ca-cert .crt AddType application/x-pkcs7-crl .crl </IfDefine>
The next section configures how the Apache server will ask for the SSL passphrase (if you encrypted your server key). It sets the SSLSessionCache, a shared memory file that allows SSL servers in different httpd processes to share the master secret for SSL sessions, specifies the random number generator that the SSL implementation will use, and sets where SSL-specific errors will be logged:
<IfModule mod_ssl.c> # Pass Phrase Dialog: # Configure the pass phrase gathering process. # The filtering dialog program (`builtin' is an internal # terminal dialog) has to provide the pass phrase on stdout. SSLPassPhraseDialog builtin # Inter-Process Session Cache: # Configure the SSL Session Cache: First the mechanism # to use and second the expiring timeout (in seconds). #SSLSessionCache none #SSLSessionCache shmht:/var/run/ssl_scache(512000) #SSLSessionCache shmcb:/var/run/ssl_scache(512000) SSLSessionCache dbm:/var/run/ssl_scache SSLSessionCacheTimeout 300 # Semaphore: # Configure the path to the mutual exclusion semaphore the # SSL engine uses internally for inter-process synchronization. SSLMutex file:/var/run/ssl_mutex # Pseudo Random Number Generator (PRNG): # Configure one or more sources to seed the PRNG of the # SSL library. The seed data should be of good random quality. # WARNING! On some platforms /dev/random blocks if not enough entropy # is available. This means you then cannot use the /dev/random device # because it would lead to very long connection times (as long as # it requires to make more entropy available). But usually those # platforms additionally provide a /dev/urandom device which doesn't # block. So, if available, use this one instead. Read the mod_ssl User # Manual for more details. SSLRandomSeed startup builtin SSLRandomSeed connect builtin #SSLRandomSeed startup file:/dev/random 512 #SSLRandomSeed startup file:/dev/urandom 512 #SSLRandomSeed connect file:/dev/random 512 #SSLRandomSeed connect file:/dev/urandom 512 # Logging: # The home of the dedicated SSL protocol logfile. Errors are # additionally duplicated in the general error log file. Put # this somewhere where it cannot be used for symlink attacks on # a real server (i.e., somewhere where only root can write). # Log levels are (ascending order: higher ones include lower ones): # none, error, warn, info, trace, debug. SSLLog /var/log/ssl_engine_log SSLLogLevel info </IfModule>
At the bottom of the httpd.conf file is the VirtualHost section for the SSL server.
|

The VirtualHost sets its own DocumentRoot, ServerName, ServerAdmin, ErrorLog, etc. Normally, they're the same as the unencrypted server defined at the top of the file.
<IfDefine SSL> ## ## SSL Virtual Host Context ## <VirtualHost _default_:443> # General setup for the virtual host DocumentRoot "/usr/local/www/data" ServerName unix.vineyard.net ServerAdmin unix@vineyard.net ErrorLog /var/log/httpd-error.log TransferLog /var/log/httpd-access.log
The next section configures SSL for the virtual host. If SSL is not turned on, the Apache server will speak traditional unencrypted HTTP on port 443 probably not what you want. After SSL is switched on, the set of ciphers to be used are selected:
# SSL Engine Switch: # Enable/Disable SSL for this virtual host. SSLEngine on # SSL Cipher Suite: # List the ciphers that the client is permitted to negotiate. # See the mod_ssl documentation for a complete list. SSLCipherSuite ALL:!ADH:!EXPORT56:RC4+RSA:+HIGH:+MEDIUM:+LOW:+SSLv2:+EXP:+eNULL
You can use the OpenSSL ciphers command to decode this string:
% openssl ciphers -v "ALL:\!ADH:\!EXPORT56:RC4+RSA:+HIGH:+MEDIUM:+LOW:+SSLv2:+EXP:+eNULL" DHE-DSS-RC4-SHA SSLv3 Kx=DH Au=DSS Enc=RC4(128) Mac=SHA1 EDH-RSA-DES-CBC3-SHA SSLv3 Kx=DH Au=RSA Enc=3DES(168) Mac=SHA1 EDH-DSS-DES-CBC3-SHA SSLv3 Kx=DH Au=DSS Enc=3DES(168) Mac=SHA1 DES-CBC3-SHA SSLv3 Kx=RSA Au=RSA Enc=3DES(168) Mac=SHA1 RC4-SHA SSLv3 Kx=RSA Au=RSA Enc=RC4(128) Mac=SHA1 RC4-MD5 SSLv3 Kx=RSA Au=RSA Enc=RC4(128) Mac=MD5 EDH-RSA-DES-CBC-SHA SSLv3 Kx=DH Au=RSA Enc=DES(56) Mac=SHA1 EDH-DSS-DES-CBC-SHA SSLv3 Kx=DH Au=DSS Enc=DES(56) Mac=SHA1 DES-CBC-SHA SSLv3 Kx=RSA Au=RSA Enc=DES(56) Mac=SHA1 DES-CBC3-MD5 SSLv2 Kx=RSA Au=RSA Enc=3DES(168) Mac=MD5 RC2-CBC-MD5 SSLv2 Kx=RSA Au=RSA Enc=RC2(128) Mac=MD5 RC4-MD5 SSLv2 Kx=RSA Au=RSA Enc=RC4(128) Mac=MD5 RC4-64-MD5 SSLv2 Kx=RSA Au=RSA Enc=RC4(64) Mac=MD5 DES-CBC-MD5 SSLv2 Kx=RSA Au=RSA Enc=DES(56) Mac=MD5 EXP-EDH-RSA-DES-CBC-SHA SSLv3 Kx=DH(512) Au=RSA Enc=DES(40) Mac=SHA1 export EXP-EDH-DSS-DES-CBC-SHA SSLv3 Kx=DH(512) Au=DSS Enc=DES(40) Mac=SHA1 export EXP-DES-CBC-SHA SSLv3 Kx=RSA(512) Au=RSA Enc=DES(40) Mac=SHA1 export EXP-RC2-CBC-MD5 SSLv3 Kx=RSA(512) Au=RSA Enc=RC2(40) Mac=MD5 export EXP-RC4-MD5 SSLv3 Kx=RSA(512) Au=RSA Enc=RC4(40) Mac=MD5 export EXP-RC2-CBC-MD5 SSLv2 Kx=RSA(512) Au=RSA Enc=RC2(40) Mac=MD5 export EXP-RC4-MD5 SSLv2 Kx=RSA(512) Au=RSA Enc=RC4(40) Mac=MD5 export %
Now it is time to specify the path of the certificate and the keys. A DSA certificate is only required if you intend to use the DSA ciphers; you probably don't want to do that.
# Server Certificate: # Point SSLCertificateFile at a PEM encoded certificate. If # the certificate is encrypted, then you will be prompted for a # pass phrase. Note that a kill -HUP will prompt again. A test # certificate can be generated with `make certificate' under # built time. Keep in mind that if you've both a RSA and a DSA # certificate you can configure both in parallel (to also allow # the use of DSA ciphers, etc.) SSLCertificateFile /usr/local/etc/apache/ssl.crt/server.crt #SSLCertificateFile /usr/local/etc/apache/ssl.crt/server-dsa.crt # Server Private Key: # If the key is not combined with the certificate, use this # directive to point at the key file. Keep in mind that if # you've both a RSA and a DSA private key you can configure # both in parallel (to also allow the use of DSA ciphers, etc.) SSLCertificateKeyFile /usr/local/etc/apache/ssl.key/server.key #SSLCertificateKeyFile /usr/local/etc/apache/ssl.key/server-dsa.key
These options are used for client authentication using SSL; we'll discuss them in detail in Chapter 21. For now, let's leave them turned off:
# Server Certificate Chain: # Point SSLCertificateChainFile at a file containing the # concatenation of PEM encoded CA certificates which form the # certificate chain for the server certificate. Alternatively # the referenced file can be the same as SSLCertificateFile # when the CA certificates are directly appended to the server # certificate for convenience. #SSLCertificateChainFile /usr/local/etc/apache/ssl.crt/ca.crt # Certificate Authority (CA): # Set the CA certificate verification path where to find CA # certificates for client authentication or alternatively one # huge file containing all of them (file must be PEM encoded) # Note: Inside SSLCACertificatePath you need hash symlinks # to point to the certificate files. Use the provided # Makefile to update the hash symlinks after changes. #SSLCACertificatePath /usr/local/etc/apache/ssl.crt #SSLCACertificateFile /usr/local/etc/apache/ssl.crt/ca-bundle.crt # Certificate Revocation Lists (CRL): # Set the CA revocation path where to find CA CRLs for client # authentication or alternatively one huge file containing all # of them (file must be PEM encoded) # Note: Inside SSLCARevocationPath you need hash symlinks # to point to the certificate files. Use the provided # Makefile to update the hash symlinks after changes. #SSLCARevocationPath /usr/local/etc/apache/ssl.crl #SSLCARevocationFile /usr/local/etc/apache/ssl.crl/ca-bundle.crl # Client Authentication (Type): # Client certificate verification type and depth. Types are # none, optional, require and optional_no_ca. Depth is a # number which specifies how deeply to verify the certificate # issuer chain before deciding the certificate is not valid. #SSLVerifyClient require #SSLVerifyDepth 10 # Access Control: # With SSLRequire you can do per-directory access control based # on arbitrary complex boolean expressions containing server # variable checks and other lookup directives. The syntax is a # mixture between C and Perl. See the mod_ssl documentation # for more details. #<Location /> #SSLRequire ( %{SSL_CIPHER} !~ m/^(EXP|NULL)/ \ # and %{SSL_CLIENT_S_DN_O} eq "Snake Oil, Ltd." \ # and %{SSL_CLIENT_S_DN_OU} in {"Staff", "CA", "Dev"} \ # and %{TIME_WDAY} >= 1 and %{TIME_WDAY} <= 5 \ # and %{TIME_HOUR} >= 8 and %{TIME_HOUR} <= 20 ) \ # or %{REMOTE_ADDR} =~ m/^192\.76\.162\.[0-9]+$/ #</Location> This SSLOptions directive allows you to adjust the SSL implementation, as indicated by the comments. The default configuration uses the +StdEnvVars option for any URL that references a CGI, SHTML, Perl, or PHP3 script. This option causes mod_ssl to set variables allowing the script to determine whether or not SSL was used to invoke the script, which encryption algorithm was used, its strength, and other useful data. If you are using SSL client-side certificates, the certificate information will be passed in an environment variable as well:
# SSL Engine Options: # Set various options for the SSL engine. # o FakeBasicAuth: # Translate the client X.509 into a Basic Authorization. This means that # the standard Auth/DBMAuth methods can be used for access control. The # user name is the `one line' version of the client's X.509 certificate. # Note that no password is obtained from the user. Every entry in the user # file needs this password: `xxj31ZMTZzkVA'. # o ExportCertData: # This exports two additional environment variables: SSL_CLIENT_CERT and # SSL_SERVER_CERT. These contain the PEM-encoded certificates of the # server (always existing) and the client (only existing when client # authentication is used). This can be used to import the certificates # into CGI scripts. # o StdEnvVars: # This exports the standard SSL/TLS related `SSL_*' environment variables. # Per default this exportation is switched off for performance reasons, # because the extraction step is an expensive operation and is usually # useless for serving static content. So one usually enables the # exportation for CGI and SSI requests only. # o CompatEnvVars: # This exports obsolete environment variables for backward compatibility # to Apache-SSL 1.x, mod_ssl 2.0.x, Sioux 1.0 and Stronghold 2.x. Use this # to provide compatibility to existing CGI scripts. # o StrictRequire: # This denies access when "SSLRequireSSL" or "SSLRequire" applied even # under a "Satisfy any" situation, i.e., when it applies, access is denied # and no other module can change it. # o OptRenegotiate: # This enables optimized SSL connection renegotiation handling when SSL # directives are used in per-directory context. #SSLOptions +FakeBasicAuth +ExportCertData +CompatEnvVars +StrictRequire <Files ~ "\.(cgi|shtml|phtml|php3?)$"> SSLOptions +StdEnvVars </Files> <Directory "/usr/local/www/cgi-bin"> SSLOptions +StdEnvVars </Directory>
Some versions of Microsoft Internet Explorer generate errors when the SSL server uses the SSL keepalive facility. These errors result from a bug in the way that Internet Explorer handles SSL requests; they are tremendously annoying. The errors don't happen when Internet Explorer is used with Internet Information Server, since IIS has similar errors in its implementation. If you are using mod_ssl, you can instruct the module to not use keepalives if the HTTP User Agent contains the string "MSIE" that is, if it is Microsoft Internet Explorer.
# SSL Protocol Adjustments: # The safe and default but still SSL/TLS standard compliant shutdown # approach is that mod_ssl sends the close notify alert but doesn't wait for # the close notify alert from client. When you need a different shutdown # approach you can use one of the following variables: # o ssl-unclean-shutdown: # This forces an unclean shutdown when the connection is closed, i.e., no # SSL close notify alert is sent or allowed to received. This violates # the SSL/TLS standard but is needed for some brain-dead browsers. Use # this when you receive I/O errors because of the standard approach where # mod_ssl sends the close notify alert. # o ssl-accurate-shutdown: # This forces an accurate shutdown when the connection is closed, i.e., a # SSL close notify alert is sent and mod_ssl waits for the close notify # alert of the client. This is 100% SSL/TLS standard compliant, but in # practice often causes hanging connections with brain-dead browsers. Use # this only for browsers where you know that their SSL implementation # works correctly. # Notice: Most problems of broken clients are also related to the HTTP # keep-alive facility, so you usually additionally want to disable # keep-alive for those clients, too. Use variable "nokeepalive" for this. # Similarly, one has to force some clients to use HTTP/1.0 to workaround # their broken HTTP/1.1 implementation. Use variables "downgrade-1.0" and # "force-response-1.0" for this. SetEnvIf User-Agent ".*MSIE.*" \ nokeepalive ssl-unclean-shutdown \ downgrade-1.0 force-response-1.0
Finally, mod_ssl creates its own log file of the protocols and ciphers used for each HTTP request:
# Per-Server Logging: # The home of a custom SSL log file. Use this when you want a # compact non-error SSL logfile on a virtual host basis. CustomLog /var/log/ssl_request_log \ "%t %h %{SSL_PROTOCOL}x %{SSL_CIPHER}x \"%r\" %b" </VirtualHost> </IfDefine> 17.2.5.2 Installing the key and certificate on the web server
Having read this log file, we now know where the files we created should be located:[3]
[3] If you followed the installation script's instructions and typed make certificate before you typed make install, then you do not need to manually move the keys and certificates into their final locations, because this has already been done for you.
- /usr/ports/www/apache13-modssl/work/apache_1.3.20/conf/ssl.key/server.key
-
This is your SSL server private key. It should be installed at /usr/local/etc/apache/ssl.key/server.key.
- /usr/ports/www/apache13-modssl/work/apache_1.3.20/conf/ssl.crt/server.crt
-
This is your SSL server certificate, signed by the Nitroba certification authority. It should be installed at /usr/local/etc/apache/ssl.crt/server.crt.
- /usr/ports/www/apache13-modssl/work/apache_1.3.20/conf/ssl.crt/ca.crt
-
This is the certificate for the Nitroba certification authority that we created previously. It is not installed into the Apache hierarchy, because the web server does not need it. Instead, it should be placed somewhere underneath the DocumentRoot so that the server key can be downloaded to web browsers. We are going to install this file in /usr/local/www/data/nitroba.crt.
After the files are updated, it is necessary to stop httpd and restart it:
unix# cd /usr/ports/www/apache13-modssl/work/apache_1.3.20/conf unix# cp ssl.key/server.key /usr/local/etc/apache/ssl.key/server.key unix# cp ssl.crt/server.crt /usr/local/etc/apache/ssl.crt/server.crt unix# cp ssl.crt/ca.crt /usr/local/www/data/nitroba.crt. unix# cp ssl.crt/ca.crt /usr/local/www/data/nitroba.crt unix# unix# apachectl stop /usr/local/sbin/apachectl stop: httpd stopped unix# apachectl startssl /usr/local/sbin/apachectl startssl: httpd started unix#
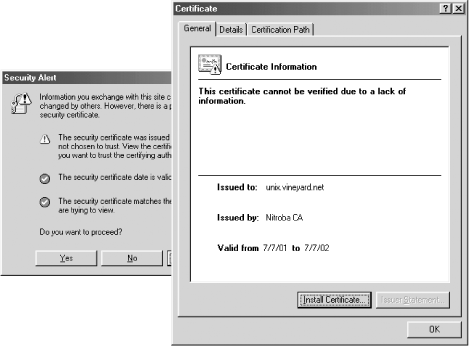
If we now go to https://unix.vineyard.net/, we get a different alert, as shown in Figure 17-4. This time we are told the certificate is valid but not trusted. If you click the "Install Certificate" button at this point you will bring up the Internet Explorer Certificate Installation Wizard. However, even if you install the unix.vineyard.net certificate, the certificate will not be trusted. This is because the you need to install the Nitroba CA certificate.
Figure 17-4. We get a different security alert after the unix.vineyard.net certificate is loaded onto the mod_ssl apache web server. If you click on the Certification Path tab, you'll be told "The issuer of this certificate was not able to be found," because no certificate for the Nitroba CA is on file.
17.2.5.3 Installing the Nitroba CA certificate into Internet Explorer
For Internet Explorer to use the unix.vineyard.net server certificate, it is necessary to add the Nitroba CA certificate to Internet Explorer's Trusted CA Certificate Store. This is easy to do! Recall that the Nitroba CA certificate was placed in the Apache DocumentRoot directory with the name nitroba.crt. To install the certificate, we simply follow these steps:
-
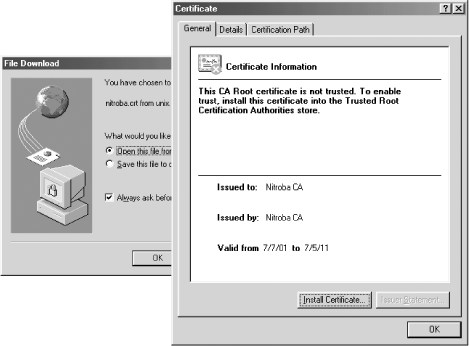
Visit http://unix.vineyard.net/nitroba.crt. This will cause Internet Explorer to download the certificate file. Tell IE that you wish to "Open" the certificate, rather than save it. Opening the certificate causes Internet Explorer to display the Certificate Information. (See Figure 17-5.)
Figure 17-5. When you visit http://unix.vineyard.net/nitroba.crt, the Nitroba CA certificate is downloaded. Internet Explorer allows you to open the certificate or save it. If you open the certificate, IE will display the Certificate Information and allow you to install the certificate.
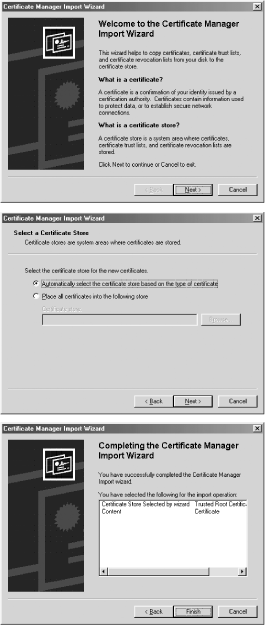
-
Click the Install button on the Certificate Information window. This will bring up the Certificate Manager Import Wizard. Tell the Wizard to import the certificate automatically into the correct store based on the certificate type. (See Figure 17-6.)
Figure 17-6. The Certificate Manager Import Wizard allows you to import a certificate into the certificate store of your choice. For most uses, just take the default choices.
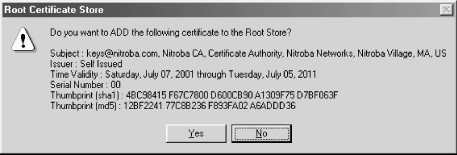
-
Finally, Internet Explorer displays the relevant fields of the certificate and asks if you really want to import it. Click Yes. (See Figure 17-7.)
Figure 17-7. After the Certificate Manager Import Wizard runs, Internet Explorer displays the information about the certificate and allows you to import it or not.
Once the certificate is imported, we can now visit https://unix.vineyard.net/ without getting any errors at all! From within Internet Explorer, select File ![]() Properties to display the properties of the HTML page, then select Certificates to learn about the certificate that was used to encrypt the page's SSL connection. The Certificate Path page indicates that the certificate unix.vineyard.net was signed by the Nitroba CA. The General page says that the Nitroba CA certificate has been approved for many uses, including:
Properties to display the properties of the HTML page, then select Certificates to learn about the certificate that was used to encrypt the page's SSL connection. The Certificate Path page indicates that the certificate unix.vineyard.net was signed by the Nitroba CA. The General page says that the Nitroba CA certificate has been approved for many uses, including:
-
Windows System Component Verification
-
Windows Hardware Driver Verification
-
Allowing data on disk to be encrypted
-
Allowing secured communication on the Internet
-
Allowing you to digitally sign a Certificate Trust List
-
Allowing data to be signed with the current time
-
Ensuring that email came from the sender
-
Protecting email from tampering
-
Ensuring that the content of email cannot be viewed by others
-
Protecting software from tampering after publication
-
Ensuring that software came from a software publisher
-
Guaranteeing your identity to a remote computer
-
Guaranteeing the identity of a remote computer
17.2.5.4 Installing the Nitroba CA certificate into Netscape Navigator
Installing new CA certificates is somewhat easier using Netscape. When you browse to a web site that is signed with an unknown CA, both Netscape 4 and Netscape 6 allow you to reject the certificate, accept it for the current session, or accept it permanently (see Figure 17-3). This is somewhat simpler than Internet Explorer's approach of requiring you to download the CA key before the web site itself will be used.
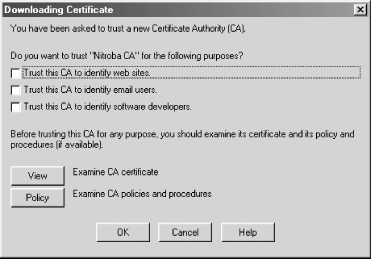
The procedure for adding a CA certificate to Netscape is analogous to adding the certificate to Internet Explorer: simply visit a URL which causes the CA key to be downloaded. This brings up Navigator's Downloading Certificate window (see Figure 17-8).
Figure 17-8. When you download a CA key with Netscape Navigator, you can choose what uses should be allowed to the CA key.
Netscape's interface also allows you to view the CA's certificate policy statement, if the location of a statement has been identified in the CA's certificate. No such policy was created for the Nitroba certificate another reason that you should not trust it!
17.2.6 Securing Other Services
You can use OpenSSL to secure other services besides HTTP. Many sites, for instance, will want to use OpenSSL to secure POP, IMAP, and SMTP, as all of these services potentially send usernames and passwords over the Internet without encryption. Using SSL causes these services to be encrypted, dramatically reducing the chances of having passwords compromised.
SSL encryption can be added to any standard Unix daemon using sslwrap . The sslwrap program is started by /etc/inetd according to a specification in the /etc/inetd.conf file. The program's command-line options include the certificate that it should use and the address of the private key.
Here is a sample of a section from the /etc/inetd.conf file on the Unix server that was created in the previous examples. It provides for POP, IMAP, and SMTP encryption using the pop3s, imaps, and smtps service names:
pop3s stream tcp nowait root /usr/local/bin/sslwrap sslwrap -cert /usr/local/etc/apache/conf/ssl.crt/server.crt -key /usr/local/etc/apache/conf/ssl.key/server.key -port pop3 imaps stream tcp nowait root /usr/local/bin/sslwrap sslwrap -cert /usr/local/etc/apache/conf/ssl.crt/server.crt -key /usr/local/etc/apache/conf/ssl.key/server.key -port imap smtps stream tcp nowait root /usr/local/bin/sslwrap sslwrap -cert /usr/local/etc/apache/conf/ssl.crt/server.crt -key /usr/local/etc/apache/conf/ssl.key/server.key -port smtp
The sslwrap program is not installed by default, but can be installed from /usr/ports/security/sslwrap on FreeBSD systems.
| only for RuBoard - do not distribute or recompile |
EAN: 2147483647
Pages: 194