Snapshot Replication
3 4
This section provides you with detailed information about the snapshot replication method. First you'll learn when you should use snapshot replication. Then you'll learn how to configure this replication type.
Uses of Snapshot Replication
Snapshot replication is highly useful in certain situations where static data is sufficient. As you have learned, with snapshot replication, a snapshot of data is taken and copied to subscribers. This data is not updated until the next snapshot is applied. If you use snapshot replication, you should not modify the data on the subscriber because it will be overwritten when the next snapshot is applied.
The types of applications that can benefit from snapshot replication include the following:
- Price lists that are distributed to remote store locations Typically, updating prices once per night is quite sufficient.
- Lookup tables that do not require frequent updates Lookup tables typically have fairly static data.
Other applications can benefit from snapshot replication as well. However, when updates to data need to be replicated frequently, transactional or merge replication is more useful.
Configuring Snapshot Replication
As mentioned, before you configure any type of replication, you must set up publishing and distribution, which you learned how to do earlier in this chapter. To set up snapshot replication, you first configure a publication, and then you configure subscribers.
Configuring Publications
Configuring a publication enables you to specify what data is replicated, how it is replicated, and when the replication occurs. To configure a publication, follow these steps:
- In Enterprise Manager, click the Tools menu. Next either point to Replication and then choose Create And Manage Publications, or choose Wizards, expand the Replication folder in the Select Wizard dialog box that appears, and choose Create Publication Wizard. Performing either procedure will display the Create And Manage Publications dialog box, shown in Figure 26-13. This dialog box allows you to select a database or table containing the data you want to publish.
Figure 26-13. The Create And Manage Publications dialog box.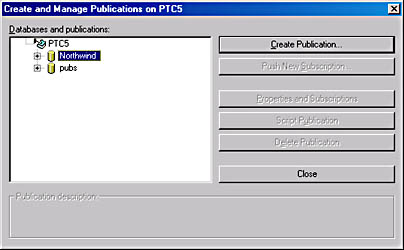
If publications already exist, the following buttons will be available in addition to the Create Publication button:
- Push New Subscription Enables you to create a new push subscription for an already existing publication. This process is described in the section "Configuring Subscriptions" later in this chapter.
- Properties And Subscriptions Enables you to modify both publication and subscription properties.
- Script Publication Enables you to create a script that can be used to create more publications.
- Delete Publication Enables you to delete an already configured publication.
- Select the database you want to use for the publication (in Figure 26-13, Northwind is selected), and then click Create Publication to invoke the Create Publication Wizard. The Create Publication Wizard welcome screen appears, as shown in Figure 26-14.
Figure 26-14. The Create Publication Wizard welcome screen.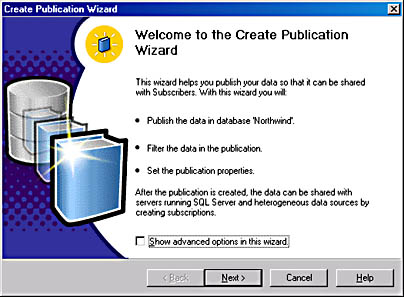
- Note the check box, Show Advanced Options In This Wizard, at the bottom of this screen. For this example, we will not select this check box. If we were to select it, an option to create immediate updating and queued updating subscriptions would be offered in the wizard. This advanced option allows subscribers to update the publication as well as the publisher. In addition, an option to allow data transformation of subscriptions would be presented.
Click Next to display the Choose Publication Database screen, as shown in Figure 26-15. This screen allows you to (again) select the database containing the data that you want to publish. The database you chose in step 2 will be selected.
Figure 26-15. The Choose Publication Database screen.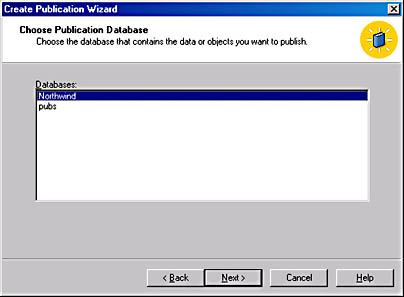
- Click Next to display the Select Publication Type screen, as shown in Figure 26-16.
Figure 26-16. The Select Publication Type screen.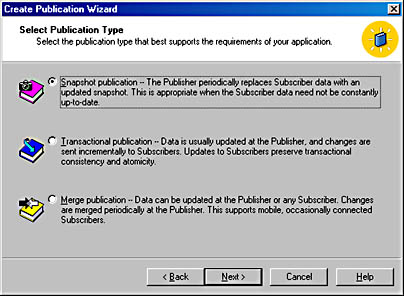
This screen allows you to select one of the three replication types. The options on the Select Publication Type screen are described here:
- Snapshot Publication Creates a snapshot publication that periodically copies a snapshot of the article to the subscriber. A snapshot publication can be created from any table.
- Transactional Publication Creates a transactional replication publication that updates the subscriber with changes made to the publisher, based on transactions. Articles can be created only from tables with a primary key.
- Merge Publication Creates a merge replication publication that allows two-way replication between the publisher and subscriber. Articles can be created from any tables.
- Click Snapshot Publication, and click Next to display the Specify Subscriber Types screen, shown in Figure 26-17. This screen lets you specify whether all of the subscribers will be running SQL Server. Figure 26-17 shows the default setting selected, which specifies that all subscribers are running SQL Server 2000. If you accept this setting, you are configuring replication to use native SQL Server 2000 data types. If you have SQL Server 7 systems in the configuration, select the second check box. If you have non-SQL Server systems in the configuration, you should select the third check box, which causes replication data to be converted to character format. This conversion of complex native data types causes additional overhead.
Figure 26-17. The Specify Subscriber Types screen.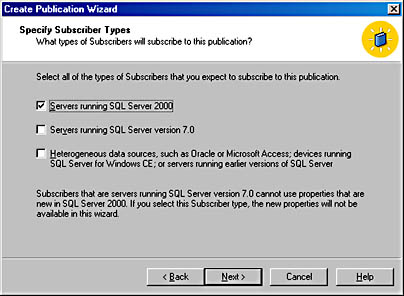
- Click Next to display the Specify Articles screen, shown in Figure 26-18. In this screen, you can specify the tables and other objects that will be replicated as articles. These articles will make up the publication that you are creating. In the left-hand list on this screen, you can select one or more check boxes in the Show column to display a list of objects, which can include tables, stored procedures, and views, in the right-hand list. Then, by selecting check boxes in the right-hand list, you can individually specify any number of tables, stored procedures, and views to publish. Or you can simply select one or more check boxes in the Publish column of the left-hand list to select all items of one or more object types in the current database for publication. Remember, each table, stored procedure, or view is considered an article, and a publication is a set of articles that are logically grouped together.
Figure 26-18. The Specify Articles screen.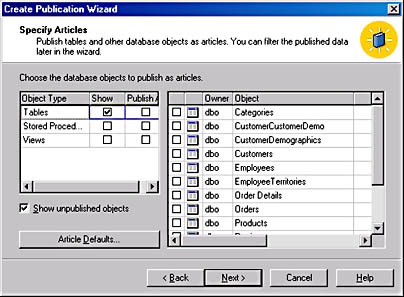
Notice also the Article Defaults button on this screen. This button allows you to set the defaults for the various articles in your system. When you click this button, you will be asked to select the article type. Click Table Articles and then click OK. The Default Table Article Properties window is invoked, as shown in Figure 26-19. The General tab allows you to specify options such as the following:
- The article name
- The article description
- The name of the article's destination table
- The owner of the article's destination table
The Snapshot tab, which is shown in Figure 26-20, enables you to do the following:
- Truncate any existing data and specify how indexes are handled
- Specify whether clustered and nonclustered indexes are copied
- Specify whether user-defined data types are converted to base data types
- Specify whether constraints are replicated
Specify the setting you want and click OK.
Figure 26-19. The General tab of the Default Table Article Properties window.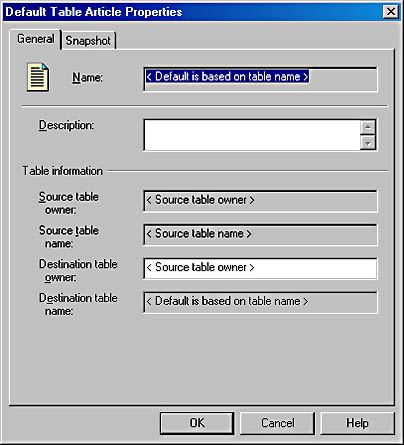
Figure 26-20. The Snapshot tab of the Default Table Article Properties window.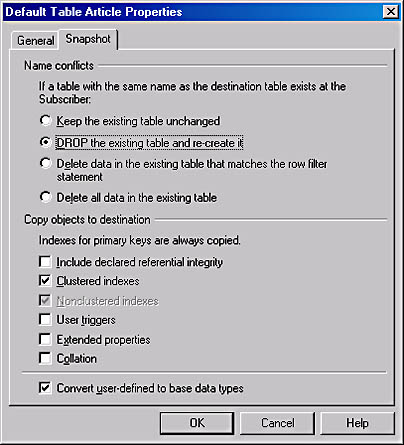
- Make your selections in the Specify Articles screen, and then click Next. An analysis of the publication is made. If you are publishing the Northwind database, as in this example, the screen shown in Figure 26-21 is displayed, informing you that you are attempting to replicate an identity column and that the IDENTITY property on the published column will not be transferred to the column on the subscriber's table.
Figure 26-21. The screen displayed when you try to replicate an identity column.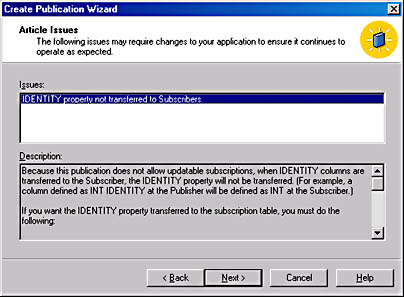
- After the publication analysis is completed (and after you click OK to return to the wizard if the informational message box appears), the Select Publication Name And Description screen appears, as shown in Figure 26-22. In this screen, you specify simply a publication name and a description. You can also choose to list this publication in Active Directory services.
- Click Next to display the Customize The Properties Of The Publication screen, shown in Figure 26-23. In this screen, you specify whether you will define data filters (by clicking Yes) or use default configuration options (by clicking No). Clicking No and then clicking Next takes you to the Completing The Create Publication Wizard screen, shown in Figure 26-31 (near the end of this section). In this example, we'll click Yes so we can view the remaining screens and set additional options.
Figure 26-22. The Select Publication Name And Description screen.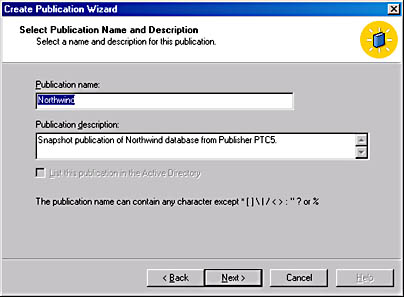
Figure 26-23. The Customize The Properties Of The Publication screen.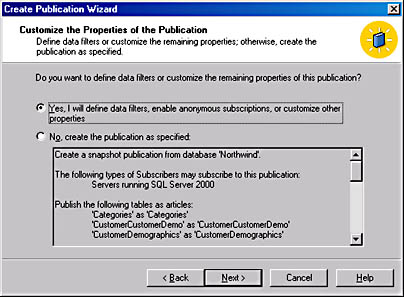
- Click Next to display the Filter Data screen, shown in Figure 26-24. In this screen, you specify whether you want to filter the data vertically (filter columns) or horizontally (filter rows) or both. In this example, we will select both vertical filtering and horizontal filtering.
NOTE
Filtering serves the same function whether you are using snapshot or transactional replication. However, the manner in which filtering works depends on the type of replication you use. In the next chapter, more information about the effects of filtering on transactional replication is provided. With snapshot replication, the WHERE clause used to create the snapshot performs the filtering. (Step 13 in this section describes how you specify this WHERE clause.)
Figure 26-24. The Filter Data screen.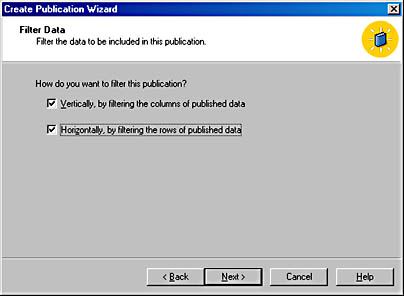
- Click Next to display the Filter Table Columns screen, shown in Figure 26-25. This screen allows you to exclude columns from replication. First select the table from the Tables In Publication list, and then, in the Columns In Selected Table list, clear the check boxes beside the columns that you don't want to be replicated. This allows you to vertically filter the article, which will create the replicated table with fewer columns than the table on the publisher has.
NOTE
Primary key columns cannot be filtered out. You will learn why in the next chapter.
Figure 26-25. The Filter Table Columns screen.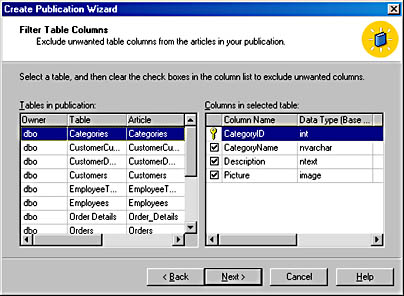
- Click Next to display the Filter Table Rows screen, shown in Figure 26-26. This screen allows you to select tables in which you want to filter the data by rows. Select a table, and click the Build […] button to set up the filter.
Figure 26-26. The Filter Table Rows screen.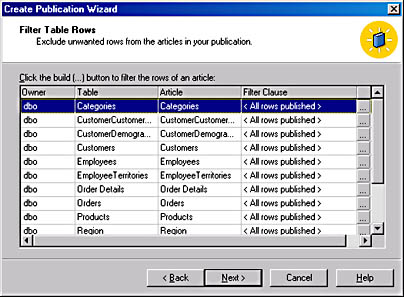
- The Specify Filter dialog box appears, as shown in Figure 26-27. This dialog box allows you to add a WHERE clause to an SQL statement that will filter the row data. When you are finished specifying which rows will be replicated, click OK to return to the wizard.
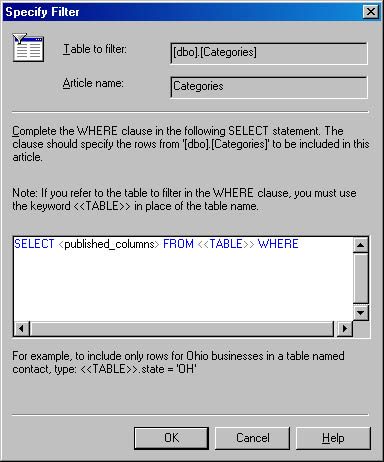
Figure 26-27. The Specify Filter dialog box.
- Click Next to display the Allow Anonymous Subscriptions screen, shown in Figure 26-28. This screen allows you to specify whether anonymous subscribers or only known subscribers can access the replication data. Your choice should be based on your configuration needs.
Figure 26-28. The Allow Anonymous Subscriptions screen.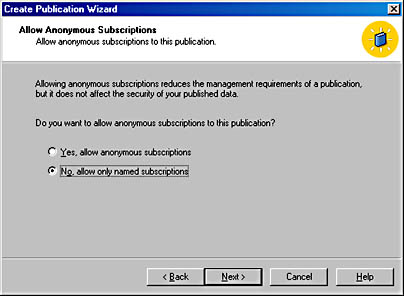
- Click Next to display the Set Snapshot Agent Schedule screen, shown in Figure 26-29. This screen lets you either accept the default schedule for when the Snapshot Agent runs or invoke a dialog box in which you can set a new schedule.
Figure 26-29. The Set Snapshot Agent Schedule screen.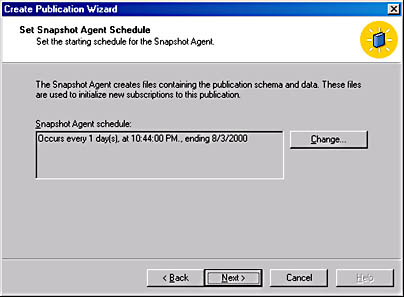
- Click Change to display the Edit Recurring Job Schedule dialog box, shown in Figure 26-30. This dialog box lets you specify when the snapshot job occurs. Choose the schedule that best fits your needs. The schedule shown in Figure 26-30 expires the same day that it begins. If you are configuring snapshot replication, as we are doing here, you should specify the snapshot job to run on a recurring schedule if you want the snapshot to be updated periodically. When configuring transactional replication, you must run the snapshot after you create a new subscription, unless the subscription is anonymous. Merge replication always applies the most recent snapshot to your subscriber. Therefore, when configuring merge replication, you can run the snapshot either just before or just after you create a new subscription. When you are finished setting the schedule, click OK.
Figure 26-30. The Edit Recurring Job Schedule dialog box.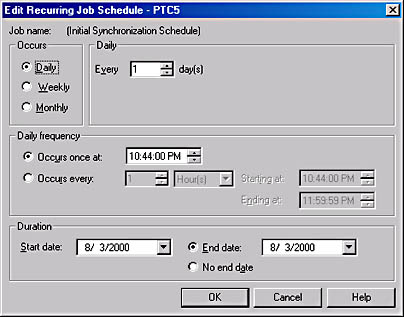
- Click Next to display the Completing The Create Publication Wizard screen, shown in Figure 26-31. Here you are presented with a summary of the publication that you have specified.
Figure 26-31. The Completing The Create Publication Wizard screen.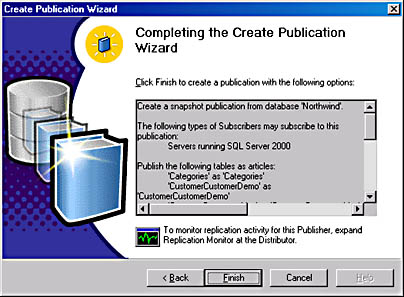
- Once you have reviewed this summary, click Finish. You will see the progress of the wizard as the publication is created. The dialog box shown in Figure 26-32 will then appear to inform you that the creation of the publication has been completed.
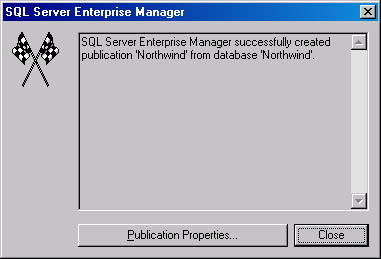
Figure 26-32. The dialog box informing you of the completed task.
You have now created a publication that can be distributed to subscribers. You can enable subscribers or modify the properties of this publication in the Create And Manage Publications dialog box (described earlier in this section).
Modifying the Snapshot Schedule
As conditions on your network change, you might need to modify the snapshot schedule. (Instructions for initially configuring the snapshot schedule are provided in the preceding section.) When configuring the snapshot replication schedule, you must consider several factors, which are listed here:
- The volatility of the data If the data is frequently changing, the snapshot should be refreshed fairly often. If the data is fairly stable, the snapshot does not need to be refreshed as often.
- The criticality of the changes Do the subscribing systems depend on the refreshed data? If so, the snapshot should be refreshed more frequently.
- The speed of the system If the network, publisher, distributor, and subscribers are extremely fast, the snapshot can be updated more frequently without causing performance problems on other components in the system.
To configure the snapshot schedule, follow these steps:
- In Enterprise Manager, expand the server that you want to modify, expand the Replication Monitor folder, expand the Agents folder, and then click the Snapshot Agents folder.
- In the right-hand pane, right-click the publication and choose Agent Properties from the shortcut menu that appears, as shown in Figure 26-33.
Figure 26-33. A publication shown in Enterprise Manager.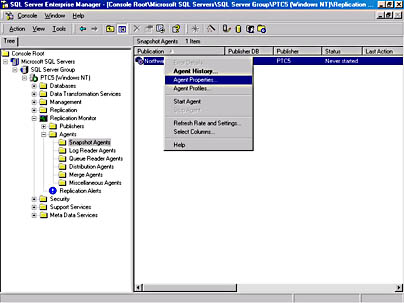
- A Properties window appears, as shown in Figure 26-34. This window displays properties for the publication agent you selected.
Figure 26-34. The General tab of an agent's Properties window.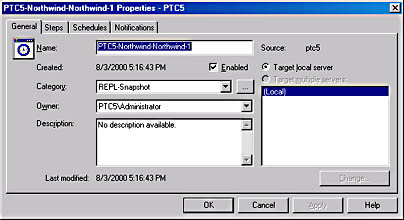
- Click the Schedules tab (Figure 26-35). On this tab, you can view the current publication schedule. The New Schedule button allows you to add a new schedule. The New Alert button allows you to create a new alert. The Edit button is used to modify an existing schedule. The Delete button is used to delete an existing schedule.
Figure 26-35. The Schedules tab of an agent's Properties window.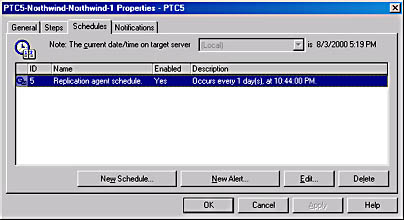
- Click Edit to display the Edit Job Schedule dialog box, shown in Figure 26-36. This dialog box allows you to configure the Snapshot Agent to run on a schedule that fits your needs. You change a recurring schedule by first clicking Change, which invokes the Edit Recurring Job Schedule dialog box. In the Edit Job Schedule dialog box, you can configure the agent to run whenever the CPU is idle, which is a new feature in SQL Server 2000. This type of schedule can be useful in some cases, but if you select it, you will not know exactly when the agent will run. Enter the desired schedule, and click OK.
Figure 26-36. The Edit Job Schedule dialog box.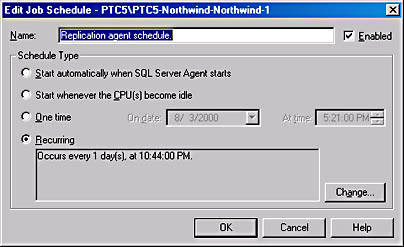
When you have completed these steps, the publisher will update snapshot schedule information in the distribution database. This schedule will determine how often the snapshot is created. To modify how often the snapshot is copied to the subscribers, you need to configure the Distribution Agent for that subscription.
Enabling Subscribers
Before you can configure subscribers, you must enable them in the distribution database. Enabling a subscriber allows the SQL Server system to communicate with the distribution database. Once you set up the connection between the distribution database and the subscriber, you can configure subscriptions. (This process is described in the next section, "Configuring Subscriptions.") To enable a subscriber, follow these steps:
- In Enterprise Manager, click the Tools menu. Next either point to Replication and then choose Configure Publishing, Subscribers, And Distribution, or choose Wizards, expand the Replication folder in the Select Wizard dialog box that appears, and then select Configure Publishing And Distribution Wizard. Performing either procedure displays the Publisher And Distributor Properties window, shown in Figure 26-37.
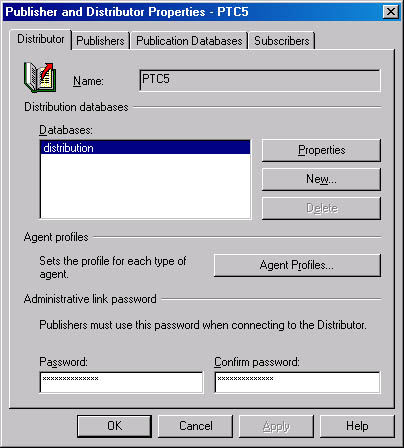
Figure 26-37. The Publisher And Distributor Properties window.
- In the Publisher And Distributor Properties window, click the Subscribers tab, shown in Figure 26-38. Here you will see a list of currently defined subscribers on your network. In order for a subscription to be sent to a subscriber, the subscriber must be defined here.
In this tab, you can select subscribers that have permission to subscribe to the publisher specified on the tab. The first time that you open the Publisher And Distributor Properties window, you will see only the publisher system listed, since you haven't yet added any subscribers.

Figure 26-38. The Subscribers tab of the Publisher And Distributor Properties window.
- To add a subscriber, first click New to display the Enable New Subscriber dialog box, shown in Figure 26-39. In this dialog box, you select the kind of subscriber you want to enable (SQL Server, Microsoft Access, OLE DB, ODBC, and so on). This setting determines the type of publications the new subscriber can subscribe to. Select SQL Server Database, and then click OK.
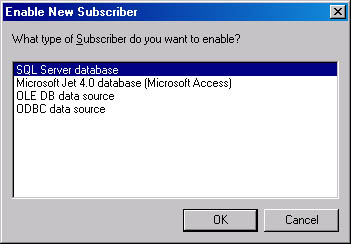
Figure 26-39. The Enable New Subscriber dialog box.
- The Registered SQL Server Properties window appears, as shown in Figure 26-40. Because we chose the SQL Server database option in the previous step, the SQL Server-specific connection options are presented here. If we had chosen a different option in the Enable New Subscriber dialog box, we would be presented with a different window here. Specify the system name and authentication method for the system that you are enabling as a subscriber.
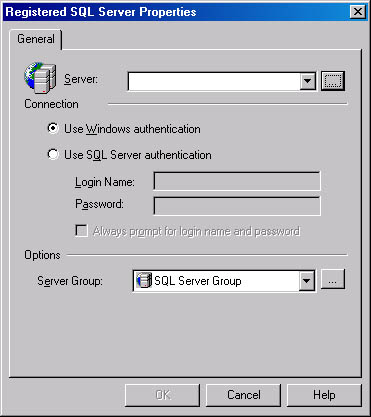
Figure 26-40. The Registered SQL Server Properties window.
If you want to see a list of available SQL Server systems to choose from, click the […] button next to the Server box. This will invoke the Select Server dialog box, shown in Figure 26-41. Here you can select a server to enable as a subscriber.
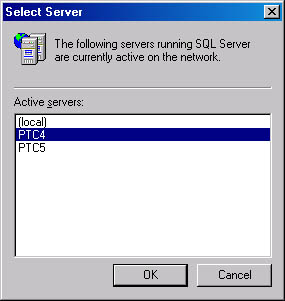
Figure 26-41. The Select Server dialog box.
- Once you have completed the tasks listed in step 4 and clicked OK in the Select Server dialog box and the Registered SQL Server Properties window, the Publisher And Distributor Properties window appears again, with the new subscriber appearing in the Subscribers list, as shown in Figure 26-42. The added system can now be used as a subscriber to the specified publisher.

Figure 26-42. The Publisher And Distributor Properties window, showing the new subscriber.
Configuring Subscriptions
Now that you have configured the publisher, distributor, and publications and have enabled the subscribers, you are ready to configure the subscriptions. You can configure subscriptions from either the subscriber or the publisher. From the subscriber, you can configure a pull subscription; from the publisher, you can configure a push subscription.
Configuring Pull Subscriptions Pull subscriptions are controlled by and configured from the subscriber. Thus, you must select the subscriber system in the Enterprise Manager before you start the Pull Subscription Wizard. Typically, subscribers that are not constantly connected to the network use pull subscriptions. For example, pull subscriptions are appropriate for the portable computers used by a mobile sales force that irregularly connects to the network and updates the subscription. To configure a pull subscription, follow these steps:
- In Enterprise Manager, click the Tools menu. Next either point to Replication, choose Pull Subscription To, and then select Pull New Subscription in the Pull Subscription dialog box that appears, or choose Wizards, expand the Replication folder in the Select Wizard dialog box that appears, and then select Pull Subscription Wizard. Either way, the Pull Subscription Wizard welcome screen appears, as shown in Figure 26-43. (In the figures in this section, a server called PTC5 is the selected subscriber, and a server named PTC4 is the publisher.)
Figure 26-43. The Pull Subscription Wizard welcome screen.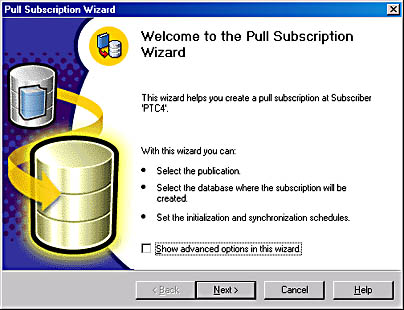
- Click Next to display the Look For Publications screen, shown in Figure 26-44. This screen allows you to choose the method of finding the publisher, which can be either through registered servers (the default) or by looking through the active directory. This will determine how the publishers are found and will affect the results shown in the next screen.
- Click Next to display the Choose Publication screen, shown in Figure 26-45. This screen is used to identify the publication that will be used in the replication. Servers that are registered with your SQL Server system are listed here. Expand the desired publisher system and select the publication you want to use, as shown in Figure 26-45.
If you need to register a server, click Register Server. The Registered SQL Server Properties window appears. We used this window when we enabled a subscriber in the last section.
Figure 26-44. The Look For Publications screen.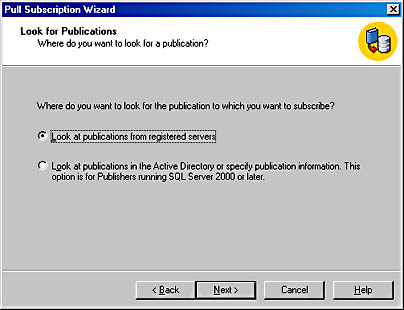
Figure 26-45. The Choose Publication screen.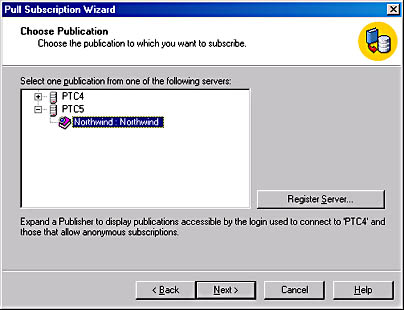
- Once you have selected the publication, click Next to display the Specify Synchronization Agent Login screen, shown in Figure 26-46. In this screen, you can specify how and with what login account the subscriber connects to the distributor. The default selection of Impersonate The SQL Server Agent Account is usually the best option. If the system that you are configuring has the SQL Server Agent configured to use a special login, the login should be specified here.
Figure 26-46. The Specify Synchronization Agent Login screen.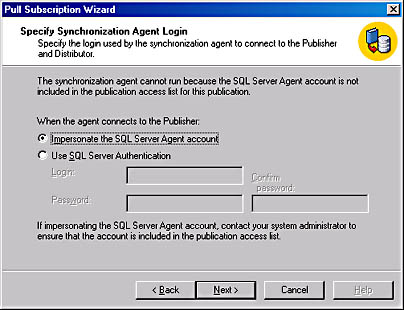
- Click Next to display the Choose Destination Database screen, shown in Figure 26-47. In this screen, you specify which database you want the replicated articles to be placed in. Figure 26-47 shows a database called Sub selected for the subscription. If you want to create a new database, click New to open the Database Properties window.
- If you opened the Database Properties window to create a new database, click OK to return to the Choose Destination Database screen when you are finished. Click Next to display the Initialize Subscription screen, shown in Figure 26-48. Click Yes to initialize the database schema and data at the subscriber.
Figure 26-47. The Choose Destination Database screen.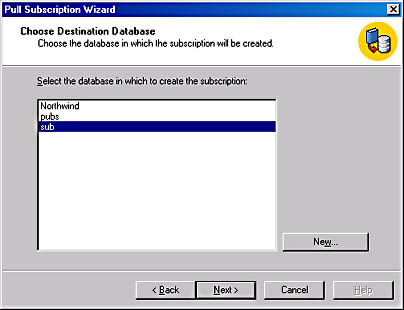
Figure 26-48. The Initialize Subscription screen.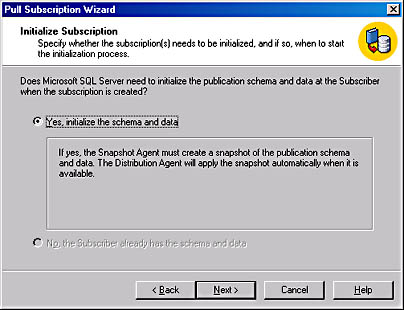
- Click Next to display the Snapshot Delivery screen, shown in Figure 26-49. This screen allows you to select where the snapshot is delivered from. It is usually sufficient to accept the default setting, which specifies that the snapshot will be selected from the default location.
Figure 26-49. The Snapshot Delivery screen.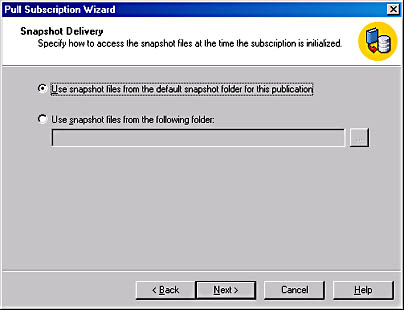
- Click Next to display the Set Distribution Agent Schedule screen, shown in Figure 26-50. This screen enables you to select continuous updates, scheduled updates, or updates on demand.
Remember that we have set up snapshot replication in this example, so the entire contents of the articles will be copied to the subscriber whenever an update occurs. Depending on how often data is changed and how important it is to keep the data synchronized, you could select any of the options. Clicking Change invokes the Edit Recurring Job Schedule dialog box described earlier in this chapter. This dialog box allows you to set up your own recurring schedule.
Figure 26-50. The Set Distribution Agent Schedule screen.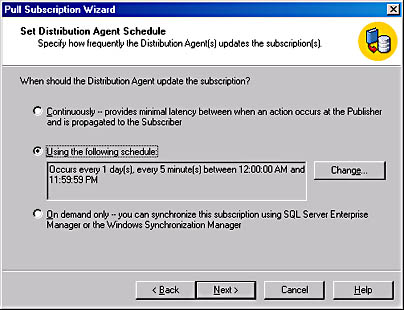
- Click Next to display the Start Required Services screen, shown in Figure 26-51. You can start SQL Server Agent from this screen, if it is not running already. This screen shows whether SQL Server Agent is running on the subscriber. If SQL Server Agent is not running, you will be prompted to start it. If you want to start SQL Server Agent manually, expand the Management folder in Enterprise Manager, right-click SQL Server Agent, and use the options on the shortcut menu that appears to start and stop SQL Server Agent.
Figure 26-51. The Start Required Services screen.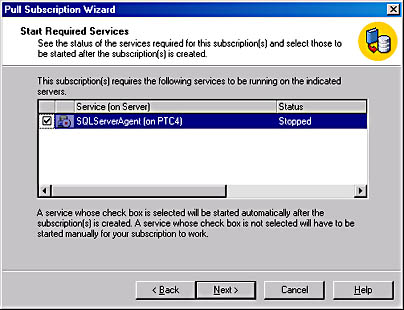
- If the SQL Server Agent is not currently configured to start automatically, you will see the Configure SQL Server Agent screen. Configure the agent, and click OK. If the SQL Server Agent is already configured to start automatically, you will not see this screen.
- Click Next to display the Completing The Pull Subscription Wizard screen, shown in Figure 26-52. Click Finish to complete the tasks of setting up the subscription.
Figure 26-52. The Completing The Pull Subscription Wizard screen.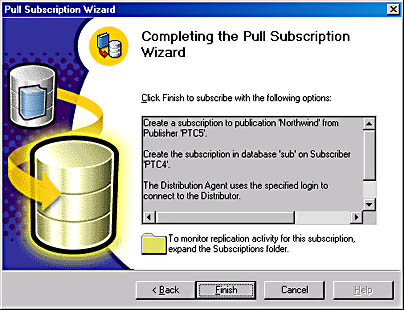
The articles will now be replicated on the subscriber and will be regularly updated according to the schedule you have set up. You might have to verify the schedule that the publication agents are running on before the replication can begin. Because Snapshot Agent runs on its own schedule, if you did not configure it to immediately propagate the snapshot to the distributor, the data might take some time to reach the distributor. Even though replication is working, the actual data will not reach the subscriber until the Snapshot Agent has done its job.
Configuring Push Subscriptions A push subscription is initiated on the publisher. You configure a push subscription by using the Push Subscription Wizard. When a push subscription is used, the schedule on which the replication occurs is determined on the distributor. The push subscription is the typical subscription method for nonportable subscribers. These subscriptions are used because of the convenience of being able to manage all subscriptions from the distributor, rather than having to manage each subscription individually from the subscriber. To run the Push Subscription Wizard, follow these steps:
- Invoke the Push Subscription Wizard by using either of two methods. To use the first method, in Enterprise Manager, point to Replication on the Tools menu, and then choose Push Subscription To Others. The Create And Manage Publications dialog box appears, as shown in Figure 26-53. Select a publication in the Databases And Publications list box, and then click Push New Subscription.
Figure 26-53. A publication selected in the Create And Manage Publications dialog box.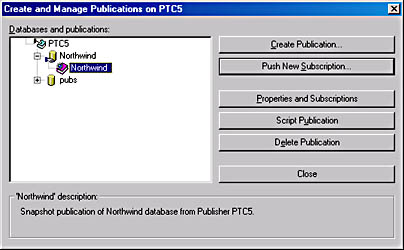
To use the second method, choose Wizards from the Tools menu, expand the Replication folder in the Select Wizards dialog box that appears, choose Push Subscription Wizard, select a publication in the Create And Manage Publications dialog box that appears, and then click Push New Subscription. Either way, the Push Subscription Wizard welcome screen appears, as shown in Figure 26-54.
Figure 26-54. The Push Subscription Wizard welcome screen.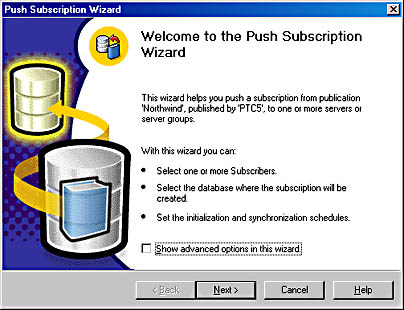
- Click Next to display the Choose Subscribers screen, as shown in Figure 26-55. This screen is used to specify the subscribers that the publication will be pushed to. In this case, the system PTC4 is selected. These subscribers must be enabled, as described in the section "Enabling Subscribers" earlier in this chapter.
Figure 26-55. The Choose Subscribers screen.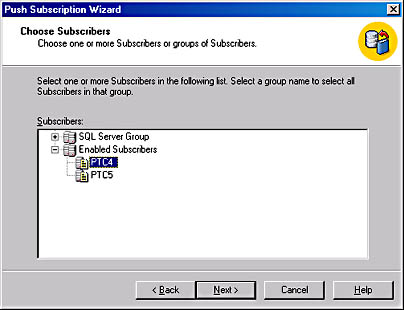
- Click Next to display the Choose Destination Database screen, shown in Figure 26-56. In this screen, you specify the database that will accept the publication on the subscriber. You can choose a database that already exists, or you can create a new database, depending on your system configuration and your needs. To use an existing database, either type the database name or click Browse and select the database from the list of existing databases that appears. To create a new database, click Browse Or Create and then click Create New in the Browse Databases dialog box that appears. You will be presented with the Database Properties window, which is used in Enterprise Manager to create a new database. After you have created the new database, you will be returned to the Choose Destination Database screen.
- Click Next to display the Set Distribution Agent Schedule screen, shown in Figure 26-57. Here you can choose to continually update the subscription or to update it based on a schedule you specify. With snapshot replication, selecting the option to continually update the subscription doesn't make much sense. If you want to update the schedule, click Change to display the Edit Recurring Job Schedule dialog box described earlier. Here you can easily configure a recurring schedule.
Figure 26-56. The Choose Destination Database screen.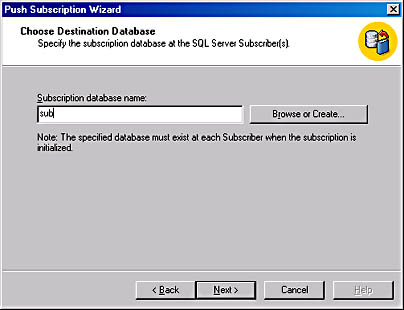
Figure 26-57. The Set Distribution Agent Schedule screen.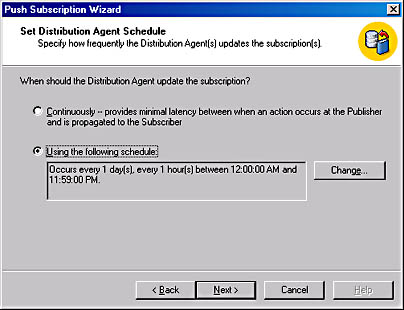
NOTE
The schedule that you are setting in this wizard is the schedule that is used to refresh the client from the snapshot. This schedule should be coordinated with the snapshot refresh schedule. If the snapshot has not been updated, the subscription will be updated with old snapshot data. - Click Next to display the Initialize Subscription screen, shown in Figure 26-58. In this screen, you specify whether the subscription needs to be initialized. The option to initialize the schema and data set on the subscriber is selected by default. If the schema already exists, the option to not initialize the schema is available. In this screen, you can also start the Snapshot Agent if it is not already started. It's a good idea to start the Snapshot Agent when you initialize the snapshot; otherwise, you must start the agent by hand. It's also important to set the schedule for the Snapshot Agent so that it corresponds to the schedules of the pull and push subscriptions, as described in the section "Modifying the Snapshot Schedule" earlier in this chapter.
Figure 26-58. The Initialize Subscription screen.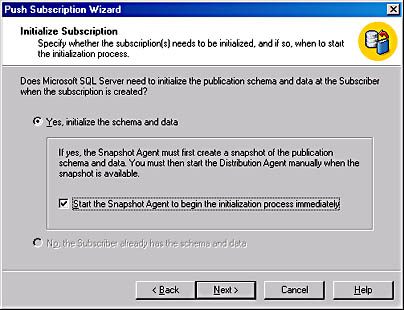
- Click Next to display the Start Required Services screen (shown in Figure 26-51), which enables you to start SQL Server Agent if it is not already started.
- Click Next to display the Completing The Push Subscription Wizard screen, shown in Figure 26-59. Review your settings, and then click Finish to begin the process of copying the snapshot to the subscriber. You will see a dialog box describing the progress of the wizard, which is followed by a message box indicating that the operation was successfully completed. Once you have completed this wizard, the push subscription is created and will be updated on a regular basis.
Figure 26-59. The Completing The Push Subscription Wizard screen.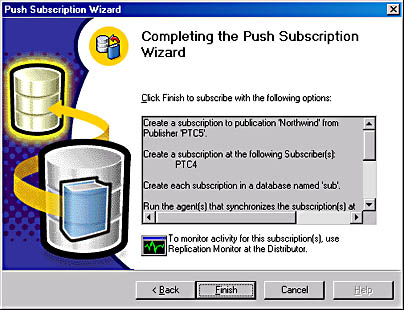
EAN: N/A
Pages: 264