| ColorSync Utility is the hub for your systemwide color-management settings. You can find it in Applications > Utilities > ColorSync Utility. From here you can repair damaged or corrupt ICC profiles, look at the information associated with individual profiles, attach profiles to specific devices, build Quartz filters, and analyze the color space associated with a profile. Profile First Aid If your ICC profiles do not appear in applications like Photoshop, they may be corrupt. Here's how to repair corrupt profiles: 1. | Launch ColorSync Utility (choose Applications > Utilities > ColorSync Utility).
| 2. | Click the Profile First Aid button.
| 3. | In the Profile First Aid pane, click the Repair button at the bottom.
Profile First Aid checks every ICC profile installed on your Mac and automatically repairs any with corrupt or damaged settings.
|
Profile Details You can see the details for your color profiles, including the version number, the location on your hard drive, and what type of device the profile is associated with. To view the information for a color profile: 1. | Launch ColorSync Utility (choose Applications > Utilities > ColorSync Utility).
| | | 2. | Click the Profiles button (Figure 5.5).
Figure 5.5. The Profiles button in ColorSync Utility opens the Profiles dialog, which lets you look at the properties for your installed ICC profiles. The graph represents the part of the color spectrum that the selected profile can display. 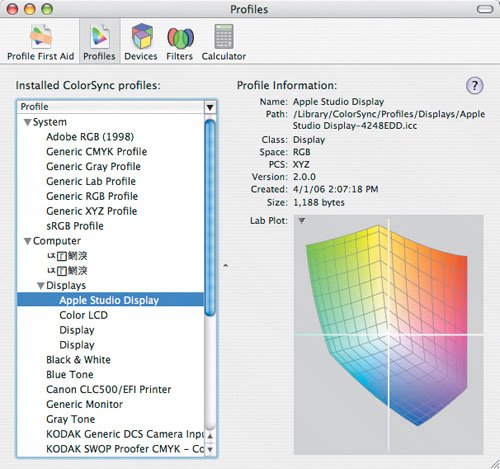
| 3. | Profiles are grouped by category; click the disclosure triangle by the device type you want to view. If you want to view display profiles, for example, click the Computer disclosure triangle, and then click the Displays disclosure triangle.
| 4. | Select the device you want to view. Since I have an Apple Studio Display, I'll select it.
You should now see the file information about the profile, as well as a graph showing what part of the color spectrum the device can display.
|
Device Profile Assignments When you connect a device like a scanner, printer, or digital camera to your Mac, Tiger should automatically assign it a profile. Here's how I check to see which profile is assigned to my HP LaserJet 2600n printer: 1. | Launch ColorSync Utility (choose Applications > Utilities > ColorSync Utility).
| | | 2. | Click the Devices button (Figure 5.6).
Figure 5.6. ColorSync Utility's Devices pane shows each device that is connected to your Mac and has a ColorSync device profile associated with it. You can also change the default profile for each device from here. 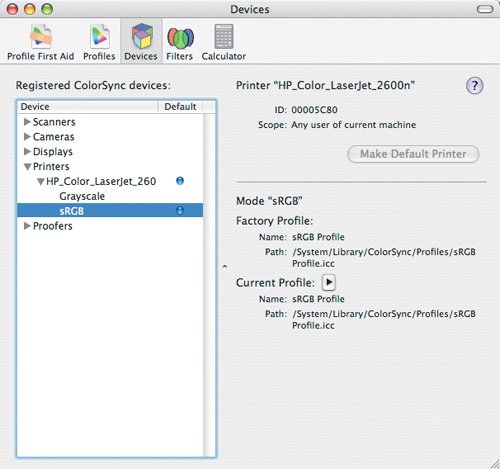
| 3. | Click the Printers disclosure triangle.
| 4. | Click the disclosure triangle for your printer. In this case, I'll choose my LaserJet 2600.
| 5. | If more than one profile is associated with your printer, select the profile you want to see. Since my printer includes profiles for Grayscale and sRGB, I'll select sRGB so that I can see the profile I use most often.
|
Tip A blue dot next to a profile name indicates the device's default profile.
ColorSync Utility Devices should now show the factory default ICC profile and the currently assigned profile. The two will be the same unless you have assigned a different color profile to the device. Typically, you assign a different profile when you are supplied with custom-built ICC profiles for your workflow. Here's how to select an alternate profile: 1. | Select a device profile as we did above.
| 2. | Click the Current Profile disclosure triangle.
| 3. | From the pop-up menu, choose Other.
| | | 4. | Use the Open dialog to navigate to the location on your hard drive where the custom profile is located (Figure 5.7).
Figure 5.7. To assign an alternate ICC device profile that you created or someone else provided to you, choose Other from the Current Profile pop-up menu, and then navigate to the profile in the Open dialog. 
| 5. | Select your custom profile.
| 6. | Click the Open button.
|
Filters Tiger includes a technology called Quartz rendering, which is used as a part of Display PDF to render what you see on your display. It also lets you apply special filter effects to your documents when you output them to a printer or as a PDF. Several Quartz filters are included with Tiger to let you do such things as applying sepia-tone effects to your outputs, printing color images in grayscale, applying PDF settings when outputting to PDF format, and more. Let's say you want to make a Quartz filter that simulates what an image looks like when built with Web-safe colors. Here's what you do: 1. | Launch ColorSync Utility (choose Applications > Utilities > ColorSync Utility).
| | | 2. | Click the Filters button (Figure 5.8).
Figure 5.8. You can modify Quartz filters from the Filters pane in ColorSync Utility, and you can create your own custom filters, too. In this example, we made a custom filter that simulates Web-safe colors in your documents. 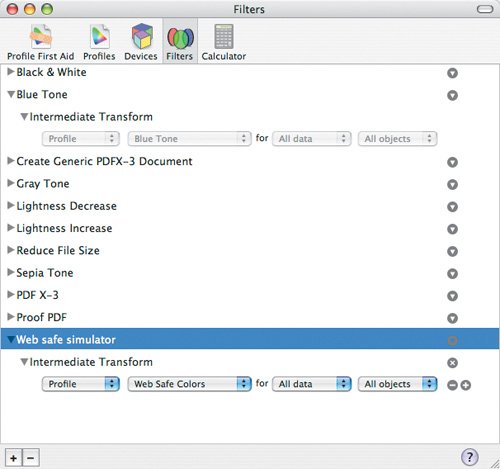
| 3. | Click the plus (+) button in the bottom left corner of the Filters pane to create a new Filter workflow.
| 4. | Give your workflow a descriptive name, like Web safe simulator.
| 5. | Click the disclosure triangle to the right of your workflow name.
| 6. | From the Component pop-up menu, choose the type of document setting you want to control. In this case, choose Add Color Management Component > Intermediate Transform.
| | | 7. | Your Intermediate Transform filter should appear below your new workflow. Click the filter's disclosure triangle to display its settings.
| 8. | Don't worry about the Profile menu. Instead, click the second pop-up menu that says None, and choose Web Safe Colors.
|
Here's how to apply a Quartz filter: 1. | Choose File > Print to open the Print dialog.
| 2. | Choose ColorSync from the pop-up menu that shows Copies & Pages by default.
| | | 3. | Choose a filter name from the Quartz Filter pop-up menu. In this case, we can choose our Web safe simulator workflow (Figure 5.9).
Figure 5.9. To apply your custom Quartz filter to a document, choose ColorSync in Tiger's standard Print dialog, and then select your filter from the Quartz Filter pop-up menu. 
| 4. | Click the Print button, or choose Save as PDF from the PDF pop-up menu button.
|
A Little Bit About Display PDF Mac OS X displays everything you see on your monitor as PostScript information. The process used to render the PostScript information is called Display PDF. This same technology lets you apply special effects to documents when you output them to your color printer, and it also allows every Mac OS X application to print basic PDF documents even if you don't have Adobe Acrobat installed. |
Tip Quartz filters are available in any application that uses Tiger's standard Print dialog. The Adobe Creative Suite applications and QuarkXPress use their own custom Print dialogs. The exceptions are Adobe Acrobat and Adobe Reader. Both applications use their own Print dialog but still include access to Quartz filters.
Calculator ColorSync Utility includes a tool called Calculator that helps you see the difference in a color when you shift it from one space to another, such as when you convert from RGB to CMYK. It also shows the variation in color values as you move from one ICC profile to another. I use this tool to see if a color will shift too much for a project when I convert my RGB images to CMYK. Here's how it works: 1. | Launch ColorSync Utility (choose Applications > Utilities > ColorSync Utility).
| 2. | Click the Calculator button (Figure 5.10).
Figure 5.10. The Calculator in ColorSync Utility shows you how a color will change when you transition it from one color space to another. The red RGB color swatch on the left loses its vibrancy when it gets converted to CMYK. The color swatch on the right is duller and browner. 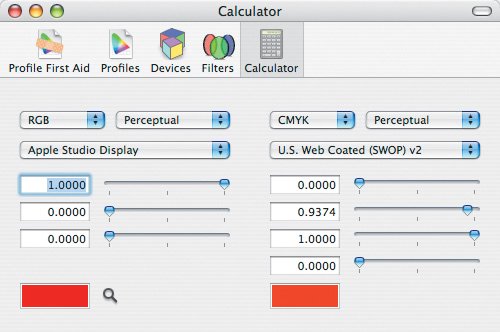
Tip The magnifying glass icon at the bottom of the Calculator pane is a color sampler. Click it and then find and click on the color on your display that you want to sample. Its values are automatically loaded in ColorSync Utility. | | | 3. | In the Calculator pane, choose a color space and ICC profile from the settings on the left.
| 4. | Use the sliders or enter a color value to set your initial color.
| 5. | Choose a target color space and ICC profile from the pop-up menus on the right. The Calculator automatically displays the new color values along with a sample color swatch.
|
This is a quick way to see if colors will shift so much that they don't closely resemble the original color anymore. Tip Apple is certainly working hard to keep Mac OS X up to date and bug free, but ColorSync hasn't seen the benefits of those efforts. You will likely experience odd problems from time to time. For example, I use Apple's ADC Studio Display and Apple's DVI to ADC adapter with my PowerBook to increase the size of my Desktop. If the Studio Display is connected to my PowerBook, I can't assign a color profile to my PowerBook's built-in display or the Studio Display. I also can't launch Display Calibrator Assistant. Hopefully, Apple will address the many bugs with Mac OS X 10.5.
|