Setting Up Printers
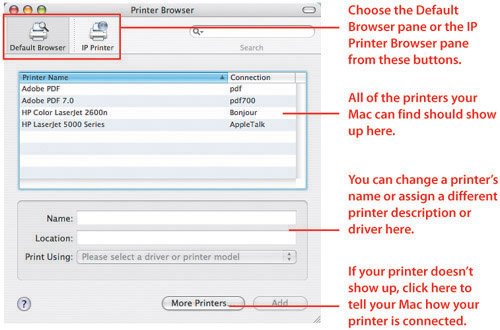
| Mac OS X uses an application called Printer Setup Utility to set up and manage your printers (Figure 3.1). It's hiding on your hard drive in Applications > Utilities. Since Apple includes a large selection of printer drivers with Tiger, you may be able to get away with simply plugging your printer into your Mac or network. If the printer connects directly to your Mac, all you need is a USB cable. If you have a networked printer, you'll need an Ethernet cable. If you aren't sure about the whole networking thing, check out Chapter 6, "Networking." Figure 3.1. All the controls you need to add, remove, modify, and monitor your printers are in Printer Setup Utility.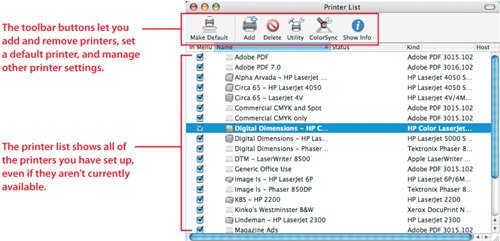 If the necessary printer driver is included with Mac OS X v10.4 Tiger, local printers, meaning printers that are connected directly to your Mac, should automatically appear in the printer list when you print; no extra steps are required. If the printer doesn't appear in the list, or if it is a networked printer, you'll have to manually add it.
Tip The list shows you the names of the printers that are available, along with the connection type each device uses, which is useful when you have several printers with similar names. If your printer doesn't show up in the list of available devices in the Printer Setup Utility Printer List window, that's OK. Some printers don't show up automatically. Here's how to add the stubborn ones:
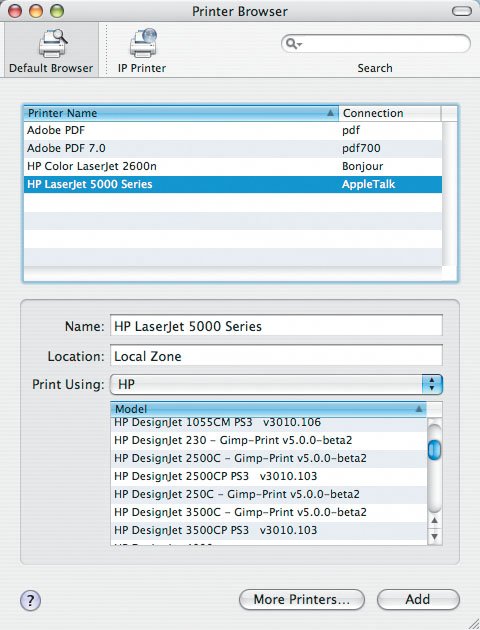
Adding Print DriversEven though Mac OS X has an amazing number of drivers preinstalled, Apple can't keep up with every printer and output device on the market, so you may have to add drivers yourself. This is more common with high-end output devices like direct-to-film and direct-to-plate systems than it is with run-of-the-mill laser and inkjet printers. Always start by visiting the manufacturer's Web site and downloading the latest drivers for your printer, even if you have an installation disk. It's fairly common for manufacturers to issue new and updated drivers that won't be on the disk that shipped with your printer. Downloading the drivers from the manufacturer's Web site ensures that you always have the latest and greatest drivers, which usually fix bugs, as well as add new or improved functionality. As an example, one of my printers is capable of duplex, or two-sided, printing, but I couldn't take advantage of the feature until an updated printer driver was released. Unfortunately, you may not know about a feature your printer has until an updated driver is available. Printer drivers are typically delivered in installer applications, sometimes called packages, that handle the dirty work of putting all the necessary files and drivers where they need to go. Simply double-click the installer and follow the instructions. You may need to enter your administrator password before the installer can do its job. Once the installer finishes, you can add your printer through Printer Setup Utility as if the driver had been there all along. In some cases, the installer automatically runs a script that finds and adds the printer to your list so you don't have to. Tip Updated printer drivers usually improve Mac compatibility, but sometimes they improve other features too. For example, updates may enhance the image quality in screened graphics. If you have a color printer, a new driver may improve color-correction features. GIMP Printer DriversAs sad as it seems, not every printer manufacturer sees the value in creating printer drivers for the Mac. In some cases they write drivers, but don't take the time to write high-quality drivers or ones that are fully functional. Enter Gimp-Print, an open-source printer-driver system that Mac OS X takes advantage of to add hundreds of printers that otherwise wouldn't work with your Mac. In Mac OS X v10.3, the drivers were included; you just had to know how to find them. In Mac OS X v10.4, they show up along with all of the other preinstalled drivers in the Print Using pop-up menu in the Printer Browser window (Figure 3.4). GIMP-Print drivers are easy to pick out from the print driver list: look for Gimp-Print after the printer driver's name. Figure 3.4. GIMP printer drivers are easy to spot: They always include the word Gimp right after the printer model. GIMP printer drivers aren't made by your printer's manufacturer, but sometimes they give you more options than the official driver does. If you find that the printer driver you currently have assigned to your printer doesn't offer all of the features you expect, check to see if there is a Gimp-Print version available in the Print Using list.
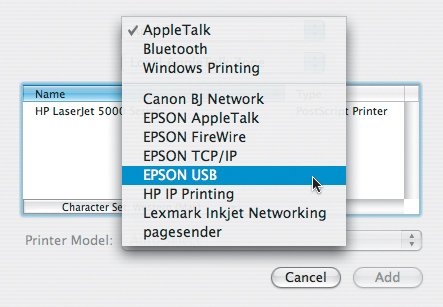
Manually Choosing a Printer DriverSometimes printers don't correctly identify themselves to your Mac, giving you the "Driver not installed" error. If you know the printer driver is installed, you can select it yourself in the Printer Browser window.
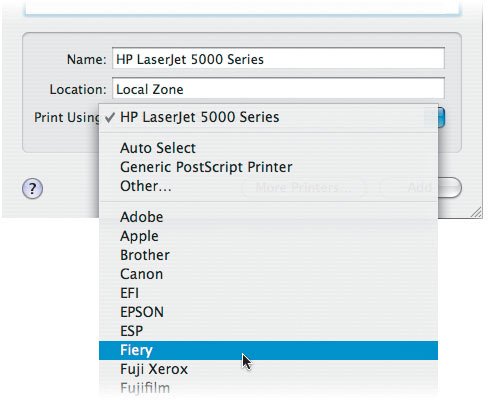
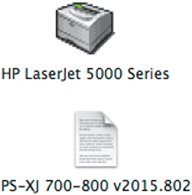
Not all print shops and service bureaus stay up-to-date with the latest equipment, so if you connect your Mac to their network to output files, you may need to use a PostScript printer description file that was written for Mac OS 9 and never updated for Tiger. For instance, you may have a printer description file that someone copied from an older Mac OS 9 machine and then e-mailed to you (Figure 3.6). In this situation, you will have to manually add the printer driver too.
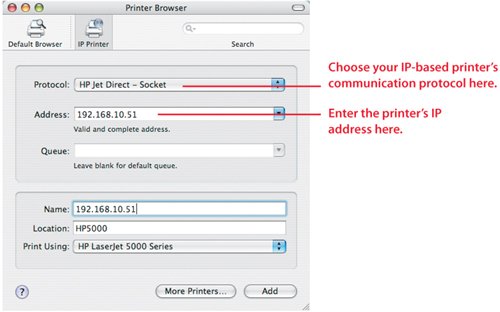
Figure 3.6. PostScript printer description files that were developed for Mac OS 9 will work in Tiger, but they aren't always easy to identify. The printer description file on the top is for the HP LaserJet 5000; the one on the bottom is for a Fiery XJ 800 RIP. Tip PostScript printer description files are actually just small text files that hold the information your Mac needs so that it can talk to a specific type of output device. IP PrintersSome networked printers and RIP servers won't show up in the Printer Browser window because they use their IP addresses to identify themselves on your network. An IP address is just a specially crafted unique number that identifies a device on your network. It is always a set of four numbers separated by periodsfor example, 10.0.0.16. Whoever set up or manages your network should be able to tell you if any of your printers are IP printers instead of AppleTalk printers. They can also tell you the IP addresses of the printers you need to use. To learn more about networking and IP addresses, see Chapter 6. Here's how to add an IP-based output device to your printer list:
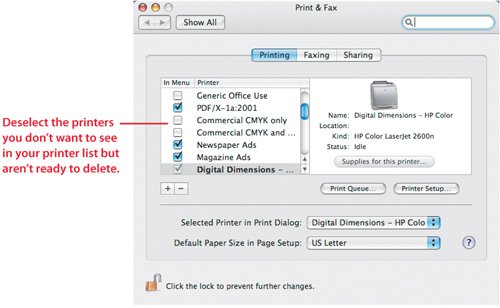
Be sure to enter the information exactly as it is given to you. Capitalization, spelling, and punctuation must be accurate. Hiding or Showing Printers in Your ListI have several printers in my office, plus I output to different devices when I travel, or if I'm at a vendor, service bureau, or print shop. My printer list, even after pruning output devices I know I won't use again, has grown to more than 20 devices.
If your printer list is like mine, and is getting long enough that it's difficult to find specific printers, hide the printers you don't use regularly. Tip System Preferences is also available from the Dock. Since it's easy to remove the icon from there, I always tell people to access System Preferences via the Apple menu. Feel free to launch System Preferences whichever way is most convenient for you.
Tip Hiding printers you rarely use is much quicker than deleting them and having to re-add them later. Setting a Default PrinterYour default printer is the one that is automatically selected each time you go to print from any application. My default printer is an HP LaserJet 5000 for two reasons: It's the printer I use most often in my office, and it prevents me from accidentally sending a document to a printer that's expensive to use, such as a 44-inch wide-format DirectJet, or a film and plate imaging system.
To set a specific printer or other output device as your default printer, you need to use Printer Setup Utility (Applications > Utilities).
You can also set your default printer in the Print & Fax preference pane. Here's how:
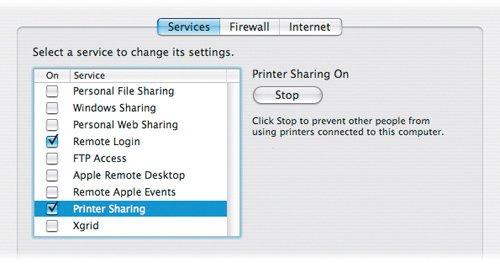
Setting Up a Shared PrinterJust because your inkjet or desktop laser printer isn't necessarily a network device doesn't mean that you can't share it with other designers in your office. The quick and dirty way to share your printers is tucked away in the Sharing preference pane of System Preferences.
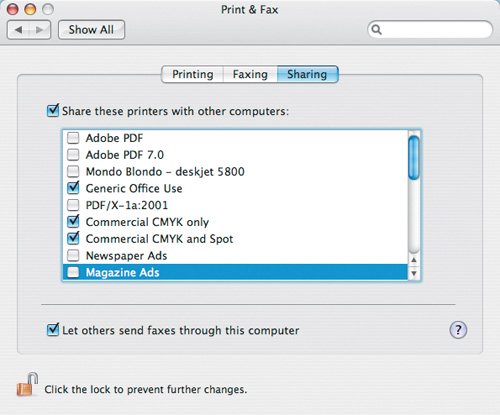
I call this "quick and dirty" because you end up sharing all of the printers from your printer list, even printers that may already be on the network. That's confusing because everyone else sees the printer on the network, along with the duplicate that you are sharing. It gets worse if several people are sharing the same printers because the list of duplicates keeps growing. The better way to share a printer lives in the Print & Fax preference pane:
Tip If the printers are all listed together, click the first and then Shift-click the last; all the printers in between will also be selected. If the printers are scattered throughout the list, click the first and then Command-click the other printers you want to select. Pooling PrintersIf you have more than one of the same printer, or similar printers, you can group them together in a printer pool. The advantage of a printer pool is that you don't need to worry about figuring out which printer is currently available before you output a job. Instead, choose your printer pool as an output device; your Mac will print to the first available printer. This is really handy if you work in an environment where several people are printing documents at the same time. The downside is that you don't get any feedback telling you which printer your output went to. You have to check each device until you find your print job. To set up a printer pool, launch Printer Setup Utility (Applications > Utilities).
Printer pools show up in your Printer List just as any other output device does. Desktop PrintersDesktop printers link you to a window that shows the current status of a specific printer. You can have individual desktop printers for all of your output devices (Figure 3.12). When you double-click a desktop printer icon, you can see the status of printing or queued jobs, control what jobs print and in what order, and (for printers that support it) check your printer's toner or ink level. Without desktop printers, you have to launch Printer Setup Utility and then double-click on a printer in the Printer List window see this information. Figure 3.12. Desktop printers give you quick access to the controls for a printer. Double-clicking one opens a window where you can start and stop print jobs, see what jobs are waiting to print, check ink and toner levels, and even order printer supplies from Apple. If you have a core group of printers you use all the timesay a laser printer for proofs, direct-to-plate and direct-to-film systems, and a wide-format inkjetand you need to monitor the status of the jobs you send to them, desktop printers will make your life much easier.
Tip A quicker way to create a desktop printer is to drag it from the Printer List window in Printer Setup Utility to the Desktop. The printer remains in your list, and a printer icon appears on your Desktop. The default location for desktop printers is your Desktop. If you want to save the desktop printer somewhere else, that's OK. Either choose a location from the Where pop-up menu when you are naming your desktop printer, or move its icon after you create it. If you no longer need a desktop printer, just drag it to the Trash. Only the desktop printer icon is deleted. Your original printer stays in the Printer List. Working with Print QueuesPrint queues let you manage the various jobs you are printing. When you print something, the queue for the printer you are sending the job to automatically appears in the Dock with an icon that represents your print device. The queue icon disappears after your job finishes printing. If you double-click the printer queue icon in your Dock, it shows the printer queue window (Figure 3.13). This is the same window that opens when you double-click a desktop printer icon or double-click a printer name in Printer Setup Utility's Printer List window. Figure 3.13. The printer queue window shows you any jobs that are printing to that output device, enables you to start and stop print jobs, and gives you one-button access to the printer's utilities.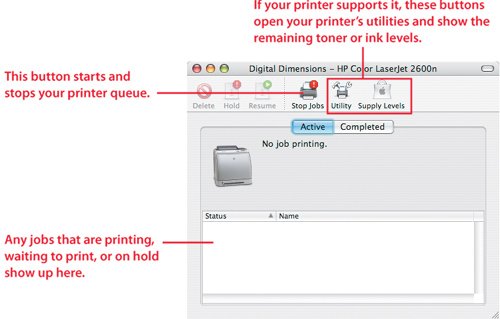 Tip If you want to keep the queue icon in the Dock, click and hold on the printer's icon while a job is printing, and then choose Keep in Dock from the menu. Let's take a look at the components in a printer queue window. The top of the window holds the buttons that control what happens to your print jobs, and the bottom of the window shows the jobs that are currently printing or waiting to print. Each printer queue window shows a specific printer, so print jobs show up in the queue for only the printer they are going to.
Tip If you are running low on something, just click the Supplies button to go to a page on Apple's Web site that shows consumables for your printer. This isn't the cheapest way to buy new toner and ink, but it sure is convenient.
Preview Before PrintingMac OS X can create an onscreen preview of a document you are about to print, which is useful if you want to get an idea of what an output looks like before taking the time to send it to your printer and potentially waste toner, ink, time, and money.
Soft Proofing toggles the document between how it looks onscreen and how it should look after it is printed. If your document is in color, but you are printing it on a black and white device, Soft Proof shows what your output will look like in black and white. If you are printing a color document to a color printer, the Soft Proof option is disabled. Tip Some applications don't use Apple's standard Print dialog, so you may have to look around to find the Preview button. And some applications, like all of Adobe's Creative Suite, disable Apple's print preview. Print Dialog OptionsApplications such as Adobe InDesign and QuarkXPress have their own printing options and disable the printing options that are built into Apple's Print dialog. If you are printing from a professional page-layout or graphics application, always use the printing features built into the program instead of trying to use Apple's. On the other hand, if you are using an application that takes advantage of Apple's Print dialog, there are some options buried away that you can use. Let's take a look at the Print dialog. Tip At the bottom of the Printer pop-up menu is the Add Printer option. Choosing it launches Printer Setup Utility and opens the Printer Browser window so that you can add more printers to your list. The last option in the Printer pop-up menu is Print & Fax Preferences, which is useful if you have a printer you need to use but it is not selected to show in the Printer pop-up menu. To view the Print dialog, choose File > Print (Command-F) (Figure 3.16). Figure 3.16. This is a standard Print dialog. Most applications use this, but Adobe and Quark override it and display their own instead.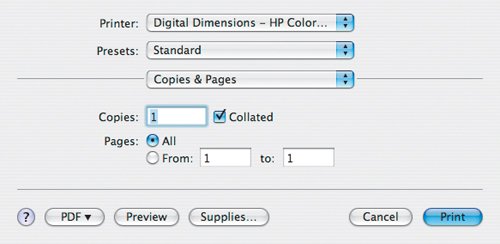
Copies & PagesUsing the Copies and Pages options, you can select the number of copies you need, whether or not they are collated, and the page range to print. Everything in this section is set by filling in a field or checking a box; it's pretty easy to figure out. LayoutThe Layout options handle two functions: printed page layout and duplexing (Figure 3.17). Figure 3.17. The Print Layout pane lets you control how many individual pages are printed on each sheet, and it also holds the controls for duplex, or two-sided, printing.
SchedulerUse the Scheduler options to specify when your job will print. The default option is Now. Setting a job to print at a later time is useful when you need to follow a print schedule and your workflow expects certain jobs to be available at a predetermined time. You can also schedule large, time-consuming files to print when your office is closed, freeing up your printers during business hours. Tip The Priority option is an easily abused tool because your Mac uses this to check other Macs on your network to see which print job has the highest priority. If someone else sends a job to the printer you want to use, but he or she sets a higher priority than you did, your Mac will patiently wait until the other user's job finishes printing before sending yours. Be nice to your coworkers, and leave your print priority set to Medium unless you have a good reason to change it. If you output large-format, high-resolution graphics, such as banners, signs, or mountable prints, try scheduling your largest file to start printing at the end of your workday. You don't have to remember to start the print job, and your output is waiting for you when you show up the next morning.
Tip Normally, a document's first page prints first, and the last page prints lastthe order that your document pages are actually in. If, however, your printer outputs pages printed side up, your pages are in reverse order. If you have only a couple of pages, that's no problem. But if you are printing a long document, you are going to spend a lot of time re-collating your pages. Clicking the Reverse radio button forces your document to print in reverse order, meaning that the last page prints first and the first page prints last. Paper HandlingWith the Paper Handling options, you fine-tune the settings you chose in the Copies & Pages pane (Figure 3.18), meaning you can change the output page order and paper size. Figure 3.18. From the Paper Handling pane, you can override your printer's default order for outputting pages.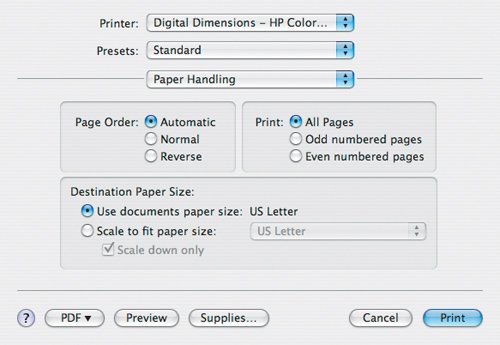
Tip If your printer doesn't support duplexing, use the Print options to manually duplex a document. First print your odd-numbered pages, and then reload your printed pages into your printer. Now print just the even pages onto the backs of your odd pages. ColorSyncThe ColorSync options are not what you use to set your system ColorSync options. Instead, this is where you select how to handle color management for your current print job and apply some special effects to your output. If you want to learn more about ColorSync and color management, check out Chapter 5, "Color Management."
Cover PageThe Cover Page options let you print an extra page with your document that contains additional information about the print job. Some agencies may find this useful for auditing and job billing information.
Error HandlingDepending on your printer model and the drivers your Mac uses to communicate with it, you may have an Error Handling menu. This menu shows up more commonly in PostScript laser printers that support multiple paper trays.
Paper FeedIf your printer has more than one paper tray or manual-feed capability, you can use the Paper Feed options to control which trays your print job pulls paper from (Figure 3.19). Figure 3.19. Use the Paper Feed options to force a print job to pull paper from a specific printer tray. You can also use them to pull the first page of your document from a different paper tray, which is useful if you need a different stock for the first page or if you want to add a slip sheet between copies of the document.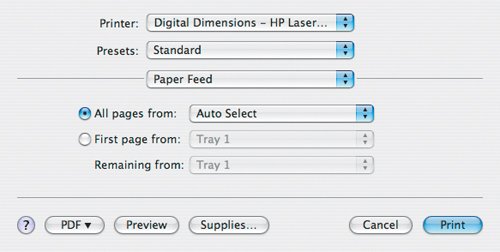 Tip If you are outputting multiple copies of a long document with a coversay, an annual report that is going to be spiral boundthe Paper Feed options are really handy. Load your report's cover stock into a lower-capacity tray, and use that for your cover (page one) and a high-capacity tray for the report contents. Since your document output is precollated, you won't have to insert your cover before binding. I also use this feature when I have preprinted covers that need to be added to an output job, by adding a blank page where the cover should be in my document. When I print my file, I choose the bypass tray for the blank page, which inserts my cover where I need it without printing anything on it.
Printer FeaturesThe Printer Features options change based on your currently selected output device. What you see is determined by the printer description file, or printer driver, that your printer is using. If your output device is pretty limited in what it can do, or if the printer manufacturer neglected to add features when it created the printer driver, you won't see much here. When I use my HP LaserJet 5000, my only option is a pop-up menu for choosing my media type. On the other hand, this printer includes two unique menus: Finishing and Image Quality. Other printers group these, or similar, options in the Printer Features options. Application settingsWhatever application you are currently using can show its own set of options, too (Figure 3.20). If your application adds a set of options, it appears below Printer Features and usually lists the application name plus the word Settings. For example, the text-editor application I use all the time, Tex-Edit Plus, shows up as Tex-Edit Plus Settings. Microsoft Word, on the other hand, shows up as just Microsoft Word. Figure 3.20. The application settings options are application specific and vary depending on what application you are currently using. The options on the left are from Tex-Edit Plus, and the ones on the right are from Microsoft Word.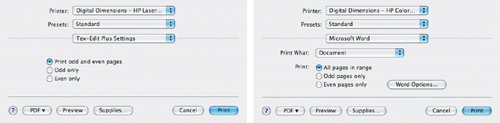 You can usually choose to print the even, the odd, or all pages in your document from here, as with the Paper Handling options. Some applications add more options that relate to the type of document you are outputting. SummaryThe Summary pane shows you a summary of all the settings you have selected for your document. If you created a complex group of output settings, this is the place to go before clicking Print. You can double-check everything from one window and look for mistakes before they cost you money. If you are about to output 500 books with 30 double-sided pages on custom stock, it's nice to know if you forgot to turn on duplexing before you see pages coming out of the printer. Printer PresetsModifying a bunch of printing settings can be a real pain, especially if you know you have to do it all over again the next time you need to print something. Using presets will help save your sanity and improve your productivity by saving time and reducing errors. After you make your changes in the Print dialog pop-up menus, save those changes in the Presets pop-up menu (Figure 3.21). Figure 3.21. After creating a complex group of printer settings, use the Presets menu to turn them into a group that you can select anytime you want.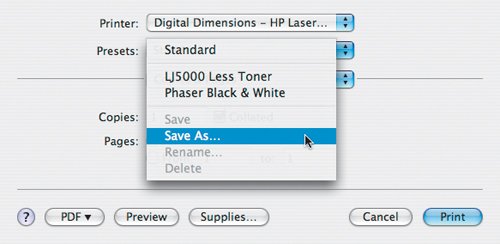 Tip You can make as many presets as you want; just be sure to choose names that make sense. I always name my presets first with the name of the printer for which I use the preset, followed by a description of what the preset does. For example, I have one preset called LJ 5000 Less Toner, where I reduced resolution and turned Save Toner on. I have another called "Phaser Black & White" that I use when I want to print documents in black and white on my color printer. After you finish creating your document output settings, do the following:
Now you can select those settings from the Presets pop-up menu instead of reentering them each time you need to print. In addition to saving time, you are reducing mistakes, since you don't have to worry about incorrectly selecting or forgetting a setting. You can also rename or delete a printer-settings group from the Presets pop-up menu. To rename a settings group:
To delete a set:
Unlike other parts of Mac OS X, here you don't get a dialog asking you what you want to delete, and you don't get any warning. The assumption is that the printer preset you have selected is the one you want to delete. Tip If you work with an agency that uses Web-based job tickets, order fulfillment, or time sheets, save the completed forms as Web receipts. You'll have a searchable record of the form on your Mac, complete with date and time stamp. PDF ButtonMac OS X uses a technology called Display PDF to render everything you see onscreen as PostScript, giving you a much more accurate representation of what you will see when you print something. That also means you have the ability to create PDFs without having to install Acrobat. We'll go more in depth in Chapter 4, so for now, know that Mac OS X's built-in PDF tool is useful but isn't the best option for outputting professional jobs. With that in mind, there are a couple of cool features hidden inside the PDF button that sits at the bottom left corner of the standard Print dialog (Figure 3.22). If you are using Tiger's built-in faxing tools, this is where you find the Fax PDF option that lets you fax documents. I really like the Save PDF to Web Receipts Folder option. When I purchase something on the Internet, I use this to save my Web page receipt for my records. Figure 3.22. The PDF button actually opens a menu. Click and hold it to see a wide range of PDF options, including Save as PDF and Fax PDF. Although you can create PDFs from here, they aren't created with the Adobe Distiller engine, so it shouldn't be used for final job outputs. Faxing in TigerMac OS X v10.3 and v10.4 include faxing capabilities. If you spend a lot of time faxing, a dedicated fax machine is probably a better option. On the other hand, Tiger's built-in faxing works just fine for occasional use. Here's how to fax from applications that don't override Apple's Print dialog with their own:
Tip If you need to keep a log of the faxes you send and receive, pagesender can helpit maintains a database of all your incoming and outgoing faxes. It can even tell you how many times it tried to send a fax, along with any errors that prevented it from completing the transmission, such as busy signals or a failure to respond on the receiving end. Mac OS X's built-in faxing is pretty utilitarian. You can send and receive faxes, but that's about it. If you need to fax on a fairly regular basis, consider purchasing fax software. My favorite is pagesender, from SmileOnMyMac (www.smileonmymac.com) (Figure 3.23). It's inexpensive, has robust logging, uses the information from several popular contact managers (including Apple's Address Book), and even shows up in print dialogs as if it were just another printer, working around Adobe and Quark's custom print dialogs. Figure 3.23. If you plan to fax from your Mac on a regular basis, consider pagesender, from SmileOnMyMac, which offers a much more robust and complete feature set than Apple's Fax PDF option does.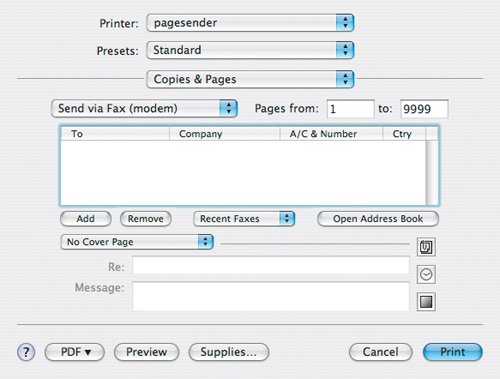 Of course, your Mac needs a modem in order for faxing to work. iBooks and PowerBooks have a modem built in. Most G4 anduntil fall 2005G5 PowerMacs had a modem built in. Apple's Intel-based Macs, including the MacBook Pro, don't include a modem. Apple and several other companies sell external modems that connect to your Mac via USB, but if you don't already have a modem in your Mac, it's probably easier just to buy a fax machine. |


EAN: 2147483647
Pages: 107