Managing Files with the Finder
| Imagine for a moment that a client calls and wants you to make one last change in his 60-page annual report before sending it off to the printer, but the file is nowhere to be found. Turns out you accidentally deleted it, and you don't have any other copies of it. Now you have only two hours to re-create three weeks' worth of work. If this designer's nightmare hasn't happened to you, odds are you know someone who has fallen victim to lost files. Happily for us all, these break-out-in-a-cold-sweat moments are easy to avoid, simply by backing up your projects to CDs or DVDs on a regular basis. The old excuse of "It's too hard to figure out how to burn a CD" won't fly anymore, thanks to Tiger's built-in disc-burning features. We'll take a look at a few ways to save your data to CDs and DVDs here, and in Chapter 9, "System Maintenance," we'll tackle creating a data-backup schedule. Burning CDs and DVDsAssuming you have an optical drive that can read and write discs, Mac OS X can create data CDs and DVDs right in the Finder. Here's how it works:
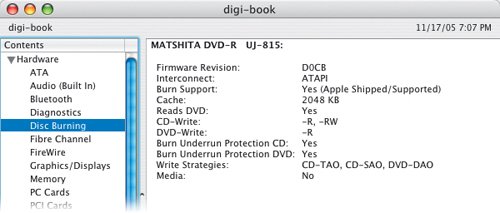
Unless you are using a CD-RW or DVD-RW/DVD+RW (rewritable), burning a CD or DVD is a one-shot deal. You can't go back and add more data to the disc later. Considering how cheap blank CDs and DVDs are, this isn't that big of a deal. The nice thing about burning CDs and DVDs in the Finder is that it's quick and easy. You don't have to worry about any special settingsjust pop a blank disc in your Mac, drag some files to it, and then eject. A note about the Trash icon: Normally, the Trash icon changes to an Eject icon when you drag a removable disk, network disk, or flash drive onto it. When you drag a burnable CD or DVD to the Trash, the icon changes to a radiation symbol (Figure 1.18). This lets you know that you are about to burn your disc. Figure 1.18. Drag a CD that you are ready to burn toward the Dock, and the Trash icon changes to the Burn icon. Drop your CD on the Burn icon to create your CD. When finished, your Mac automatically ejects the disc. Tip Determining the type of drive you have works for external drives that are connected via USB or FireWire too. Depending on how your drive is connected, select FireWire or USB, and your drive will show up in the right side of the window. The information is listed just the same as if the drive were inside your Mac. Just look for the telltale CD-RW/DVD-ROM and CD-RW/DVD-R. Determining your drive typeNot all optical drives are created equal. Apple uses two types of drives, depending on what model Mac you buy. The Combo drive can read CDs and DVDs, and burn CDs. The SuperDrive can read and burn CDs and DVDs. Even though most people associate DVDs with movies, consider upgrading to a SuperDrive if your model of Macintosh doesn't come with one. A DVD makes for great storage because it can hold about seven times more than a CD. If you aren't sure whether you have a Combo drive or SuperDrive, it's easy to check.
If you have a relatively new Mac, Reads DVD will display Yes, meaning you have at least a Combo drive capable of reading from and writing to CDs, as well as reading DVDs. CD-Write shows what types of CDs the drive can handle. -R indicates discs that can be burned to only once, and -RW indicates discs that can be written to, then erased and written to multiple times. A -R next to DVD-Write means you have a SuperDrive that can burn data and movie DVDs in addition to CDs.
Erasing a CD-RW or DVD-RWErasing a disc is one function that Apple could make a little more user friendly. Here's how to erase a CD-RW or DVD-RW:
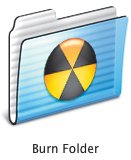
Burn FolderTiger has a great feature called a Burn Folder (Figure 1.22). You can use it to hold collections of files you want to burn to a CD or DVD without having to move files to different locations, potentially saving you from misplacing files. When you drag a file or folder into a Burn Folder, the original item stays where it was, and an alias is created inside the Burn Folder. When you are ready to burn a disc, the folder collects all of the files and creates the disc for you. Figure 1.22. You can store files in a Burn Folder until you are ready to burn a disc. You need to put a blank disc in your Mac only when you are ready to burn the files to CD or DVD. So, why use a Burn Folder instead of putting a blank disc in your Mac and dragging files to it? Because you may want to slowly collect files to burn to a disc over a period of days or weeks, and you don't want to keep a blank disc in your Mac while you build your collection. Burn Folders are also useful for organizing documents you plan on backing up or archiving. Make a series of Burn Folders for each backup you want to make, and burn your backups when you have time. Tip Burn Folders make easy work of archiving client projects. Drag all the page-layout files, graphics, fonts, and other digital assets for the project to a new Burn Folder. When the project is finished and ready to archive, use the Burn Folder to copy everything to a blank CD or DVD. It's an easy way to archive projects without having to worry about misplacing files while they are being copied. Setting up and using a Burn Folder is easy to do:
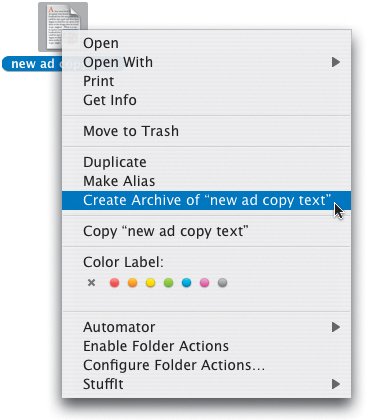
Archiving FilesSometimes you need to fit more files on a disk than you have space for, or you want to email several documents at the same time without worrying about the email-attachment-size caps that some Internet services impose. Creating an archive, or compressed version, of the files lets you save disk spaceor, in the case of email, hopefully keep under attachment-size limits. Tip The Finder's archive function is useful when you need to compress a project before it goes off to a service bureau, printer, or another designer but you have no way of finding out what operating system they are using. Windows and Mac users can both decompress a Zip file, and the tools are already built into Tiger. File compressionFile compression is the mystical art of converting a file to a smaller version of itself that can be converted back to its original, bigger form without losing any data. Mac OS X can create compressed files, or archives, for you. No extra tools needed. Just Control-click or right-click the file or folder of files you want to compress, and choose "Create Archive of" from the contextual menu (Figure 1.23). The compression format used is called Zip (files have the .zip extension), and it is cross-platform, meaning you can give archives to Windows users and open the archives they send you. Figure 1.23. To compress a file or folder into an archive, Control-click the item's icon, and then choose "Create Archive of" from the contextual menu. Your file or folder is compressed into a Zip file, suitable for giving to Mac or Windows users.
To decompress a Zip-formatted archive, just double-click its icon (Figure 1.24). If you aren't sure what kind of archive you have, look for the extension at the end of the file's name. Figure 1.24. A file that's been compressed with the Zip format looks like a document with a zipper. Files compressed using StuffIt get their own little box icon.
|


EAN: 2147483647
Pages: 107