External Database Configuration


For most database configurations, Windows NT/2000 databases excluded, ACS supports only one instance of a username and password. If you have multiple user databases with common usernames stored in each, you must take care in your database configurations because the first database to match the authentication credentials is the one that ACS uses from that point on for the user.

Take the following occurrence as an example; assume that you have a user on an Lightweight Directory Access Protocol (LDAP) server with the username of user1 and a password of cisco123. You also have a similar user on an external Open DataBase Connectivity (ODBC) database with the username of user1 and a password of ocsic321. The first database that matches with the username user1 and properly authenticates is the one that is used from that point on. If the external ODBC database were the one that was matched, user1 with a password of cisco123 would no longer be used by ACS.

After a user has been authenticated to an external database, the authorization that can take place is up to ACS. This can complicate things a little more because users authenticated from a CRYPTOCard Token server might require different authorizations on the network than those authenticated by the LDAP server.

Because of this need for different authorizations, you should place users authenticated by the CRYPTOCard server in one group and users authenticated by the LDAP server in another group. To do this, you use database group mappings. This is a way to map an authentication server, VASCO, CRYPTOCard, ODBC, and so on, to a group that you have configured in ACS. For some databases, a user can belong to only one group. For other databases, such as LDAP, Netscape Directory Server (NDS), and Windows, support for group mapping by external database group membership is possible.

To configure ACS for use with external databases, you begin in the External User Databases configuration tab from the left menu. Follow these steps to select an option:

NOTE

Until further noted in this chapter, we assume this to be the starting place for all configurations.


Step 1.

Select the External User Databases button on the left menu.

The result of the preceding step is that you are placed in the configuration screen for external user databases. In this configuration page seen in Figure 11-1, you can select between unknown user policy, database group mappings, and database configuration.

Figure 11-1. External User Databases Configuration


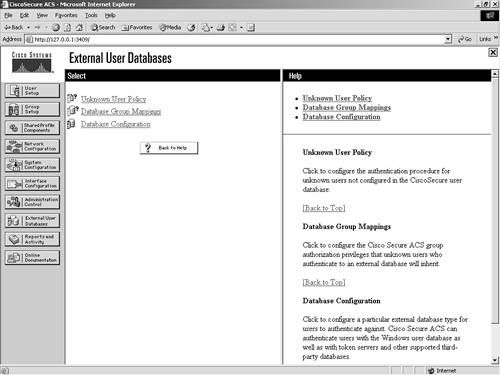
You are probably asking yourself why you would ever want to configure a policy for unknown users. It seems pretty straightforward that if you don't know a user, you would want them to fail authentication. The fact is that when you deal with multiple databases, not knowing a user only means that ACS does not know the user. You might trust another database that does know the user. Unknown user policy is where you configure the authentication procedure for users that are not located in the ACS database.

Database group mappings is where you configure what group privileges external database users inherit when authenticated in ACS. This means that in most cases when a user is authenticated by an external user database, his or her actual privileges are drawn from the ACS and not the external database.

You begin your configuration with the database configuration link. This is where you define all the external servers that you work with and authenticate users against. The Database Configuration page is seen in Figure 11-2 and is detailed in the list that follows:

  • Windows NT/2000

  • Novell NDS

  • Generic LDAP

  • External ODBC Database

  • LEAP Proxy RADIUS Server

  • RADIUS Token Server

  • VASCO Token Server

  • ActivCard Token Server

  • PassGo Defender Token Server

  • CRYPTOCard Token Server

  • SafeWord Token Server

  • RSA SecurID Token Server

Figure 11-2. Database Configuration


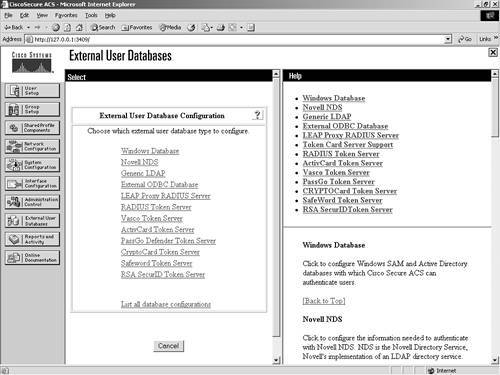
The following sections cover configuration of each of these databases in ACS. For each database that you configure, you must provide certain information, and you want to have the actual database configured before you begin.

Windows NT/2000

The Windows NT/2000 external database configuration is somewhat different from any other external database configuration. Because the ACS server is native to the Windows operating system, it has added functionality therein that you cannot get out of other databases. For example, with Windows NT/2000, you can map databases to domains, so you can have the same username across different domains, all with different passwords. Figure 11-3 shows the configuration of the Windows NT/2000 database. If you want to have more control over who is able to authenticate, you can select the Grant Dial-in Permissions check box in the Windows profile, and then select the option in ACS to verify that it is selected. It is important to understand that the Grant Dial-in Permissions option in ACS applies to any access that a user with the option enabled tries to make. The Grant Dial-in Permissions option does not just mean dialup.

Figure 11-3. Windows NT/2000 Configuration


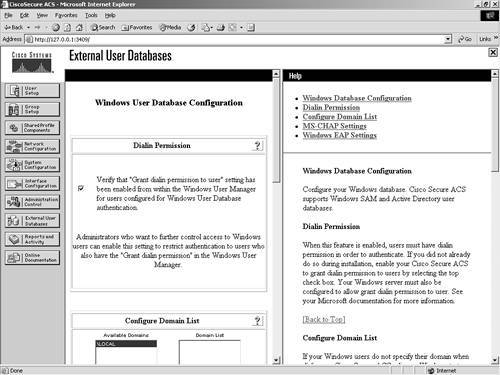
In addition to the capability to check for dial-in permission, ACS can search a list of trusted domains. In this scenario, a user would enter their domain\username and password, and the configuration of an external Windows NT/2000 database would search that domain. If you use a domain-qualified username, the domain list is irrelevant. ACS attempts to authenticate a domain-qualified username only against the domain it is specified as belonging to.

If you do not use a domain-qualified username, ACS submits the user credentials to Windows for authentication. If Windows rejects the user and the domain list is configured, ACS submits the user credentials again in a domain-qualified format, once per each domain in the domain list, until a domain authenticates the user or all explicitly queried domains have rejected the user credentials.

If the authentication request is denied, ACS logs the failed attempt and fails the request. If the credentials submitted by the user do not match the credentials associated with the first matching username that Windows finds, authentication fails.

This is the normal processing procedure; however, using the domain list is not required to support Windows authentication.

You can also see the domain list in Figure 11-4. Additionally, you can configure Microsoft Challenge Handshake Authentication Protocol (MS-CHAP) settings as seen in Figure 11-4. This allows for password changes using MS-CHAP version 1 or 2.

Figure 11-4. MS-CHAP Configuration
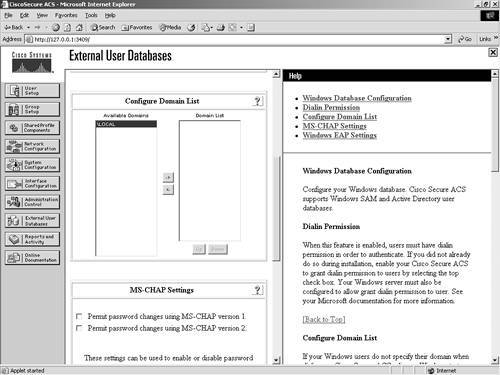

Novell NDS

The following steps configure most external databases. Here, they are seen in a generic form. You will find that you can use these steps time and time again when configuring multiple external databases. The generic steps to create the external server configuration are as follows:

Step 1.

Select the external database that you want to use with ACS to authenticate users. In this case, you select the Novell NDS link.

Step 2.

From the Database Configuration Creation page, select the Create New Configuration button.

Step 3.

From the Create a New External Database Configuration page, enter a name for your server and select Submit.

Step 4.

From the External User Database Configuration page, select the Configure button to configure server-specific parameters or the Delete button to delete the server configuration.

Figure 11-5 demonstrates the results. From this point on, these steps hold true for all other database configurations discussed in this chapter, unless further noted.

Figure 11-5. Novell NDS Server Creation


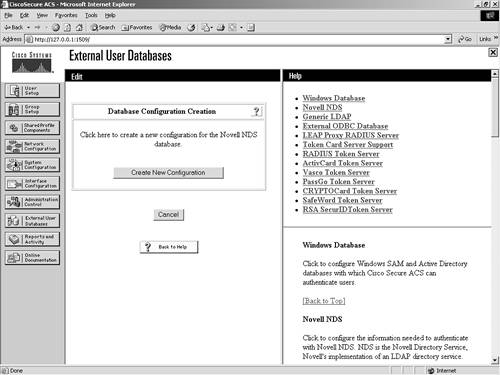
NOTE

ACS supports ASCII, PAP, PEAP (EAP-GTC), and EAP-TLS authentication with Novell NetWare Directory Services (NDS) servers.


To facilitate the communications between the ACS and Novell NDS server, you need to install Novell Requestor software on the same server as ACS. The Novell Requestor software is available by downloading the Novell client and installing it. Without this client, you cannot proceed, and you get an error in ACS. Once the Authenticator is installed, you are able to access the configuration page seen in Figure 11-6.

Figure 11-6. Novell NDS Database Authentication Support


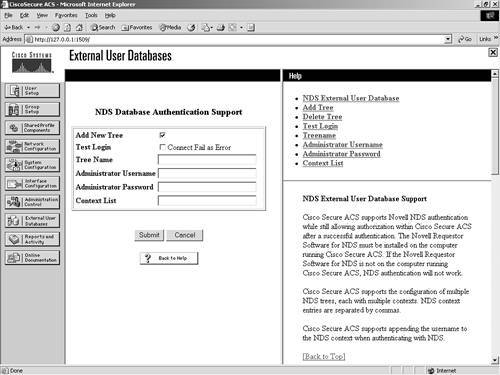
To configure ACS for NDS, perform these tasks:

Step 1.

You must select the check box indicating that you want to Add New Tree.

Step 2.

Choose the Test Login option if you want ACS to test the tree's administrative login when you click Submit.

Step 3.

Enter a tree name.

Step 4.

Enter an administrator username.

Step 5.

Enter an administrator password.

Step 6.

Enter a context list. A context list is similar to the path where the user information is located.

Step 7.

Click the Submit button to complete your configuration.

After you have named a tree, you can't change it, so you must completely remove the entry by deleting the tree. Also notice that for Novell NDS, you can create only one configuration. This differs from other external databases such as the Generic LDAP database, where you can configure more than one database entry. However, you can add new trees within the same configuration. A sample of what an NDS configuration might look like is seen in Figure 11-7.

Figure 11-7. Sample NDS Configuration in ACS
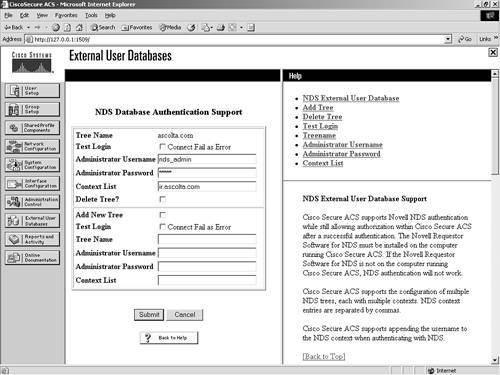

Generic LDAP

For the configuration of a Generic LDAP server, you follow the same generic process as seen in the Novell NDS section earlier in the chapter; however, the configuration parameters are different because of the type of server you are accessing. LDAP is the Lightweight Directory Access Protocol (LDAP), and ACS provides support for ASCII, PAP, EAP-TLS, and PEAP (EAP-GTC) authentication using Generic LDAP.

LDAP configuration can contain more than one subtree for users or groups, and each LDAP configuration supports only one subtree directory for users and one subtree directory for groups. Therefore, you have to configure separate LDAP instances for each user directory subtree and group directory subtree combination for which Cisco Secure Access Control Server (CSACS) submits authentication requests. In Figure 11-8, you can see that an LDAP database is configured already, and also an option to create a new configuration exists.

Figure 11-8. Database Configuration and Creation of LDAP


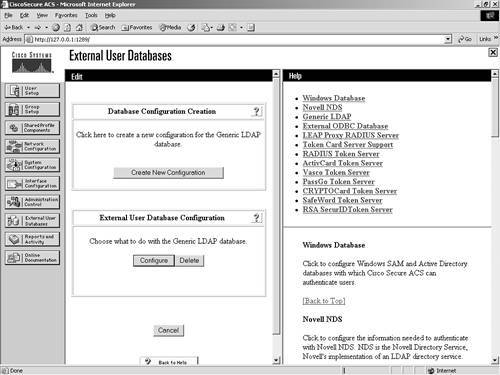
The information required to communicate with the Generic LDAP server includes domain filtering options, common LDAP configuration parameters, and server-specific information.

You can direct authentication in LDAP by utilizing the domain filtering features in ACS. Users can enter a username in the format username@domainname. In this case, you might want to filter based on this. Enter the domain qualifier as @domainname. This defines what ACS is to look for. The domain filtering options available in ACS are as follows:

  • Process all usernames

  • Process only usernames that are domain qualified

    - Qualified by suffix or prefix

    - Domain qualifier

    - Strip domain before submitting username to the LDAP server

  • Process all usernames after stripping domain name and delimiter

    - Strip starting characters through the last XX character, where XX is a value

    - Strip ending characters from the first XX character, where XX is a value

The following parameters are considered common LDAP configuration parameters and are seen in Figure 11-9:

  • User Directory Subtree

  • Group Directory Subtree

  • UserObjectType

  • UserObjectClass

  • GroupObjectType

  • GroupObjectClass

  • Group Attribute Name

  • Server Timeout

  • On Timeout Use Secondary option

  • Failback Retry Delay

Figure 11-9. Common LDAP Configuration Parameters


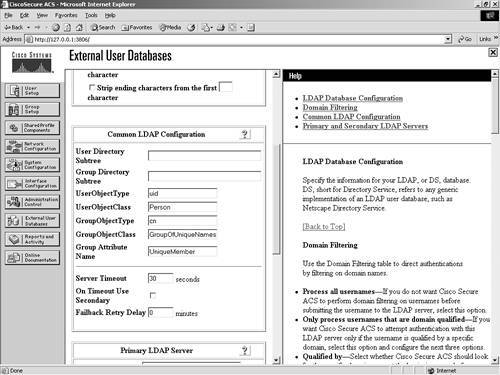
Along with the common configuration parameters, you also need to specify some server-specific options. Figure 11-10 shows the server-specific options. They include the following for both the primary and secondary server:

  • Hostname

  • Port

  • LDAP Version

  • Security (Use Secure Authentication)

  • Certificate DB Path

  • Admin DN

  • Password

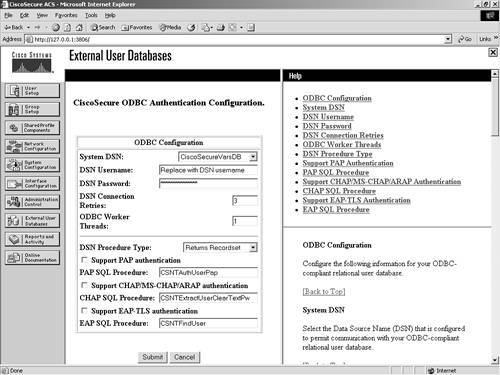
Figure 11-10. LDAP Server Configuration Parameters


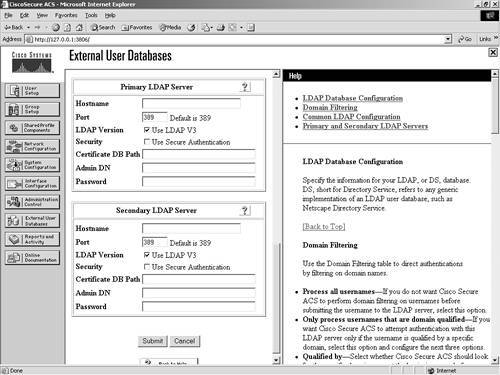
After your configuration has been submitted, you are ready to communicate with the LDAP server.

External ODBC Database

You have the ability to configure ACS to authenticate to an ODBC-compliant relational database. When you authenticate users to a relational database of this type, ACS supports ASCII, PAP, ARAP, CHAP, MS-CHAP (versions 1 and 2), LEAP, EAP-TLS, EAP-MD5, and PEAP (EAP-GTC). This is done through the ODBC Authenticator feature. Other authentication protocols are not supported with ODBC external user databases; however, they might be compatible with other external type databases.

You can also configure the relational database to assign groups to users that have been authenticated to the database. This type of group specification overrides database group mappings discussed in a later section.

The following explains how ACS processes authentication with an ODBC external user database:

[1] Cisco Secure ACS forwards user authentication requests to an ODBC database in either of the two following scenarios. The first scenario is when the user account in the Cisco Secure user database lists an ODBC database configuration as the authentication method. The second is when the user is unknown to the Cisco Secure user database and the Unknown User Policy dictates that an ODBC database is the next external user database to try.

In either case, Cisco Secure ACS forwards user credentials to the ODBC database via an ODBC connection. The relational database must have a stored procedure that queries the appropriate tables and returns values to Cisco Secure ACS. If the returned values indicate that the user credentials provided are valid, Cisco Secure ACS instructs the requesting AAA client to grant the user access; otherwise, Cisco Secure ACS denies the user access.

Cisco Secure ACS grants authorization based on the Cisco Secure ACS group to which the user is assigned. While the group to which a user is assigned can be determined by information from the ODBC database using a process known as "group specification," it is Cisco Secure ACS that grants authorization privileges.

When utilizing an external ODBC database, you can set up only a single configuration. You do not have the option to create a new configuration after the initial configuration is set up; rather, you can configure or delete the configuration.

To configure the database information, follow these steps:

Step 1.

Select the Configure option from the External User Database screen.

Step 2.

You can now enter the information necessary to communicate with the external database. Figure 11-11 shows the options that you must provide, including the following:

- System DSN:

  • CiscoSecureVarsDB

  • CiscoSecureDBSync

- DSN Username

- DSN Password

- DSN Connection Retries, with a default of 3

- ODBC Worker Threads, with a default of 1

- DSN Procedure Type:

  • Returns Recordset (Microsoft SQL)

  • Returns Parameters

- Support PAP authentication

- PAP SQL Procedure, with a default of CSNTAuthUserPap

- Support CHAP/MS-CHAP/ARAP authentication

- CHAP SQL Procedure, with a default of CSNTExtractUserClearTextPw

- Support EAP-TLS authentication

- EAP SQL Procedure, with a default of CSNTFindUser

Figure 11-11. External ODBC Database Parameters


To configure the database parameters, follow these steps:

Step 1.

Select the System DSN.

Step 2.

Enter the Domain Name System (DSN) username.

Step 3.

Enter the DSN password.

Step 4.

Enter a value for connection retries or leave the default value of 3.

Step 5.

Enter the number of ODBC worker threads or leave the default value of 1. The maximum value is 10. You should increase this value only if the ODBC driver you are using is certified thread safe.

Step 6.

Select the DSN procedure type. The two options available are Returns Recordset or Returns Parameters. This tells ACS how it receives information from the relational database. For Microsoft SQL, use the Returns Recordset procedure type. For Oracle databases, choose Returns Parameters.

Step 7.

If you want to support PAP authentication, check the Support for PAP authentication check box.

Step 8.

Enter the PAP SQL procedure type or leave it with the default CSNTAuthUserPap.

Step 9.

If you want to support CHAP/MS-CHAP/ARAP authentication, check the Support CHAP/MS-CHAP/ARAP authentication check box.

Step 10.

Enter the CHAP SQL Procedure. The default is CSNTExtractUserClearTextPw.

Step 11.

If you want to support EAP-TLS authentication, check the Support EAP-TLS authentication check box.

Step 12.

Enter the EAP-SQL Procedure. The default value is CSNTFindUser.

Step 13.

When finished, click the Submit button.

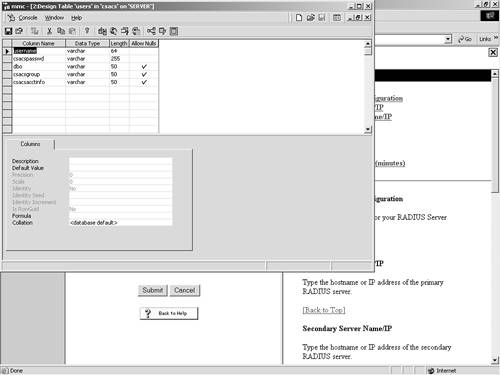
If the ODBC drivers on the server are configured correctly, the screen refreshes to a successful completion page, as seen in Figure 11-12.

Figure 11-12. Successful ODBC Database Configuration Screen


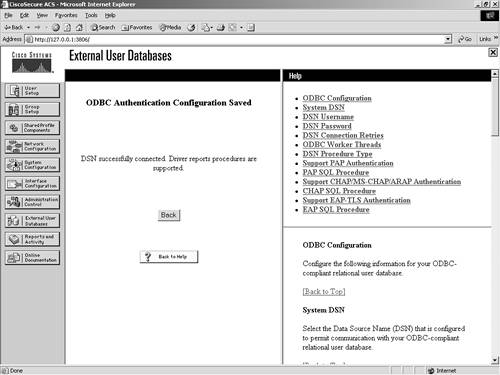
Note that this cannot be successful unless the ODBC drivers are properly configured. After the ODBC drivers are configured, you need to configure the ODBC server. For purposes of simplicity, the following example is the configuration of a SQL server using PAP authentication.

The following steps can be used to configure a simple database in SQL to facilitate PAP authentication:

Step 1.

Create a database that you can use for authentication using the SQL Server Enterprise manager.

Step 2.

Enter a user for the database that can be authenticated with the ODBC driver.

Step 3.

In the database that you have created, create a table. (We call this table users for this example.)

Step 4.

For the table, create the following columns:

- username

- csacspasswd

- dbo

- csacsgroup

- csacsacctinfo

Step 5.

Make the all columns data type VARCHAR. For the username column, set the length to 64, and for csacspasswd, set the length to 255. You can take the defaults for the rest. We also allowed nulls for everything but username and csacspasswd. You can see an example of this table in Figure 11-13.

Figure 11-13. Table Creation in SQL 2000


Step 6.

Next, using the SQL Server Query Analyzer, you can paste the following:

 drop procedure dbo.CSNTAuthUserPap GO CREATE PROCEDURE CSNTAuthUserPap @username varchar(64), @pass varchar(255) AS SET NOCOUNT ON IF EXISTS( SELECT username FROM users WHERE username = @username AND csacspasswd = @pass ) SELECT 0,csacsgroup,csacsacctinfo,"No Error" FROM users WHERE username = @username ELSE SELECT 3,0,"odbc","ODBC Authen Error" GO GRANT EXECUTE ON dbo.CSNTAuthUserPap TO Administrator GO 

Step 7.

Select the database that you are working with from the drop-down menu.

Step 8.

Press the F5 key. (You should receive the following output: "The command(s) completed successfully.")

Step 9.

Save your query results and you are done. This completes the process of configuring the ODBC database configuration in ACS. If you need additional guidance, the ACS CD includes stub routines for creating both SQL and Oracle procedures.

LEAP Proxy RADIUS Server

[2] For Cisco Secure ACS-authenticated users accessing your network via Cisco Aironet devices, Cisco Secure ACS supports ASCII, PAP, MS-CHAP (versions 1 and 2), and LEAP authentication with a proxy RADIUS server. Other authentication protocols are not supported with LEAP Proxy RADIUS Server databases.

Cisco Secure ACS uses MS-CHAP version 1 for LEAP Proxy RADIUS Server authentication. To manage your proxy RADIUS database, refer to your RADIUS database documentation.

Lightweight Extensible Authentication Protocol (LEAP) Proxy RADIUS Server authentication allows you to authenticate users against existing Kerberos databases that support MS-CHAP authentication. You can use the LEAP Proxy RADIUS Server database to authenticate users with any third-party RADIUS server that supports MS-CHAP authentication.

The third-party RADIUS server must return Microsoft Point-to-Point Encryption (MPPE) keys in the Microsoft RADIUS vendor-specific attribute (VSA) MSCHAP-MPPE-Keys (VSA 12). If the third-party RADIUS server does not return the MPPE keys, the authentication fails and is logged in the Failed Attempts log.

You should install and configure your proxy RADIUS server before configuring Cisco Secure ACS to authenticate users with it. For information about installing the proxy RADIUS server, refer to the documentation included with your RADIUS server.

To configure a LEAP Proxy RADIUS Server, begin by selecting the LEAP Proxy RADIUS Server link in the External User Database Configuration page. Upon selecting this link, you are taken to the page that creates this configuration in ACS.

To establish a LEAP Proxy RADIUS Server configuration in ACS, follow these steps:

Step 1.

From External User Databases, select Database Configuration.

Step 2.

Select LEAP Proxy RADIUS Server.

Step 3.

Select the Create New Configuration button.

Step 4.

Enter a name for your new configuration.

Step 5.

Choose Submit.

This creates the entry. After the entry is created, you then can configure the parameters required for the connection to take place.

To configure the database parameters, follow these steps:

Step 1.

Select the Configure button.

Step 2.

Enter the primary server name/IP.

Step 3.

Enter the secondary server name/IP.

Step 4.

Enter the shared secret.

Step 5.

Enter the authentication port. This can usually be left as the default of 1812.

Step 6.

Enter the timeout (seconds). The default value is 10 seconds.

Step 7.

Enter the number of retries. The default is 3.

Step 8.

Enter the failback retry delay (minutes). The default value is 5.

Step 9.

Click Submit.

This enables the database in ACS. You can see an example of this configuration in Figure 11-14. Later in this chapter, you learn how to use this database for user authentication.

Figure 11-14. LEAP Proxy RADIUS Server Configuration
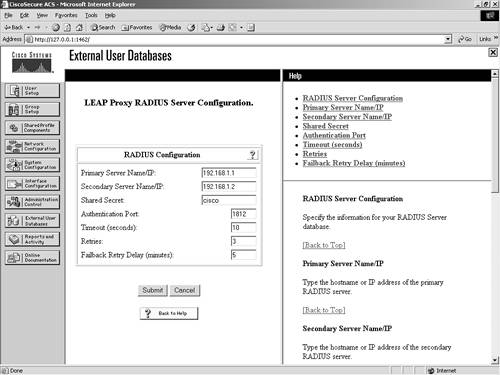

RADIUS Token Server

To configure ACS to work with a RADIUS Token Server, begin with the following steps:

Step 1.

From External User Databases, select Database Configuration.

Step 2.

Select RADIUS Token Server.

Step 3.

Select the Create New Configuration button.

Step 4.

Enter a name for your new configuration.

Step 5.

Choose Submit.

To configure the database parameters, follow these steps:

Step 1.

Select the Configure button.

Step 2.

Enter the primary server name/IP.

Step 3.

Enter the secondary server name/IP.

Step 4.

Enter the shared secret.

Step 5.

Enter the authentication port. This can usually be left as the default of 1812.

Step 6.

Enter the timeout (seconds). The default value is 10 seconds.

Step 7.

Enter the number of retries. The default is 3.

Step 8.

Enter the failback retry delay (minutes). The default value is 5.

You might note that the preceding steps are the same steps as you performed for the LEAP Proxy RADIUS Server. However, you can note a difference in this configuration. You have the ability to configure TACACS+ Shell Configuration options. This enables you to specify how Cisco Secure ACS should respond to TACACS+ authentication requests for users authenticating with this RADIUS Token Server. To configure these options, perform the following tasks:

Step 1.

Under the heading Shell Password Prompt, select the radio button for Static (sync and async tokens) and enter a prompt, or select From Token Server (async tokens only) and enter a password.

Step 2.

To complete the configuration, click Submit.

This can be seen in Figure 11-15.

Figure 11-15. Configuring RADIUS Token Server Parameters


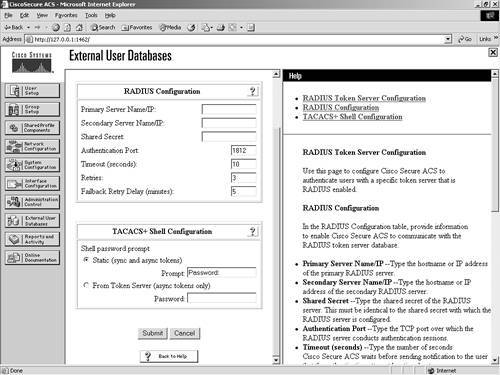
As you can see in Figure 11-16, you can create another RADIUS Token Server entry, or you can configure or delete the one you just made.

Figure 11-16. Configure/Delete RADIUS Token Server


This completes the configuration. To configure another server, repeat the process.

VASCO Token Server

To configure ACS to work with a VASCO Token Server, begin with the following steps:

Step 1.

From External User Databases, select Database Configuration.

Step 2.

Select VASCO Token Server.

Step 3.

Select the Create New Configuration button.

Step 4.

Enter a name for your new configuration.

Step 5.

Choose Submit.

To configure the database parameters, follow these steps:

Step 1.

Select the Configure button.

Step 2.

Enter the primary server name/IP.

Step 3.

Enter the secondary server name/IP.

Step 4.

Enter the shared secret.

Step 5.

Enter the authentication port. This can usually be left as the default of 1812.

Step 6.

Enter the timeout (seconds). The default value is 10 seconds.

Step 7.

Enter the number of retries. The default is 3.

Step 8.

Enter the failback retry delay (minutes). The default value is 5.

To configure these options, perform the following tasks:

Step 1.

Under the heading Shell Password Prompt, select the radio button for Static (sync and async tokens) and enter a prompt, or select From Token Server (async tokens only) and enter a password.

Step 2.

To complete the configuration, click Submit.

As you can see in Figure 11-17, you can create another VASCO Token Server entry, or you can configure or delete the one you just made.

Figure 11-17. Configure/Delete VASCO Token Server


This completes the configuration. To configure another server, repeat the process.

ActivCard Token Server

To configure ACS to work with an ActivCard Token Server, begin with the following steps:

Step 1.

From External User Databases, select Database Configuration.

Step 2.

Select ActivCard Token Server.

Step 3.

Select the Create New Configuration button.

Step 4.

Enter a name for your new configuration.

Step 5.

Choose Submit.

To configure the database parameters, follow these steps:

Step 1.

Select the Configure button.

Step 2.

Enter the primary server name/IP.

Step 3.

Enter the secondary server name/IP.

Step 4.

Enter the shared secret.

Step 5.

Enter the authentication port. This can usually be left as the default of 1812.

Step 6.

Enter the timeout (seconds). The default value is 10 seconds.

Step 7.

Enter the number of retries. The default is 3.

Step 8.

Enter the failback retry delay (minutes). The default value is 5.

To configure these options, perform the following tasks:

Step 1.

Under the heading Shell Password Prompt, select the radio button for Static (sync and async tokens) and enter a prompt, or select From Token Server (async tokens only) and enter a password.

Step 2.

To complete the configuration, click Submit.

PassGo Defender Token Server

To configure ACS to work with a PassGo Defender Token Server, begin with the following steps:

Step 1.

From External User Databases, select Database Configuration.

Step 2.

Select PassGo Defender Token Server.

Step 3.

Select the Create New Configuration button.

Step 4.

Enter a name for your new configuration.

Step 5.

Choose Submit.

To configure the database parameters, follow these steps:

Step 1.

Select the Configure button.

Step 2.

Enter the primary server name/IP.

Step 3.

Enter the secondary server name/IP.

Step 4.

Enter the shared secret.

Step 5.

Enter the authentication port. This can usually be left as the default of 1812.

Step 6.

Enter the timeout (seconds). The default value is 10 seconds.

Step 7.

Enter the number of retries. The default is 3.

Step 8.

Enter the failback retry delay (minutes). The default value is 5.

To configure these options, perform the following tasks:

Step 1.

Under the heading Shell Password Prompt, select the radio button for Static (sync and async tokens) and enter a prompt, or select From Token Server (async tokens only) and enter a password.

Step 2.

To complete the configuration, click Submit.

CRYPTOCard Token Server

To configure ACS to work with a CRYPTOCard Token Server, begin with the following steps:

Step 1.

From External User Databases, select Database Configuration.

Step 2.

Select CRYPTOCard Token Server.

Step 3.

Select the Create New Configuration button.

Step 4.

Enter a name for your new configuration.

Step 5.

Choose Submit.

To configure the database parameters, follow these steps:

Step 1.

Select the Configure button.

Step 2.

Enter the primary server name/IP.

Step 3.

Enter the secondary server name/IP.

Step 4.

Enter the shared secret.

Step 5.

Enter the authentication port. This can usually be left as the default of 1812.

Step 6.

Enter the timeout (seconds). The default value is 10 seconds.

Step 7.

Enter the number of retries. The default is 3.

Step 8.

Enter the failback retry delay (minutes). The default value is 5.

To configure these options, perform the following tasks:

Step 1.

Under the heading Shell Password Prompt, select the radio button for Static (sync and async tokens) and enter a prompt, or select From Token Server (async tokens only) and enter a password.

Step 2.

To complete the configuration, click Submit.

SafeWord Token Server

To configure ACS to work with a SafeWord Token Server, begin with the following steps:

Step 1.

From External User Databases, select Database Configuration.

Step 2.

Select SafeWord Token Server.

Step 3.

Select the Create New Configuration button.

Step 4.

Enter a name for your new configuration.

Step 5.

Choose Submit.

To configure the database parameters, follow these steps:

Step 1.

Select the Configure button.

Step 2.

Enter the primary server name/IP.

Step 3.

Enter the secondary server name/IP.

Step 4.

Enter the shared secret.

Step 5.

Enter the authentication port. This can usually be left as the default of 1812.

Step 6.

Enter the timeout (seconds). The default value is 10 seconds.

Step 7.

Enter the number of retries. The default is 3.

Step 8.

Enter the failback retry delay (minutes). The default value is 5.

To configure these options, perform the following tasks:

Step 1.

Under the heading Shell Password Prompt, select the radio button for Static (sync and async tokens) and enter a prompt, or select From Token Server (async tokens only) and enter a password.

Step 2.

To complete the configuration, click Submit.

RSA SecurID Token Server

The configuration of an RSA server is somewhat different from the others in that after the server configuration is created, it is the only one available. This means that you can configure only one server. Also, RSA SecurID Token Servers require additional software be installed on the ACS server. If the RSA software is not installed, you receive an error similar to the one seen in Figure 11-18. After the RSA software has been installed, you are then able to configure the ACS parameters. For help installing the software or to obtain RSA software, you can visit www.rsasecurity.com.

Figure 11-18. RSA Configuration Error


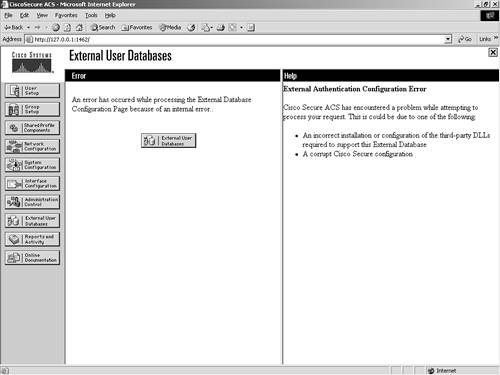
If your installation is correct, ACS displays the name of the token server and the path to the authenticator DLL. This indicates that the installation of the RSA ACE client for Windows 2000 is configured properly. For information on how to install the ACE client, refer to the ACS configuration guides provided with ACS or at www.cisco.com.


Cisco Access Control Security(c) AAA Administrative Services
Cisco Access Control Security: AAA Administration Services
ISBN: 1587051249
EAN: 2147483647
Year: 2006
Pages: 173

flylib.com © 2008-2017.
If you may any questions please contact us: flylib@qtcs.net