Using The Design Document
|
| < Day Day Up > |
|
Writing Your Design Document
Before you sit down to write your design document, you should have spent a considerable amount of time thinking through the gameplay. The best way to do this, as we already discussed, is to build a physical or software prototype of your game and playtest it, improving and expanding your design until you have a solid foundation for your full game. Only after you have gone through several iterations of prototype can you really be ready to write your design document.
Many designers will move to an outline, and start pounding out the text of the design document at this point. We recommend flowcharting your entire game and building a set of wireframe interfaces for every screen in the game first. As we briefly discussed in Chapter 11 on page 306, a wireframe is a rough sketch that shows all the features that will need to be included on an interface screen. By sketching out both the flow of the game and every required screen, you will be forced to think through the entire player experience for the game—finding inconsistencies and issues before any artwork or programming has been done.
Figure 14.2 is an example of a game flowchart created using typical software, like Microsoft Visio. This is for an online multiplayer version of the Wheel of Fortune game. As you can see, it illustrates how players move through the game and interact with it. Notice how the flowchart shows all possible paths through the game and all possible results, including how the player wins and loses, as well as what happens if the player disconnects.
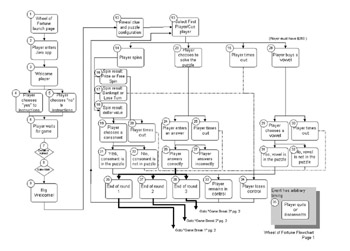
Figure 14.2: Flowchart for multiplayer Wheel of Fortune
You can use flowcharts to map out all sorts of processes within your game. The more detailed you are, the easier it will be to communicate your ideas to your teammates.
After you create your flowcharts, you’ll need to sketch out the main interfaces for the game in wireframe format. Figure 14.3 shows an interface wireframe from Wheel of Fortune, an early concept sketch for the interface, and the final interface as released. If you look closely, you’ll see that several changes were made during production—notably in the way that chat is handled in the game. Wireframes are not the end of the design process, but the beginning. They give the game designer, the artists, programmers, and producers a visual reference point to discuss the game in its early stages. They can also be usability tested at this point. Changes can be made to the design at this point, when they cost nothing to make, rather than months down the road when they would have much higher repercussions.
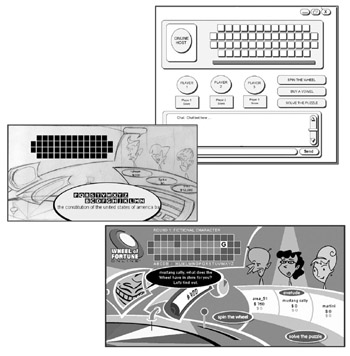
Figure 14.3: Interface wireframes, sketches, and final interface for multiplayer Wheel of Fortune
Exercise 14.2: Flowchart and Wireframes
Either on paper or using a software tool like MS Visio or Flow Charting PDQ, create a full flowchart for your original game design. Complete the set of wireframes you created in Exercise 11.8 if you have not yet done so. Now, annotate your wireframes with callouts describing every feature as described in the next paragraph.
Now that you’ve created a prototype, a flow chart, and a full set of wireframes, you will have a very good idea of what you need to communicate in your design document. You’ll also have a set of visual aids for explaining the features of you game. Most people can absorb information more clearly from visual displays like your wireframes than from long paragraphs of text explaining the features of your game. Because of this, your wireframes are not only a good tool to help you think through your game, but they are an excellent reference point for your readers. As you outline your document, use the flowchart and wireframes to explain the areas and features of the game. You may want to create callouts on your wireframes explaining how various features will work. These callouts can be supported by bullet points that expand on the visual diagrams.
Ideally, by working through your concept from prototype to flowchart and wireframes to documentation, you will find that the document is actually quite simple to write. Instead of being faced with the mammoth task of thinking through the game while you write the document, you will have broken the task down into smaller stages that allow the game itself to dictate how the design document should be written.
As with the rest of your design experience, the document should be an interactive process. Don’t try to complete it in a single pass. Let it grow over time. Fill out sections as they become clear, then go back to other sections and refine them.
Exercise 14.3: Table of Contents
Outline the table of contents for your original design document. Consider every aspect of your prototype, flowchart, and wireframes when you are deciding how to describe your game. Draw from the example documents you downloaded from the web and the ones shown in this chapter.
You may realize while writing a later section that your thoughts from an earlier section need to be revised. Since everything in the design document is linked, you’ll be continually going back and forth between the sections, modifying and updating them. Here’s an example as to how the process might go for the “level design” section:• First pass: Make outline of all levels and give them names
-
Second pass: Write one paragraph descriptions of what takes place on each level
-
Third pass: Design maps for each level
-
Fourth pass: Populate maps with content
Exercise 14.4: Fleshing Out Your Design Document
Flesh out your design document using your table of contents, your flowchart, wireframes, and the documentation you created while designing your prototype, such as your concept document, rules, etc. Work with your team members to complete each section as described earlier.
|
| < Day Day Up > |
|
EAN: 2147483647
Pages: 162