Changing the Look of Characters
Changing the Look of Characters
The text you type in a document is displayed in a particular font. A font is a complete set of characters that all have the same design. The fonts that are available vary from one computer to another. Common fonts include Times New Roman, Courier, and Arial.
You can vary a font s basic design by changing the following attributes :
-
Almost every font comes in a range of font sizes . The font size is measuredin points , from the top of letters that have parts that stick up (ascenders), such as h , to the bottom of letters that have parts that drop down (descenders), such as p . Each point is equal to about 1/72 of an inch.
-
Almost every font comes in a range of font styles . The most common are regular (or plain), italic, bold, and bold italic.
-
Fonts can be enhanced by applying font effects , such as underlining, small capital letters, or shadows.
-
A range of font colors is available in a standard palette, but you can also specify custom colors.
-
You can alter character spacing by pushing characters apart or squeezing them together to achieve a desired effect.
After you have selected an appropriate font for each element of a document, you can use these sets of attributes to achieve different effects. Although some attributes might cancel each other out, they are usually cumulative. For example, The Garden Company might use a bold font in various sizes and various shades of green to make different heading levels stand out in a newsletter. Collectively, the font and the attributes used to vary its look are called character formatting .
| Tip | The way you use attributes in a document can influence its visual impact on your readers. Used judiciously, attributes can make a plain document look attractive and professional, but excessive use can make it look amateurish and detract from the message. For example, using too many different fonts within the same document is the mark of inexperience, so the rule of thumb is to not use more than two or three. Also, because lowercase letters tend to recede, using all uppercase (capitals) letters can be usefulfor titles and headings or for certain kinds of emphasis. However, large blocks of uppercase letters are tiring to the eye. (Where do the terms uppercase and lowercase come from? Until the advent of computers, individual letter blocks were assembled to form the words that would appear on a printed page. The blocks were stored alphabetically in cases, with the capital letters in the upper case and the small letters in the lower case.) |
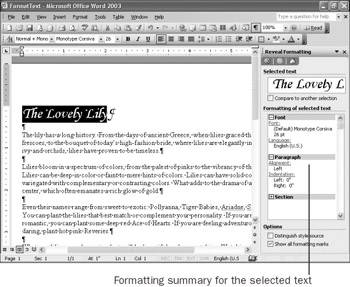
When you are formatting a document, you can open the Reveal Formatting task pane to display the formatting of selected text, such as its font and font effects. In this task pane you can display, change, or clear the formatting for the selected text. You can also use the Reveal Formatting task pane to select text based on formatting, which enables you to compare the formatting used in the selected text with formatting used in other parts of the document.
In this exercise, you will format the text in a document by changing its font, font size, font color , and character spacing.
BE SURE TO start Word before beginning this exercise.
USE the FormatText document in the practice file folder for this topic. This practice file is located inthe ![]() My Documents\Microsoft Press\Office 2003 SBS\ChangingText\ChangingChar folder and can also be accessed by clicking Start/All Programs/Microsoft Press/Microsoft Office System 2003 Step by Step .
My Documents\Microsoft Press\Office 2003 SBS\ChangingText\ChangingChar folder and can also be accessed by clicking Start/All Programs/Microsoft Press/Microsoft Office System 2003 Step by Step .
OPEN the FormatText document.
-
Select The Lovely Lily , the title at the top of the document.
-
On the Formatting toolbar, click the down arrow to the right of the Font box, scroll the list of available fonts, and click Monotype Corsiva .
Troubleshooting If Monotype Corsiva is not available, select a similar script-style font, such as Brush Script MT.
The title at the top of the document now appears in the new font.
-
On the Formatting toolbar, click the down arrow to the right of the Font Size box,and click 26 in the list.
The size of the title text increases to 26 points.
-
On the Format menu, click Reveal Formatting .
The Reveal Formatting task pane appears, displaying the formatting of the selected text.
-
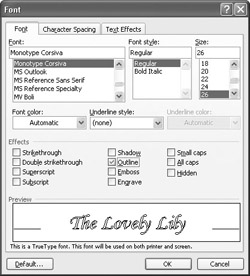
In the Font area of the Reveal Formatting task pane, click the Font link (the blue underlined word) to display the Font dialog box.
-
In the Effects area of the Font dialog box, select the Outline check box.
In the Preview box, the text changes to show how it will look with this effect applied.
-
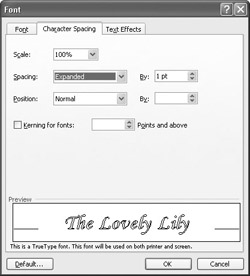
Click the Character Spacing tab.
-
Click the down arrow to the right of the Spacing box, and click Expanded .
-
Click the up arrow to the right of the adjacent By box until the spacing is expanded by 2 pt (points), and then click OK .
The selected text appears with an outline effect and with the spacing between the characters expanded by 2 points. Both of these effects are now listed in the Font area of the Reveal Formatting task pane.
-
At the top of the Reveal Formatting task pane, point to the Selected text box,and when a down arrow appears, click the arrow, and then click Clear Formatting .
The formatting of the selected text is removed.
-
On the Standard toolbar, click the Undo button.
The formatting of the selected text is restored.
-
Select the word pinks in the first sentence of the second paragraph.
-
On the Formatting toolbar, click the down arrow to the right of the Font Color button, and then on the color palette, click the Pink box in the first column of the fourth row.
The color of the selected word is now pink. (You ll need to deselect it in orderto see the color.) Its formatting is listed in the Font area of the Reveal Formatting task pane.
Tip To apply the most recently selected color to other text, select the word or phrase, and then click the Font Color button (not the down arrow). The color that appears on the Font Color button is applied to the selected text.
-
Select the phrase rich glow of gold at the end of the second paragraph, click the down arrow to the right of the Highlight button on the Formatting toolbar, and then on the color palette, click the Yellow box in the first column of the first row.
The highlighted phrase now stands out from the rest of the text.
Tip You don t have to select the text before choosing a highlighting color. If you select a highlighting color from the color palette without first selecting text, the mouse pointer becomes a highlighter, and you can drag across text to highlight it. Click the Highlight button to turn off the highlighter.
-
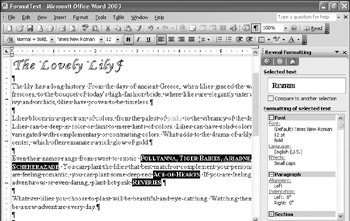
Select the text Pollyanna, Tiger Babies, Ariadne, Scheharazade in the third paragraph.
Troubleshooting If the Reveal Formatting task pane overlays some of the text in the document, you can either scroll the horizontal scroll bar or make the task pane narrower. Point to the left border of the task pane, and when the pointer changes to a double arrow, drag the border toward the right so that more of the document s text is visible.
-
On the Format menu, click Font to open the Font dialog box, select the Small caps check box, and click OK .
The lowercase letters in the names of the lilies now appear in small capital letters, making those names easy to find in the text.
-
In the same paragraph, select Ace of Hearts , hold down the [CONTROL] key, and double-click Reveries in the last line of the paragraph to add that word to the selection.
-
Press the [F4] key.
These two lily names now appear in small caps. When you press [F4], your last editing or formatting action is applied to the selected text.
-
In the Reveal Formatting task pane, point to the Selected text box, click the down arrow, and then click Select All Text With Similar Formatting .
All the flower names that have been formatted in small caps are selected.
-
On the Formatting toolbar, click the Bold button.
The flower names are now both small caps and bold.
-
In the Reveal Formatting task pane, click the Close button.
The Reveal Formatting task pane closes .
-
On the Standard toolbar, click the Save button.
Word saves your changes to the document.
CLOSE the FormatText document.
| |
If someone will be reading your document on a computer, you can apply effects that will make your text vibrant and visually alive . For example, you can add flashing lights or a marquee that will draw your reader s attention to specific words and phrases. To create these special effects, you apply an animation effect to selected text.
To apply an animation effect:
-
Select the text that you want to animate.
-
On the Format menu, click Font .
The Font dialog box appears.
-
Click the Text Effects tab.
-
In the Animations box, select the animation effect you want to apply to the selected text.
-
Click OK.
| |
EAN: 2147483647
Pages: 350