Marking Notes with Note Flags
While reviewing notes in a paper notebook, people often mark various sections with stars or check marks, circle other items, or use a highlighter. Frequently, these markings are inconsistent and difficult or impossible to change later.
With Note Flags in OneNote, you can mark your notes with consistent flags ”a check box for an action item, a star for important items, and so on. OneNote includes a few preset flags that you can customize, and you can create your own. You can also highlight parts of notes to draw attention to them.
In this exercise, you will update your notes to record the status of some action items and call attention to others.
USE the Action Items notebook in the practice file folder for this topic. This practice file is located inthe ![]() My Documents\Microsoft Press\Office 2003 SBS\Mini folder and can also be accessed by clicking Start/All Programs/Microsoft Press/Microsoft Office System 2003 Step by Step .
My Documents\Microsoft Press\Office 2003 SBS\Mini folder and can also be accessed by clicking Start/All Programs/Microsoft Press/Microsoft Office System 2003 Step by Step .
BE SURE TO start OneNote before beginning this exercise.
-
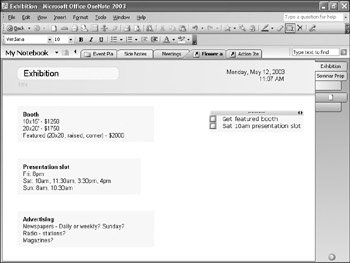
On the Standard toolbar, click the Note Flag button.
A small square appears to the left of the selected line of text.
Troubleshooting The small square is a check box indicating a To Do item. This is the default selection for Note Flags. However, other flags are available to you. Because OneNote remembers which flag you used last, if you have already used Note Flags, you might see a different flag. To display the To Do indicator, click the down arrow to the right of the Note Flags button, and click To Do.
-
Press the [ “] key, placing the insertion point in front of the line that reads Sat 10am presentation slot , and then click the Note Flag button again.
-
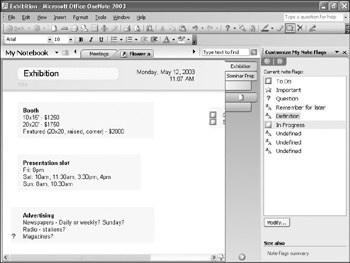
Click at the beginning of the line that reads Magazines? (under the heading of Advertising ), and click the down arrow to the right of the Note Flags button.
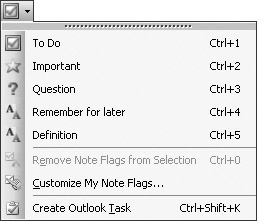
The full list of available note flags appears.
Troubleshooting You might have to click the chevrons at the bottom of the menu to see the full menu.
-
In the drop-down list, click Question .
A small question mark icon appears to the left of the selected line of text.
-
On the Standard toolbar, click the down arrow to the right of the Note Flags button, and click Customize My Note Flags .
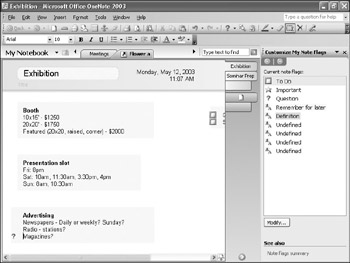
The Customize My Note Flags task pane appears on the right side of the window.
-
Click the first undefined item in the list, and click Modify .
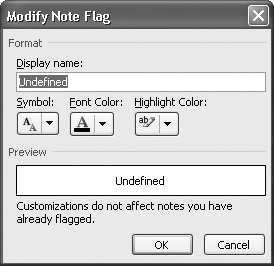
The Modify Note Flag dialog box appears.
-
In the Display name box, type In Progress .
-
Click the down arrow to the right of the selected Symbol , and click the yellow check box.
-
Click OK .
The Modify Note Flag dialog box closes , and the new note flag appears in the Customize My Note Flags task pane.
-
Double-click the Important note flag.
The Modify Note Flag dialog box appears.
-
Click the down arrow to the right of the selected Highlight Color , click Sky Blue , and then click OK .
The change is reflected in the list in the Customize My Note Flags task pane.
-
In the Customize My Note Flags task pane, click the Close button.
The task pane closes.
-
On the File menu click Open , browse to
 My Documents\Microsoft Press\Office 2003 SBS\Mini folder, click the Action Items notebook, and click Open .
 The Action Items section is displayed and added to the tabs at the top of the notebook.
-
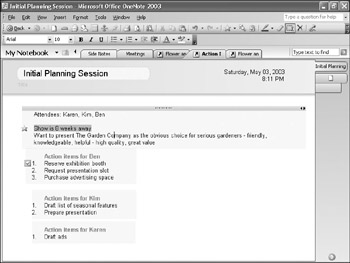
Click the Action Items section tab, and click at the beginning of the line that reads Reserve exhibition booth in the Action items for Ben ) area.
-
Click the down arrow to the right of the Note Flags button.
The menu now includes your customized note flag.
-
Click In Progress .
A small yellow check box appears next to the selected line of text.
-
Click the check box that you just inserted.
A red check mark appears in the box.
-
Select the text that reads Show is 8 weeks away , click the down arrow to the right of the Note Flags button, and click Important .
A small yellow star appears to the left of the selected text, and the text is highlighted in blue.
-
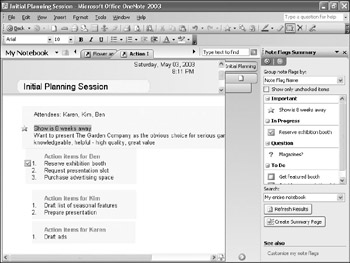
On the View menu, click Note Flags Summary .
The Note Flags Summary task pane appears on the right side of the window, summarizing the note flags in the current section.
-
In the Search list near the bottom of the task pane, click My entire notebook.
The list now includes note flags in other open sections.
CLOSE OneNote.
EAN: 2147483647
Pages: 350