Using Extended XML Capabilities
|
| < Day Day Up > |
|
Probably the most dramatic change in Excel 2003 is the enhanced support for documents using Extensible Markup Language (XML). Unlike Hypertext Markup Language (HTML), which is used to describe the appearance of data on the Web, XML is used to describe the structure of data. For example, an HTML table containing a company’s sales data would be understood perfectly by any human viewing the page, but the server presenting the data and the client receiving the data on behalf of its user would have no idea as to what sort of data was transmitted. If the file were an XML file, on the other hand, the machines involved could recognize the data as sales data and handle it appropriately. XML support was introduced in Excel 2002, but you were limited to opening and saving workbooks in the XML Spreadsheet Schema, which was a useful but far from comprehensive ability.
| Note | All new XML capabilities described in this section are only available in the Microsoft Office 2003 Professional Edition. Users with other editions will still be able to save and open XML workbooks as in Excel 2002. |
Creating Excel Lists
Many of the advanced data tools in Excel operate on a list, which is a range of cells consisting of one or more columns where each column has a label at the top. In Excel 2002 and earlier, lists were a bit haphazard; when you wanted to create a PivotTable, sort data, or create an AutoFilter, you clicked any cell in the range and selected the menu item to perform the command you wanted. If Excel couldn’t determine the boundaries of the range, such as by being unable to find a heading for one or more columns, the process would come to a grinding halt. In Excel 2003, lists are well-defined entities that you create by choosing Data, List, Create List, and using the controls in the Create List dialog box to define the area comprising the list.
| Note | If you select the cells in your list before you choose Data, List, Create List, the range appears in the Create List dialog box. |
When you create a list, several things happen.
-
A border appears around the list’s edges. You can drag the edges of the border to resize your list.
-
AutoFilter controls appear in the heading cells, which you can use to limit the data that is displayed within the list.
-
An insert row, designated by an asterisk, appears. Just as in an Access table or an Excel data entry form, you can fill in the insert row and press Enter to add the row of data to the list and create a new insert row.
-
The List toolbar appears, containing helpful list-management buttons.
-
You have the option to display a total row at the bottom of the list by choosing the Toggle Total Row button on the List toolbar. The default operation in the total row is to sum the contents of a column, but you can click any cell in the total row to display a list of other summary operations available for use in the row.
After you create a list (one example of which is shown in Figure 1-2), you can work with the list as a separate entity within your worksheet. For example, you can filter the data, create a PivotTable, or add new rows to the list. Whichever task you perform, Excel will shift the worksheet contents around the list to reflect the new entry (such as by adding a blank row when you add data to a list). If you are working on a network equipped with SharePoint Services, you can publish the list to the server, update the list’s data using the copy of the list on the SharePoint site, or edit a copy of the list on a computer away from the network and integrate your changes when you return. You can also use the more advanced data validation tools available through SharePoint to limit the types of data you and your colleagues can enter into the lists. In Excel, you can require users to enter numerical values, but on a SharePoint server you can be more specific as to data type, such as by requiring users to enter integer values.
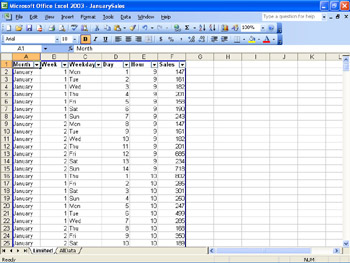
Figure 1-2: Data lists enhance your ability to create and display data collections in Excel 2003.
Mapping Excel Data to XML Schemas
XML data structures are defined in a schema, which in Excel is stored in a .xsd file. The following XML code listing shows how you might construct part of a schema to store data about a product.
This XML code isn’t a macro you can run using the Microsoft Visual Basic Editor. Instead, the code describes a product with three attributes.
    <xs:complexType name="productType">
        <xs:sequence>
            <xs:element name="productId" type="xs:string" />
            <xs:element name="productName" type="xs:string" />
            <xs:element name="priceEach" type="xs:decimal" />
        </xs:sequence>
    </xs:complexType>
This schema tells Excel to expect three data elements for a data structure named productType: productId, productName, and priceEach. The complexType statement names the data structure, whereas element definition statements give you the name of the element and the expected data type (in this case, either a string or a decimal value), while the <xs:sequence> statement tells Excel to expect the elements in exactly that order every time.
Publishing Spreadsheets with Web Components
Technically part of the Microsoft Office program suite, rather than Excel, the Office Web Components available for your use in Excel 2003 offer updated functionality that make it possible for you to publish Web pages that behave like spreadsheets. There are three Web components available in Office 2003: PivotTable Lists, Spreadsheets, and Charts. A fourth component, the Data Source Component, provides database access for Web-based PivotTable lists.
|
| < Day Day Up > |
|
EAN: 2147483647
Pages: 161