14.6 Stem: Simplified Creation of Client-Server Applications
| In this section, we'll look at Stem, a package that makes it very easy to create sophisticated client-server applications for administrative services. Stem is a relatively new open source package developed by Uri Guttman. The project's home page is http://www.stemsystems.com. Stem can be used to create a variety of useful client-server applications, including ones that are network-based. In essence, Stem allows you to create complex applications with only script-level effort.
Installing Stem is straightforward. Once installed, Stem provides you with the ability to create communicating processes via simple configuration files and ordinary Unix commands (or scripts). Stem handles all interprocess communication for you transparently. As we'll see, Stem can be used to create entirely new applications and can also serve as the conduit that allows existing commands and programs to communicate regardless of their individual interfaces. To understand some Stem examples, we first need to define a few terms:
Let's look at a simple Stem application which illustrates these items. It is shown in Figure 14-2. This application creates a three-way chat. The three windows in the figure each represent one of the chatters. I've numbered the various lines in the chat to indicate the order in which they were entered. If you look at the figure closely, you'll notice that this chat is somewhat unusual in that not all messages go to every window. In fact, messages from both A and C go only to the sender himself and to B, while messages from B go to everyone. Figure 14-2. A simple Stem chat application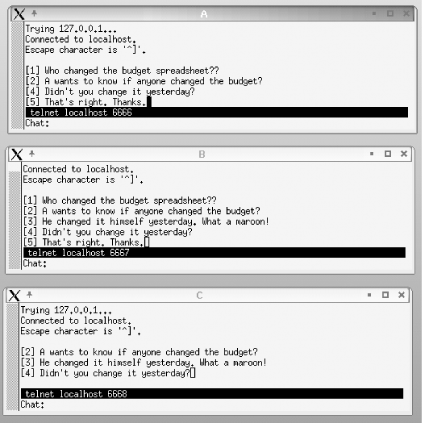 This application was created without any programming. The main part of it is created using this Stem configuration file, named chat1.stem (.stem is the extension used for Stem configuration files): # simple chat [ class => 'Stem::SockMsg', name => 'A', args => [ port => 6666, # communications port for this cell server => 1, # listen for connections cell_attr => [ 'data_addr' => ':sw:x' # send input to cell to this address ], # end cell_attr ], # end args ], # end cell A Cells B and C created here, using ports 6667 and 6668, and targets of y and z (respectively). class => 'Stem::Switch', name => 'sw', args => [ in_map => [ # input map: multiplex input x => [ qw( x y ) ], y => [ qw( x y z ) ], z => [ qw( y z ) ], ], # end in_map out_map => [ # output map: set destination for inputs x => 'A', y => 'B', z => 'C', ], # end out_map ], # end args ], # end cell sw Stem configuration files are formatted using Perl object syntax (which takes a bit of getting used to when you first encounter it). When executed, this configuration file creates five cells (although only three are shown above). It also implicitly creates a Stem hub. The syntax for creating a cell is can be deduced from this example. Each cell definition is enclosed within a pair of square brackets located in column 1. Defining a cell involves specifying at least its cell class; often, a name and other attributes are also specified (the latter via args). Each item for each cell is specified using the format: attribute => value, This is the Perl object attribute assignment syntax. For example, the first definition in the preceding configuration file creates a cell of type Stem::SockMsg (the type is specified via the class attribute). Note that Perl module name syntax is used to specify the cell class, and all of the provided cell types begin with "Stem::". This cell type is a socket message cell, and it is used to interface external programs to Stem. In this case, we will use it to interface a window to the Stem hub. This cell is given the name A, and several attributes are defined via the args list (enclosed in square brackets). The communications port the cell will use is set, the cell is specified as a server (meaning that it will listen for communications on the port), and the address for messages is specified via the data_addr attribute of the cell_info element in the args list; note that each subordinate list is always enclosed in square brackets. The address given here specifies the current hub (indicated by the empty first field), the cell named sw, and the target x within that cell. Thus, all input received by this cell will be sent to target x in cell sw. The actual configuration file contains two more SockMsg cell specifications, for the B and C chat windows. They are defined similarly, although they have different port numbers and message addresses. The final cell defined in the configuration file is a switch cell (class Stem::Switch) named sw. This type of cell receives messages from other cells and routes them to other cells based on the instructions in its two maps. The maps are specified using its two arguments. The input map defines a list of targets that incoming messages can reference. For each one, the map also defines the list of targets to which messages designated for it should be sent. This is done via another Perl square-bracketed list. The target names included in the list must be quoted, and the Perl qw function is used to do so. In this case, we see that messages coming in for target x will be sent to targets x and y, those for target y will go to all three targets, and those for target z will go to targets y and z. The output map associates switch targets with other cells. In this case, target x is associated with cell A, y with B, and z with C (as expected). Taken with the input map, this mapping results in the message display behavior we saw in the actual application (see Figure 14-2). Once the cells are defined, all that remains is to start the Stem process and attach user processes to the ports to which the cells are listening. Here are the commands to do so: xterm -T Chat -n Chat -geometry 80x40+500+0 -e run_stem chat1 xterm -T A -n A -geometry 80x10+0+0 -e ssfe -prompt Chat: telnet localhost 6666 xterm -T B -n B -geometry 80x10+0+175 -e ssfe -prompt Chat: telnet localhost 6667 xterm -T C -n C -geometry 80x10+0+350 -e ssfe -prompt Chat: telnet localhost 6668 We use four xterm windows for this simple demonstration application. The first one runs the run_stem script included with the Stem package. This creates a Stem hub using the specified configuration file (here, chat1.stem). The other three commands run ssfe, a program which provides an input prompt at the bottom of the window while running a specified command (ssfe is included with Stem). Here, we use the telnet command to attach to the ports we specified when creating the socket message cells. Note that I omitted the Stem hub windows from the previous figure. In fact, that window is also active, and the addition of one additional cell to the configuration file will allow you to interact directly with the hub: [ class => 'Stem::TtyMsg', args => [ ], ], This cell is a TTY message cell, and it creates a command interface to a Stem hub. For this cell, the args attribute is set to an empty list. You can use this command interface to modify the functioning of the running application. For example, you can redefine the switch maps on the fly. The next logical step is to create a chat program where chatters can be on different computer systems. This will involve a Stem hub on each system where someone is chatting. This is the configuration file that could be used on a client system: # chat_cli.stem [ class => 'Stem::Hub', name => 'chat_client2', args => [ ], ], # create a portal for communicating with other hubs [ class => 'Stem::Portal', args => [ ], ], [ class => 'Stem::SockMsg', name => 'B', args => [ port => 6668, server => 1, cell_attr => [ 'data_addr' => 'chat_server:sw:z' ], # end cell_attr ], # end args ], # end cell B In this example configuration file, we explicitly create the Stem hub, naming it chat_client1. The second cell definition creates a portal: an object used for communication between distinct hubs. In this case, this hub will use it to send messages to the Stem hub running the chat server. The final cell definition creates a cell named C, and it uses port 6668 on the local host for communication, and specifies it message destination address as sw:z (target z in cell sw on hub chat_server). The following commands can be used to start the client application, including the required windows: xterm -T Chat -n Chat -geometry 80x40+500+0 -e run_stem chat_cli xterm -T C -n C -geometry 80x10+0+350 -e ssfe -prompt Chat: telnet localhost 6668 These commands will create the hub process and one chat window. Here is the configuration file for the chat server: # chat_serv.stem [ class => 'Stem::Hub', name => 'chat_server', args => [ ], ], [ class => 'Stem::Portal', args => [ 'server' => 1, # listen for messages from other hubs 'host' => '' # accept messages from any host ], ], [ class => 'Stem::SockMsg', name => 'A', args => [ port => 6666, server => 1, cell_attr => [ 'data_addr' => ':sw:x' ], ], ], [ class => 'Stem::Switch', name => 'sw', args => [ in_map => [ # everybody sees everything x => [ qw( x y z ) ], y => [ qw( x y z ) ], z => [ qw( x y z ) ], ], out_map => [ x => 'chat_server:A', y => 'chat_client1:B', z => 'chat_client2:B', ], ], ], The first two definitions create the hub (named chat_server) and a server portal that will listen for messages from other hubs from any host (the latter is indicated by the null host attribute). The next definition creates a chat cell on the local host (named A), and the final definition defines a switch cell. In this case, all input received from any target will be sent to every target. The following commands will start the Stem processes used for the chat server: xterm -T Chat -n Chat -geometry 80x40+500+0 -e run_stem chat_serv xterm -T A -n A -geometry 80x10+0+0 -e ssfe -prompt Chat: telnet localhost 6666 Note that we do not have to specify the host names where the Stem hubs are running anywhere in this configuration. Stem automatically handles that for us. Lots of different kinds of tasks can be performed using this same basic structure. For example, we'll now consider a simple monitoring application that is very similar in stucture to the preceding chat application. Here is the client configuration file: # mon_cli.stem [ class => 'Stem::Hub', name => 'collecting', args => [ ], ], [ class => 'Stem::Portal', args => [ ], ], [ class => 'Stem::Proc', name => 'do_it', args => [ path => '/usr/local/sbin/my_mon', cell_attr => [ 'data_addr' => 'monitoring:A:A', 'send_data_on_close' => 1, ], ], ], The first three cell definitions create the hub and portal. The final section of the configuration file creates a process cell named do_it. Process cells can create and control processes. The path attribute specifies the path to the command or program to be run. In this case, a simple system monitoring script is selected. The cell_attr attribute once again specifies the message destination address where all input received by the cell will be sent. In this case, the cell's input consists of the output from the created process. The final attribute, send_data_on_close, tells the cell to transmit all remaining input when the process ends. It is used to avoid message delays due to data buffering on the local host. The server portion of the application is created using this configuration file: # mon_serv [ class => 'Stem::Hub', name => 'monitoring', args => [ ], ], [ class => 'Stem::Portal', args => ['server' => 1, 'host' => '' ], ], [ class => 'Stem::SockMsg', name => 'A', args => [ port => 6666, server => 1, cell_attr => [ 'data_addr' => 'monitoring:A:A', ], ], ], Note the similarities to the chat server configuration file. This file creates a hub, portal (as a server portal), a TTY interface to the hub, and a single socket message cell. No switch is needed in this case, as we just want the monitoring output from the client hub to be displayed in a window by the server hub. So how does this work? The following commands will start the required processes: On the client xterm -T Client -n Client -geometry 80x40+500+0 -e run_stem mon_cli On the server xterm -T Trigger -n Trigger -geometry 80x40+500+0 -e run_stem mon_serv xterm -T Monitor -n Monitor -geometry 80x10+0+0 -e telnet localhost 6666 Then, in the Stem hub window on the server (Trigger), enter the command: Stem> collecting:do_it cell_trigger This will cause the process cell do_it on the client hub to be triggered.[11] It will then run its associated process and return the appropriate message(s) to the server hub. The messages will then be displayed in the window labeled Monitor. Each one will look like the following:
date: Wed Jul 24 01:33:40 EDT 2002 load average: 5.07 total processes: 294 free memory: 4404 ------------------------------------------------- This is the output of the script my_mon. Note that a similar command to the server hub could be used to perform the same task on a different client system. This application can easily be made more automated. For example, this implementation assumes that the Stem client processes are already running on the client. However, the boot_stem script which is part of the Stem package can be used instead to start the remote client processes instead. In addition, the triggering command to the Stem server hub can also be automated via a script. More complex monitoring applications are also possible with a little more work. Stem includes a variety of useful predefined cell types. Some of the most useful are listed below:
We'll return to the chat application for our final example, which will illustrate creating a simple custom Stem cell type. We will create a cell which receives input, prepends a label to it, and then sends it on to another cell. We will interpose this cell between the chat socket message cells and the switch cell in order to label chat text with its originating window. Stem cell classes are defined in Perl modules. Here is the Perl code that corresponds to the new cell type (stored as Stem/ChatLabel.pm with respect to the location of the chat configuration files): package Stem::ChatLabel; use strict; # define cell attributes my $attr_spec = [ { 'name' => 'sw_addr', }, # target switch cell { 'name' => 'hub_addr', 'default' => '', }, # target hub { 'name' => 'sbefore', 'default' => '', }, # label string ]; # called when the cell is created (boilerplate code) sub new { my( $class ) = shift ; my $self = Stem::Class::parse_args($attr_spec, @_); return $self unless ref $self ; return $self ; } # called whenever data is received by the cell sub data_in { my ($self, $msg) = @_; # get message data my $data = $msg->data(); # add the label prefix to the current message (if any) substr($$data, 0, 0, $msg->from_cell() . ': ') ; substr($$data, 0, 0, $self->{'sbefore'} . '_') if $self->{'sbefore'}; # create and send modified message $msg->data($data) ; $msg->to_cell($self->{'sw_addr'}) ; $msg->to_hub($self->{'hub_addr'}) if $self->{'hub_addr'}; $msg->dispatch() ; } 1 ; # module exit After the initial module definition and use strict statements, the file defines the attributes this cell class will use (in addition to ones used by all cells). This is accomplished by defining $attr_spec. This cell will have three additional attributes: the name of the switch cell where the modified messages should be sent, the hub name where that switch is located (default to the current hub), and the string that should be prepended to the message text (defaults to a null string, but see below). The next section of the file defines the new() method for this cell. This is the constructor method called when a cell of this type is created. The code here is that typically used for Stem cells, and it was simply copied from the module for another cell. The final function creates the data_in method for this cell type. This method is invoked whenever a cell of this type receives a message. In this case, the function extracts the current string using the message's data() method. Next, it adds the prefix string if one was defined, using the originating cell name if none was specified in the configuration file. Finally, the data_in method modifies the message's address, substituting its own hub and switch selections for the current ones, and then the message is dispatched. Here are the relevant portions of the client configuration file showing how this cell can be used: [ class => 'Stem::SockMsg', name => 'A', args => [ port => 6666, server => 1, cell_attr => [ 'data_addr' => ':lab:a' # destination cell = ChatLabel cell ], ], ], [ class => 'Stem::ChatLabel', name => 'lab', args => [ sw_addr => 'sw', # switch cell name hub_addr => 'chat_srv', # chat server hub name ], ], The socket message cell's message destination cell is changed to the label cell. The label cell itself specifies the server hub name and the switch cell name on that hub. The rest of the configuration file is unchanged. In this case, messages will be labeled with the name of the socket message cell that received them (since no message prefix attribute was specified for the ChatLabel cell), as in this example: A: Pizza is ok for lunch as long as it is vegetarian. This overview has introduced you only to Stem's most basic capabilities. For more information about Stem and what it can do, consult the package documentation and its home page. As I said before, experimenting with its demo programs and these examples is a good way to become familiar with the package and how it works. |

EAN: 2147483647
Pages: 162
- Challenging the Unpredictable: Changeable Order Management Systems
- Enterprise Application Integration: New Solutions for a Solved Problem or a Challenging Research Field?
- Distributed Data Warehouse for Geo-spatial Services
- Data Mining for Business Process Reengineering
- Healthcare Information: From Administrative to Practice Databases