Managed Class and Struct Basics
First off, there is nothing forcing you to program in an objected-oriented fashion with classes or structs, and using classes and structs does not mean you are doing OOP. For example, it is possible to break the code based on function areas instead of objects. It may appear to be OOP, but what you really are doing is just using a class as a namespace. Plus, you gain none of the benefits of OOP.
It is the organization of code and data into unique objects that distinguishes procedural coding from object-oriented coding.
For those totally new to object programming, you need to understand that each time you implement a class definition a new instance of it will be created. In other words, no matter how many instances you want, they will all be created from the same class definition.
But before you look at objects and OOP, you will look at the class and the struct and what makes up a class and a struct in general terms.
Declaring Managed Classes and Structs
Managed classes and structs are basically an extension of traditional C++ classes and structs. Like traditional C++ classes and structs, managed classes and structs are made up of variables and methods. Unlike traditional classes and structs, managed classes and structs are created and destroyed in a completely different manner. Also, managed classes and structs have an additional construct called the property.
Private, Public, and Protected Member Access Modifiers
There really is no real difference between a class and struct except for the default access to its members. Classes default to private access to their members, whereas structs default to public. Notice that I used the term "default." It is possible to change the access level of either the class or the struct. So, truthfully, the usage of a class or a struct is just a matter of taste. Most people who code C++ use the keyword class when they create objects, and they use structs to simply group data together, without any methods or with simply a constructor method.
The way you declare managed classes is very similar to the way you declare traditional classes. Let's take a look at a class declaration. With what you covered in the last chapter, much of a class definition should make sense. First, there is the declaration of the class itself and then the declaration of the class's variables, properties, and methods.
The following example is the Square class, which is made up of a constructor, a method to calculate the square's area, and a dimension variable:
__gc class Square { // constructor Square ( Int32 d) { Dims = d; } // method Int32 Area() { return Dims * Dims; } // variable Int32 Dims; }; The first thing to note about this class is that because the access to classes defaults to private, the constructor, the method, and the variable are not accessible outside the class. This is probably not what you want. To make the class's members accessible outside of the class, you need to add the access modifier public: to the definition:
__gc class Square { public: // public constructor Square ( Int32 d) { Dims = d; } // public method Int32 Area() { return Dims * Dims; } // public variable Int32 Dims; }; With this addition, all the class's members are accessible. What if you want some members private and some public? For example, what if you want the variable Dims only accessible through the constructor? To do this, you add the private: access modifier:
__gc class Square { public: Square ( Int32 d) { Dims = d; } Int32 Area() { return Dims * Dims; } private: Int32 Dims; }; Besides public and private, Managed C++ provides one additional member access modifier: protected. Protected access is sort of a combination of public and private; where a protected class member has public access when it's inherited but private access (i.e., can't be accessed) by methods that are members of a class that don't share inheritance.
Here is a quick recap of the access modifiers for members.
If the member has public access, it is
-
Accessible by external functions and methods
-
Accessible to inheriting
If the member has private access, it is
-
Not accessible by external functions and methods
-
Not accessible to inheriting
If the member has protected access, it is
-
Not accessible by external functions and methods
-
Accessible to inheriting
If you are visually oriented like me, maybe Figure 3-1 will help clear up member access modifiers.
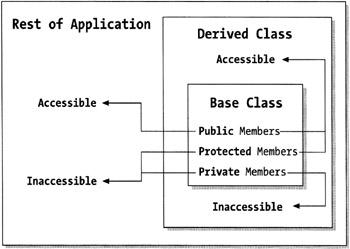
Figure 3-1: Summary of the three member access modifiers
The __gc and __nogc Keywords
If you have come from the traditional C++ world, you may have noticed the new keyword __gc in front of the class's definition. This is one of the biggest and most important changes between traditional C++ and Managed C++. The use of the __gc keyword tells the compiler, which in turn tells the common language runtime (CLR), that this class will be managed or garbage collected (hence the g and c). Managed C++ does not, even though the name suggests it, default to garbage-collected classes. Instead, it is up to the developer to decide if he wants the class to be managed or garbage collected and, if so, he must manually place the __gc in front of the class.
For this minor inconvenience, you get several benefits:
-
Garbage collection
-
Inheritance from any .NET Framework base class that is not sealed or, if no base class is specified, automatic inheritance from the System::Object class
-
Ability for the class to be used within .NET Framework collections and arrays
-
Inheritance from any number of managed interfaces
-
Ability to contain properties
-
Ability to contain pointers to unmanaged classes
With the good, there is the bad. Traditional C++ programmers might find these items drawbacks with managed classes:
-
Only single class inheritance is allowed.
-
Inheritance from unmanaged classes is not allowed.
-
Cannot be a parent class of an unmanaged type.
-
Does not support friends.
-
Cannot contain an overridden new or delete operator.
-
Must use public inheritance.
-
Cannot be used with the sizeof or offsetof operator.
-
Pointer arithmetic with class pointers is not allowed.
On the other hand, these drawbacks may not be as bad as you might think. Managed classes allow multiple interface inheritance. The .NET Framework is quite extensive, so inheritance of unmanaged classes may not be needed as frequently as you might expect. Overriding new and delete seems to defeat the purpose of managed classes. Because pointer arithmetic is not allowed, sizeof and offsetof are kind of useless, anyway, and pointer arithmetic is a very big contributor to memory leaks and programs aborting due to illegal memory access.
Even though it is the default for classes and structs, the __nogc keyword explicitly marks a class or struct as unmanaged and, thus, not subject to any of the restrictions or benefits of being managed.
The keywords __gc and __nogc can be applied to arrays whose element type is a Managed C++ built-in value type or its corresponding runtime __value type. When __gc is applied to the runtime __value type, the value type will be placed in a managed array on the heap.
For example, you can define a managed array of int runtime __value types as follows:
int ManagedArray __gc[] = new int __gc[100];
Now, because it is a managed array, you get all the benefits of being derived from System::Array. A much simpler and clearer way to generate the same managed code is this:
Int32 ManagedArray[] = new Int32[100];
Note that without the __gc keyword, the compiler will error out because runtime __value types such as int are not managed types. Thus, the following will cause the compiler to generate an error:
int ErroArray[] = new int __gc[100]; // Oops int is not a __gc
When __nogc is applied to a Managed C++ built-in value type, the value will create a stack-based array:
Int32 UnmanagedArray __nogc[100];
By the way, the following code has the same effect and is easier to read:
int UnmanagedArray[100];
Inheriting Classes
Even though writing a stand-alone class can provide quite a lot of functionality to an object, it is in the object-oriented nature of classes and their capability to inherit from other classes that their real strength lies.
As I mentioned earlier, managed classes have the ability to inherit from a single class and multiple interfaces. You will focus on class inheritance now, and later in this chapter you will look at interface inheritance.
Inheriting from a class allows an inheriting class (usually known as the child) to get access to all the public and protected members of the inherited class (usually known as the parent or base class). You can think of inheritance in one of two ways: It allows the functionality of the base class to expand without the need to duplicate any of the code, or it allows the child class to fix or augment some feature of its parent class without having to know or understand how the parent functions (this is encapsulation, by the way). But really, they both mean the same thing.
A restriction imposed by Managed C++ on classes is that a class can only use public inheritance. For example:
__gc class childClass : public baseClass {} is allowed, but the following will generate compile time errors:
__gc class childClass : protected baseClass {} __gc class childClass : private baseClass {} This means that with the public access to a base class, the child can access any public or protected member of the base class as if it were one of its own members. Private members of the base class, on the other hand, are not accessible by the child class, and trying to access them will generate a compilation error.
Unmanaged (__nogc) classes can have public, protected, or private access to their base class. Notice there is no "__gc" in front of these classes:
class childClass : public baseClass {} class childClass : protected baseClass {} class childClass : private baseClass {} Basically, for private class access, all base class members are inherited as private and thus are not accessible. Protected class access allows access to public and protected base class members but changes the public access to protected. Personally, I've never used private or protected base class access, as I've simply never had a use for it, but it's available if you ever need it.
Listing 3-1 shows the Cube class inheriting from a Square class. Notice that because both the member access and the class access of the Square class are public, the Cube class has complete access to the Square class and can use all the Square class's members as if they were its own.
Listing 3-1: Inheritance in Action
#using <mscorlib.dll> using namespace System; __gc class Square { public: Int32 Area() { return Dims * Dims; } Int32 Dims; }; __gc class Cube : public Square { public: Int32 Volume() { return Area() * Dims; } }; int main(void) { Cube *cube = new Cube(); cube->Dims = 3; Console::WriteLine(cube->Dims); Console::WriteLine(cube->Area()); Console::WriteLine(cube->Volume()); return 0; } Figure 3-2 shows the results of this little program.

Figure 3-2: Results of Inherit.exe
Sealed Classes
A sealed class or struct is one that cannot be inherited from. All value type classes are always sealed. Indirectly, this means that all boxed values are also sealed.
The sealed class enables a developer to stop all other developers from inheriting from her class. I have never had an opportunity to seal any of my classes. I have come across it a few times. Almost every time, I was forced to create my own similar class because I needed additional functionality that the sealed class lacked. Personally, I feel the sealed class goes against object-oriented development, as it stops one of the key OOP cornerstones: inheritance. But the tool is available for those who wish to use it.
The code to seal a class is simply this:
__sealed __gc class sealEx { }; | Note | From here on, I'll use only "class" as opposed to "class and struct."You can assume anything you can do with a class you can also do with a struct, except that the default access of the struct is public whereas the default access of the class is private. |
Using the Class
Unlike procedural code, the declaration of a class is simply that: a declaration. The class's methods do nothing on their own and only have meaning within the confines of an object. An object is an instantiated class. A neat thing about when a class is instantiated is that automatically all the classes it is derived from also get instantiated.
The code to instantiate or create an object from the class in the previous section is simply this:
Square *sqr = new Square(); // a pointer
or this:
Square &sqr = *new Square(); // a reference
Notice that you can create either a pointer or a reference to the Square object. For those of you coming from a traditional C++ background, working with pointers and their more complex syntax will not be an issue. I personally have found working with references a little easier, as you will see later when I cover references to objects.
Pointer to an Object
If you recall from the previous chapter, Managed C++ data types can fall into one of two types: value types and reference types. Managed classes are reference types. What this means is that the class, when created using the new operator, allocates itself on the heap, and then a reference or pointer is placed on the stack indicating the address of the allocated object.
This is only half the story, though. It is the CLR that places the class on the heap. The CLR will maintain this class on the heap so long as a pointer or reference is using it. When all references to the class go out of scope or, in other words, no variables are accessing it, the CLR will delete it automatically.
| Note | If the class accesses certain unmanaged resources that hold resources, the CLR will hold the class for an indefinite (not necessarily infinite) period of time. Using COM-based ADO is a classic example of this. Code in a destructor will sometimes, but not always, be able to resolve this issue. Because you are not dealing with unmanaged resources in this book, this should not be an issue. |
Once you have created a class using the following:
Square *sqr = new Square(); // a pointer
you now have access to its variables, properties, and methods. The code to access an object pointer is simply the name of the object you created followed by the -> operator. For example:
Sqr->Dims = 5; Int32 area = Sqr->Area();
You might be wondering why pointer arithmetic is not allowed on managed class pointers. They seem harmless enough. Well, the problem comes from the fact that the location of the class can move. The garbage collection process not only deletes unused heap space, it also compresses it. Thus, it is possible that a class can be relocated during the compression process.
Pinning Pointers
If you are a seasoned traditional C++ programmer, you probably saw an immediate problem with allowing a pointer's address to change. Passing a pointer to a managed class's data, as a parameter to an unmanaged function call, may fail. Because the pointer is passed by value, if the class moves, the value of the parameter will no longer be valid.
To solve this problem, Managed C++ has added the __pin keyword, which stops the CLR from changing its location during the compression phase of garbage collection. The pointer remains pinned so long as the pinned pointer stays in scope or until the pointer gets assigned the value of 0. Listing 3-2 shows the __pin keyword in action.
Listing 3-2: __pin in Action
#using <mscorlib.dll> using namespace System; __gc class Test { public: Int32 i; Test() { i = 0; } }; void incr (int * i) // unmanaged function { (*i)++; } Int32 main () { Test __pin *ptrTest = new Test; // ptrTest is a pinned pointer incr( &ptrTest->i); // pointer to managed data passed as actual // parameter of unmanaged function call Console::WriteLine ( ptrTest->i.ToString() ); } Figure 3-3 shows the results of this little program.
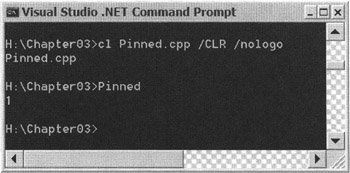
Figure 3-3: Results of Pinned.exe
References to an Object
I assume that up until now you've been using the member access operator or dot (.) operator on faith that I would explain it later. There really isn't anything special about the dot operator, as it's only used for accessing individual member variables, properties, or methods out of a class. Its syntax is simply this:
class-name . member-data-or-method Int32 intval; String *s = intval.ToString();
You have seen both the -> and . operators used when accessing class members. What is the difference? Basically, the -> operator is used to access data or methods from a pointer, whereas the . operator is used to access the actual object.
You should be scratching your head right now in confusion. Aren't all managed classes reference-type-only? The answer to this question is yes, but remember that Int32s are value type objects and not reference types, so when you access value type objects, you are accessing the actual object, and thus you must use the . operator.
You might be wondering what all this has to do with references to an object. Well, when you access the actual object, you are actually referencing the object.
References to objects are similar to pointers to objects in that they both store the address of the object in the stack. But there's one major difference between them: Pointers can change what they point to, but a reference can't be changed once initialized.
Why would you use a reference to an object when a pointer to an object is so much more powerful? The reason is simple: References are safer to work with. You know that once a reference to an object is created, it will always point to that object. The reference will cause a compile-time error if you try to change its value.
Whether or not you create your own references to objects is really just a matter of taste. I like using references to objects because they seem to make things clearer for me. I know that if I am using a pointer to an object, then the object that the pointer is pointing to may change, whereas with a reference to an object I know that the same object will always be referenced. I use references in this book when I know the address will not change, but whether you use them or not is totally up to you and your company standards. Listing 3-3 presents both a pointer to an object and a reference to an object in one example.
Listing 3-3: Pointers and References in Action
#using <mscorlib.dll> using namespace System; __gc class Square { public: Square(Int32 v) { Dims = v; } Int32 Area() { return Dims * Dims; } Int32 Dims; }; int main(void) { Square *sqr1 = new Square( 2 ); // Pointer Square &sqr2 = *new Square( 3 ); // Reference Console::WriteLine( sqr1->Dims); // Pointer Console::WriteLine( sqr1->Area() ); Console::WriteLine( sqr2.Dims ); // Reference Console::WriteLine( sqr2.Area() ); return 0; } Figure 3-4 shows the results of this little program.
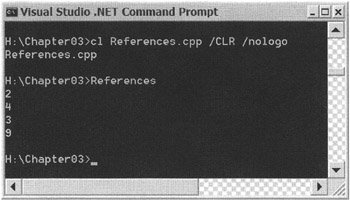
Figure 3-4: Results of References.exe
Member Variables
This fancy name is simply C++'s way of reminding programmers that classes and structs are objects. Member variables are simply variables defined within the definition of a class or a struct.
The syntax of defining member variables is identical to that of ordinary variables except for one important thing: You cannot initialize a variable in its definition. I explain how to initialize variables later in this chapter when I cover constructors. The definition of a variable is simply a data type and a variable name, or a comma-delimited list of variable names:
__gc class varExample { Int32 x; String *str1, *str2; }; In Managed C++, member variables can be either managed data types or a pointer to an unmanaged data type.
Member variables can be public, protected, or private. With Managed C++ and managed classes, public member variables should be handled with care, especially if invalid values in these variables will cause problems in the program's execution. A better solution is to make them private (or protected, so that inherited access can still access them directly), and then make public properties to them for external methods to access. Properties can, if coded correctly, perform validation on the data entered into the variable. Otherwise, they work just like normal member variables. I cover properties later in this chapter.
Static Member Variables
Static member variables are variables that provide class-wide storage. In other words, the same variable is shared by all instances of a class. To define a static member variable in a managed class, simply define it as static and assign a value to it in that class definition like this:
__gc class staticVar { static Int32 staticVar = 3; }; You might be wondering how initializing the variable within the class can work, as it would appear that the value would be reset for each instance of the class. Fortunately, this is not the case; as only the first time that the class is instantiated does the variable get created and initialized.
Member Methods
Just like member variables, member methods are Managed C++'s way of reminding programmers that they are working with objects. A member method is simply a function declared within a class or struct. Everything you learned about functions in the previous chapter is applicable to member methods. You might consider revisiting Chapter 2's section on functions if you are uncertain how they are defined or how they work.
Like all members of a class, member methods can be public, protected, or private. Public methods are accessible outside of the class and are the workhorse of interclass communication. It is via methods that classes pass messages, requesting and being requested to perform some type of functionality. Protected member methods are the same as private member methods except that inherited classes have access to them. Private classes encapsulate the functionality provided by the class, as they are not accessible from outside the class except via some public member method that uses it.
Just as a quick recap, Listing 3-4 is a public member method that calls a protected member method that calls a private member method.
Listing 3-4: Member Methods in Action
#using <mscorlib.dll> using namespace System; __gc class MethodEx { public: void printPublic(Int32 num) { for (Int32 i = 0; i < num; i++) { Console::WriteLine( S"Public" ); } printProtected(num/2); } protected: void printProtected(Int32 num) { for (Int32 i = 0; i < num; i++) { Console::WriteLine( S"Protected" ); } printPrivate(num/2); } private: void printPrivate(Int32 num) { for (Int32 i = 0; i < num; i++) { Console::WriteLine( S"Private" ); } } }; Int32 main() { MethodEx &ex = *new MethodEx(); // reference to MethodEx ex.printPublic(4); // ex.printProtected(4); // Error cannot access // ex.printPrivate(4); // Error cannot access } Figure 3-5 shows the results of this little program.

Figure 3-5: Results of MethodEx.exe
Static Member Methods
Static member methods are methods that have class scope. In other words, they exist without your having to create an instance of the class. Because they are not associated with any particular instance of a class, they can use only static member variables, which also are not associated with a particular instance. For the same reason, a static member method cannot be a virtual member method, as virtual member methods are also associated with class instances.
Coding static member methods is no different than coding normal member methods, except that the function declaration is prefixed with the static keyword.
Listing 3-5 uses a static member method to print out a static member variable.
Listing 3-5: Static Member Methods and Variables in Action
#using <mscorlib.dll> using namespace System; __gc class StaticTest { private: static Int32 x = 42; public: static Int32 get_x() { return x; } }; Int32 main() { Console::WriteLine ( StaticTest::get_x() ); return 0; } Figure 3-6 shows the results of this little program.
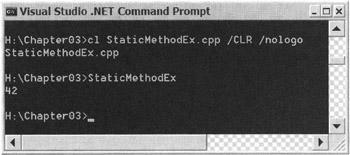
Figure 3-6: Results of StaticMethodEx.exe
You might have noticed that to access the static member method, you use the class name and the :: operator instead of the . or -> operator. The reason is you've not created an object, so you're effectively accessing the namespace tree.
Managed Class Constructors
The class constructor is a special class function that is different in many ways from the member method. In Managed C++, a constructor is called whenever a new instance of a class is created. Instances of managed classes are created using the operator __gc new. When you create an instance of a managed class, you can omit the __gc keyword from the new operator. Memory for the instance is allocated on the heap that is maintained by the CLR.
The purpose of the constructor is to initialize the member variables in the new instance of the class. The managed class constructor process differs from the unmanaged class constructor process in that, for managed class constructors, all member variables are initialized to zero before the actual constructor is called. Thus, even if the constructor does nothing, all member variables would still have been initialized to zero or the data type's equivalent. For example, the DateTime data type initializes to 1/1/0001 12:00:00am, which is this data type's equivalent of zero.
A managed class constructor method always has the same name as the class itself. A managed class constructor method does not return a value and must not be defined with the void return type. A constructor method can take any number of parameters. Note that a constructor method needs to have public accessibility to be accessible by the new operator.
If no constructor method is defined for a class, then a default constructor method is generated. This constructor method does nothing of its own, except it calls the constructor method of its parent and sets all member variables to a zero value. If you define a constructor method, then a default constructor method will not be generated. Thus, if you create a constructor method with parameters and you expect the class to be able to be created without parameters, then you must manually create your own default zero-parameter constructor method.
A special construct of a constructor method is the initializer list. It's basically a list of variables that need to be initialized before the constructor method itself is called. You can use it to initialize the class's own variables as well; in fact, it's more efficient to do it this way, but it's also much harder to read in this format. The most common uses for an initializer list are to initialize references (because they can't be initialized using assignments) and to initialize abstract classes. You'll examine abstract classes later in this chapter. The syntax for an initializer list involves simply placing a colon (:) and a comma-delimited list of functional notation variable declarations between the constructor method's declaration and the constructor method's implementation:
Constructor (Int32 x, Int32 y, Int32 z) : var1(x, y), var2(z) { } This example shows the constructors for a managed class called DotNet:
__gc class DotNet { public: DotNet () {} // default constructor DotNet (Int32 val) : value1(val), value2(2) {} DotNet (Int32 val1, Int32 val2) { value1 = val1; value2 = val2; } private: Int32 value1, value2; }; | Caution | Those of you who are experienced C++ programmers should be aware that user-defined copy constructors are not allowed for managed classes in Managed C++. |
Static Class Constructors
In traditional C++, the syntax for initializing static member variables was rather cumbersome. It forced you to define it in the class and then initialize it outside the class before the main() function was called. You saw that with managed classes you could directly assign a value to a static member variable—but what happens if you need something more elaborate than a simple assignment? Managed C++ has provided a new construct for managed classes called the static class constructor.
The static class constructor's purpose is to initialize static member variables normally with something more complex than a simple assignment, but not necessarily. Any managed class can have a static class constructor, though it only really makes sense if the class has static member variables, as the static class constructor is not allowed to initialize any nonstatic member variables.
When the static class constructor is invoked it is undefined, but it is guaranteed to happen before any instances of the class are created or any references are made to any static members of the class.
If you recall, it is possible to initialize static member variables directly in the definition of the class. If you use the static class constructor, then these default values are overwritten by the value specified by the static class constructor.
The static class constructor syntax is identical to the default constructor syntax, except that the static keyword is placed in front. This means that a static class constructor cannot take any parameters.
In the following example, the managed class Test is made up of two static member variables initialized to 32 and a static class constructor that overwrites the first constant with the value of 42:
__gc class Test { public: static Test() { value1 = 42; } static Int32 value1 = 32; static Int32 value2 = 32; }; By the way, you can have both static and nonstatic (standard, I guess) constructor methods in the same class.
Destructors
All objects allocated on the heap need to be deallocated. The process for unmanaged objects is manual. Basically, when a program is finished with the object, then the delete operator must be called for the object:
delete classname;
For managed objects, on the other hand, the process for the programmer is a lot easier. When the object is no longer needed, simply do nothing. It is the job of the CLR to detect when an object is no longer being accessed and then garbage collect it.
The destructor method has the same syntax as the default constructor method except that a tilde (~) is placed before the destructor method's name:
__gc class Test { ~Test() {} // destructor } Things may have become easier for the programmer, but behind the scenes things have become slightly more complex. In fact, the compiler is actually doing a little magic behind the scenes.
The first thing I must point out is that other languages do not support the delete operator. So, if you plan on using a managed class in other languages, you can't rely on the delete operator being called. In fact, the garbage collector doesn't use the delete operator either. Don't panic—this is really not an issue.
What the garbage collector and, subsequently, all .NET-compatible languages, use to delete classes is a protected virtual member method called Finalize. You don't have to worry about creating a Finalize member method for your class—in fact, you can't. It's up to the compiler to create one for you from the destructor you coded into your class. The following is a sample of what the compiler actually creates when you add a destructor to your managed class.
Original code by the programmer:
__gc class Test { public: ~Test() { Console::WriteLine(S" Test Destructor "); } }; Generated code:
__gc class Test { public: Test::Finalize() { Console::WriteLine(S" Test Destructor "); } virtual ~Test() { System::GC::SuppressFinalize(this); Test::Finalize(); } }; You may have noticed the System::GC::SuppressFinalize method call within the newly generated destructor. This method is placed here so that the garbage collector does not call the Finalize member method again if the delete operator was called manually.
As a Managed C++ programmer, you can't call the Finalize method directly, but you still have the option of calling the delete statement for the object. This will call the destructor and, as you can see in the preceding code, the garbage collector, because the method SuppressFinalize() forgets about the object.
Because the destruction of the class is handled by the CLR, when the destructor occurs can't be determined. If you're doing things such as cleaning up resources (files, for example) in the destructor, then you should be calling delete manually. If you're planning on using this object in C#, you can't do this, so you should place the cleanup functionality in a member method called, by convention, Dispose().
Note that the Dispose() method doesn't call the destructor; the garbage collector still does that. This can cause a problem. Resources can be deallocated twice. This is usually not a good thing and it quite often results in exceptions being thrown. To fix this, you have to make sure that you code your program in such a way that this doesn't happen. Fortunately, a simple Boolean variable will suffice:
__gc class DisposedClass { Boolean isDisposed; DisposedClass() { isDisposed = false; } ~DisposedClass() { if (!isDisposed) { // clean up resources } } void Dispose() { // clean up resources isDisposed = true; } };
Virtual Methods
Virtual methods are the cornerstone of class polymorphism, as they allow the different classes derived from a common base class to respond to the same method call and generate a different response. Polymorphism occurs when a virtual method is called through a base class pointer or reference. This is because when the call is made it is the type of the actual object pointed to that determines which copy of the virtual method is called.
Technically, when you declare a virtual method, you are telling the compiler that you want dynamic or runtime binding to be done on any method with an identical signature in a derived class. To make a method virtual, you simply need to place the keyword virtual in front of the method declaration.
Any method that you declare as virtual will automatically be virtual for any directly or indirectly derived class. It is not necessary to include the keyword virtual in the derived class method, but by including it you will make it clear to other developers that the method is, in fact, virtual.
The method signature of the base class must be the same as the derived class. This means that the name of the method and the number of parameters and their types must be identical. The return type of the method need not be identical, but it must at least be derived from the same type as that of the base method's return type.
Listing 3-6 is the standard virtual animal example. First, you declare a base class Animal with a virtual method of Speak(). You then create specific animal-type classes derived from Animal and override the virtual method Speak(). In the main() function, you create an array of Animals and assign specific type animals to it. Finally, you loop through the Animal array. Because the Speak() method is virtual, the actual object type assigned to the Animal array determines which Speak() to execute.
Listing 3-6: Virtual Methods in Action
#using <mscorlib.dll> using namespace System; __gc class Animal { public: virtual void Speak () { Console::WriteLine(S"Mysterious Silence"); } }; __gc class Dog : public Animal { public: virtual void Speak () { Console::WriteLine(S"Woof"); } }; __gc class Puppy : public Dog { public: virtual void Speak () // Note the keyword virtual is not needed but I { // include it so I will remember that it is virtual // the next time it's inherited. Console::WriteLine(S"Yip Yip"); } }; __gc class Cat : public Animal { public: virtual void Speak () { Console::WriteLine(S"Meow"); } }; Int32 main(void) { Animal *a[] = new Animal*[4]; // Array of __gc class pointers a[0] = new Cat(); a[1] = new Dog(); a[2] = new Puppy(); a[3] = new Animal(); for (Int32 i = 0; i < a->Count; i++) { a[i]->Speak(); } return 0; } Figure 3-7 shows the results of this little program.
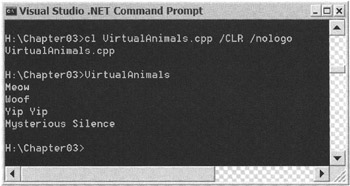
Figure 3-7: Results of VirtualAnimals.exe
Pure Virtual Method
When you look at the previous example, you may notice that the base class virtual method Speak() really has a nonsense implementation and shouldn't even be included in the class. A better way to implement this example and ensure that the virtual method is always overridden is to force the inheriting classes to override the virtual method and, if it doesn't, generate an error. You can do this with a pure virtual method.
The big difference between a pure virtual method and a virtual method is that a class that contains pure virtual methods cannot be instantiated. In other words, a class that has pure virtual methods must be inherited to be used. You will look at this in more detail later in the chapter when you examine abstract classes.
A pure virtual method is simply a definition of a method without any implementation. When you use it, the compiler checks to make sure that the pure virtual method is overwritten. If it is not, then the compiler generates an error.
A pure virtual method has the same syntax as a regular virtual method, except that instead of a method implementation, a = 0; is appended:
virtual void PureVirtualFunction() = 0;
Sealed Virtual Method
There is essentially no difference between a Managed C++ and a traditional C++ virtual method. What has changed is with Managed C++ there is an additional keyword that can seal a virtual method or, in other words, stop a virtual method from being used as a virtual method in all subsequent derived classes.
Sealing a method only works for virtual methods, for obvious reasons. To seal a virtual method, you simply place __sealed in front of it:
__sealed virtual void Speak();
If you were to apply the __sealed keyword to the VirtualAnimal example—for example, on the Dog's virtual method Speak()—then the Puppy class's virtual method Speak() will error out, as it is illegal to override a sealed virtual method.
Method Overriding
Method overriding is defining a method in a derived class that has an identical signature to the base class. How the derived class actually works depends on whether the method is virtual or not. If the method is virtual, it runs as I described previously.
On the other hand, if the method is not virtual, then it works completely differently. First off, no dynamic binding occurs, just standard static or compile-time binding. What this means is that whatever type the method is called with is executed. For example, in the VirtualAnimal example, if the Speak() method were not virtual, then the Animal class's Speak() method would be called every time in the for loop. This displays "Mysterious Silence" for a time as opposed to the assorted messages generated by the virtual version of the example. The reason this happens is because the array pointer is of type Animal.
Basically, overriding a nonvirtual method simply has the effect of hiding the base class's copy of the method.
Method Overloading
There is nothing special about coding overloaded methods, as they are handled in exactly the same way as function overloading, which I covered in the previous chapter. The only real difference is that they are now methods inside a class and not functions out on their own. For example, here is the same super-secret method (this time) overloaded three times in a Secret class:
__gc class Secret { Int32 Test () { /* do stuff */ } Int32 Test (Int32 x) { /* do stuff */ } Int32 Test (Int32 x, Int32 y, Double z) { /* do stuff */ } }; Calling an overloaded method is nothing special either. Simply call the method you want with the correct parameters. For example, here is some code to call the second super-secret Test method from a pointer object called secret and the third method from a referenced object:
secret->Test (0, 1, 2.0); // if the class is a pointer secret.Test(5); // if the class is a reference
For those of you coming from a traditional C++ or Visual Basic background, you might have used default arguments. Unfortunately, with Managed C++, managed (__gc) classes and structs do not support default arguments in member methods. In fact, they generate an error.
A suggested solution to this change in syntax is to use overloaded methods. That is, define a method with fewer parameters and then initialize the variable in the method body. For example, here are four methods that when combined together are equivalent to one method with three defaulted arguments:
__gc class NoDefaultArgs { // Invalid method with default values // Int32 DefArgs ( Int32 x = 1, Int32 y = 2, Int32 z = 3) { /* do stuff */ } // Equivalent combination of overloaded methods Int32 DefArgs () { x = 1; y = 2; z = 3; /* do stuff */ } Int32 DefArgs ( Int32 x ) { y = 2; z = 3; /* do stuff */ } Int32 DefArgs ( Int32 x, Int32 y ) { z = 3; /* do stuff */ } Int32 DefArgs ( Int32 x, Int32 y, Int32 z ) { /* do stuff */ } } I'm sure there is a good reason why Microsoft eliminated default arguments, but personally I hope they put them back in, as using overloads can get quite cumbersome.
Managed Operator Overloading
Operator overloading is one important feature that most traditional C++ programmers learn to work with early in their careers. It is one of C++'s claims to fame and is the ability to use standard operators and give them meaning in a class—for example, adding two strings together to get a new concatenated string.
Managed C++'s managed classes support operator overloading as well, but in a completely different way than traditional C++. First, managed classes do not support the operator keyword. In fact, using the operator keyword in managed classes causes an error. Instead, they are defined as ordinary static methods with specific names. Managed C++ then maps these specially named methods into infix operators for the defining class. Table 3-1 contains a list of all operator names and equivalent infix operators.
| MANAGED OPERATOR NAME | INFIX OPERATOR SYMBOL |
|---|---|
| op_Implicit | N/A |
| op_Explicit | N/A |
| op_Addition | + (binary) |
| op_Subtraction | - (binary) |
| op_Multiply | * (binary) |
| op_Division | / |
| op_Modulus | % |
| op_ExclusiveOr | ^ |
| op_BitwiseAnd | & (binary) |
| op_BitwiseOr | | |
| op_LogicalAnd | && |
| op_LogicalOr | || |
| op_Assign | = |
| op_LeftShift | << |
| op_RightShift | >> |
| op_SignedRightShift | N/A |
| op_UnsignedRightShift | N/A |
| op_Equality | == |
| op_GreaterThan | > |
| op_LessThan | < |
| op_Inequality | ! = |
| op_GreaterThanOrEqual | >= |
| op_LessThanOrEqual | <= |
| op_MultiplicationAssignment | *= |
| op_SubtractionAssignment | -= |
| op_ExclusiveOrAssignment | ^= |
| op_LeftShiftAssignment | <<= |
| op_RightShiftAssignment | >>= |
| op_ModulusAssignment | %= |
| op_AdditionAssignment | += |
| op_BitwiseAndAssignment | & = |
| op_BitwiseOrAssignment | |= |
| op_Comma | , |
| op_DivisionAssignment | / = |
| op_Decrement | -- |
| op_Increment | ++ |
| op_UnaryNegation | - (unary) |
| op_UnaryPlus | + (unary) |
| op_Negation | ! |
| op_OnesComplement | ~ |
Listing 3-7 is an example of the op_Inequality and op_Equality operators and the ! = and == infix operators. Notice how you can use either the static method call or the infix operator when you do the equality check.
Listing 3-7: Operator Overload in Action
#using <mscorlib.dll> using namespace System; __gc class M { Int32 i; public: M(Int32 x) { i = x; } static bool op_Inequality(M &m1, M &m2) // maps to operator != { Console::WriteLine(S"In op_Inequality"); return m1.i != m2.i; } static bool op_Equality(M &m1, M &m2) // maps to operator == { Console::WriteLine(S"In op_Equality"); return m1.i == m2.i; } }; Int32 main(void) { M *m1 = new M(5); M *m2 = new M(5); M *m 3 = new M(10); if ( M::op_Inequality(*m2, *m3) ) Console::WriteLine(S"Don't Equal"); else Console::WriteLine(S"Equal"); if ( *m1 != *m2 ) // infix operator ! = Console::WriteLine(S"Don't Equal"); else Console::WriteLine(S"Equal"); if ( M::op_Equality(*m2, *m3) ) Console::WriteLine(S"Equal"); else Console::WriteLine(S"Don't Equal"); if ( *m1 == *m2 ) // infix operator == Console::WriteLine(S"Equal"); else Console::WriteLine(S"Don't Equal"); return 0; } Figure 3-8 shows the results of this little program.
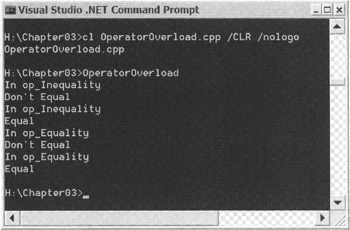
Figure 3-8: Results of OperatorOverload.exe
| Caution | Be careful when you use an infix operator with managed class pointers. When you compare m1 == m2 you are comparing if the pointers are equal, which is not what you want. Make sure you are comparing the actual value of the classes *m1 == *m2. |
One other thing to be aware of is that at least one of the managed operands must be of the same type as the defining class. Listing 3-8 compares whether the __value struct N is greater than an Int32.
Listing 3-8: Operator Overload for Mixed Data Types in Action
#using <mscorlib.dll> using namespace System; __value struct N { Int32 i; public: N(Int32 x) { i = x; } static bool op_GreaterThan(N n, Int32 v) // maps to operator > { return n.i > v; } static bool op_GreaterThan(Int32 v, N n) // maps to operator > { return v > n.i; } }; Int32 main(void) { N n(5); if ( n > 6 ) Console::WriteLine(S"Greater than"); else Console::WriteLine(S"Less than or Equal"); if ( 6 > n ) Console::WriteLine(S"Greater than"); else Console::WriteLine(S"Less than or Equal"); return 0; } Figure 3-9 shows the results of this little program.
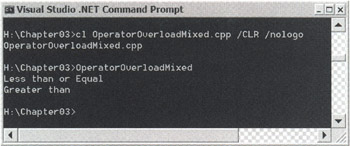
Figure 3-9: Results of OperatorOverloadMixed.exe
Member Properties
The purpose of properties is to enrich encapsulation for classes and structs. Properties are successful in doing this, and as an added benefit, they provide an improved and simplified interface to a member variable.
A problem with traditional C++ classes is that there is no simple and standardized way of maintaining member variables. Frequently, programmers will simplify the syntax of interfacing with their class and allow public access to member variables even at the risk of having invalid data placed into them. Seeing the risk of exposing some of the more volatile variables, a programmer then might decide to write getter and setter methods. These methods would protect the member variables, but would then complicate the necessary syntax for their access.
Properties solve this problem by providing direct member variable-like access to member variables, but with the security and flexibility of getter and setter methods. To the programmer accessing the class, properties act like member variables. Member properties resemble simple scalar variables, static variables, arrays, and indexes. To the developer of the class, properties are simply getter and setter methods with specific rules and syntax. The complexity of these methods is totally up to the class creator.
Scalar Properties
The most common implementation of a property is getter and setter methods accessing a single member variable. Properties can be write-only, read-only, or both.
To create a writable property, you need to use Managed C++'s new __property keyword. Then, simply use the following syntax:
__property void set_<property name> ( <property type> value) { } For example:
__property void set_Name (String *name) { } You now have full access to the parameter to do as you please. The most common thing you will do is validate the parameter and then assign it to a private member variable.
The only real catch you might encounter is that the property name cannot be the same as a member variable. A conversion I use, which is by no means a standard, is to prefix member variable storage for properties with an underscore (_) and lowercase the first letter in the property name:
<property type> _<property name>; // with first letter of name lowercase
For example:
String* _name;
A programmer who is actually writing to the property will access it using the property name (without the set_prefix), as if it were a simple variable of the property type:
<property name> = statement;
For example:
Name = S"Stephen";
To create a readable property, you need to use the __property keyword again, but this time using this syntax:
__property <property type> get_<property name> () { } For example:
__property String* get_Name () {} You are now free to put any calculation you want within the method, but it must return the type specified. For this type of property, the most common body of the method is a simple return of the member variable storage of the property.
A programmer accessing the property will do as he would any other member variable, but he will use the property name without the get_prefix.
To create a property that is both readable and writable, simply create both a readable and writable property. The only thing you need to be aware of is that the property name and property type must be the same for both the get_ and set_ methods.
Listing 3-9 shows a readable property, a writable property, and a property that is both readable and writable.
Listing 3-9: Scalar Properties in Action
#using <mscorlib.dll> using namespace System; __value struct ScalarProp { // Write only property __property void set_Name(String *name) { _name = name; } // Ready only property __property String *get_Description() { return String::Concat(_name, S" ", _desc); } // Read/write validated parameter __property void set_Number(Int32 num) { if (num < 1) num = 1; else if (num > 10) num = 10; _num = num; } __property Int32 get_Number() { return _num; } ScalarProp() { _name = S"Blank Name"; _desc = S"Scalar Property"; } private: String *_name; String *_desc; Int32 _num; }; Int32 main(void) { ScalarProp sp; sp.Name = S"The Struct"; Console::WriteLine(sp.Description); sp.Number = 20; // Will be changed to 10 Console::WriteLine(sp.Number); sp.Number = -5; // Will be changed to 1 Console::WriteLine(sp.Number); sp.Number = 6; // Will not change Console::WriteLine(sp.Number); return 0; } Figure 3-10 shows the results of this program.
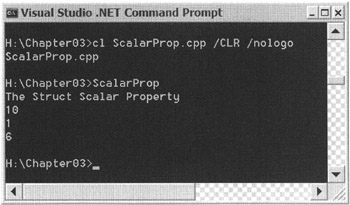
Figure 3-10: Results of ScalarProp.exe
Static Properties
As I mentioned previously, classes also contain static member variables. Likewise, Managed C++ provides property syntax to support static properties, or properties that have class-wide storage.
Static properties are nearly identical to scalar properties except that they contain the keyword static in their definition and they can only use static variables for storage. To create a readable and writable static property, simply use this syntax:
__property static void set_<property name> ( <property type> value) { } __property static <property type> get_<property name> () { } For example:
__property static void set_Name (String *name) { } __property static String* get_Name () {} A programmer accesses a static property in the same way she would a static member variable, by using class name and the :: operator:
<class>::<property name>
For example:
StaticProp::Name = S"Static Property"; Console::WriteLine(StaticProp::Name);
Listing 3-10 shows a simple readable and writable static Name property.
Listing 3-10: Static Properties in Action
#using <mscorlib.dll> using namespace System; __gc class StaticProp { static String* _name; public: __property static void set_Name (String* name) { _name = name; } __property static String* get_Name () { return _name; } }; Int32 main(void) { StaticProp::Name = S"Static Property"; Console::WriteLine(StaticProp::Name); return 0; } Figure 3-11 shows the results of this little program.
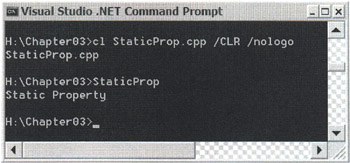
Figure 3-11: Results of StaticProp.exe
Array Properties
Managed C++ provides simple array syntax for properties. This is a big improvement over traditional C++, where getter and setter methods simply don't perform that elegantly.
The syntax for array properties is virtually the same as that for the scalar property except for the addition of the open and close square brackets:
__property <property type> get_<property name> () [] { } __property void set_<property name> ( <property type> value [] ) { } For example:
__property Int32 get_NumArray() [] { } __property void set_NumArray ( Int32 NumArray[] ) { } Notice the weird syntax (for traditional C++) of placing the square brackets between the ending brace of the parameter list and the opening curly bracket of the method body. Remember that managed arrays cannot be manipulated using pointer arithmetic. Therefore, the type returned from an array property has to be an array type.
By the way, if you look back in the previous chapter, the get_ method syntax has a strong resemblance to that of the returning of an array from a function.
Once the get_ and set_ methods have been created, it is a simple matter to access an array property using normal array syntax. Listing 3-11 shows how to add an assignable, readable, and writable array property to a class.
Listing 3-11: Array Properties in Action
#using <mscorlib.dll> using namespace System; __gc class ArrayProp { Int32 _numArray[]; public: __property Int32 get_NumArray() [] { return _numArray; } __property void set_NumArray ( Int32 NumArray[] ) { _numArray = NumArray; } }; Int32 main() { ArrayProp &array = *new ArrayProp; array.NumArray = new Int32[5]; for ( int i = 0 ; i < array.NumArray->Count ; ++i ) array.NumArray[i] = i; for ( int i = 0 ; i < array.NumArray->Count ; ++i ) Console::WriteLine(array.NumArray[i].ToString()); return 0; } Figure 3-12 shows the results of this little program.
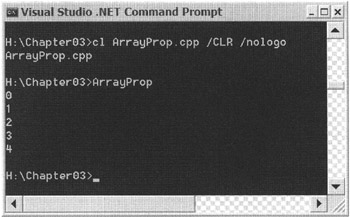
Figure 3-12: Results of ArrayProp.exe
You might have noticed that the property array storage is an unallocated private member variable. Obviously, it is possible to allocate the member variable storage in the constructor.
Indexed Properties
At first glance, indexed properties may appear to provide the same thing as array properties. Basically, they allow you to look up a property based on an index. The syntax to allow you to do this is much more complex than that of the array property:
__property <ProType> get_<ProName>(<IndxType> v1,..., <IndxType> vn) {} __property void set_<ProName>(<IndxType> v1,..., <IndxType> vn, <ProType> p) {} or
__property Student &get_ReportCard(String *n) {} __property void set_ReportCard(String *n, Student &s) {} So why would a programmer go through all of the problems of using indexed properties? It boils down to one thing: The index doesn't have to be numeric. In other words, when you use indexed properties, you get the ability to work with an array index of any type.
In the preceding sample, the index is of type String. So, when a programmer wants to access an indexed property, he would access it like this:
<ProName>[v1,..., vn]
or
<ProName>[v1]...[vn]
in the preceding example:
ReportCard[<string name>]; // where <string name> is a value index
If the index properties are a little hazy still, Listing 3-12 is a more complex example to show them in action. You start by defining a Student class with two read-only properties. You then create a Course class, which, using a nested class, stores a linked list of students and their grades for the course. You use an indexed property ReportCard to extract the grades from the linked list using the student's name.
Listing 3-12: Indexed Properties in Action
#using <mscorlib.dll> using namespace System; __gc class Student { String *_name; Int32 _grade; public: Student(String * s, Int32 g) { _name = s; _grade = g; } __property String *get_Name() { return _name; } __property Int32 get_Grade() { return _grade; } }; __gc class Course { __gc struct StuList { Student *stu; StuList *next; }; StuList *pStu; static StuList *ReportCards = 0; public: __property Student &get_ReportCard(String *n) { for(pStu = ReportCards; pStu && (pStu->stu->Name != n); pStu = pStu->next) ; if (pStu != 0) return *pStu->stu; else return *new Student(0,0); // empty student } __property void set_ReportCard(String *n, Student &s) { for(pStu = ReportCards; pStu && (pStu->stu->Name != n); pStu = pStu->next) ; if (pStu == 0) { StuList *stuList = new StuList; stuList->stu = &s; stuList->next = ReportCards; ReportCards = stuList; } } }; Int32 main() { Course &EnglishLit = *new Course; Student &Stephen = *new Student(S"Stephen", 95); Student &Sarah = *new Student(S"Sarah", 98); EnglishLit.ReportCard[ S"Stephen" ] = Stephen; // index String lit EnglishLit.ReportCard[ Sarah.Name ] = Sarah; // index String* Console::WriteLine(EnglishLit.ReportCard[ Stephen.Name ].Grade); Console::WriteLine(EnglishLit.ReportCard[ S"Sarah" ].Grade); return 0; } Figure 3-13 shows the results of this little program.
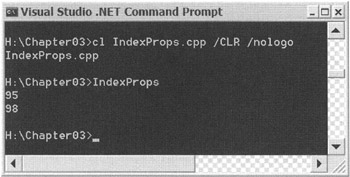
Figure 3-13: Results of IndexProps.exe
Nested Classes
As their name suggests, nested classes are classes defined inside another class. You might think of them as member classes.
Like all members of a class, a nested class's accessibility is determined by whether it is located within the public, protected, or private area of its class. Unlike member types, a nested class, though limited to the scope of the enclosing class, has its own members, and these members adhere to the accessibility of the nested class. For example, if the nested class has public accessibility, but the accessibility of the nested class's member variable is private, then the member variable is private as far as the surrounding class is concerned, even though the nested class is accessible to external functions and methods.
In Listing 3-13 you can see a surrounding class with a nested class. The nested class has three members: a public, a protected, and a private member variable. The surrounding class has three member variable references to the nested class: public, protected, and private. The surrounding class also has an initializer list constructor for the member variables and a method to access all the nested class instances within the surrounding class. The listing shows an inheriting class to the surrounding class with a method showing how to access the nested class instances of its parent class. Finally, the listing shows a main() function that shows how to reference the member variable found within the nested class within the surrounding class. The class has no output. Its purpose is to show you a method of accessing nested classes' public members.
Listing 3-13: Indexed Properties in Action
#using <mscorlib.dll> using namespace System; __gc class SurroundClass { protected: __gc class NestedClass // Declaration of the nested class { public: Int32 publicMember; protected: Int32 protectedMember; private: Int32 privateMember; }; NestedClass &protectedNC; // protected variable reference to NestedClass private: NestedClass &privateNC; // private variable reference to NestedClass public: NestedClass &publicNC; // public variable reference to NestedClass // Constructor for SurroundClass // Notice the initializer list declaration of the reference member variable SurroundClass() : publicNC(*new NestedClass), protectedNC(*new NestedClass), privateNC(*new NestedClass) {} // A member showing how to access NestedClass within SurroundClass // Notice only public member variables of the nested class are accessed // The private and protected are hidden void method() { Int32 x; NestedClass &nc1 = *new NestedClass(); // Declared another reference // NestedClass x = nc1.publicMember; // Accessing new NestedClass variable x = publicNC.publicMember; // Accessing public NestedClass variable x = protectedNC.publicMember;// Accessing protected NestedClass variable x = privateNC.publicMember; // Accessing private NestedClass variable } }; // An inherited class showing how to access NestedClass within a member method // Notice only public and protected NestedClass are accessed // The private is hidden __gc class inheritSurroundClass : public SurroundClass { public: void method() { Int32 x; NestedClass &nc1 = *new NestedClass(); // can access because NestedClass // declaration protected x = nc1.publicMember; x = publicNC.publicMember; x = protectedNC.publicMember; } }; // The main function shows how to access NestedClass from outside SurroundClass // inheritance tree // Notice only the public NestedClass reference is accessible Int32 main() { SurroundClass &sc = *new SurroundClass(); Int32 x = sc.publicNC.publicMember; return 0; } There is a lot of code in Listing 3-13. Figure 3-14 should clear up any confusion.
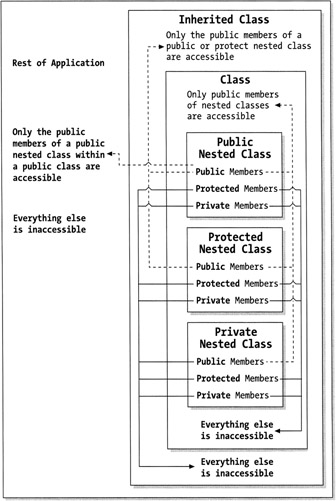
Figure 3-14: Accessing nested class members
Only public members are accessible outside of a nested class. For the surrounding class to access the public variable, the nested class can be public, protected, or private. For an inheriting class of the surrounding class, only public or protected access to the nested class will allow access to the nested class's public member variable. Finally, to access the nested class's public member variable outside of the inheritance tree of the surrounding class, both the nested class and the surrounding class must have public access.
Type Casting between Classes
Type casting is the process of converting from one type to another. I covered type casting of the built-in types in Chapter 2. Now I expand on that discussion to include class and struct types.
Managed C++ provides three different operators for type casting between classes or structs: static cast, dynamic_cast, and __try_cast. Each performs the process of trying to convert from one class type to another.
Notice that I wrote "trying to" convert. To legally convert a class to another, it needs to inherit from or be the class type being converted to. For example, let's say class B inherits from class A, which in turn inherits from the Object class (all managed classes inherit from the Object class). This means that class B can safely be converted to a class A or the Object class. Class A, on the other hand, can safely convert to the Object class, but it would be an invalid conversion to class B, as class A is not inherited from class B.
The static_cast operator is the fastest of the three conversion operators, but it is also the most dangerous, as it assumes that the programmer knows what she is doing and so it does no validity checks of its own. The syntax for the operator is simply this:
static_cast<target_type>(object_to_convert);
or
static_cast<Int32>(var); static_cast<ClassA*>(ClassBvar);
The dynamic_cast operator is slower than the static_cast operator because it verifies that the type casting is valid. If the conversion is allowed, then the dynamic_cast operator completes the conversion. On the other hand, if it's not a valid conversion, then the dynamic_cast operator returns a null pointer. The syntax of the dynamic_cast operator is identical to the static_cast operator except that static is replaced with dynamic in the following statement:
dynamic_cast<ClassA*>(ClassBvar);
A nifty little trick to check if a class is of a certain type can be done using the dynamic_cast operator. If you come from the C# world, this is equivalent to the is operator:
if ( dynamic_cast<ClassA*>(ClassB) != 0) { // ClassB is of type ClassA } The last conversion operator is the __try_cast. This operator is similar to the dynamic_cast operator except that instead of returning a null pointer, it throws an exception of type System::InvalidCastException. I cover exceptions in Chapter 4.
The __try_cast operator is really, as far as I'm concerned, a testing tool, so you should use it only during the development phase. My reasoning is that the __try_cast exception should only occur when there's a mistake in the code and, thus, after the testing phase the __try_cast should always succeed. You should convert all references to __try_cast to static_casts before you release the software to production.
Listing 3-14 doesn't produce any output. I've provided comments on what the result of each statement is. If you want to prove to yourself that I'm right, you can run the code through a debugger and watch the results as you execute each statement.
Listing 3-14: Type Casting in Action
#using <mscorlib.dll> using namespace System; __gc class A {}; __gc class B : public A {}; __gc class C {}; Int32 main(void) { Object *v1 = new A(); Object *v2 = new B(); Object *v3 = new C(); A *a1 = new A(); A *a2 = new B(); A *a3 = dynamic_cast<A*>(v1); // cast from Object(actual A) to A A *a4 = dynamic_cast<A*>(v2); // cast from Object(actual B) to A A *a5 = static_cast<A*>(v3); // a5 has invalid value of type C class B *b1 = new B(); B *b2 = dynamic_cast<B*>(v2); // cast from Object(actual B) to B B *b3 = dynamic_cast<B*>(v3); // Fails b3 = null. Mismatch classes B *b4 = dynamic_cast<B*>(a2); // cast from A(actual B) to B C *c1 = new C(); C *c2 = dynamic_cast<C*>(v1); // Fails c2 = null. Mismatch classes C *c3 = static_cast<C*>(v2); // c3 has invalid value of type B class C *c4 = _try_cast<C*>(v3); // cast from Object(actual C) to C B *e1 = __try_cast<B*>(c1); // aborts with exception return 0; } EAN: 2147483647
Pages: 169