A Simple Web Service
Enough theory, let's look at some code. In this example, you'll create an overly simplified Web service that finds a zip code based on city and state. It's so oversimplified that it finds the zip code only for two city and state combinations. In truth, it really doesn't matter what the internal workings of a Web service are, as they're just (in the case of this book) standard Managed C++ classes. What is special is the ability to access these classes over a network.
The process of creating a Web service is very easy. The first step is the same as that of any other project: Select the appropriate template (in this case, the ASP.NET Web Service template) to start building your Web service and give it a name. As you can see in Figure 15-1, I gave the project the name FindZipCode.
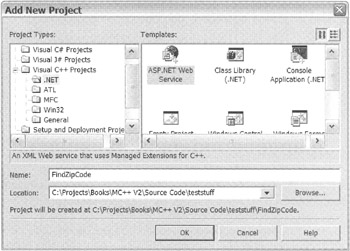
Figure 15-1: Selecting the ASP.NET Web Service template
Once the New Project Wizard finishes, you're left with (believe it or not) a fully functioning "Hello, World" Web service. Okay, let's modify the "Hello, World" service so that it provides zip code-finding functionality.
The first thing I usually do with the template is delete the generated Web service *.asmx, *.cpp, and *.h files. Then I add a new ASP.NET Web service with a more appropriate name. If you like the default name generated, then you can go ahead and use that one. In the case of this example, I actually like the default, FindZipCodeClass, so I won't go through the delete process.
As I discussed way back in Chapter 3, I like to use only one source file when I develop my classes. The code generated by the Web service wizard uses the old two-file format. I prefer to use *.h files to contain the source for my Managed C++ classes (this is also the standard used by Microsoft with Web Forms). Because of this, I open up FindZipCodeClass.cpp and delete all the pregenerated code except the #include directives. You can't simply delete FindZipCodeClass.cpp because, if you recall, only *.cpp gets compiled so I need to retain at least one *.cpp file to include all the relevant *.h files. Listing 15-1 shows the final contents of FindZipCodeClass.cpp.
Listing 15-1: FindZipCodeClass.cpp
# include "stdafx.h" #include "FindZipCodeClass.h" #include "Global.asax.h"
The next file you should look at is FindZipCodeClass.asmx. In almost all cases, you will not change the contents of this file. As you can see in Listing 15-2, the file contains a single WebService directive containing a Class attribute that specifies the name of the associated class with this .asmx file.
Listing 15-2: FindZipCodeClass.asmx
<%@ WebService Class=FindZipCode.FindZipCodeClass %>
Like with ASP.NET, Web services are not fully supported by Managed C++ and the only way to implement them is to precompile the source. In other languages, such as C# and Visual Basic .NET, there would be two additional attributes: the Language attribute, which specifies the language of the associated code, and the Codebehind attribute, which specifies the source file for the Web service. These other attributes allow the Web service to be compiled at runtime.
The last file of interest in this simple example is the FindZipCodeClass.h file, which I use to contain the actual logic of the Web service. When you first open the file, you will notice that it contains the default code used to support the GUI designer. Web services do not have a GUI front end, so it is safe to delete all this code. Listing 15-3 shows the final version of FindZipCodeClass.h.
Listing 15-3: FindZipCodeClass.h
#pragma once using namespace System; using namespace System::Web; using namespace System::Web::Services; namespace FindZipCode { [WebService(Namespace=S"http://contentmgr.com", Description = S"Zip code retrieval service")] public __gc class FindZipCodeClass : public WebService { public: [WebMethod(Description = S"Get the zip code from city and state")] Int32 GetZip(String *city, String *state) { // Obviously very simplified if (city->Equals(S"Louisville") && state->Equals(S"KY")) return 40241; else if (city->Equals(S"Irvine") && state->Equals(S"CA")) return 92612; else throw new Exception(S"Zip Code not found"); } }; } As you can see, I removed the constructor, the Dispose() method, and the InitializeComponent() method along with the components variable because they are not needed. I also removed the redundant name qualifying because using namespace System::Web::Services does this for you.
The public method GetZip() is nothing particularly special, except that it throws an exception on an error. I could have just as easily returned a predetermined value to handle the not found condition, but I want to show you, when you build consuming clients later in the chapter, that exception handling works even over the Internet.
So far, nothing new has been done to this class to support Web services. You may have noticed that the class derives from WebService, but this is optional. The only reason that I can think of that you would need to add this is if you need to access the information found on the HTTP request or the session's state. In the previous example, the class inheritance can be safely deleted.
This only leaves the two attributes WebService and WebMethod to provide the magic of Web services.
As you might have noticed when you were entering the previous example, the first attribute WebService is not autogenerated. It too is optional. Though, in this case I recommend always adding it. The WebService attribute provides the Web service with two important features:
-
A guaranteed unique namespace (if used properly)
-
A description of the Web service for potential consumer clients to read and determine if it is the correct Web service to use
How do you guarantee a unique namespace? It is possible for some third-party developer to create a Web service with the exact same name and members as your Web service. So what a Web service does to stop this from happening is use your Web address as a root namespace, because a Web address is guaranteed to be unique for the Web server that hosts the Web service. Of course, it is still required that all Web services be unique on a single Web server.
Here is the code for the WebService attribute from the previous example:
[WebService(Namespace=S"http://contentmgr.com", Description = S"Zip code retrieval service")]
Notice that it uses a standard attribute syntax.
No Web service magic yet, so the magic must be (and is) this last WebMethod attribute. The WebMethod attribute is the only required element (other than the .asmx file) for a Web service. You must add it to any public methods that you want to be accessible within the Web service.
| Note | Only public members with the [WebMethod] attribute are accessible within the Web service. |
Even if the member is public, it will not be accessible unless it has a WebMethod attribute. Just like the WebService attribute, you can include an optional Description of the Method.
[WebMethod(Description = S"Get the zip code from city and state")]
Okay, let's compile and run the Web service. You can do this the same way as any other application. I use Ctrl-F5, but you can use any method you are comfortable with. What you should get is a Web page that looks something like the one shown in Figure 15-2.
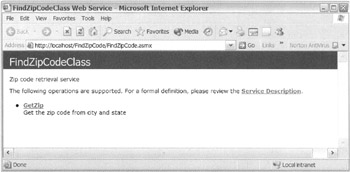
Figure 15-2: The FindZipCode Web service Web page
| Tip | You might get the error "Resource can't be found."If you do, check the URL that Visual Studio .NET is trying to execute. Most likely it is using the solution's URL instead of the project's. To fix this, go to Debugging properties of the project and change the HTTP URL to point to the correct place. |
I don't remember coding this, do you? This Web page was automatically created when you compiled your Web service. This page is how a third-party developer will get information about your Web service. Note that I used the term "developer." The client application will get its information using WSDL. Because I wasn't very detailed in my descriptions on the WebService and WebMethod attributes, this page isn't very helpful. I personally recommend that you be as detailed in those attribute descriptions as possible. This will make it easier for a developer to use your Web service.
Go ahead and click the Service Description hyperlink to generate and display the WSDL for your Web service. As you can see in Listing 15-4, it's interesting, but I personally won't use it. I'll let the computer figure all this out for me.
Listing 15-4: FindZipCode's WSDL
<?xml version="1.0" encoding="utf-8"?> <definitions xmlns:soap12="http://schemas.xmlsoap.org/wsdl/soap12/" xmlns:soap="http://schemas.xmlsoap.org/wsdl/soap/" xmlns:s="http://www.w3.org/2001/XMLSchema" xmlns:s0="http://contentmgr.com" xmlns:soap12enc="http://www.w3.org/2002/06/soap-envelope" xmlns:http="http://schemas.xmlsoap.org/wsdl/http/" xmlns:soapenc="http://schemas.xmlsoap.org/soap/encoding/" xmlns:tm="http://microsoft.com/wsdl/mime/textMatching/" xmlns:mime="http://schemas.xmlsoap.org/wsdl/mime/" targetNamespace="http://contentmgr.com" xmlns="http://schemas.xmlsoap.org/wsdl/"> <types> <s:schema elementFormDefault="qualified" targetNamespace="http://contentmgr.com"> <s:element name="GetZip"> <s:complexType> <s:sequence> <s:element minOccurs="0" maxOccurs="1" name="city" type="s:string" /> <s:element minOccurs="0" maxOccurs="1" name="state" type="s:string" /> </s:sequence> </s:complexType> </s:element> <s:element name="GetZipResponse"> <s:complexType> <s:sequence> <s:element minOccurs="1" maxOccurs="1" name="GetZipResult" type="s:int" /> </s:sequence> </s:complexType> </s:element> </s:schema> </types> <message name="GetZipSoapIn"> <part name="parameters" element="s0:GetZip" /> </message> <message name="GetZipSoapOut"> <part name="parameters" element="s0:GetZipResponse" /> </message> <portType name="FindZipCodeClassSoap"> <operation name="GetZip"> <documentation>Get the zip code from city and state</documentation> <input message="s0:GetZipSoapIn" /> <output message="s0:GetZipSoapOut" /> </operation> </portType> <binding name="FindZipCodeClassSoap" type="s0:FindZipCodeClassSoap"> <soap:binding transport="http://schemas.xmlsoap.org/soap/http" style="document" /> <operation name="GetZip"> <soap:operation soapAction="http://contentmgr.com/GetZip" style="document" /> <input> <soap:body use="literal" /> </input> <output> <soap:body use="literal" /> </output> </operation> </binding> <binding name="FindZipCodeClassSoap12" type="so:FindZipCodeClassSoap"> <soap12:binding transport="http://schemas.xmlsoap.org/soap/http" style="document" /> <operation name="GetZip"> <soap12:operation soapAction="http://contentmgr.com/GetZip" style="document" /> <input> <soap12:body use="literal" /> </input> <output> <soap12:body use="literal" /> </output> </operation> </binding> <service name="FindZipCodeClass"> <documentation>Zip code retrieval service</documentation> <port name="FindZipCodeClassSoap" binding="so:FindZipCodeClassSoap"> <soap:address location="http://localhost/FindZipCode/FindZipCode.asmx" /> </port> <port name="FindZipCodeClassSoap12" binding="so:FindZipCodeClassSoap12"> <soap12:address location="http://localhost/FindZipCode/FindZipCode.asmx"/> </port> </service> </definitions>
Now go back to the previous page and click the GetZip hyperlink. On this page, you get a simple dialog box to test your Web service. I'll show you the code to do this yourself a little later in this chapter.
Another interesting, but unnecessary, bit of information provided on this page are the HTTP request (see Listing 15-5) and response (see Listing 15-6) SOAP wrappers for your Web service. The reason that I think that they are provided (other than they look cool) is that other platforms are not as lucky as .NET and have to build and parse these SOAP wrappers themselves.
Listing 15-5: FindZipCode's Request SOAP Wrapper
POST /FindZipCode/FindZipCode.asmx HTTP/1.1 Host: localhost Content-Type: text/xml; charset=utf-8 Content-Length: length SOAPAction: "http://contentmgr.com/GetZip" <?xml version="1.0" encoding="utf-8"?> <soap:Envelope xmlns:xsi="http://www.w3.org/2001/XMLSchema-instance" xmlns:xsd="http://www.w3.org/2001/XMLSchema" xmlns:soap="http://schemas.xmlsoap.org/soap/envelope/"> <soap:Body> <GetZip xmlns="http://contentmgr.com"> <city>string</city> <state>string</state> </GetZip> </soap:Body> </soap:Envelope>
Listing 15-6: FindZipCode's Response SOAP Wrapper
HTTP/1.1 200 OK Content-Type: text/xml; charset=utf-8 Content-Length: length <?xml version="1.0" encoding="utf-8"?> <soap:Envelope xmlns:xsi="http://www.w3.org/2001/XMLSchema-instance" xmlns:xsd="http://www.w3.org/2001/XMLSchema" xmlns:soap="http://schemas.xmlsoap.org/soap/envelope/"> <soap:Body> <GetZipResponse xmlns="http://contentmgr.com"> <GetZipResult>int</GetZipResult> </GetZipResponse> </soap:Body> </soap:Envelope>
The last things shown on this page are the request (see Listing 15-7) and response (see Listing 15-8) for an HTTP POST. You'll probably use this information only in the simplest of Web services and, even then, probably only during the debug phase of that Web service's development. Other platforms, on the other hand, may need to use this information because they don't have SOAP support.
Listing 15-7: FindZipCode's HTTP POST Request
POST /FindZipCode/FindZipCode.asmx/GetZip HTTP/1.1 Host: localhost Content-Type: application/x-www-form-urlencoded Content-Length: length city=string&state=string
Listing 15-8: FindZipCode's HTTP POST Response
HTTP/1.1 200 OK Content-Type: text/xml; charset=utf-8 Content-Length: length <?xml version="1.0" encoding="utf-8"?> <int xmlns="http://contentmgr.com">int</int>
Congratulations, you've made your first Managed C++ Web service! Now let's look at an assortment of ways to access your Web service.
Accessing a Web Service using HTTP POST
Using HTTP POST commands is the easier of the two methods of consuming your Web service. All it requires is some simple HTML code and a Web browser. The problem with using HTTP POST is that the response back from the Web service is an XML document that you will need to parse yourself.
Listing 15-9 shows a sample of some HTML code you might use to consume the Web service. It is basically a stripped-down version of the code generated when you access FindZipCode.asmx.
Listing 15-9: HTML to Consume the FindZipCode Web Service
<HTML> <BODY> To execute click the 'Invoke' button. <form action='http://localhost/FindZipCode/FindZipCode.asmx/GetZip' method="POST"> <table> <tr> <td>Parameter</td> <td>Value</td> </tr> <tr> <td>city:</td> <td><input type="text" name="city"></td> </tr> <tr> <td>state:</td> <td><input type="text" name="state"></td> </tr> <tr> <td colspan="2" align="center"> <input type="submit" value="Invoke"> </td> </tr> </table> </form> </BODY> </HTML>
As you can see, there is not much to this HTML. The only tricky parts are as follows:
-
Use a form action attribute that is made up of the Web service's name, including the .asmx suffix, followed by the name of the method you want to consume.
-
Remember to use within your <form> tag a method attribute of POST and not the more common GET.
-
Make sure the names of the input types match the Web service method parameters' names.
Figure 15-3 shows the data entry code getzip.html in action. Figure 15-4 shows what the response is after you click the Invoke button.
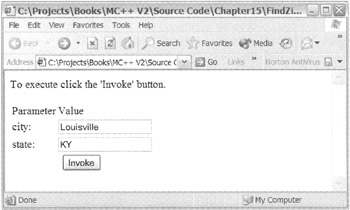
Figure 15-3: Consuming the FindZipCode Web service using getzip.html
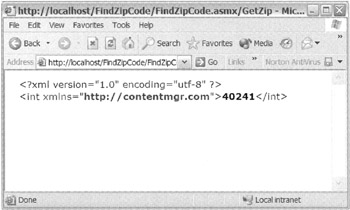
Figure 15-4: Response to getzip.html from the FindZipCode Web service
Accessing a Web Service using SOAP
With .NET, the only real way to consume Web services is to use SOAP. As you saw previously, the SOAP wrapper is quite complex. Fortunately, if you're using Visual Studio .NET and Managed C++ (or any other .NET language, for that matter) you don't have to know squat about SOAP, because everything about SOAP is taken care of for you.
Normally, when you're working with distributed programs, the client would be either a Windows Form or a Web Form. In the following example, on the other hand, I use a console to be different and to prove that it can be done. In a later example, I show how to use the more normal Windows Form.
The following example shows how to implement a client using the console. In this example, the client simply requests three zip codes. The first two are valid city/state combinations and the third is an invalid combination. The response to all three requests is written to the console. The third response ends up being a caught exception.
Start by creating a new Console Application (.NET) project. (In the example, I added this project to the chapter solution just to keep all the same code for a chapter together.)
Once the wizard has done its thing, you need to add a Web reference to the FindZipCode Web service. I thought it would be neat to use a real Web reference instead of localhost, so I copied the Web service FindZipCode that I created previously to my Web site host server, Contentmgr.com. Unfortunately, Contentmgr.com does not support .NET Framework version 1.1, so I had to place a .NET Framework version 1.0 copy of the Web service there, but the result is ultimately the same.
| Tip | For those of you who want to try out a remote copy of the Web service, I keep a copy ofFindZipCode on Contentmgr.com. You can find the Web service at http://contentmgr.com/FindZipCode.asmx. |
To add a Web reference, you right-click the References folder of your client application and select Add Web Reference. This will cause the Add Web Reference dialog box to appear (see Figure 15-5).
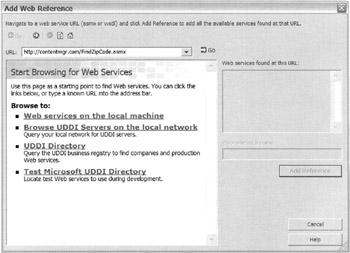
Figure 15-5: The Add Web Reference dialog box that appears before you select a Web service
From here, you can either click one of the links within the dialog box to search for the Web service or type the URL of the Web service in the supplied text box. In Figure 15-51 typed in the URL of the Web service, but if you don't have access to a Web server or don't want to use my copy of the Web service, then select the "Web services on the local machine" link, which will find and make available the Web service you built previously. Once you select the Web service, you want the Add Web Reference dialog box changes to look like Figure 15-6.
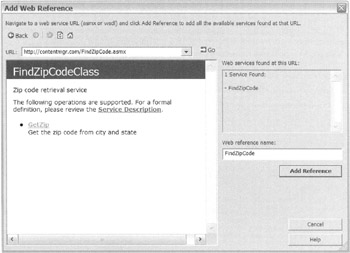
Figure 15-6: The Add Web Reference dialog box after you have selected a Web service
Now all you have to do is change the Web reference name to something more appropriate than the Web server's name, and then click the Add Reference button.
The addition of a Web reference adds a number of files to your project. Among them are a WSDL file and a DISCO file. Both are nice to look at but, in most cases, you will do nothing with them directly. The only file of real importance is the include file with the same name as the Web reference name you changed previously. All you need to do with this file is include it at the top of your client application. If you are curious, you can open this file to see some of the details of how the connection to the Web service is made.
Now you need to make the changes to your main .cpp file, as shown in Listing 15-10.
Listing 15-10: A Console Web Services Client Application
#include "stdafx.h" #include "FindZipCode.h" using namespace System; using namespace FindZipCode; void _tmain() { FindZipCodeClass *fzc = new FindZipCodeClass(); try { Console::WriteLine(fzc->GetZip("Louisville", "KY").ToString()); Console::WriteLine(fzc->GetZip("Irvine", "CA").ToString()); Console::WriteLine(fzc->GetZip("xx", "cc").ToString()); } catch (Exception *e) { Console::WriteLine(e->Message); } } Believe it or not, that's all the coding you have to do. Notice that you instantiate a Web service class in the same way as you do any other class:
FindZipCodeClass *fzc = new FindZipCodeClass();
Also notice that you access methods in the same way:
fzc->GetZip("Louisville", "KY").ToString(); From the client programming perspective, there is no difference between using a local class and using a Web service class. If I were to give this code to a developer, he or she would have no way of knowing it uses Web services unless he or she opened the FindZipCode.h include file.
Go ahead and run the client. Figure 15-7 shows the result of the client application ZipCodeConsoleClient.exe. As is expected, two zip codes are printed to the console, and then the exception is captured and printed to the console (just as I predicted at the beginning of this example).
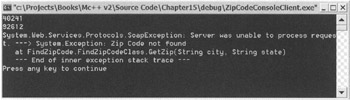
Figure 15-7: The client consumer of Web service FindZipCode in action
Debugging a Web Service
Debugging a Web service on its own is really no different than debugging any other .NET application. Simply compile within the debug solution configuration and then set breakpoints where you want the execution to stop.
There is only one scenario that requires you to do anything special, and that is if you create your Web service within a solution that has a different name than the Web service. When you do this, starting the debugger causes the error shown in Figure 15-8.
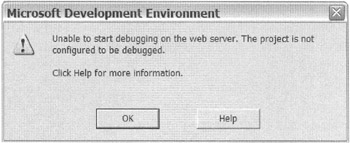
Figure 15-8: The debugging Web service error
The wording of the error doesn't really explain what caused the error. But it's very easy to solve the problem. What has happened is that the URL to your Web service is incorrect. When you build a Web service from an existing solution, Visual Studio .NET creates a URL to your Web service using the solution's path instead of the Web service's. Thus, if you look in the Web service project properties under the Configuration Properties ➣ Debugging folder, you'll find that the HTTP URL has a value of http://localhost/solutiondir/webservicename.asmx when it should have the value http://localhost/webservicedir/webservicename.asmx. To fix the problem, simply type the correct HTTP URL in the text box.
Debugging a Web service when it is being consumed by a client is, on the other hand, not as simple and requires a little more effort to set up.
The first step is to set a breakpoint just before the first call to the Web service. Read that carefully: It says the first time the Web service is called, not the first time you want to call the Web service with the debugger.
Then, the only way you can get the debugger to work is to step into the Web service the first time the Web service is used in the client application. If you fail to step into the Web service the first time, you get the dreaded "breakpoint cannot be set" error (see Figure 15-9) whenever you try to break within the Web service.
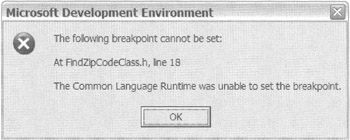
Figure 15-9: The "breakpoint cannot be set" error
Basically, once this initial connection between client and Web service is established, by stepping into the Web service, you can then debug the Web service just like normal.
EAN: 2147483647
Pages: 169