Flylib.com

Books Software


Image Processor


Image Processor

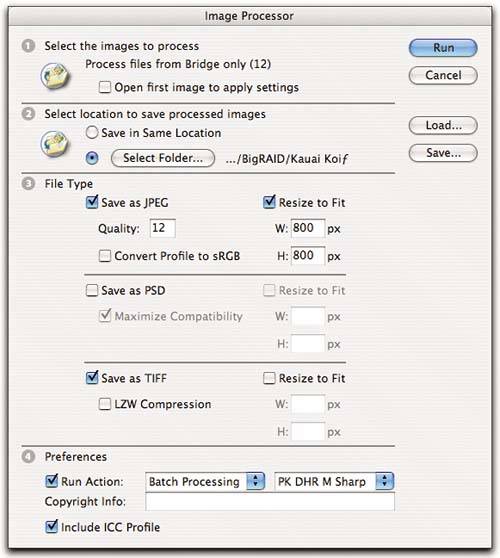
New to Photoshop CS2, Image Processor offers a quick way of saving up to three versions of the selected imagesa JPEG, a TIFF, and a Photoshop file, with each format in a separate subfolder. You can set different sizes for each format, and optionally , run an action and include a copyright notice. Figure 9-13 shows the Image Processor dialog box.

Figure 9-13. Image Processor


Let's look at the options.

  • Open first image to apply settings is primarily useful for processing unedited images that require approximately the same treatment. When you run Image Processor, the first raw opens in Camera Raw. The settings you make there are applied to all the other images. These settings are used only by Image Processorthey aren't written to the image's metadata.

  • Select location to save processed images lets you save the images either in the same folder, or in one that you designate here. In either case, if you've chosen multiple file formats, a subfolder is created for each file format.

  • File Type lets you save any combination of JPEG, PSD, and TIFF, with the option to resize the image in any of the chosen formats.

  • Preferences lets you choose an action that runs on all the processed images, lets you include copyright info if you haven't done so already, and gives you a choice as to whether or not to include the ICC profile in the images.

The settings shown in Figure 9-13 create a full-resolution TIFF, and a JPEG downsampled to a maximum dimension of 800 pixelsthe image's aspect ratio is always maintained . A sharpening action was applied to all the images, and I elected to include the ICC profiles. The images were saved in JPEG and TIFF subfolders inside the "Kauai Koi" subfolder.

One nifty feature of Image Processor is that it takes care of flattening and downsampling to 8-bit/channel automatically for the JPEGs while saving the TIFFs as layered 16-bit/channel images. So it's by far the quickest and easiest way to save a high-resolution TIFF and low-resolution JPEG version of the same imagesomething many of us need to do often.


Merge to HDR

Merge to HDR is a faceless (when launched from Bridge) automate routine that combines multiple raw exposures into a High Dynamic Range (HDR) file. HDR files use 32-bit floating point values per channel to let you represent an essentially unlimited dynamic range. Since you can't print HDR images, and can display them only with specialized displays that are well outside the mainstream, this is an esoteric routine for most photographersHDR images are mostly used in the movie industry, and are often rendered synthetically.

For mainstream photography, HDR offers the ability to map a very wide dynamic range captured through multiple exposures through an HDR file to a tone-mapped 16-bit or 8-bit channel image. You need a series of raw exposures of the same scene that differ only in shutter speed. A heavy tripod, a cable release, and mirror lockup are also recommended, particularly with longer focal lengths. Subject movement pretty much kills the process, so considerable planning is needed. If you have a real need for HDR imagery, by all means investigate Photoshop's HDR support further. Otherwise, file under E for Experimental.


PDF Presentation

The PDF Presentation command lets you build very simple slide shows with the Presentation option, or multipage PDFs with the Multi-Page Document option. Both options build a multipage PDF with one image per page, but the Presentation option does a little extra work, setting up a transition between pages and making sure that the PDF opens in full screen mode. I almost always use the Presentation optionsee Figure 9-14.

Figure 9-14. PDF Presentation


PDF Presentation is fairly limited. It doesn't let you add captions, or copyright notices, or anything else to the image, and it only lets you set a single transition that's used between all the images. It does, however, do the grunt work of getting all the images into a PDF. If you own Acrobat 7.0 Professional, you can add text there and finesse the transitions on an image-by-image basis. The PDF Presentation dialog box also gives you one last opportunity to change the image order by dragging the items in the list, but this is a task that's better done in Bridge, where you can at least see the thumbnails.

Once you've made your choices in the PDF Presentation dialog box and you've clicked Save, you're prompted for a filename and destination for the PDF; then the PDF Save Options dialog box appears. If you're using PDF Presentation to create a simple slide show, most of these options are irrelevant. It may be conceptually interesting that you can create a multipage PDF/X1a:2001 document directly from raw files, but it's hard to envisage a reason for doing so! Here are the settings that matter for slide show use.

  • General tab . The only useful preset for slide show use is Smallest File Size , which may apply heavier JPEG compression than you want. Otherwise, leave Standard set to None, and choose your desired level of compatibility from the Compatibility menu. If in doubt, choose Acrobat 4 (PDF 1.3)it's the lowest common denominator.

  • Compression tab . PDF Presentation uses the last-used Camera Raw workflow settings. If you need to downsample, you can choose downsampling options herethe differences for on-screen use between the various downsampling methods are quite subtle. You can also choose a compression method and quality setting in this tab. The option to convert 16-bit/channel images to 8-bit/channel doesn't always seem reliable, so if you want the slide show to be compatible with the largest number of PDF readers, you should probably set the Camera Raw workflow settings to produce 8-bit/channel images before launching PDF presentation.

  • Output tab . The only relevant options in the Output tab are the color ones. Choose No Conversion if you want the PDF in the output space specified in Camera Raw's workflow settings. If you want it in some other space, choose Convert to Destination, then choose the space you want from the Destination menu. I always recommend choosing Include Destination Profiledespite the wording, this option dictates whether or not the PDF contains a profile.

  • Security . The security options only work inside Adobe products. If you set any level of security, you need the password to open the document in Photoshop. Once it's open in Photoshop, it's completely editablethe restrictions apply only when the document is opened in Acrobat or Acrobat Reader. Macintosh users can open the PDF in the Mac's Preview application with no restrictions, so the security is largely illusory. (Perhaps the tab should be labeled "False sense of security.")

PDF Presentation tends to emphasize the disconnect in user interface and terminology between Acrobat and The Rest of the Adobe Universe. It has become massively more complex though admittedly more powerful in Photoshop CS2, so if you want to use it to build slide shows (which it does quite well), find the settings that work for you and save them as a preset.