The Preproduction Phase
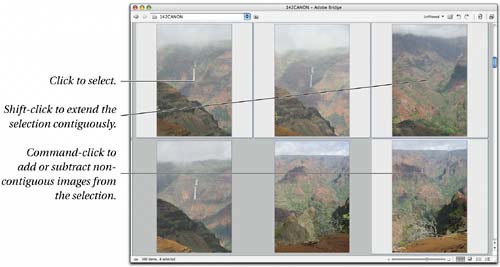
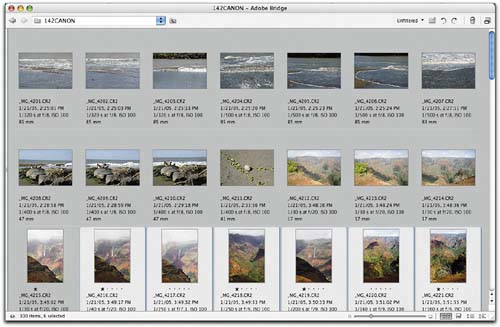
| The absolute order in which you perform tasks like selecting, sorting, renaming, keywording, and so on, isn't critical, so the order in which I'll discuss them is, I freely admit, arbitrary. But in those cases where the result of one task depends on the prior completion of another, I'll point that out. I do, however, offer one golden rule. Start with the operations required by the largest number of images, and complete these before you start handling individual images on a case-by-case basis. For example, the first thing I always do with a folder full of new raw images is to select all the images and enter my copyright notice by applying a metadata template. Similarly, if you know that you want to add the same keyword or keywords to all the images in a shoot, you can do it now (see "Applying Keywords and Metadata," later in this chapter). But if you don't care about copyrighting or keywording your rejects, you can make your initial selects first. Selecting and EditingSome photographers like to do a rough application of Camera Raw settings on all the images before they start making selects by flagging or ranking. Then they look at a large preview for each image and apply a flag or rank accordingly. Others may take a quick scan of the thumbnails and weed out any obvious junk before proceeding. Still others may want to do keywording and metadata editing before they start making selects. Bridge can accommodate all these different styles. So start out by loading a Bridge configuration that works for the task you want to start withif you need to refresh your memory on configuring Bridge's layout for different tasks and saving those layouts as workspaces, see "The Window Menu and Bridge Configuration" in Chapter 6, Adobe Bridge. Selecting by thumbnailIf the thumbnail view lets you see enough detail to make initial selects, choose an all-thumbnail view, then click-select the keepers or the rejects, whichever is easier. Shift-clicking selects all contiguous files between the last-selected image and the one on which you click, Command-clicking selects noncontiguous images one at a time. See Figure 7-6. You can apply a label or rating as you gosee "Rating and Labeling," later in this chapter. Figure 7-6. Selects by thumbnail
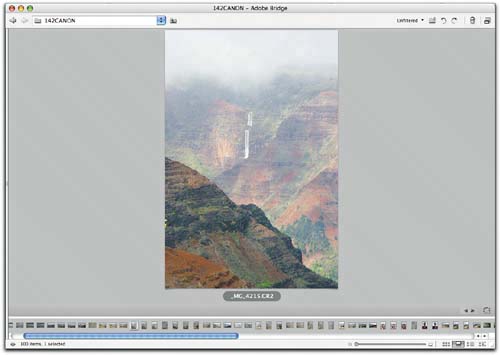
Selecting by previewTo see more detail, you can look at each image's preview. Bridge's Filmstrip view lets you see a large preview with a single row of thumbnails. The left and right arrow keys let you navigate from one thumbnail to the next and display the corresponding previewsee Figure 7-7. Figure 7-7. Selects by previewPress right arrow to go to the next image. Press left arrow to go to the previous image.
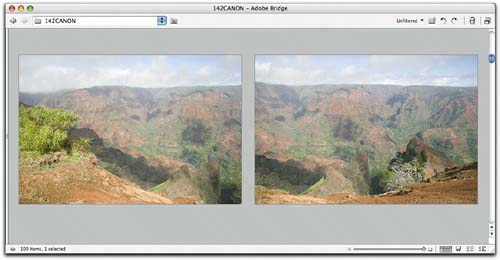
With this method, it's easier to apply a label or rating as you go than to rely on selecting thumbnailssee "Rating and Labeling," later in this chapter. Selecting in Slide ShowBridge's Slide Show view lets you review images one at a time at up to full-screen resolution. Slide Show offers the largest preview you can get without opening the image in Camera Raw and zooming. You can't select images in Slide Show view, but you can apply labels or ratings. Comparing imagesWhen you're making selects, you often need to compare images. In Slide Show view you can see before-and-afters, but I offer two techniques for comparing images side by side.
Figure 7-8 shows a Bridge window with side-by-side thumbnails. Figure 7-9 shows two simultaneous Camera Raw sessions. Figure 7-8. Comparing thumbnails in Bridge
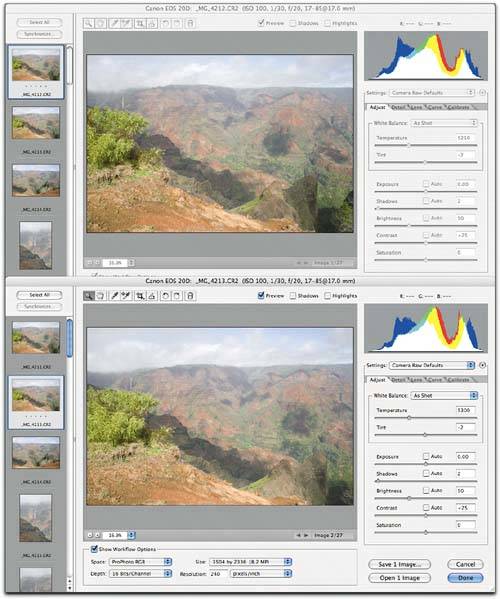
Figure 7-9. Simultaneous Camera Raw sessionsCamera Raw hosted by Photoshop Camera Raw hosted by Bridge
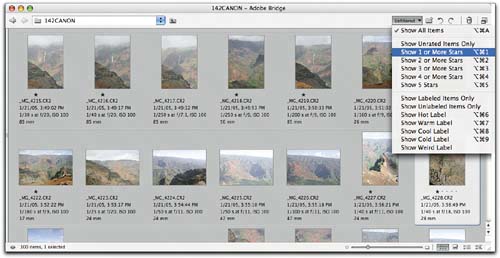
If you use this technique, remember that the settings that get applied to the image are those written by the last copy of Camera Raw to touch it. Rating and LabelingPhysically selecting thumbnails is certainly one way to distinguish keepers from rejects, but it's ephemeral. A better method, which can be used with any of the techniques described in the previous section, is to use ratings or labels. Ratings and labels become part of the image's metadata that you can use to search and to filter which images get displayed (see "Labeling, Rating, and the Label Menu" in Chapter 6, Adobe Bridge). As I mentioned earlier in this chapter, I prefer using ratings to labels, but the choice is entirely up to you. In this section I'll discuss the mechanics of applying and using labels and ratings. One star rating for binary sortsIf you've become accustomed to using the old File Browser's flagging mechanism for binary, yes/no sorting and selecting, you'll be happy to find that the old keyboard shortcut, Command-' (apostrophe), now lets you toggle a one-star rating on and off. If you've selected a mixture of images, some of which have a one-star rating and some of which are unrated, pressing Command-' works the same as the old File Browser's Flag commandthe first application adds one star to the unrated images and preserves the one-star rating for those that already have it. When all the selected images have the same attribute (all rated with one star, or all unrated), the command acts as a toggle, adding a star to unrated images or removing it from ones rated with one star. However, if the selection also contains images rated with more than one star, pressing Command-' will apply a one-star rating to these images, so you need to be a little careful with your selections. If you have no old habits, or if you're happy to unlearn those that you have, Command-1 applies a one-star rating to all selected images, and Command-0 removes the rating for all selected images. You can apply the rating to one image at a time (which is the most convenient method in Filmstrip view, and the only possible method in Slide Show view), or to multiple selected images (which is often convenient in Thumbnails view). Once you've applied the one-star rating, you can segregate the rated and unrated images in any of the following three wayssee Figure 7-10.
Figure 7-10. Separating rated and unrated imagesChoose Show 1 or More Stars from the Unfiltered/Filtered menu, or...
...choose Show Unrated from the Unfiltered/Filtered menu, then choose Invert Selection from the Edit menu, or...
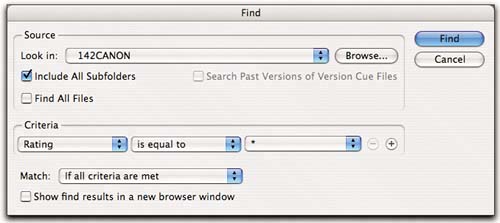
...choose Find from the Edit menu, then use the selection criteria shown at right.
One-star is great for making quick, yes/no, binary decisionskeep or rejectbut for more nuanced choices, you can add stars to the rating. Multistar RatingsThe techniques for applying multistar ratings are the same as those for applying a single star. Command-0 removes the rating, and Command-1 through Command-5 apply one to five stars. Command-. (period) adds a star to the current rating, and Command-, (comma) reduces it by one star. There are basically two ways to approach rating your images. Use whichever one works for you.
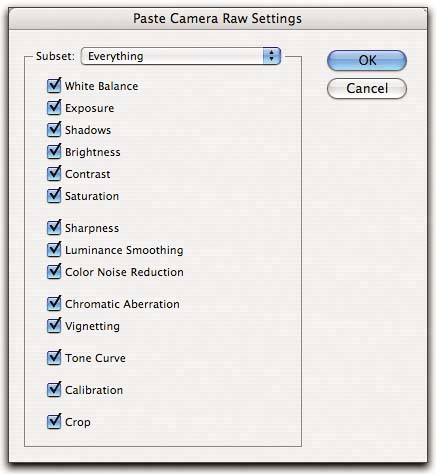
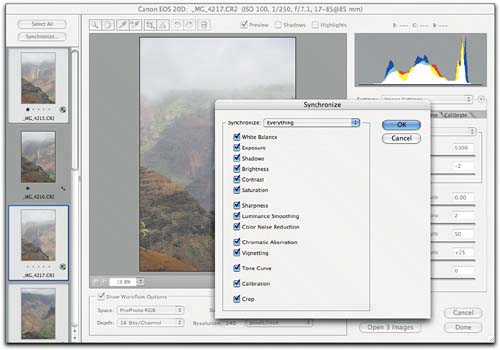
If you're collaborating with others in determining the hero shots, the first approach is probably the more suitable. The second approach lends itself better to situations where you're the only person making the call. The techniques shown in Figure 7-10 are equally applicable to multi-star ratings as they are to single-star ones. The Unfiltered/Filtered menu commands let you find all images that have a minimum number of stars, while the Find command lets you find images that have a specific number of stars. LabelsThe main reason I don't use labels is that they introduce extraneous color in Bridge windows. But the Label mechanism is also less well suited to rating images than is the star-based ratings system. It's intuitively obvious that a five-star rating is either better or worse than one star, while there's no clear comparison between, say, yellow and green. The stars are incremental, but the labels are notthey're simply arbitrary labels. You can apply any of the first four labels using Command-6 through Command-9, but there's no concept of promoting or demoting images from one label to another. Labels are also less portable than ratings. Your labels will show up as white on any machine that uses a different label definition than yours, which is almost certain to happen if you use something other than the default label definitions (red, yellow, green, blue, and purple), and reasonably likely to happen even if you do use the default definitions, since the recipient may not. They can always search for your label text, but it's probably simpler just to use ratings. Applying Camera Raw SettingsThere are basically three ways to approach the task of applying rough Camera Raw edits to multiple images. Remember, at this stage in the workflow, you're simply aiming for good, not perfect. (Perfect comes later, when you've whittled the images down to the selects you'll actually deliver.) To work efficiently, look for and select images that require approximately the same edit. Once you've done so, you can apply the edits in any of the following three waysyou can mix and match techniques as required. Edit by example in BridgeSelect the first of the images that need the same edit, then open it in Camera Raw. The choice of host applicationBridge or Photoshopdepends on what else is going on. If Photoshop is busy batch-processing files, host Camera Raw in Bridge. If Bridge is busy building the cache, host Camera Raw in Photoshop. If they're both busy, host Camera Raw in BridgeBridge's multithreading lets you work in Camera Raw with surprisingly responsive performance even while Bridge itself is busy doing other tasks. Make your editswhite balance, exposure, whatever the image needsand then dismiss the Camera Raw dialog box by clicking Done (it's the default option in Camera Raw hosted by Bridge, but not in Camera Raw hosted by Photoshop). Choose Apply Camera Raw Settings>Copy Camera Raw Settings from Bridge's Edit menu, or press Command-Option-C. Then select all the other images that need the same edit and choose Apply Camera Raw Settings>Paste Camera Raw Settings from Bridge's Edit menu (press Command-Option-V). If necessary, select the combination of subsets or settings you want to apply from the Paste Camera Raw Settings dialog box, then click OK. See Figure 7-11. Figure 7-11. Copy and Paste Camera Raw SettingsEdit the first image in the series, then choose Copy Camera Raw Settings.
Select the remaining images in the series, then choose Paste Camera Raw Settings. Choose the settings you want to apply from the Paste Camera Raw Settings dialog box, shown at right.
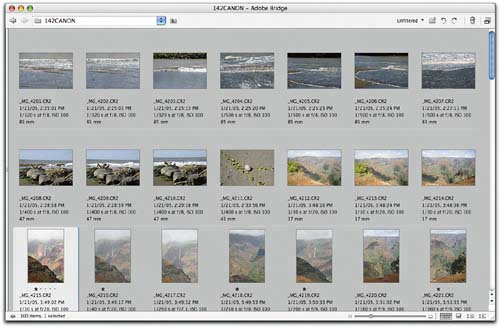
The Camera Raw settings you chose are applied to the selected images.
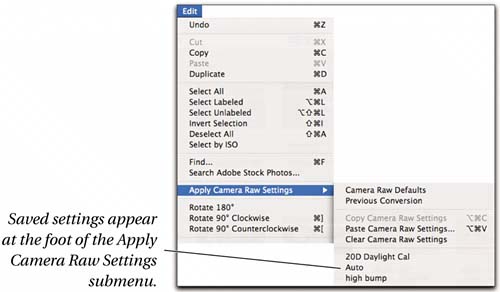
This approach works well when you need to apply the same settings to a large number of images that are identifiable by relatively small thumbnails, because you can select them quickly. But if you need to make small changes to the settings for each image, the following two approaches are better suited. Edit by presetsIf you've saved presets for Camera Raw in Camera Raw's Settings foldersee "Loading and Saving Settings" in Chapter 4, Camera Raw Controls, if you need a refresheryou can apply them to all the selected images by choosing Apply Camera Raw Settings from Bridge's Edit menu, then choosing the settings or settings subsets from the submenu. See Figure 7-12. Figure 7-12. Choosing saved presets
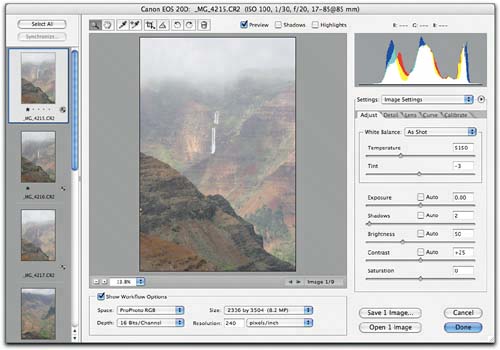
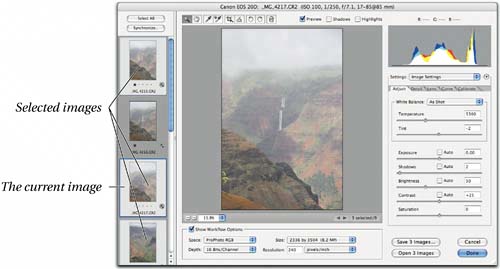
Saving Settings Subsets as presets is particularly powerful, because you can simply choose them in succession. Each one affects only the parameters recorded when you saved it, so you can load a preset for white balance, followed by one for Exposure, for Brightness, for Contrast, for Calibrate settings, and so on. This approach is useful for fine-tuning results after a rough edit accomplished using Copy/Paste Camera Raw settings, or for applying very general settings, such as lighting-specific Calibrate adjustments, that you don't want to include in your default settings. Edit in Camera RawThe method that offers the most flexibility, and the one I prefer, is to open multiple images in Camera Raw. There's probably a limit to the number of images you can open simultaneously in Camera Raw, but I haven't yet found itI've been able to open 1500 images simultaneously in Camera Raw and while it took a couple of minutes to launch, it worked perfectly. That said, it's more practical to work with smaller sets of images. If you open 10 or more images, you'll get a dialog box asking if you really want to open 10 files. I recommend clicking the Don't show again checkbox, and cheerfully opening as many images as your machine can reasonably handle without bogging downif the hardware is at all recent, it's almost certainly a considerably larger number than 10. When you open multiple images, Camera Raw works in filmstrip mode. The current image is one whose preview shows in the preview windowsee Figure 7-13. Figure 7-13. Camera Raw in filmstrip modeThe current image is the one whose preview appears in the preview window.
Camera Raw in filmstrip mode offers two basic methods for editing multiple images besides the obvious one of editing images one by one.
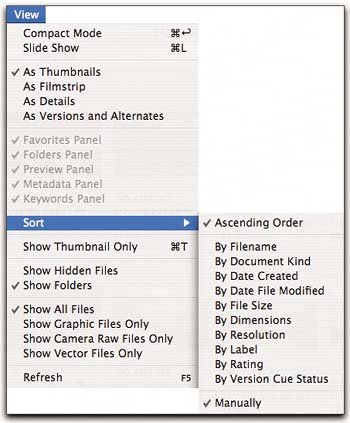
You can mix and match both of these approaches, while enjoying the benefits of zoomable previews, and Undo. (And if you simply can't resist the temptation, you can fine-tune individual images too.) Of all the methods of editing multiple raw images, I find this one the most powerful and the most flexible. Sorting and RenamingBy default, Bridge sorts images by filename, so new raw images appear in the order in which they were shot, because the camera applies consecutive numbering to each image. You can vary the sort order by choosing any of the options on Bridge's View>Sort submenusee Figure 7-16. Figure 7-16. The Sort menu
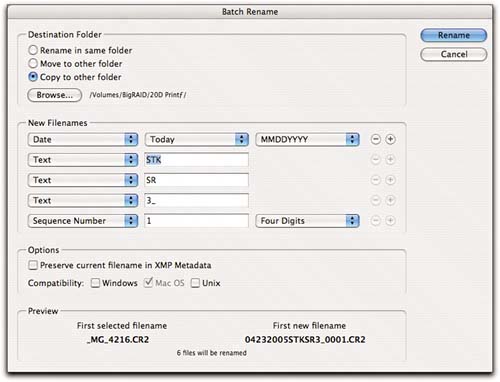
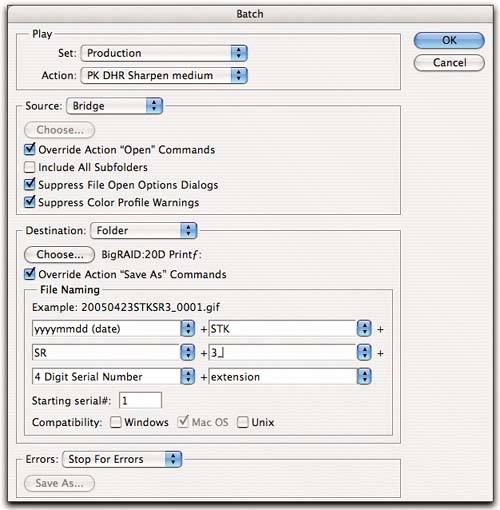
You can also create a custom sort order by dragging the thumbnails, just as you would with chromes on a light table. When you do so, the Manually item on the Sort menu is checked. The manual sort order is stored only in the Bridge cache for the folder. If you use distributed caches, you can move or rename the folder and Bridge will still remember the sort order. But if you combine images from several folders into a different folder, you have in effect created a new sort order, and it may well not be the one you wanted. So a simple way to preserve that order is to use Batch Rename to rename the images including a numbering scheme that reflects your custom sort order. Or you may wish to batch-rename your raw images using some other scheme entirely. For example, my friend and colleague Seth Resnick, who has put more sheer ingenuity into building his workflow than anyone else I know, uses a sophisticated naming scheme that, to the initiated, at least, conveys a great deal of information at a glance. For example, he might rename a raw file called 4F3S0266.tif to 20050423STKSR3_0001.tif. This decodes as follows. 20050423 defines the date on which the image was shot (April 23 , 2005), so the files are automatically sorted by date order. STK indicates that the image was shot for stock, and SR indicates that it was shot by Seth Resnick. The number 3 indicates that it belonged to the third assignment or collection of images of the day, while the 0001 indicates that it was the first image in the collection. The .tif is the file extension that defines the file type. Figure 7-17 shows how to set up the either Bridge's Batch Rename or Photoshop's Batch dialog box to accomplish this renaming. Unless you want to run an action on the raw files and save them, it makes more sense to use Bridge's Batch Rename than Photoshop's Batch, but when the goal is to produce renamed converted images, Photoshop's Batch is the way to go. Figure 7-17. Batch renamingBridge's Batch Rename dialog box
Photoshop's Batch dialog box
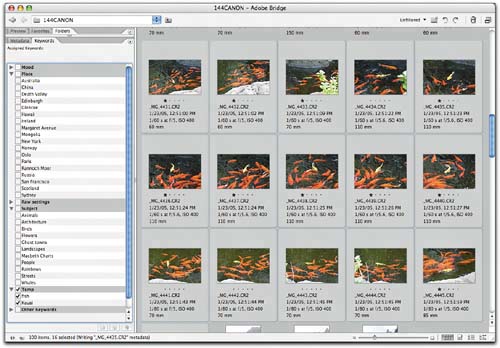
Tip Always Include the Extension as the Last Item. When you use proprietary raw files, each image is accompanied by a sidecar .xmp file that differs in name from the raw file only by the extension. If you include the extension as the last element, the sidecar files will get renamed correctly along with the raw files. If you fail to do so, the batch rename will fail with a message saying "file already exists." Tip Process JPEGs Separately. The Batch Rename command is smart enough to handle sidecar .xmp files, but if you shoot raw and JPEG, and you have three files whose names are distinguished only by their extension rather than two, you need to do a little more work. First, use the search tool to search for all the JPEGs, and run the batch rename on them. Then use the search tool again to find all the raws and run the same batch rename. You'll wind up with correctly named raws, JPEGs, and sidecar .xmp files for each image. Tip Be Careful with Length and Special Characters. To remain compatible with today's operating systems, your filenames should be no longer than 31 characters, including the extension. Some antediluvian systems may limit you to an 8.3 (eight characters plus a three-character extension) filename, but those are fortunately getting rarer with each passing moment. For cross-platform compatibility, limit yourself to the lower 128 characters of the ASCII character set and avoid characters that have a reserved use in the operating system such as \/:*?<> or |. If you limit yourself to lowercase and uppercase alphabetic characters, numerals, underscores, and hyphens, and only use the period immediately before the extension, you'll be safe. Applying Keywords and MetadataThe key to being efficient with keywords and metadata is the same as that for being efficient with applying Camera Raw edits. Look for and select images that need the same treatment, and deal with them all at once. IPTC metadataThe only metadata that is editable in Bridge (or in Photoshop, for that matter) is the IPTC metadata. For recurring metadata such as copyright notices, metadata templates provide a very convenient way to make the editssee Figure 6-19 in Chapter 6, Adobe Bridge. Alternatively, you can select multiple images and then edit the metadata directly in the Metadata palette. Click in the first field you want to edit, and type in your entry. Then press Tab to advance to the next field. Continue until you've entered all the metadata shared by the selected images, and then click the checkmark icon at the lower right of the palette, or press Enter or Return, to confirm the entries. KeywordsKeywords show up in the IPTC section of the Metadata palette, but you can't enter or edit them thereyou have to use the Keywords palette. The Keywords palette contains individual keywords grouped into sets (represented by the folder icons). The default keywords and sets are pretty useless unless you know a lot of people called Julius and Michael, but you can easily replace them with ones that are more useful for your purposes. To apply a keyword, select one or more images and then click in the column to the left of the keyword. A check mark appears in the column, and Bridge writes the keyword to each file's sidecar.xmp file. To remove a keyword, select the images and then uncheck the checkmark. Deleting a keyword from the Keywords palette doesn't delete the keyword from any images to which it has been applied; it only deletes it from the palette. So I find that it makes sense to keep only keywords I know I'll use a lot stored in the palette. For keywords that apply only to the current session, I create them in a set called Temp and delete them when I'm done, to keep the palette manageable. Keyword sets let you organize keywords, but they also offer a very useful functionalitythey let you apply all the keywords in the set to selected images by clicking next to the set name rather than the keyword names. When you click next to a keyword to apply it, Bridge starts writing it to the selected images. If you then add another keyword, Bridge will write both keywords to the images it hasn't yet touched, but then it has to go back and add the second keyword to the images it had already processed. Tip Sets Are Not Set in Stone. My Temp set also serves to add multiple keywords. When I want to apply multiple keywords to a set of images, I drag any existing keywords I want to use into the Temp set and create any new ones I want to apply inside the Temp set. Then I click beside the Temp set icon to apply all the keywords it currently contains to all the selected imagessee Figure 7-18. Figure 7-18. Adding multiple keywordsTo add multiple keywords quickly and efficiently, drag them all into the same set, then click next to the set name to apply all the keywords in the set.
All the work you do in Bridge is aimed at setting things up to produce converted versions of your chosen raw images, with the correct Camera Raw settings to get the tone and color you want, and including all the metadata you've entered. So let's look at this last stage of the workflow, actually converting your raw images. |


EAN: N/A
Pages: 112