Why Shoot Raw?
| The answer to the above question is simply, control over the interpretation of the image. When you shoot JPEG, the camera's on-board software carries out all the tasks listed earlier to produce a color image, then compresses it using JPEG compression. Some cameras let you set parameters for this conversiontypically, a choice of sRGB or Adobe RGB as color space, a sharpness value, and perhaps a tone curve or contrast settingbut unless your shooting schedule is atypically leisurely, you probably can't adjust these parameters on an image-by-image basis, so you're locked into the camera's interpretation of the scene. JPEGs offer fairly limited editing headroomlarge moves to tone and color tend to exaggerate the 8-by-8-pixel blocks that form the foundation of JPEG compressionand while JPEG does a pretty good job of preserving luminance data, it really clobbers the color, leading to problems with skin tones and gentle gradations. When you shoot raw, however, you get to control the scene interpretation through all the aforementioned aspects of the conversion. With raw, the only on-camera settings that have an effect on the captured pixels are the ISO speed, shutter speed, and aperture. Everything else is under your control when you convert the raw file. You can reinterpret the white balance, the colorimetric rendering, the tonal response, and the detail rendition (sharpening and noise reduction) with a great deal of freedom, and, within the limits explained in the previous section, "Exposure and Linear Capture," you can even reinterpret the basic exposure itself, resetting the white and black points. Using All the BitsMost of today's cameras capture at least 12 bits per channel per pixel, for a possible 4,096 levels in each channel. More bits translates directly into editing headroom, but the JPEG format is limited to 8 bits per channel per pixel: So when you shoot JPEG, you trust the camera's built-in conversions to throw away one-third of your data in a way that does justice to the image. When you shoot raw, though, you have, by definition, captured every-thing the camera can deliver, so you have much greater freedom in shaping the overall tone and contrast for the image. You also produce a file that can withstand a great deal more editing in Photoshop than can an 8-bit per channel JPEG. Edits in Photoshop are "destructive"when you use a tool such as Levels, Curves, Hue/Saturation, or Color Balance, you change the actual pixel values, creating the potential for either or both of two problems:
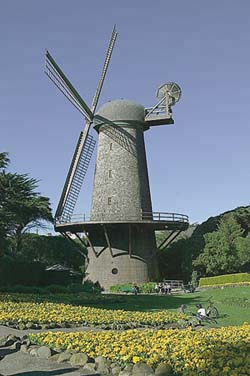
Figure 1-6 shows how the compression and expansion of tonal ranges can affect pixel values. Don't be overly afraid of losing levelsit's a normal and necessary part of image editing, and its effect can be greatly reduced by bringing correctly exposed images into Photoshop as 16-bit/channel files rather than 8-bit/channel onesbut simply be aware of the destructive potential of Photoshop edits. Figure 1-6. Destructive editingBefore-and-after histograms show the loss of levels. The top histogram shows the state of the unedited image; the bottom one shows the state of the image after editing. The gaps indicate lost levels where the tonal range was stretched, and the spikes indicate lost differences where the tonal range was compressed.
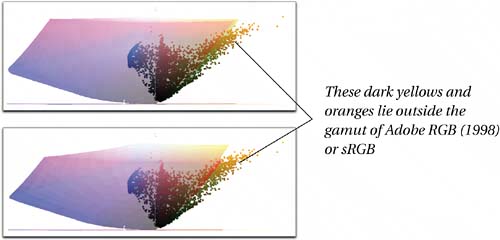
White Balance ControlI'll go into much more detail on how Camera Raw's white balance controls actually work in Chapter 2, How Camera Raw Works. For now, I'll make the key point that adjusting the white balance on a raw file is fundamentally different from attempting to do so on an already-rendered image in Photoshop. As Figure 1-6 shows, Photoshop edits are inherently destructiveyou wind up with fewer levels than you started out with. But when you change the white balance as part of the raw conversion process, the edit is much less destructive, because instead of changing pixel values by applying curves, you're gently scaling one or two channels to match the third. There may be very few free lunches in this world, but white balance control in Camera Raw is a great deal cheaper, in terms of losing data, than anything you can do to the processed image in Photoshop. Colorimetric InterpretationWhen you shoot JPEG, you typically have a choice between capturing images in either sRGB or Adobe RGB (1998). Yet the vast majority of today's cameras can capture colors that lie outside the gamut of either of these spaces, especially in the case of saturated yellows and cyans, and those colors get clipped when you convert to sRGB or Adobe RGB. Raw converters vary in their ability to render images into different color spaces, but Adobe Camera Raw offers four possible destinations. One of these, ProPhoto RGB, encompasses all colors we can capture, and the vast major ity of colors we can seeif you see serious color clipping on a conversion to ProPhoto RGB, you're capturing something other than visible light! Figure 1-7 shows a totally innocuous image rendered to ProPhoto RGB, and plotted against the gamuts of sRGB and Adobe RGB. Notice just how much of the captured color lies outside the gamut of both spaces. Figure 1-7. Color spaces and clippingThe gamut plots below, produced using Chromix ColorThink, plot color in Lab space. You're looking at a side elevation of the color space, with the Lightness axis running vertically. The a* axis, from red to green, runs almost straight toward you out of the page; the b* axis, from blue to yellow, runs from left to right. Even an innocuous image like the one at right can contain colors that lie well outside the range that either Adobe RGB (1998) or sRGB can represent.
The image above plotted (as squares) against the color gamut of Adobe RGB (1998) (shaded solid) The image above plotted (as squares) against the color gamut of sRGB (shaded solid)
ExposureAs with white balance adjustments, exposure adjustments performed as part of the raw conversion are relatively lossless (unless you clip highlights to white or shadows to black), unlike tonal adjustments made in Photoshop on the rendered image (see Figure 1-3). In practice, however, you have rather less freedom to adjust exposure than you do white balance. The main limitation on exposure adjustments is that when you try to open up significantly underexposed images, you'll probably see noise or posterization in the midtones and shadows. It's not that the edit is destructiveyou just didn't capture enough shadow information in the first place. Completely blown highlights are also beyond recovery, but Camera Raw goes a good bit further than other raw converters in rescuing highlight detail even when only one channel contains data. Depending on the camera and the white balance chosen, you may be able to recover one or more stops of highlight detail. Nevertheless, good exposure is still highly desirablesee the section "Exposure and Linear Capture," earlier in this chapter. Detail and NoiseWhen you shoot JPEG, the sharpening and noise reduction are set by the on-camera settings (most cameras let you make a setting for sharpness, but few do for noise reduction). When you shoot raw, you have control over both sharpening and noise reductionCamera Raw even lets you handle luminance noise and color noise separately. This confers several advantages. You can tailor the noise reduction to different ISO speeds, apply quick global sharpening for rough versions of images, or convert images with no sharpening at all so that you can apply more nuanced localized sharpening to the rendered image in Photoshop. |
EAN: N/A
Pages: 112