| Many Flash applications, especially games, are able to detect object collisions one of the most easily understood applications of conditional logic. To detect collisions between two objects (movie clip instances), ActionScript provides the hitTest() method of the MovieClip class. Using this method in conjunction with a conditional statement allows you to take action when two movie clips collide. You define in the script the various actions you want to take, depending on which object is hit. Take a look at the following script: myBody_mc.onEnterFrame = function() { if (hitTest ("wallOfCotton_mc")) { pain = 0; } else if (hitTest ("wallOfCardboard_mc")) { pain = 5; } else if (hitTest ("wallOfBricks_mc")) { pain = 10; } }
If the movie clip instance to which this event handler is attached (myBody_mc) collides with the movie clip instance named wallOfCotton_mc, pain is set to 0. If myBody_mc collides with wallOfCardboard_mc, pain is set to 5. Finally, if myBody_mc collides with wallOfBricks_mc, pain is set to 10. The hitTest() method is very straightforward. In the following exercise, we use the hitTest() method in conjunction with a conditional statement to take specific action if the rocket_mc movie clip instance collides with either of the two red bars (the launch window) that are in motion. If the rocket hits either bar, the launch aborts; if the rocket passes through the space between the bars, the launch is successful. Open rocketLaunch5.fla. This step builds on the file you worked with in the preceding exercise.
Double-click launchWindow_mc at the top of the stage to edit this clip in place. This movie clip instance contains other two movie clip instances: the red bars, with one flipped horizontally in the opposite direction of the other. The red bar on the left is named leftGuide_mc and the one on the right is named rightGuide_mc. Because both of these bars are movie clip instances, you can use them to react to a collision with the rocket_mc movie clip instance.
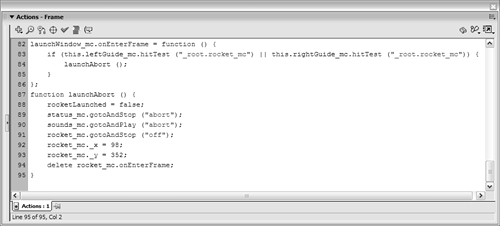
Return to the main timeline. With the Actions panel open, select Frame 1 of the Actions layer and add the following script: launchWindow_mc.onEnterFrame = function () { if (this.leftGuide_mc.hitTest ("_root.rocket_mc") || this.rightGuide_mc.hitTest ("_root  .rocket_mc")) { launchAbort (); } }; .rocket_mc")) { launchAbort (); } };
The script attaches an onEnterFrame event handler to the launchWindow_mc movie clip instance. The script executes at our project's frame rate of 24 frames a second. The conditional statement within this script does one thing: using the hitTest() method and the OR logical operator (||), it checks whether the rocket_mc movie clip instance has collided with the leftGuide_mc or rightGuide_mc movie clip instance, which are both inside the launchWindow_mc movie clip instance. If at any time either condition proves true, the launchAbort() function is called. Let's create that function, and wrap up our work on this project.
Place this function definition at the end of the current script: function launchAbort () { rocketLaunched = false; status_mc.gotoAndStop ("abort"); sounds_mc.gotoAndPlay ("abort"); rocket_mc.gotoAndStop ("off"); rocket_mc._x = 98; rocket_mc._y = 352; delete rocket_mc.onEnterFrame; }

This function works in almost the same manner as that of the rocketReset() function we created earlier in this lesson. The difference is that both the status_mc and sounds_mc movie clip instances are moved to the frame labeled abort in the launchAbort() function. Scripting for our project is complete. Let's do a final test.
Choose Control > Test Movie to test your project. Click and hold down the Launch button to experience what happens at prelaunch. Release the button to launch the rocket. Apply thrusters with the idea of getting the rocket through the space between the red bars. If you get through, the launch will be successful; if you don't, it will abort.
Close the test environment to return to the authoring environment, and save your work as rocketLaunch6.fla. This step completes the exercise and this lesson. By using conditional logic in your scripts, you can greatly increase your project's dynamism and provide a unique experience to every person who interacts with it.
|
